


 本文深入剖析了Android系统中Service和ContentProvider的管理机制。详细介绍了Service的生命周期、启动过程及AMS中的管理类ActiveServices。同时,对ContentProvider的使用、获取及安装流程进行了全面解读。
Service 管理
官方对Service的描述是:
Service是一种可在后台执行长时间运行操作而不提供界面的应用组件。服务可由其他应用组件启动,而且即使用户切换到其他应用,服务仍将在后台继续运行。此外,组件可通过绑定到服务与之进行交互,甚至是执行进程间通信IPC。
在Service使用上,应用需要在AndroidManifest.xml文件中通过标签<service/>来声明一个Service,标签的属性如下:
<service android:description="string resource"
         android:directBootAware=["true" | "false"]
         android:enabled=["true" | "false"]
         android:exported=["true" | "false"]
         android:foregroundServiceType=["connectedDevice" | "dataSync" |
                                        "location" | "mediaPlayback" | "mediaProjection" |
                                        "phoneCall"]
         android:icon="drawable resource"
         android:isolatedProcess=["true" | "false"]
         android:label="string resource"
         android:name="string"
         android:permission="string"
         android:process="string" >
    . . .
</service>
<service/>标签属性比较简单,大部分和前面介绍的<application/>的属性重复,关于标签的描述大家可以参考官网:<service/>标签
我们重点记录下特殊的几个属性:
android:directBootAware:服务是否支持直接启动,即其是否可以在用户解锁设备之前运行- 在直接启动期间,应用中的服务仅可访问存储在设备保护存储区的数据
android:process:指定将运行服务的进程的名称。- 正常情况下,应用的所有组件都会在为应用创建的默认进程中运行。该名称与应用软件包的名称相同。
<application>元素的process属性可为所有组件设置不同的默认进程名称- 不过,组件可以使用自己的
process属性替换默认值,将应用散布到多个进程中 - 如果为此属性分配的名称以冒号(
:)开头,则系统会在需要时创建应用专用的新进程,并且服务会在该进程中运行 - 如果进程名称以小写字符开头,则服务将在使用该名称的全局进程中运行,前提是它拥有相应的权限。如此一来,不同应用中的组件便可共享进程,从而减少资源使用。
android:isolatedProcess:如果设置为true,则此服务将在与系统其余部分隔离的特殊进程下运行。
都是创建新的进程,那么android:process和android:isolatedProcess的区别是什么呢?
- 当我们仅仅指定
android:process属性时,服务启动后进程信息如下:u0_a50 7889 3220 1114656 94464 0 0 S lee.hua.skills_android u0_a50 8358 3220 1078100 58700 0 0 S lee.hua.skills_android:newProcess- 创建了新的进程,不过
user是一样的,都是u0_a50 Android在新进程的权限和接口调用方面未做限制
- 创建了新的进程,不过
- 当我们仅仅指定
android:isolatedProcess属性时,服务启动后进程信息如下:u0_a50 7889 3220 1114656 94464 0 0 S lee.hua.skills_android u0_i0 8358 3220 1078100 58700 0 0 S lee.hua.skills_android:newProcess- 首先,
user不同了,查看uid分别是:(u0_a50)10050和(u0_i0)99000 Android中定义的isolated进程的起始号为99000Android对isolated进程的接口调用做了一些限制- 比如调用
bindService()的进程如果是isolated进程的话会抛出安全异常
- 比如调用
- 首先,
后面Service的启动代码中会涉及到isolated相关的逻辑,我们先看下Service的生命周期
Service的生命周期
和Activity类似,Service也有声明周期,但是和Activity的声明周期相比,Service的要简单许多。
官方图示如下:

- 图片左侧显示的是使用
startService()创建的服务的生命周期 - 图片右侧显示的是使用
bindService()创建的服务的生命周期
Service生命周期(从创建到销毁)可遵循以下任一路径:
-
startService()- 该服务在其他组件调用
startService()时创建,然后无限期运行,且必须通过调用stopSelf()来自行停止运行。 - 此外,其他组件也可通过调用
stopService()来停止此服务。服务停止后,系统会将其销毁。
- 该服务在其他组件调用
-
bindService()- 该服务在其他组件(客户端)调用
bindService()时创建。然后,客户端通过IBinder接口与服务进行通信。 - 客户端可通过调用
unbindService()关闭连接。 - 多个客户端可以绑定到相同服务,而且当所有绑定全部取消后,系统即会销毁该服务。(服务不必自行停止运行。)
- 该服务在其他组件(客户端)调用
Service 有两种运行模式
- 前台模式:前台服务执行一些用户能注意到的操作,前台服务必须显示通知。即使用户停止与应用的交互,前台服务仍会继续运行。
- 后台模式:后台服务执行用户不会直接注意到的操作,在
API 26或更高版本,当应用本身未在前台运行时,系统会对运行后台服务施加限制
关于生命周期的回调函数就不细讲了,比较简单,大家可以参考官网:Service基础知识
而在ActivityThread的成员变量mServices中保存了应用中所有Service对象,定义如下:
final ArrayMap<IBinder, Service> mServices = new ArrayMap<>();
对于Service类来说,重要的成员变量如下:
public abstract class Service extends ContextWrapper implements ComponentCallbacks2 {


    // 引用 ActivityThread 对象
    private ActivityThread mThread = null;
    // Service 的类名
    private String mClassName = null;
    // service 的唯一标识符
    private IBinder mToken = null;
    // 引用 Application
    private Application mApplication = null;
}
Service的管理类
AMS 中对于Service的管理是通过ActiveServices类来进行的。ActiveServices类的构造方法如下:
    public ActiveServices(ActivityManagerService service) {


        mAm = service;
        int maxBg = 0;
        try {


            maxBg = Integer.parseInt(SystemProperties.get("ro.config.max_starting_bg", "0"));
        } catch(RuntimeException e) {


        }
        mMaxStartingBackground = maxBg > 0
                ? maxBg : ActivityManager.isLowRamDeviceStatic() ? 1 : 8;
    }
构造方法很简单,只是从系统属性ro.config.max_starting_bg中读取了允许后台允许的Service的最大数量。
ActiveServices类中还有一些重要的成员变量,如下所示:
    // How long we wait for a service to finish executing.
    static final int SERVICE_TIMEOUT = 20*1000;
    // How long we wait for a service to finish executing.
    static final int SERVICE_BACKGROUND_TIMEOUT = SERVICE_TIMEOUT * 10;
    // How long the startForegroundService() grace period is to get around to
    // calling startForeground() before we ANR + stop it.
    static final int SERVICE_START_FOREGROUND_TIMEOUT = 10*1000;

    final ActivityManagerService mAm;

    // 系统运行运行的最大Service数量
    final int mMaxStartingBackground;

    final SparseArray<ServiceMap> mServiceMap = new SparseArray<>();
    final ArrayMap<IBinder, ArrayList<ConnectionRecord>> mServiceConnections = new ArrayMap<>();
    final ArrayList<ServiceRecord> mPendingServices = new ArrayList<>();
    final ArrayList<ServiceRecord> mRestartingServices = new ArrayList<>();
    final ArrayList<ServiceRecord> mDestroyingServices = new ArrayList<>();
mServiceMap是一个SparseArray类型的数组,索引是用户Id- 不同用户的
Service记录存放在数组元素中,每个元素是一个ServiceMap ServiceMap中存储了某个用户所有的ServiceRecord对象- 应用进程中的
Service在AMS中对应的数据结构就是ServiceRecord类
- 不同用户的
mServiceConnections储存的是所有连接记录ConnectionRecord的对象- 连接记录指的是某个进程绑定
Service时传递的信息 mServiceConnections记录了AMS和使用服务的进程之间的联系
- 连接记录指的是某个进程绑定
mPendingServices保存的是正在等待进程启动的Service- 当启动一个服务时,服务所在的进程可能还没有启动
- 这时
AMS会先去启动服务所在的进程,这个时间可能比较长 - 因此,先把
Service的信息保存在mPendingServices中
mRestartingServices保存的是正在等待重新启动进程的Service- 如果
Service所在的进程崩溃了,会把该Service加入到mRestartingServices中,准备重新启动进程
- 如果
mDestroyingServices保存的是正在等待进程销毁的Service- 销毁进程也需要一段时间,因此在完成销毁前,先把
Service保存在mDestroyingServices中
- 销毁进程也需要一段时间,因此在完成销毁前,先把
Service 的启动过程
Context提供了两个接口来启动Service,分别是startService()和bindService()。定义如下:
   public abstract ComponentName startService(Intent service);
   public abstract boolean bindService(@RequiresPermission Intent service, @NonNull ServiceConnection conn, @BindServiceFlags int flags);
从接口定义可以看出,bindService()需要传递一个回调接口ServiceConnection来接收Binder对象。
这两个接口最后调用的是AMS的startService()和bindService(),两个方法的实现差不多,bindService()更复杂一些。
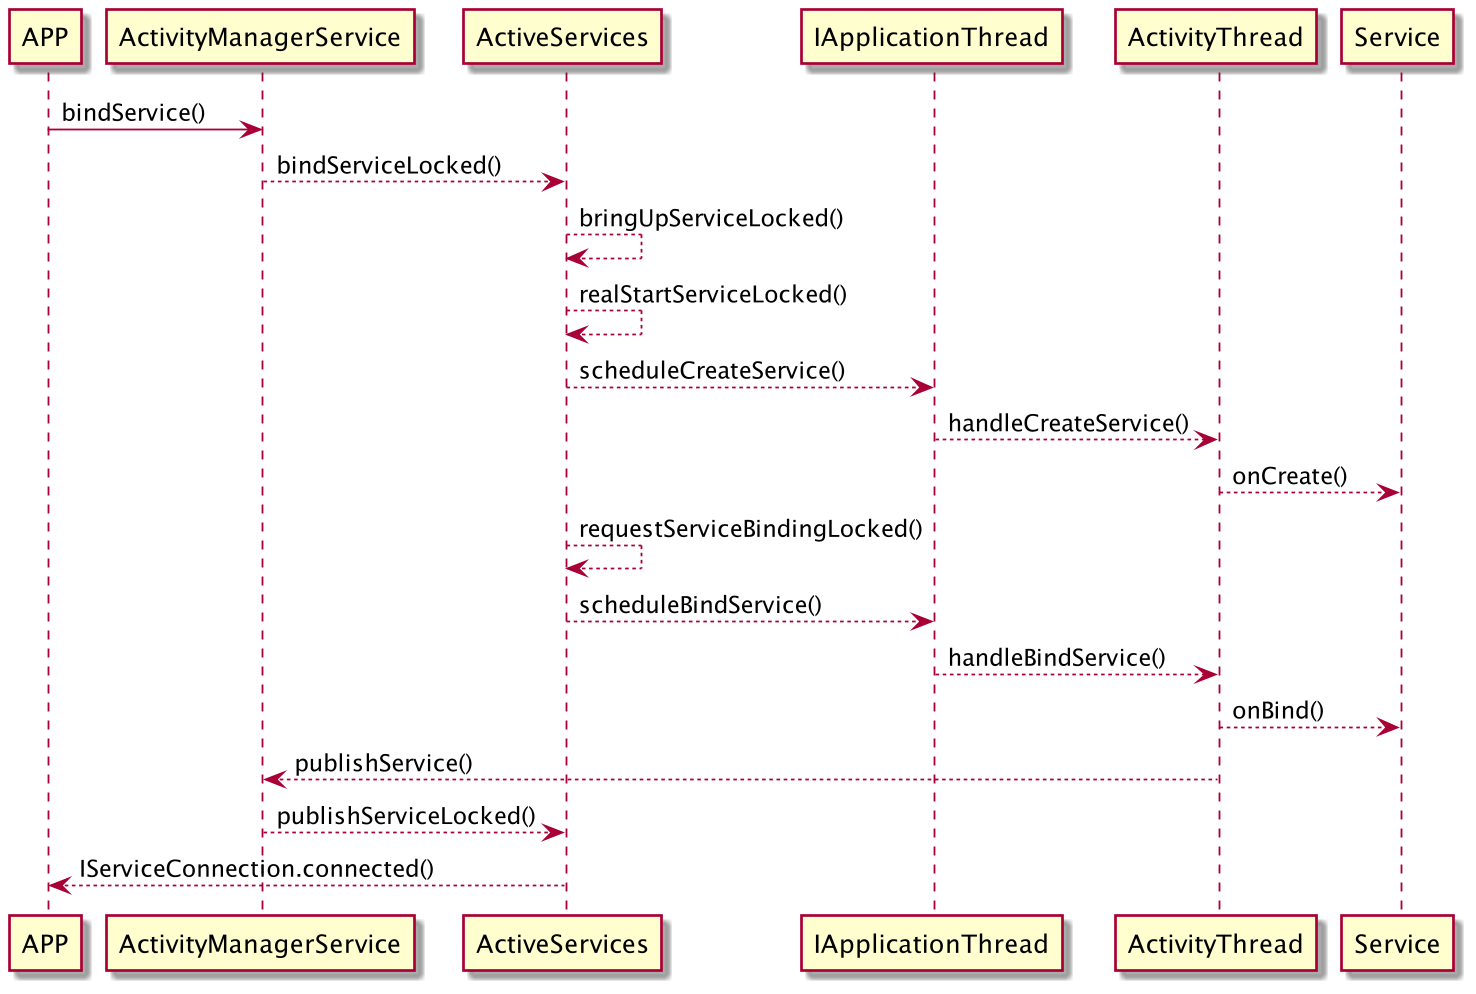
后面以bindService()方法为例进行分析,在此之前,我们先看下启动过程的时序图:
AMS中bindService()的代码如下:
    public int bindService(IApplicationThread caller, IBinder token, Intent service,
            String resolvedType, IServiceConnection connection, int flags, String callingPackage,
            int userId) throws TransactionTooLargeException {


        // 检查调用进程是否是isolate Process,如果是抛出安全异常
        enforceNotIsolatedCaller("bindService");
        // 检查启动Service的Intent中是否包含文件描述符
        if (service != null && service.hasFileDescriptors() == true) {


            throw new IllegalArgumentException("File descriptors passed in Intent");
        }
        // 检查 callingPackage 是否为空
        if (callingPackage == null) {


            throw new IllegalArgumentException("callingPackage cannot be null");
        }
        synchronized(this) {


            // 调用 ActiveService 类的 bindServiceLocked 方法
            return mServices.bindServiceLocked(caller, token, service,
                    resolvedType, connection, flags, callingPackage, userId);
        }
    }
ActiveService.bindServiceLocked
ActiveService类的bindServiceLocked()方法如下:
int bindServiceLocked(IApplicationThread caller, IBinder token, Intent service,
        String resolvedType, final IServiceConnection connection, int flags,
        String callingPackage, final int userId) throws TransactionTooLargeException {


    ......// 省略一些权限和错误检查
    // 创建 ServiceRecord 对象
    ServiceLookupResult res =
        retrieveServiceLocked(service, resolvedType, callingPackage, Binder.getCallingPid(),
                Binder.getCallingUid(), userId, true, callerFg, isBindExternal, allowInstant);
    ......// 省略 res 的异常检查
    ServiceRecord s = res.record;
    ......
    try {


        // 将 service 从 mRestartingServices 列表中移除
        if (unscheduleServiceRestartLocked(s, callerApp.info.uid, false)) {


            ......
        }
        ......
        if ((flags&Context.BIND_AUTO_CREATE) != 0) {


            s.lastActivity = SystemClock.uptimeMillis();
            // 通过 bringUpServiceLocked 启动 Service 所在的进程
            if (bringUpServiceLocked(s, service.getFlags(), callerFg, false,
                    permissionsReviewRequired) != null) {


                // 请注意,这里做了退出操作
                return 0;
            }
        }
        if (s.app != null) {


            ......
            // 调整进程的优先级
            mAm.updateLruProcessLocked(s.app, s.app.hasClientActivities
                    || s.app.treatLikeActivity, b.client);
            mAm.updateOomAdjLocked(s.app, true);
        }
        if (s.app != null && b.intent.received) {


            // 如果进程已经启动并且绑定过了,直接调用 IServiceConnection 的 connected()方法
            // 此方法最终会调用 ServiceConnection 的 onServiceConnected() 方法
            try {


                c.conn.connected(s.name, b.intent.binder, false);
            } catch (Exception e) {


                ......
            }
            if (b.intent.apps.size() == 1 && b.intent.doRebind) {


                // Intent 参数中要求重新绑定的情况,执行 requestServiceBindingLocked()
                requestServiceBindingLocked(s, b.intent, callerFg, true);
            }
        } else if (!b.intent.requested) {


            // 还没有进行绑定,执行 requestServiceBindingLocked() 方法
            requestServiceBindingLocked(s, b.intent, callerFg, false);
        }
        ......
    }
    return 1;
}
bindServiceLocked()方法中:
- 如果
Service所在的进程还没有启动,会执行bringUpServiceLocked()来启动进程 - 如果所在进程已经启动,那么只需要调用
requestServiceBindingLocked()方法来绑定服务
ActiveService.bringUpServiceLocked
bringUpServiceLocked()方法的主要作用是启动Service,核心代码如下:
private String bringUpServiceLocked(ServiceRecord r, int intentFlags, boolean execInFg,
        boolean whileRestarting, boolean permissionsReviewRequi
最低0.47元/天 解锁文章


 947
947

 被折叠的 条评论
为什么被折叠?
被折叠的 条评论
为什么被折叠?
 到【灌水乐园】发言


