OAuth2.0_完善环境配置_把资源微服务客户端信息_授权码存入到数据库_Spring Security OAuth2.0认证授权---springcloud工作笔记149

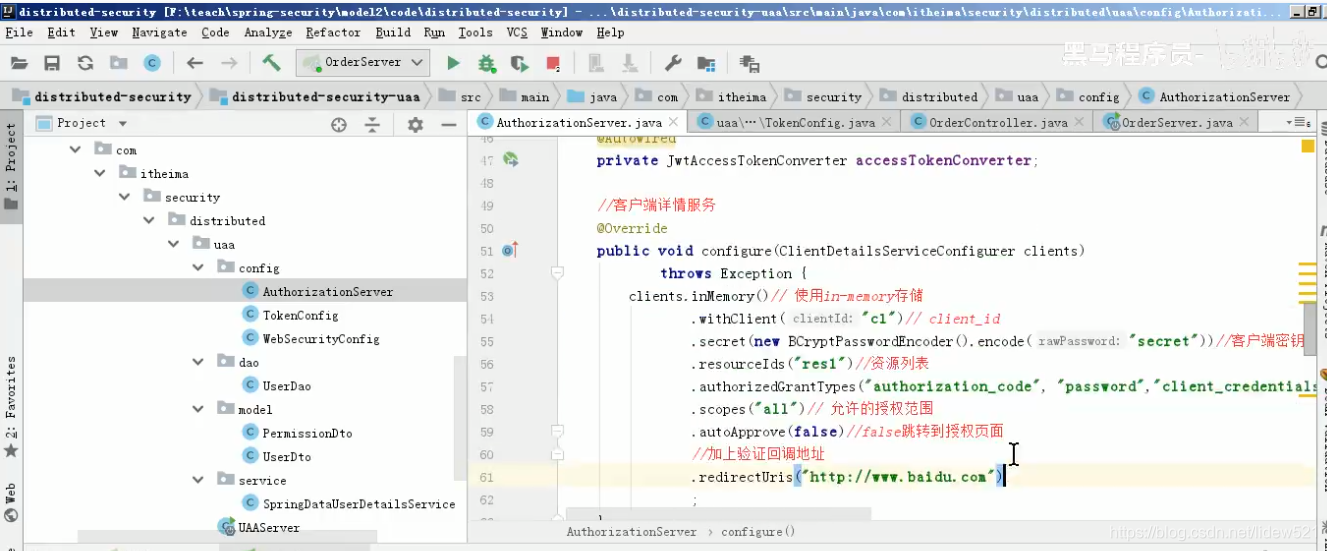
这篇博客介绍了如何将OAuth2.0的客户端信息和授权码从内存配置转移到数据库存储。首先创建`oauth_client_details`和`oauth_code`表,然后在授权服务中注释掉内存存储,使用`ClientDetailsService`配合`DataSource`和`passwordEncoder`处理数据库操作。接着更新`websecurityconfig`配置,启用数据库存储授权码。最后,验证了数据库中成功存储了客户端信息和授权码。

摘要生成于 C知道 ,由 DeepSeek-R1 满血版支持, 前往体验 >

技术交流QQ群【JAVA,C++,Python,.NET,BigData,AI】:170933152

然后我们之前资源微服务的客户端信息,我们都是配置在内存中的,现在

我们配置到数据库中去,授权码也存在数据库中去.

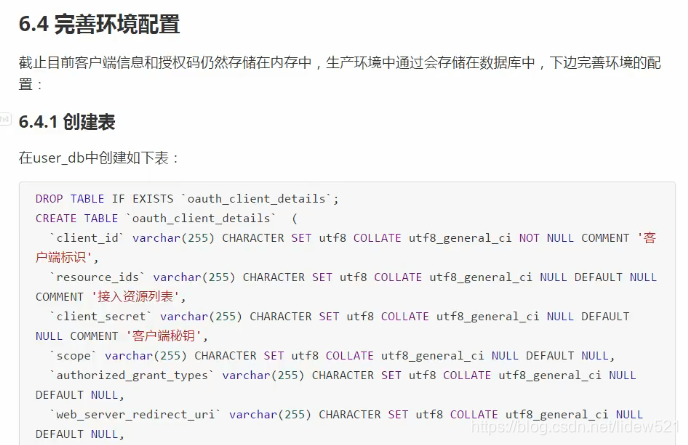
先去生成oauth_client_details 这个表.

可以看到我们现在要把客户端详情,配置到数据库中去,上面的这些客户端的详情数据.


oauth_client_details,这个用来存储客户端的信息


### Spring Security OAuth2 实现 APP 扫码登录 #### 1. 配置认证服务器 为了支持APP扫码登录功能,首先需要创建一个认证服务器来管理用户的授权和令牌发放。以下是认证服务器的核心代码: ```java package cn.mrcode.imooc.springsecurity.securityapp; import org.springframework.context.annotation.Configuration; import org.springframework.security.oauth2.config.annotation.web.configuration.EnableAuthorizationServer; import org.springframework.security.oauth2.provider.token.TokenStore; @Configuration @EnableAuthorizationServer public class MyAuthorizationServerConfig { @Autowired(required = false) private TokenStore tokenStore; public void configure(AuthorizationServerEndpointsConfigurer endpoints) throws Exception { endpoints.authenticationManager(this.authenticationManager); if (this.tokenStore != null) { endpoints.tokenStore(tokenStore); } } } ``` 此部分实现了基本的认证服务器配置,并允许自定义 `TokenStore` 来存储访问令牌[^3]。 --- #### 2. 修改应用配置文件 在 `application.properties` 文件中添加必要的OAuth2参数,以便客户端能够连接到认证服务器并请求授权码和访问令牌。 ```properties # 应用端口号 server.port=8080 # 客户端ID security.oauth2.client.client-id=client-app-scan-login # 客户端密钥 security.oauth2.client.client-secret=secret-key-for-client # 授权URI(用于获取授权码security.oauth2.client.user-authorization-uri=http://localhost:8080/oauth/authorize # 获取AccessToken URI security.oauth2.client.access-token-uri=http://localhost:8080/oauth/token # 用户信息接口 security.oauth2.resource.user-info-uri=http://localhost:8081/user ``` 这些属性指定了客户端的身份以及如何与认证服务器交互[^2]。 --- #### 3. 创建资源服务器 资源服务器负责保护API端点,并验证来自客户端的访问令牌。以下是一个简单的资源配置示例: ```java package cn.mrcode.imooc.springsecurity.securityapp; import org.springframework.context.annotation.Configuration; import org.springframework.security.oauth2.config.annotation.web.configuration.EnableResourceServer; import org.springframework.security.oauth2.config.annotation.web.configuration.ResourceServerConfigurerAdapter; import org.springframework.security.oauth2.config.annotation.web.configurers.ResourceServerSecurityConfigurer; @Configuration @EnableResourceServer public class ResourceServerConfig extends ResourceServerConfigurerAdapter { @Override public void configure(ResourceServerSecurityConfigurer resources) throws Exception { resources.resourceId("resource-server"); } @Override public void configure(HttpSecurity http) throws Exception { http.authorizeRequests() .antMatchers("/user").authenticated() // 只有经过身份验证的用户才能访问 /user 路径 .anyRequest().permitAll(); // 其他路径无需权限控制 } } ``` 这段代码设置了受保护的资源路径 `/user` 并确保只有持有有效令牌的客户端可以访问它[^1]。 --- #### 4. 实现扫码登录逻辑 对于APP扫码登录场景,通常涉及以下几个步骤: - **生成二维码**:当用户点击“扫码登录”按钮时,在服务端生成唯一的临时凭证(如UUID),并将该凭证嵌入到二维码图片中。 - **扫描处理**:用户通过手机APP扫描二维码后,将携带的唯一凭证发送回后台进行匹配校验。 - **绑定会话**:如果校验成功,则建立当前设备与用户账户之间的关联关系。 下面展示了一个简化版的服务端控制器实现: ```java @RestController @RequestMapping("/auth") public class AuthController { @GetMapping("/qrcode/{userId}") public ResponseEntity<String> generateQrCode(@PathVariable String userId) { UUID tempCredential = UUID.randomUUID(); qrCodeCache.put(tempCredential.toString(), userId); // 将临时凭证存入缓存 Map<String, Object> result = new HashMap<>(); result.put("credential", tempCredential.toString()); return ResponseEntity.ok(new JSONObject(result).toString()); } @PostMapping("/scan") public ResponseEntity<Void> handleScan(@RequestBody ScanRequest request) { String credential = request.getCredential(); if (qrCodeCache.containsKey(credential)) { String boundUserId = qrCodeCache.get(credential); // 绑定用户会话... sessionService.bindUser(boundUserId); return ResponseEntity.status(HttpStatus.CREATED).build(); } else { return ResponseEntity.status(HttpStatus.NOT_FOUND).build(); } } } class ScanRequest { private String credential; public String getCredential() { return this.credential; } public void setCredential(String credential) { this.credential = credential; } } ``` 以上代码片段展示了如何动态生成二维码数据并与后续扫描操作对接[^1]。 --- #### 5. 测试整个流程 完成上述开发工作之后,可以通过Postman或其他工具模拟测试完整的APP扫码登录过程。具体包括: - 请求生成二维码; - 使用移动终端扫描二维码并向服务器提交相应信息- 成功返回已登录状态或者错误提示消息。 --- ###
评论
添加红包

请填写红包祝福语或标题

红包个数最小为10个

红包金额最低5元

当前余额3.43前往充值 >
需支付:10.00
成就一亿技术人!
领取后你会自动成为博主和红包主的粉丝 规则
hope_wisdom
发出的红包

打赏作者

添柴程序猿

你的鼓励将是我创作的最大动力

¥1 ¥2 ¥4 ¥6 ¥10 ¥20
扫码支付:¥1
获取中
扫码支付

您的余额不足,请更换扫码支付或充值

打赏作者

实付
使用余额支付
点击重新获取
扫码支付
钱包余额 0

抵扣说明:

1.余额是钱包充值的虚拟货币,按照1:1的比例进行支付金额的抵扣。
2.余额无法直接购买下载,可以购买VIP、付费专栏及课程。

余额充值