


一、课程介绍
前后端分离开发(熟悉)
搭建前端环境-nodejs&npm&vue&webpack&vuecli(了解)
前端ui框架Elementui入门(掌握)
Elmentui+crud(掌握)
Axios(掌握)–包含在crud里面
Mock.js&EasyMock(熟悉)–包含在crud里面
前后端分离
前后端分离优势
1,为优质产品打造精益团队
2,提升开发效率
3,完美应对复杂多变的前端需求
4,增强代码可维护性
总结
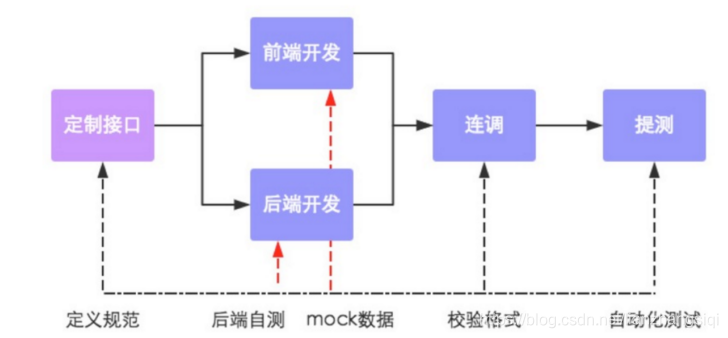
前后端分类是一种架构模式,前后端人员先预定好接口,并行开发与测试.上线时进行分别部署.对开发人员能力要求高.对于小型公司或刚转型前后端分离模式公司,开发人员能力有限,采用是后端先行前后端分离开发模式.
ElementUI-基于vue前端ui框架
安装
npm i element-ui -S
导入
在main.js中写入一下内容:
import Vue from 'vue';
import ElementUI from 'element-ui'; //引入核心js组件
import 'element-ui/lib/theme-chalk/index.css';//引入依赖的样式
Vue.use(ElementUI)
Layout布局
<template>
  <div class="hello">
    <el-row>
      <el-col :span="6"><div class="grid-content bg-purple"></div></el-col>
      <el-col :span="6"><div class="grid-content bg-purple-light"></div></el-col>
      <el-col :span="6"><div class="grid-content bg-purple"></div></el-col>
      <el-col :span="6"><div class="grid-content bg-purple-light"></div></el-col>

    </el-row>
  </div>
</template>
Container布局容器
<template>
  <div class="hello">
    <el-container>
      <el-header>标题</el-header>
      <el-container>
        <el-aside width="200px">菜单</el-aside>
        <el-main>主要内容</el-main>
      </el-container>
    </el-container>
    <!-- 图表 -->
    <el-row>
      <el-col :span="4"><i class="el-icon-edit"></i></el-col>
      <el-col :span="4"><i class="el-icon-share"></i></el-col>
      <el-col :span="4"><i class="el-icon-delete"></i></el-col>
      <el-col :span="4"><el-button type="primary" icon="el-icon-search">搜索</el-button></el-col>
    </el-row>
  </div>
</template>
Button按钮
 <el-row>
      <el-button>默认按钮</el-button>
      <el-button type="primary" disabled>主要按钮</el-button>
      <el-button type="success">成功按钮</el-button>
      <el-button type="info">信息按钮</el-button>
      <el-button type="warning">警告按钮</el-button>
      <el-button type="danger">危险按钮</el-button>
    </el-row>
    <el-row>
      <el-button plain>朴素按钮</el-button>
      <el-button type="primary" plain>主要按钮</el-button>
      <el-button type="success" plain>成功按钮</el-button>
      <el-button type="info" plain>信息按钮</el-button>
      <el-button type="warning" plain>警告按钮</el-button>
      <el-button type="danger" plain>危险按钮</el-button>
    </el-row>

    <el-row>
      <el-button round>圆角按钮</el-button>
      <el-button type="primary" round>主要按钮</el-button>
      <el-button type="success" round>成功按钮</el-button>
      <el-button type="info" round>信息按钮</el-button>
      <el-button type="warning" round>警告按钮</el-button>
      <el-button type="danger" round>危险按钮</el-button>
    </el-row>
Tree树形控件
<template>
  <div class="hello">
    <el-tree :data="data" :props="defaultProps" @node-click="handleNodeClick"></el-tree>

  </div>
</template>

<script>
export default {
  name: 'HelloWorld',
  data() {
    return {
      data: [{
        label: '一级片',
        children: [{
          label: '二级片',
          children: [{
            label: '三级片'
          }]
        }]
      }, {
        label: '一级片',
        children: [{
          label: '二级片',
          children: [{
            label: '三级片'
          }]
        }, {
          label: '二级 3-2',
          children: [{
            label: '三级 3-2-1'
          }]
        }]
      }],
      defaultProps: {
        children: 'children',
        label: 'label'
      }
    };
  },
  methods: {
    handleNodeClick(data) {
      console.log(data);
    }
  }
}
</script>
Pagination分页
在这里插入代码片
Alert警告
  <template>
        <div>
            <el-alert
              title="成功提示的文案"
              type="success">
            </el-alert>
            <el-alert
              title="消息提示的文案"
              type="info">
            </el-alert>
            <el-alert
              title="警告提示的文案"
              type="warning">
            </el-alert>
            <el-alert
              title="错误提示的文案"
              type="error">
            </el-alert>

           <el-button :plain="true" @click="open">弹出</el-button>
          <el-button :plain="true" @click="open2">成功</el-button>
          <el-button :plain="true" @click="open3">警告</el-button>
          <el-button :plain="true" @click="open4">错误</el-button>
        </div>
    </template>


<script>
export default {
  name: 'HelloWorld',
  data() {
    return {

    };
  },
  methods: {
    handleNodeClick(data) {
      console.log(data);
    },
    open(){

      this.$message(
        {
          showClose: true,
          message: '这是一条消息提示'
        }
      );
    },
    open2() {
      this.$message({
        message: '恭喜你,这是一条成功消息',
        type: 'success'
      });
    },

    open3() {
      this.$message({
        message: '警告哦,这是一条警告消息',
        type: 'warning'
      });
    },

    open4() {
      this.$message.error('错了哦,这是一条错误消息');
    }
  }
}
</script>
Tabs标签页
<template>
        <div>
          <el-tabs v-model="activeName" @tab-click="handleClick">
            <el-tab-pane label="用户管理" name="first">用户管理</el-tab-pane>
            <el-tab-pane label="配置管理" name="second">配置管理</el-tab-pane>
            <el-tab-pane label="角色管理" name="third">角色管理</el-tab-pane>
            <el-tab-pane label="定时任务补偿" name="fourth">定时任务补偿</el-tab-pane>
          </el-tabs>
        </div>
    </template>
Dialog对话框
<template>
        <div>
          <el-button type="text" @click="dialogVisible = true">点击打开 Dialog</el-button>

          <el-dialog
            title="友情提示"
            :visible.sync="dialogVisible"
            width="30%"
            :before-close="handleClose">

            <el-form :model="form">
              <el-form-item label="活动名称" :label-width="formLabelWidth">
                <el-input v-model="form.name" autocomplete="off"></el-input>
              </el-form-item>
              <el-form-item label="活动区域" :label-width="formLabelWidth">
                <el-select v-model="form.region" placeholder="请选择活动区域">
                  <el-option label="活动区域一" value="shanghai"></el-option>
                  <el-option label="活动区域二" value="beijing"></el-option>
                </el-select>
              </el-form-item>
            </el-form>
            <div slot="footer" class="dialog-footer">
              <el-button @click="dialogVisible = false">取 消</el-button>
              <el-button type="primary" @click="dialogVisible = false">确 定</el-button>
            </div>


          </el-dialog>
        </div>
    </template>
Form
<template>
        <div>
          <el-button type="text" @click="dialogVisible = true">点击打开 </el-button>

          <el-form :inline="true" :model="formInline" class="demo-form-inline">
            <el-form-item label="审核人">
              <el-input v-model="formInline.user" placeholder="审核人"></el-input>
            </el-form-item>
            <el-form-item label="活动区域">
              <el-select v-model="formInline.region" placeholder="活动区域">
                <el-option label="活动区域区域一" value="四川"></el-option>
                <el-option label="活动区域区域二" value="重庆"></el-option>
              </el-select>
            </el-form-item>
            <el-form-item>
              <el-button type="primary" @click="onSubmit">查询</el-button>
            </el-form-item>
          </el-form>
        </div>
    </template>
Table
  <template>
        <div>
          <el-button type="text" @click="dialogVisible = true">点击打开</el-button>
          <el-table
            :data="tableData"
            border="true"
            stripe="true"
            style="width: 100%">
            <el-table-column
              fixed
              prop="date"
              label="日期"
              width="180">
            </el-table-column>
            <el-table-column
              prop="name"
              label="姓名"
              width="680">
            </el-table-column>
            <el-table-column
              prop="address"
              label="地址"
              width="1080">
            </el-table-column>
          </el-table>

        </div>
    </template>


<script>
  export default {
    data() {
      return {
        tableData: [{
          date: '2019-08-02',
          name: '小南瓜',
          address: '铜锣湾'
        }, {
          date: '2019-08-04',
          name: '小地瓜',
          address: '风车镇'
        }, ]
      }
    }
  }
</script>
Mock.js模拟数据
新建demo1.js
下载安装mock.js
npm install mockjs
在demo1.js文件加入代码
let Mock=require('mockjs')
let data=Mock.mock({
// name|规则:值
'list|5':[
{
'id':1,
'name':'测试'
}
]
})
console.log(JSON.stringify(data,null,2 ))


 1575
1575

 被折叠的 条评论
为什么被折叠?
被折叠的 条评论
为什么被折叠?
 到【灌水乐园】发言


