


 本文深入剖析了Spring Boot应用上下文的初始化过程,从`SpringApplication.run()`方法开始,详细讲解了如何构建和刷新IoC容器。通过分析`prepareEnvironment()`、`createApplicationContext()`、`prepareContext()`和`refresh()`方法,揭示了配置文件加载、BeanDefinition注册、应用上下文初始化和刷新等关键步骤。文章还探讨了`@ComponentScan`、`@Import`以及SPI机制在自动装配中的作用,帮助读者理解Spring Boot启动背后的机制。
源码略显枯燥,就当学习了,好了废话不多说了,开始…
源码入口:org.springframework.boot.SpringApplication#run(java.lang.String…)
整体源码:
public ConfigurableApplicationContext run(String... args) {
   StopWatch stopWatch = new StopWatch();
   stopWatch.start();
   // ConfigurableApplicationContext Spring 的上下文
   ConfigurableApplicationContext context = null;
   Collection<SpringBootExceptionReporter> exceptionReporters = new ArrayList<>();
   configureHeadlessProperty();
   //从META-INF/spring.factories中获取监听器
   //1、获取并启动监听器
   SpringApplicationRunListeners listeners = getRunListeners(args);
   listeners.starting();
   try {
      ApplicationArguments applicationArguments = new DefaultApplicationArguments(args);
      //2、构造应用上下文环境
      ConfigurableEnvironment environment = prepareEnvironment(listeners, applicationArguments);
      //处理需要忽略的Bean
      configureIgnoreBeanInfo(environment);
      //打印banner
      Banner printedBanner = printBanner(environment);
      ///3、初始化应用上下文
      context = createApplicationContext();
      //实例化SpringBootExceptionReporter.class,用来支持报告关于启动的错误
      exceptionReporters = getSpringFactoriesInstances(SpringBootExceptionReporter.class,
            new Class[] { ConfigurableApplicationContext.class }, context);
      //4、刷新应用上下文前的准备阶段
      prepareContext(context, environment, listeners, applicationArguments, printedBanner);
      //5、刷新应用上下文
      refreshContext(context);
      //刷新应用上下文后的扩展接口
      afterRefresh(context, applicationArguments);
      stopWatch.stop();
      if (this.logStartupInfo) {
         new StartupInfoLogger(this.mainApplicationClass).logStarted(getApplicationLog(), stopWatch);
      }
      listeners.started(context);
      callRunners(context, applicationArguments);
   }
   catch (Throwable ex) {
      handleRunFailure(context, ex, exceptionReporters, listeners);
      throw new IllegalStateException(ex);
   }
   try {
      listeners.running(context);
   }
   catch (Throwable ex) {
      handleRunFailure(context, ex, exceptionReporters, null);
      throw new IllegalStateException(ex);
   }
   return context;
}
1 获取并启动监听器
事件机制在Spring是很重要的一部分内容,通过事件机制我们可以监听Spring容器中正在发生的一些事件,同样也可以自定义监听事件。Spring的事件为Bean和Bean之间的消息传递提供支持。当一个对象处理完某种任务后,通知另外的对象进行某些处理,常用的场景有进行某些操作后发送通知,消息、邮件等情况。
SpringApplicationRunListeners listeners = getRunListeners(args);
listeners.starting();
private SpringApplicationRunListeners getRunListeners(String[] args) {
   Class<?>[] types = new Class<?>[] { SpringApplication.class, String[].class };
   // 读取META-INF/spring.factories文件中的org.springframework.boot.SpringApplicationRunListener什么的配置
   return new SpringApplicationRunListeners(logger,
   getSpringFactoriesInstances(SpringApplicationRunListener.class, types, this, args));
}
这里看到了属性的方法,还是一样的套路,从META-INF/spring.factories文件中读取:

EventPublishingRunListener监听器是Spring容器的启动监听器。
listeners.starting(); 开启了监听事件。
2 构建应用上下文环境
应用上下文环境包括什么呢?包括计算机的环境,Java环境,Spring的运行环境,Spring项目的配置(在SpringBoot中就是那个熟悉的application.properties/yml)等等
//2、构造应用上下文环境
ConfigurableEnvironment environment = prepareEnvironment(listeners, applicationArguments);
//处理需要忽略的Bean
configureIgnoreBeanInfo(environment);
//打印banner
Banner printedBanner = printBanner(environment);
看一下prepareEnviroment方法的实现:
private ConfigurableEnvironment prepareEnvironment(SpringApplicationRunListeners listeners,
ApplicationArguments applicationArguments) {
// Create and configure the environment
// 创建并配置相应的环境
ConfigurableEnvironment environment = getOrCreateEnvironment();
// 根据用户配置,配置 environment系统环境
configureEnvironment(environment, applicationArguments.getSourceArgs());
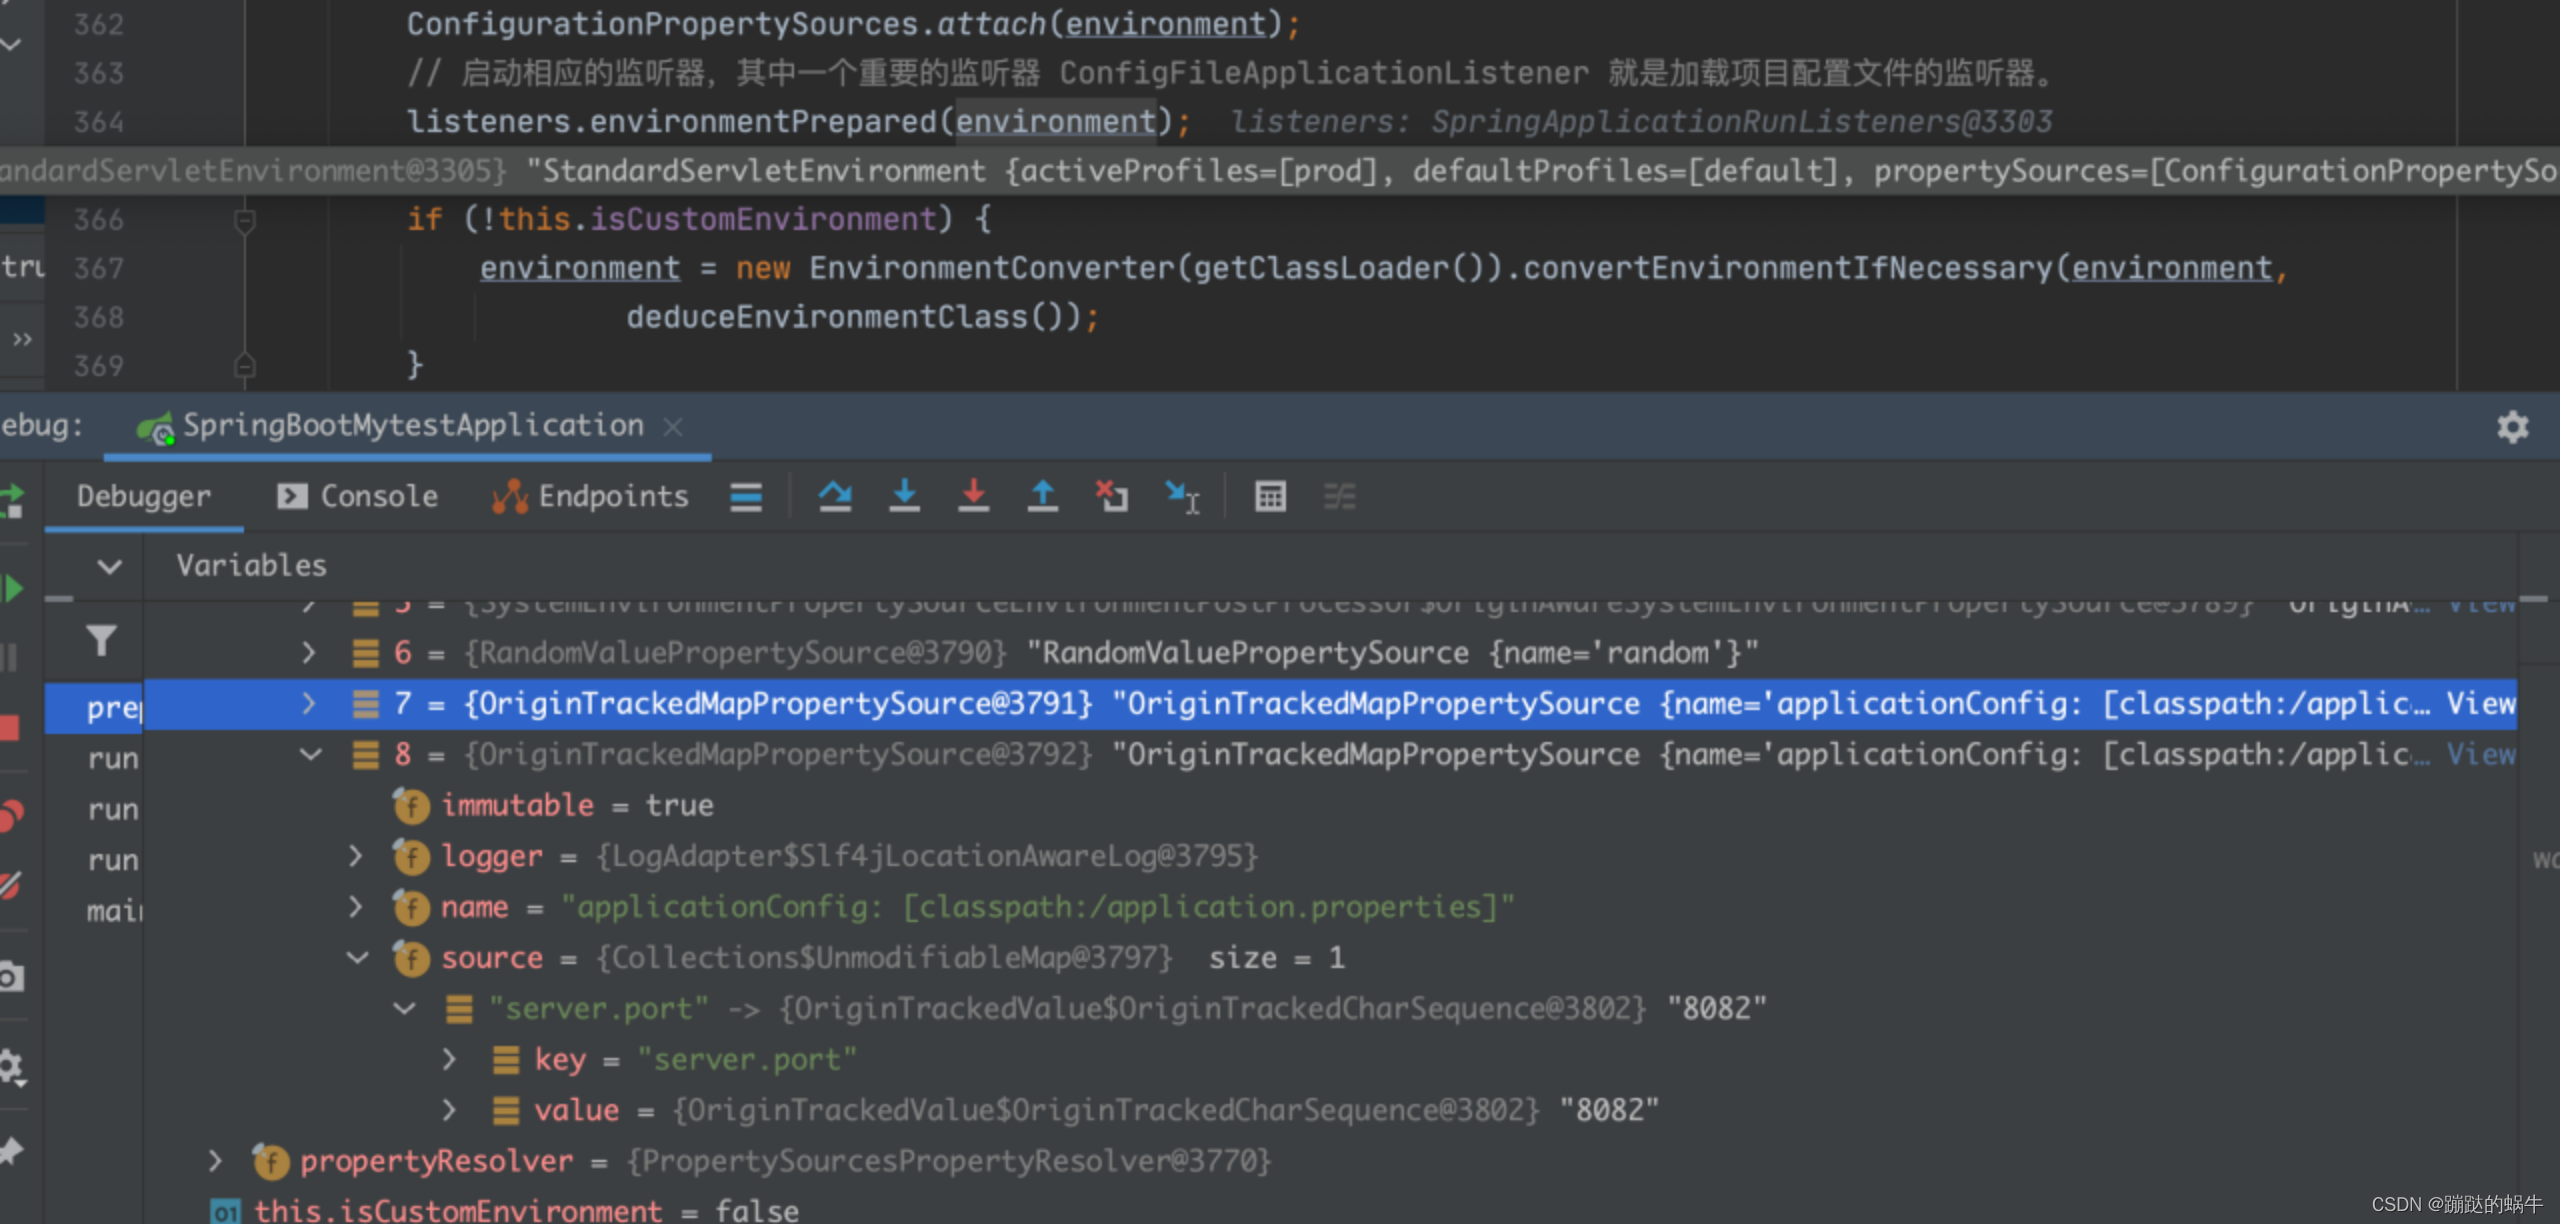
ConfigurationPropertySources.attach(environment);
// 启动相应的监听器,其中一个重要的监听器 ConfigFileApplicationListener 就是加载项目配置文件的监听器。
listeners.environmentPrepared(environment);
bindToSpringApplication(environment);
if (!this.isCustomEnvironment) {
environment = new EnvironmentConverter(getClassLoader()).convertEnvironmentIfNecessary(environment,
deduceEnvironmentClass());
}
ConfigurationPropertySources.attach(environment);
return environment;
}
看上面的注释,方法中主要完成的工作,首先是创建并按照相应的应用类型配置相应的环境,然后根据用户的配置,配置系统环境,然后启动监听器,并加载系统配置文件。
看一下getOrCreateEnvironment()干了啥?
private ConfigurableEnvironment getOrCreateEnvironment() {
   if (this.environment != null) {
      return this.environment;
   }
   //如果应用类型是 SERVLET 则实例化 StandardServletEnvironment,从前面的分析我们知道了是一个SERVLET应用
   switch (this.webApplicationType) {
   case SERVLET:
      return new StandardServletEnvironment();
   case REACTIVE:
      return new StandardReactiveWebEnvironment();
   default:
      return new StandardEnvironment();
   }
}
继承关系图:
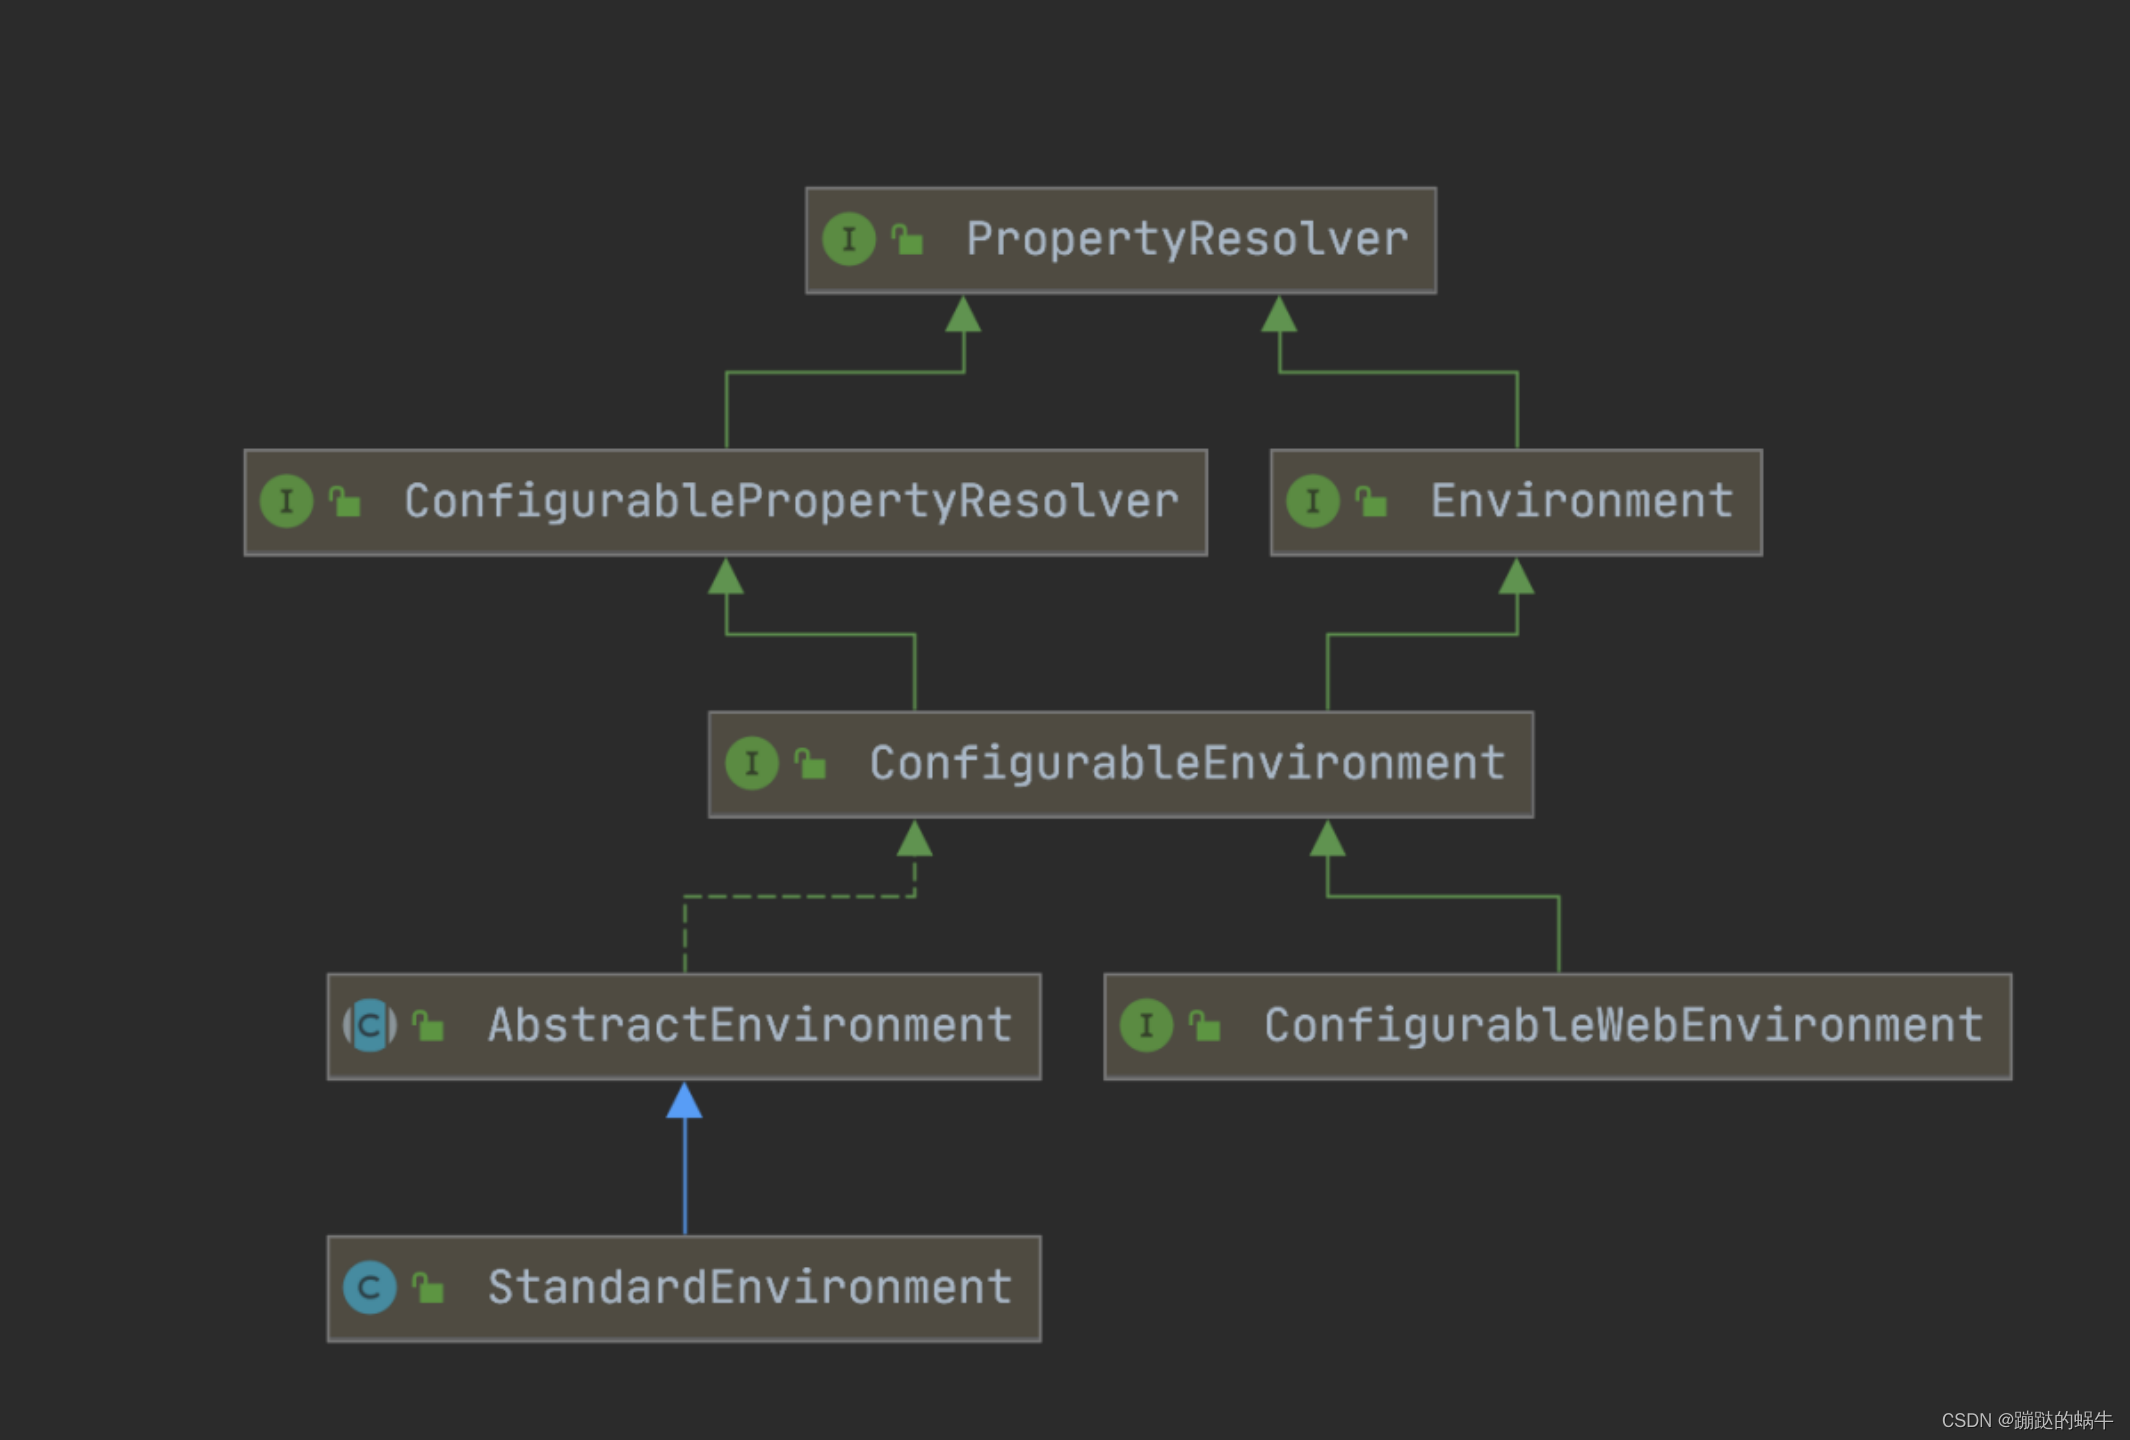
从上面的继承关系可以看出,StandardServletEnvironment是StandardEnvironment的子类。这两个对象也没什么好讲的,当是web项目的时候,环境上会多一些关于web环境的配置。
再来看一下面这个方法都干了啥?
configureEnvironment(environment,applicationArguments.getSourceArgs());
protected void configureEnvironment(ConfigurableEnvironment environment, String[] args) {
   if (this.addConversionService) {
      ConversionService conversionService = ApplicationConversionService.getSharedInstance();
      environment.setConversionService((ConfigurableConversionService) conversionService);
   }
   // 将main 函数的args封装成 SimpleCommandLinePropertySource 加入环境中。
   configurePropertySources(environment, args);
   // 激活相应的配置文件
   configureProfiles(environment, args);
}
在spring的启动参数中指定了参数:–spring.profiles.active=prod,debug看一下这个方法的执行结果:
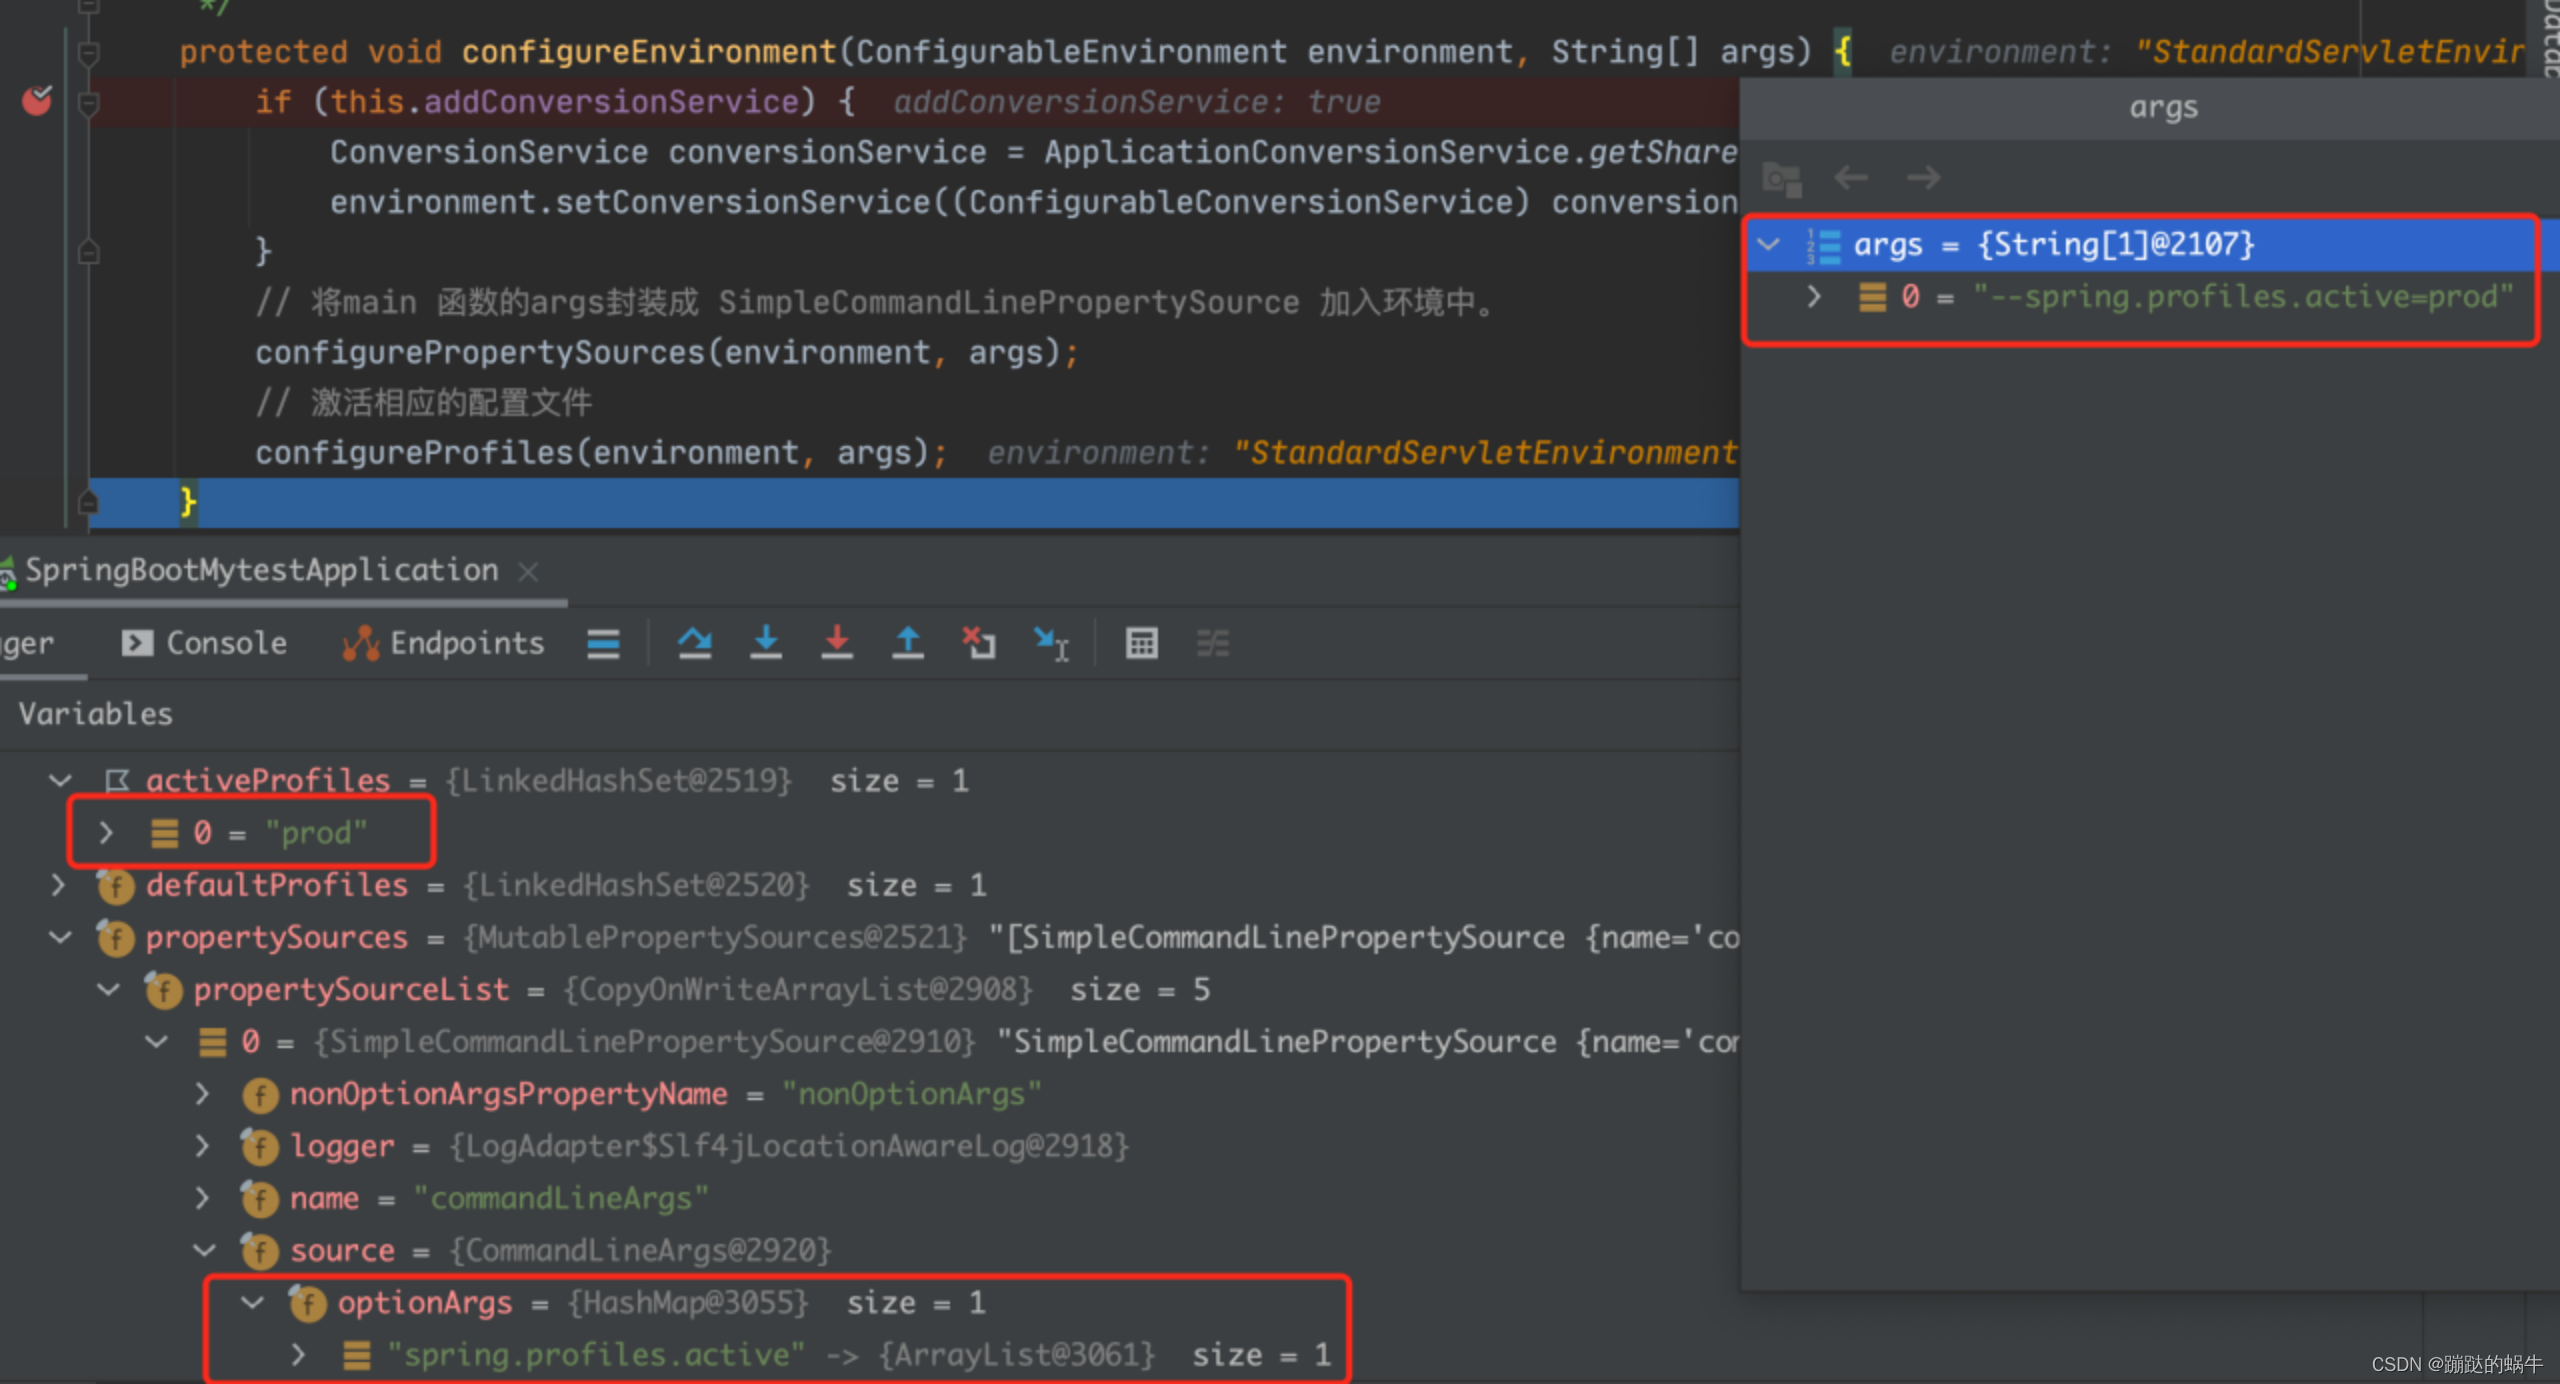
在configurePropertySources(environment, args);中将args封装成了SimpleCommandLinePropertySource并加入到了environment中。configureProfiles(environment, args);根据启动参数激活了相应的配置文件。
再来看一下listeners.environmentPrepared(environment)干了啥?
进入到方法一路跟下去就到了SimpleApplicationEventMulticaster类的multicastEvent()方法。
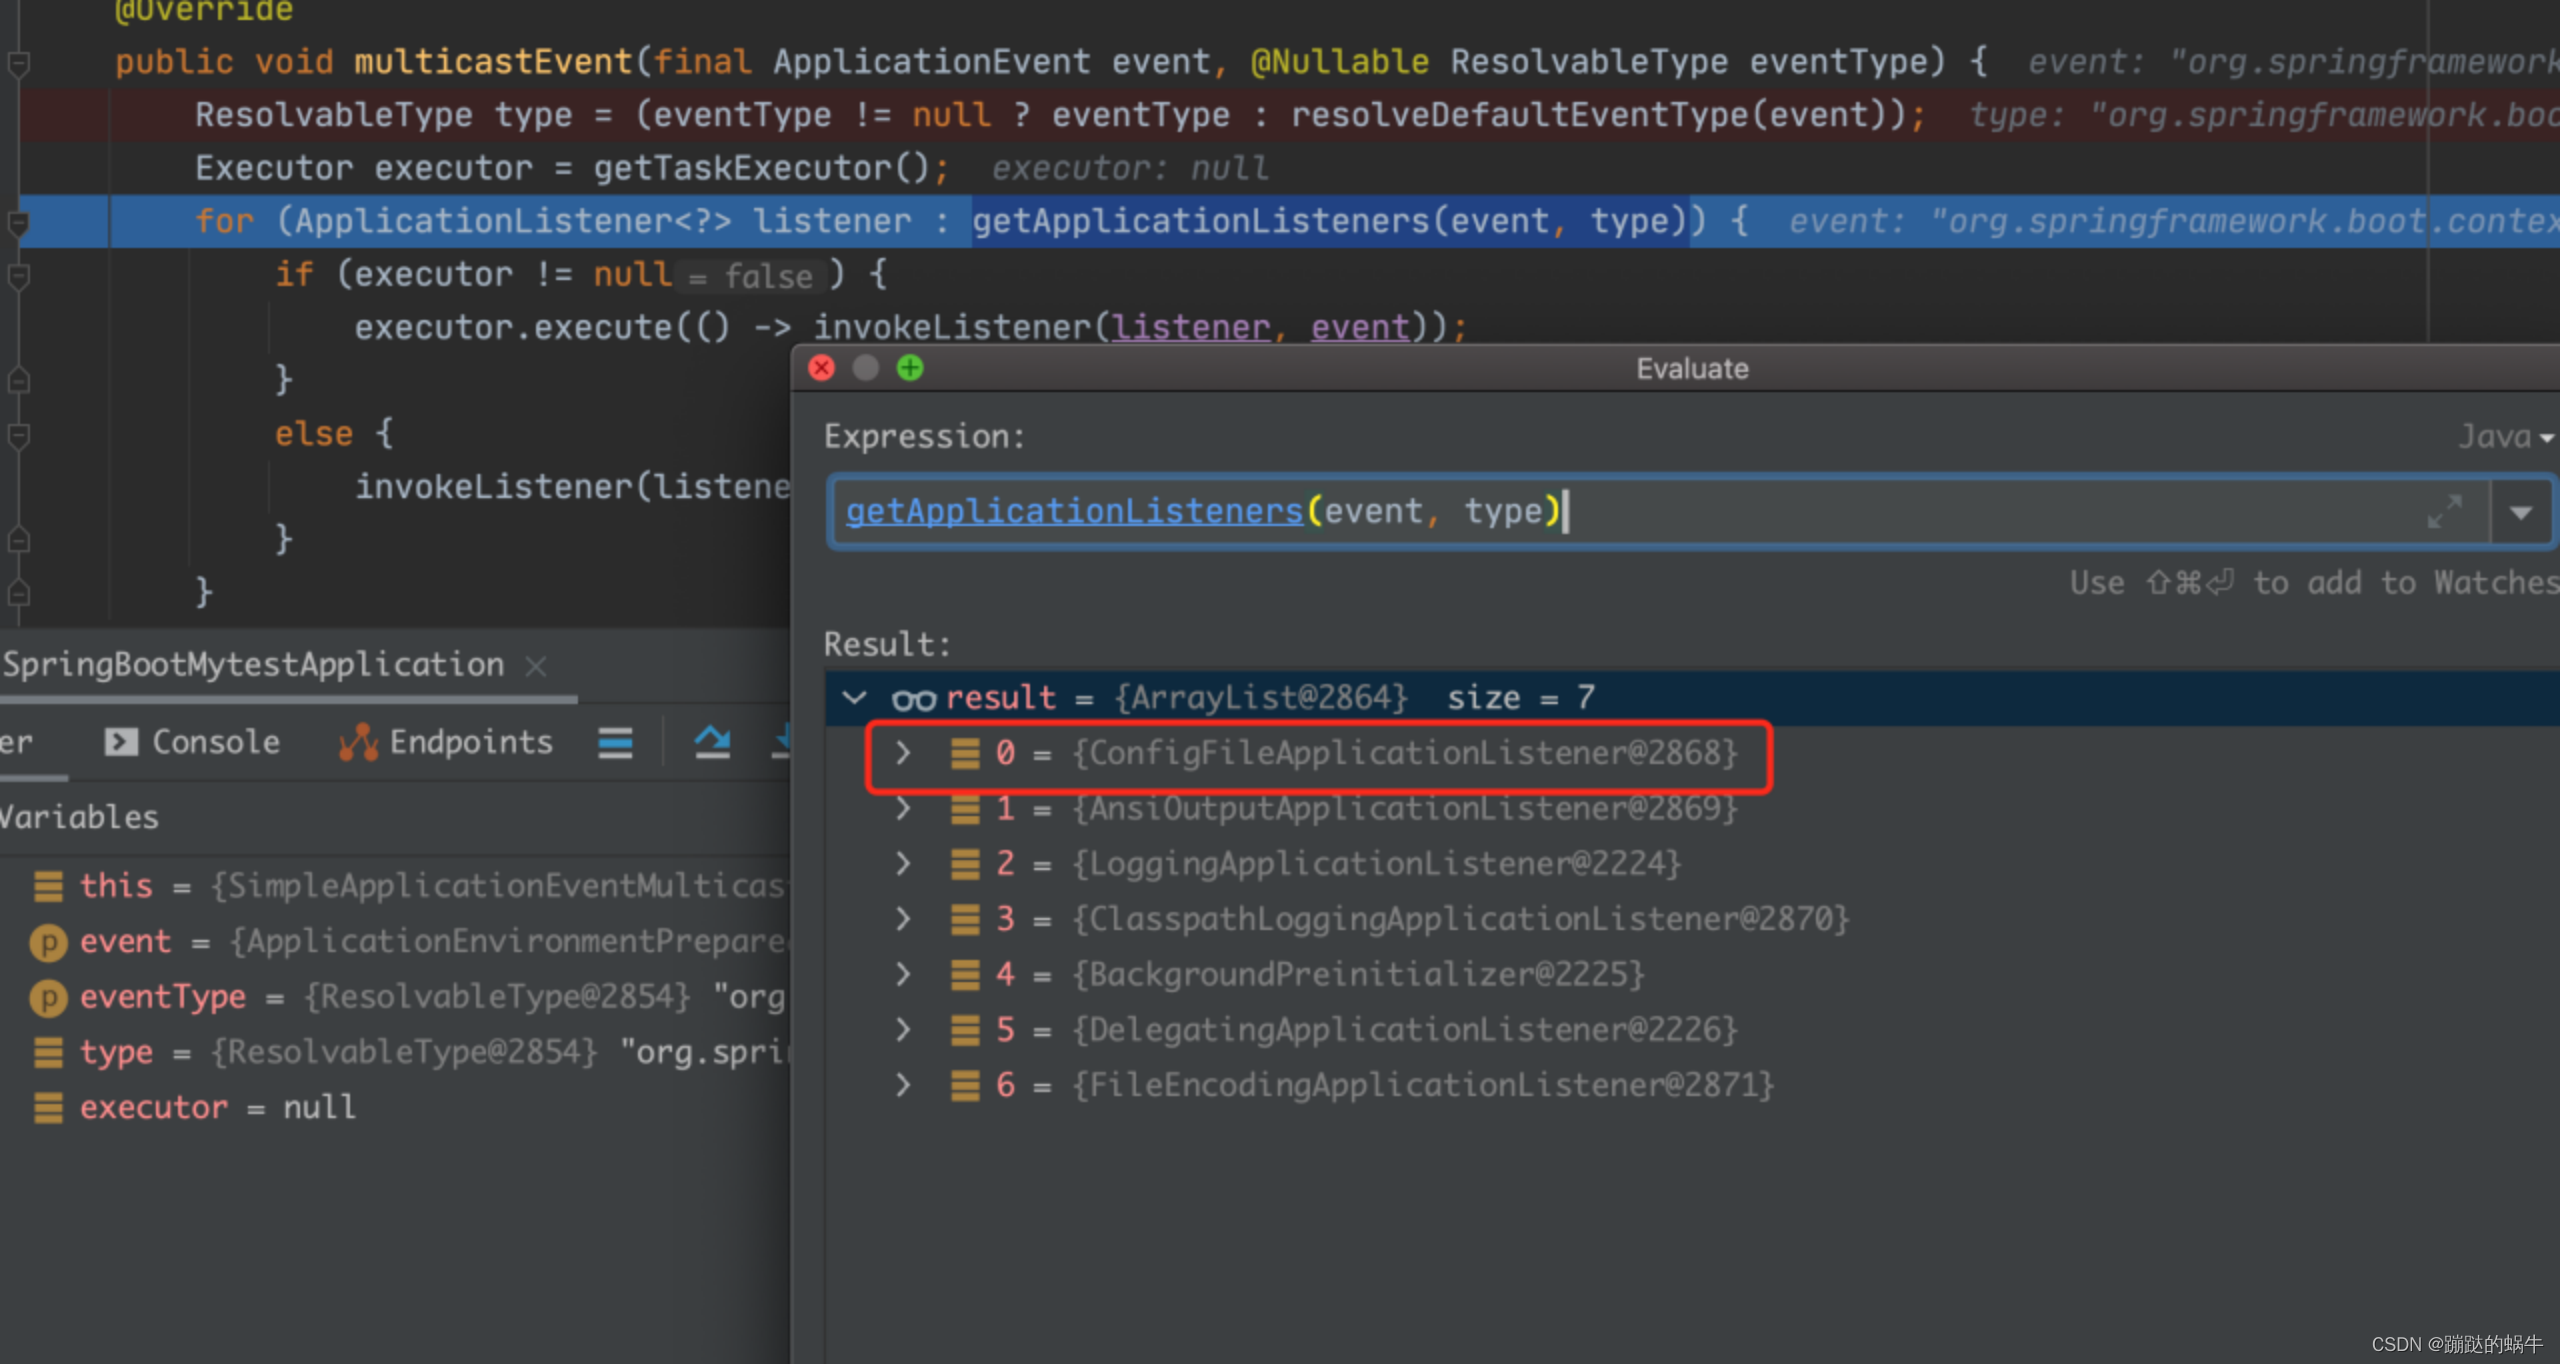
查看getApplicationListeners(event, type)执行结果,发现一个重要的监听器ConfigFileApplicationListener。看一下这个类的注释,了解作用:
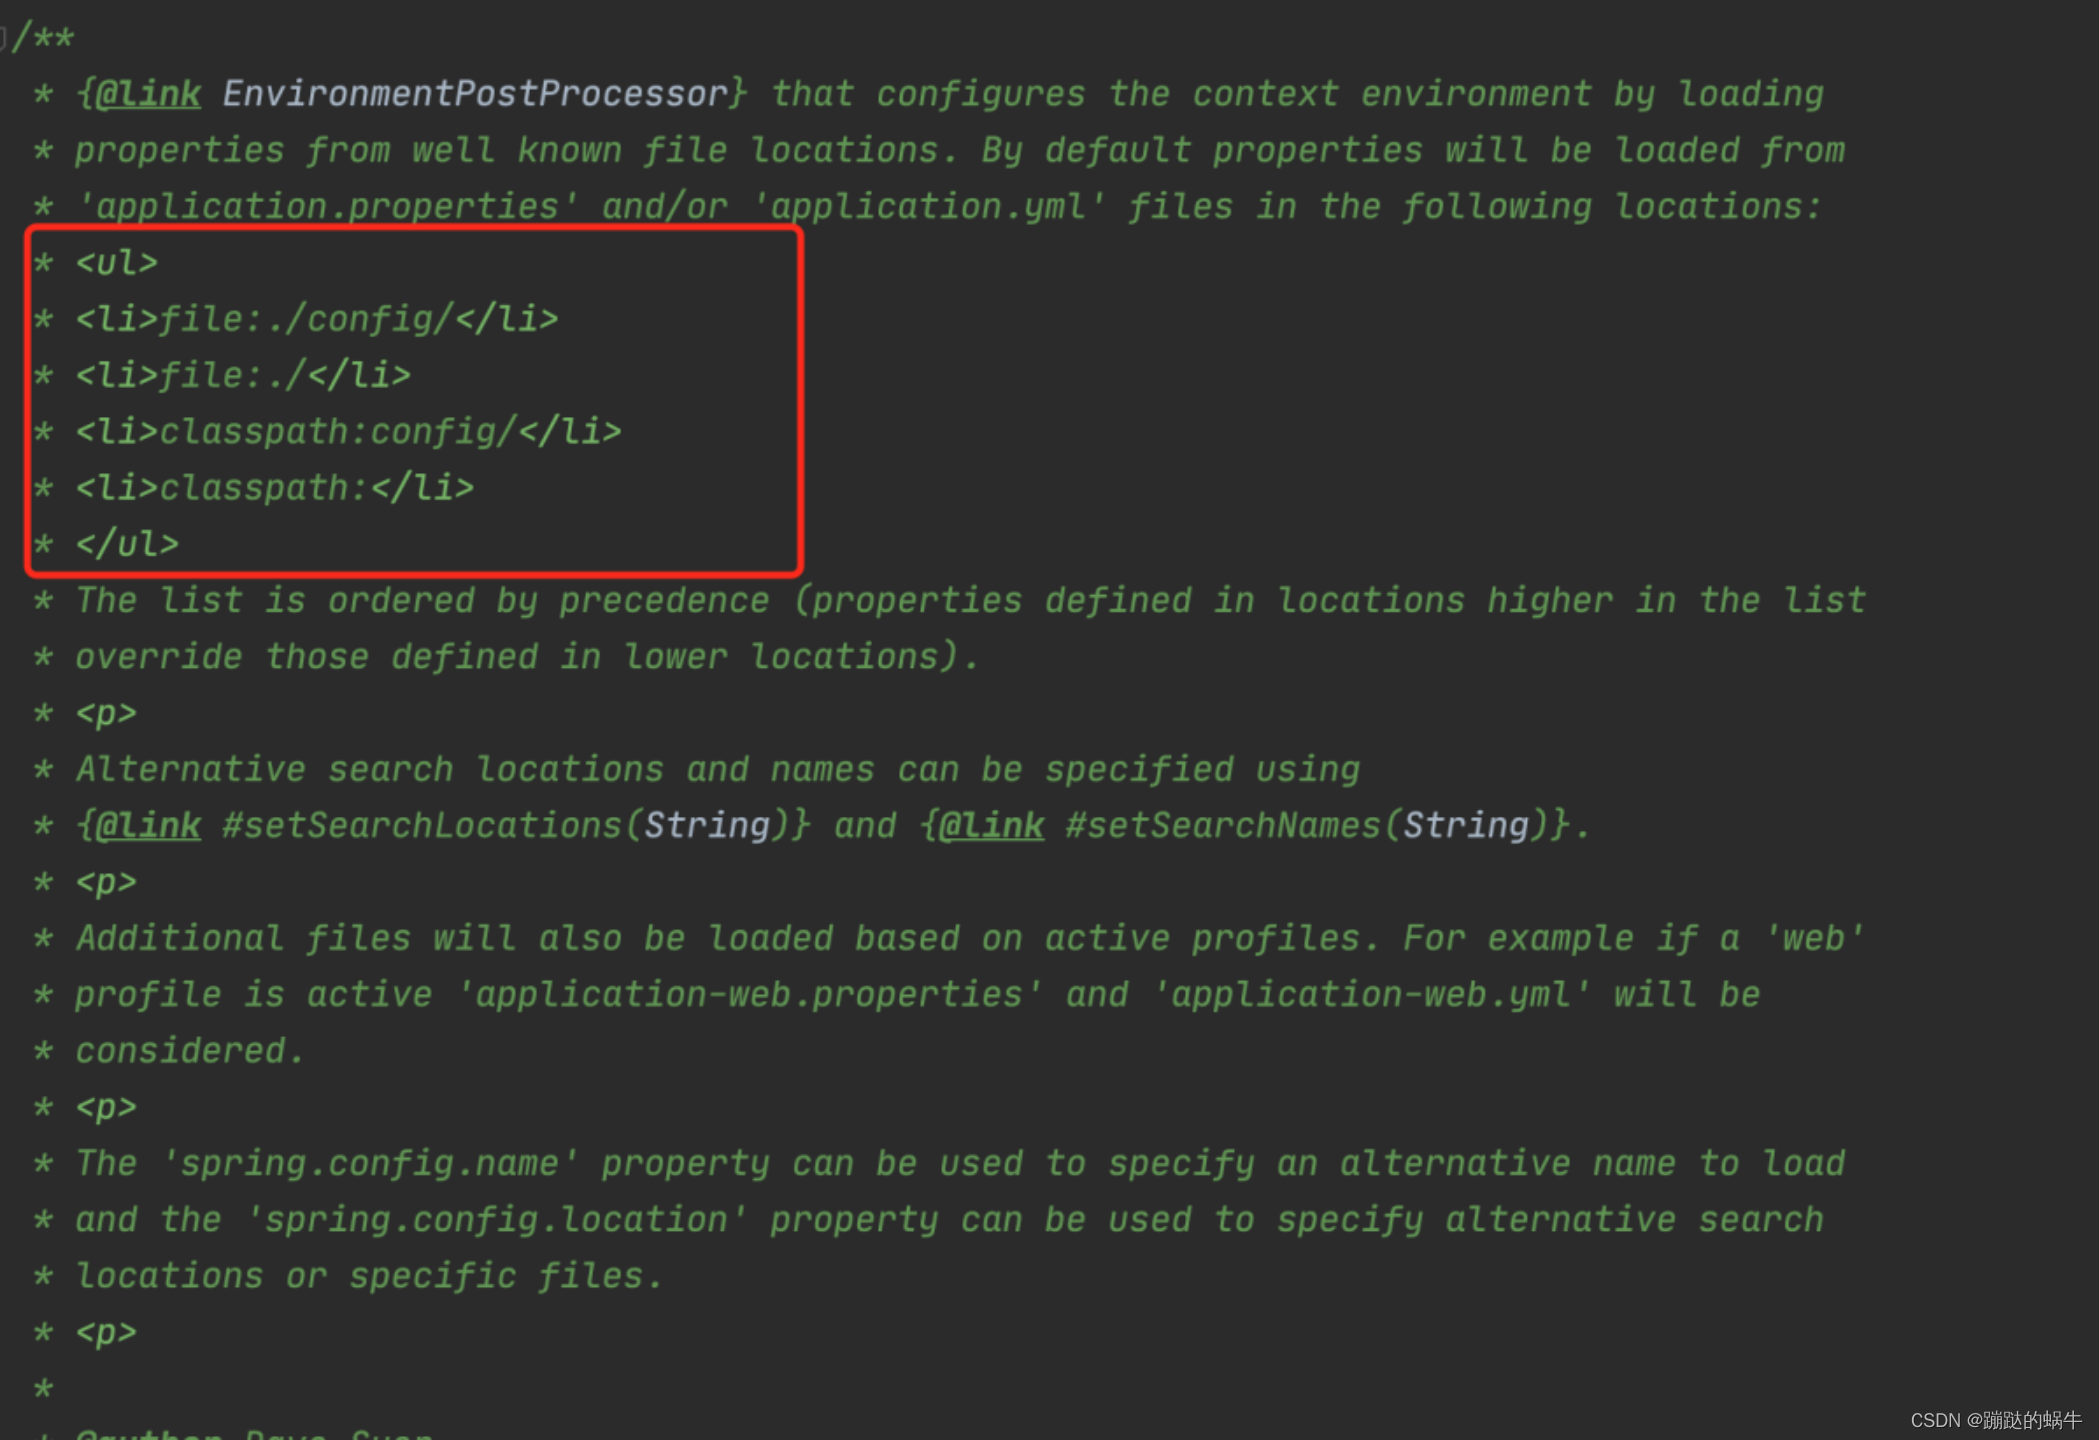
从注释中标注的标签所示的几个位置加载配置文件,并将其加入 上下文的 environment变量中。
最后看一下构建上下文后是不是将所有的配置加载进来了:
 如上所示,加载了所有的配置信息包括系统的配置信息以及用户自定义的配置信息。
3 初始化应用上下文
// ConfigurableApplicationContext Spring 的上下文
ConfigurableApplicationContext context = null;
.......
///3、初始化应用上下文
context = createApplicationContext();
看一下createApplicationContext()方法:
public static final String DEFAULT_SERVLET_WEB_CONTEXT_CLASS = "org.springframework.boot."
      + "web.servlet.context.AnnotationConfigServletWebServerApplicationContext";
......
protected ConfigurableApplicationContext createApplicationContext() {
   Class<?> contextClass = this.applicationContextClass;
   if (contextClass == null) {
      try {
         switch (this.webApplicationType) {
         // 默认为SERVLET类型,初始化
         case SERVLET:
            contextClass = Class.forName(DEFAULT_SERVLET_WEB_CONTEXT_CLASS);
            break;
         case REACTIVE:
            contextClass = Class.forName(DEFAULT_REACTIVE_WEB_CONTEXT_CLASS);
            break;
         default:
            contextClass = Class.forName(DEFAULT_CONTEXT_CLASS);
         }
      }
      catch (ClassNotFoundException ex) {
         throw new IllegalStateException(
               "Unable create a default ApplicationContext, please specify an ApplicationContextClass", ex);
      }
   }
   // 实例化对象
   return (ConfigurableApplicationContext) BeanUtils.instantiateClass(contextClass);
}
看一下AnnotationConfigServletWebServerApplicationContext的继承和实现关系: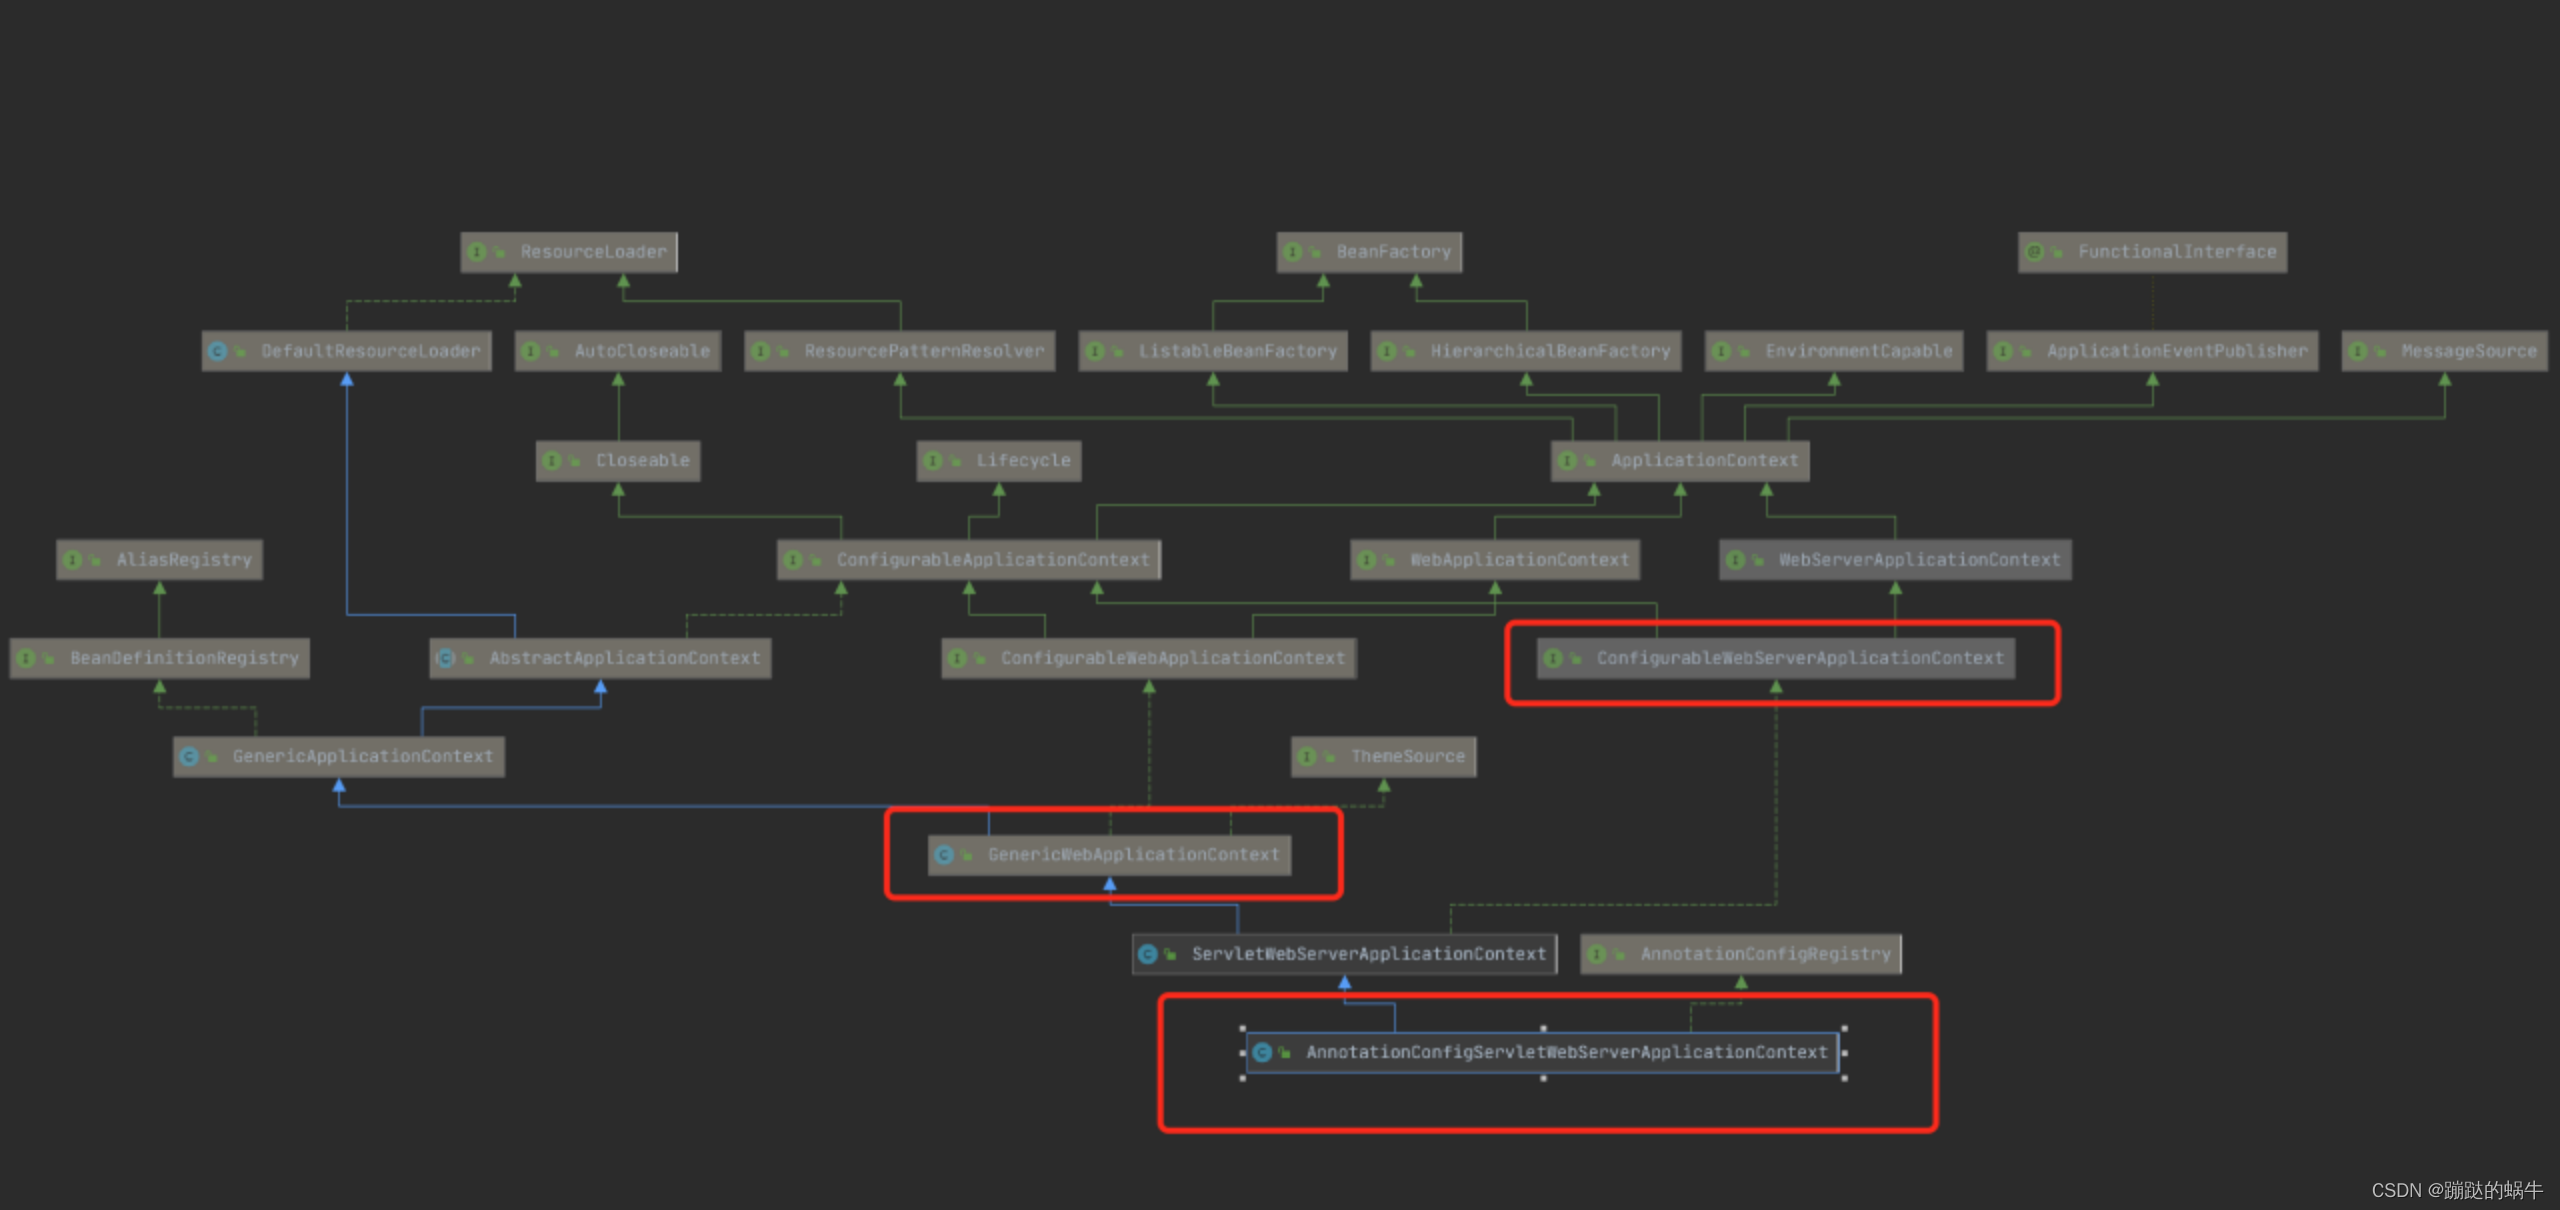
应用上下文可以理解成IoC容器的高级表现形式,应用上下文确实是在IoC容器的基础上丰富了一些高级功能。应用上下文对IoC容器是持有的关系。他的一个属性beanFactory就是IoC容器(DefaultListableBeanFactory)。所以他们之间是持有,和扩展的关系。看一下GenericApplicationContext:
public class GenericApplicationContext extends AbstractApplicationContext implements BeanDefinitionRegistry {
   private final DefaultListableBeanFactory beanFactory;
     /**
    * Create a new GenericApplicationContext.
    * @see #registerBeanDefinition
    * @see #refresh
    */
   public GenericApplicationContext() {
      this.beanFactory = new DefaultListableBeanFactory();
   }
   .....
}
beanFactory正是在AnnotationConfigServletWebServerApplicationContext实现的接口GenericApplicationContext中定义的。在上面createApplicationContext()方法中的,BeanUtils.instantiateClass(contextClass) 这个方法中,不但初始化了AnnotationConfigServletWebServerApplicationContext类,也就是我们的上下文context,同样也触发了GenericApplicationContext类的构造函数,从而IoC容器也创建了。
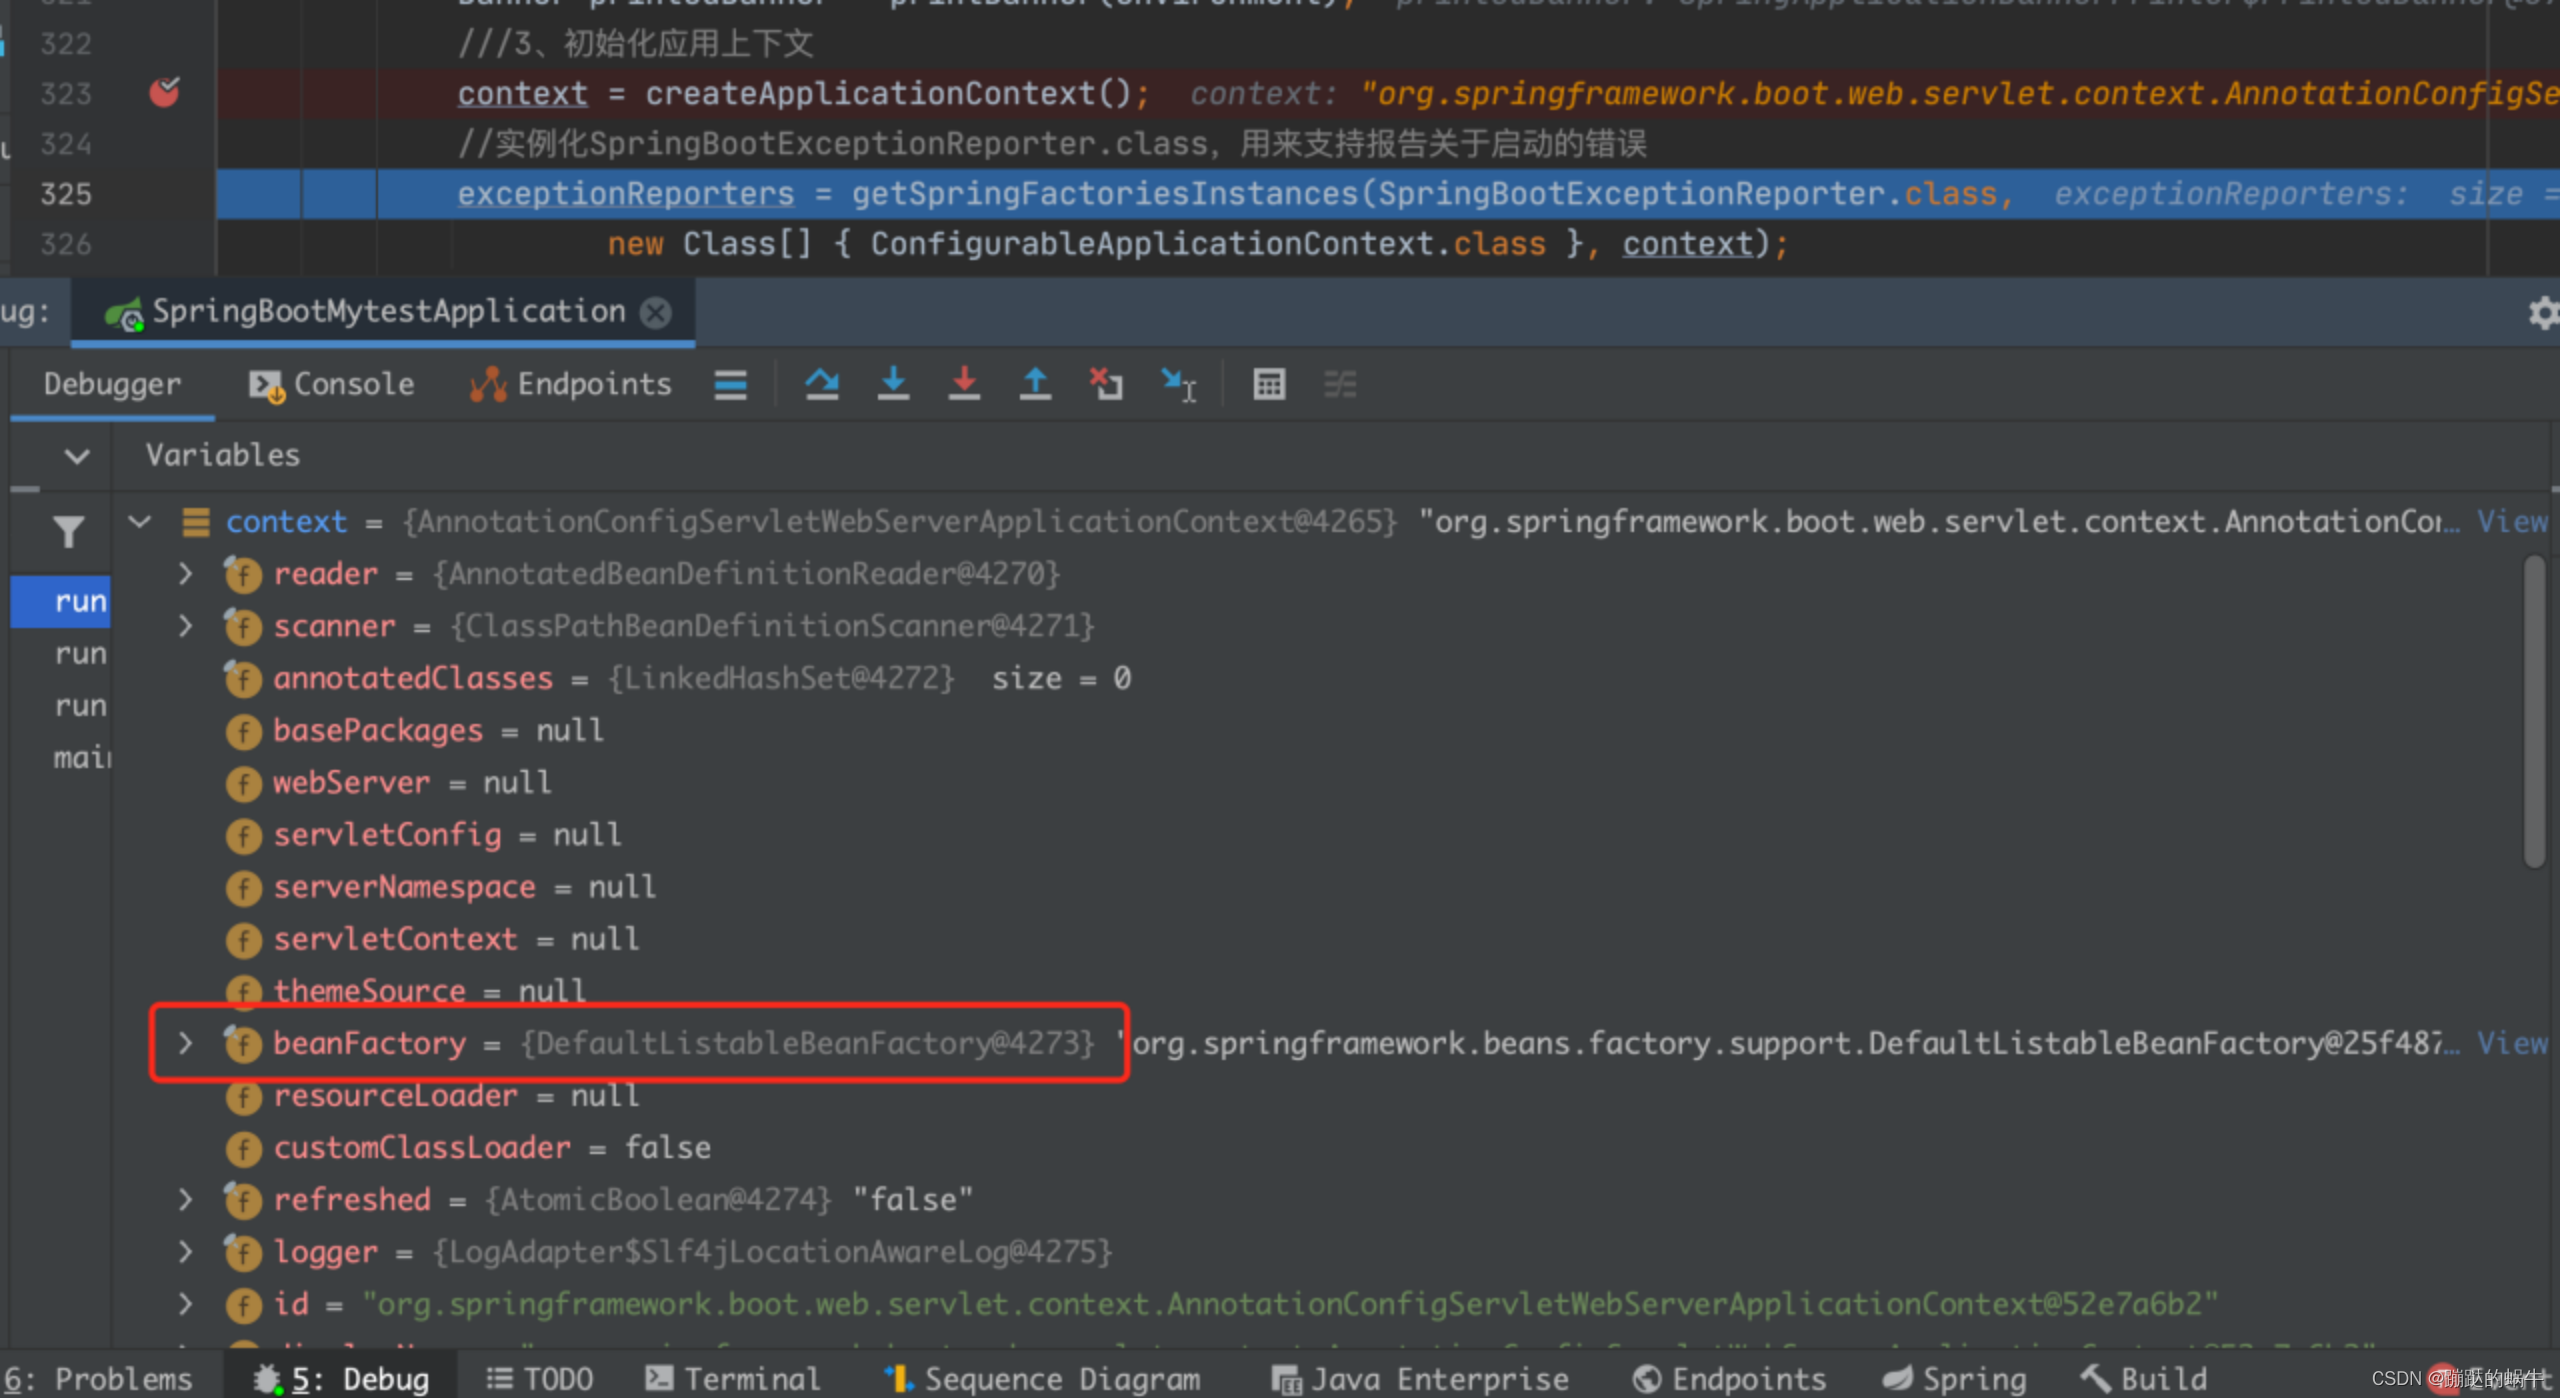
从图中可以看出,经过了上下文的初始化,初始化了IOC容器,一个熟悉的DefaultListableBeanFactory。
4 刷新应用上下文前的准备阶段
prepareContext方法介绍
private void prepareContext(ConfigurableApplicationContext context, ConfigurableEnvironment environment,
      SpringApplicationRunListeners listeners, ApplicationArguments applicationArguments, Banner printedBanner) {
   // 设置容器环境
   context.setEnvironment(environment);
   // 执行容器后置处理
   postProcessApplicationContext(context);
   //执行容器中的 ApplicationContextInitializer 包括spring.factories和通过三种方式自定义的
   applyInitializers(context);
   //向各个监听器发送容器已经准备好的事件
   listeners.contextPrepared(context);
   if (this.logStartupInfo) {
      logStartupInfo(context.getParent() == null);
      logStartupProfileInfo(context);
   }
   // Add boot specific singleton beans
   ConfigurableListableBeanFactory beanFactory = context.getBeanFactory();
   beanFactory.registerSingleton("springApplicationArguments", applicationArguments);
   if (printedBanner != null) {
      beanFactory.registerSingleton("springBootBanner", printedBanner);
   }
   if (beanFactory instanceof DefaultListableBeanFactory) {
      ((DefaultListableBeanFactory) beanFactory)
            .setAllowBeanDefinitionOverriding(this.allowBeanDefinitionOverriding);
   }
   if (this.lazyInitialization) {
      context.addBeanFactoryPostProcessor(new LazyInitializationBeanFactoryPostProcessor());
   }
   // Load the sources,加载启动类
   Set<Object> sources = getAllSources();
   Assert.notEmpty(sources, "Sources must not be empty");
   //加载我们的启动类,将启动类注入容器
   load(context, sources.toArray(new Object[0]));
   //发布容器已加载事件
   listeners.contextLoaded(context);
}
首先看这行Set sources = getAllSources(); 在getAllSources()中拿到了我们的启动类。
重点分析一下load(context, sources.toArray(new Object[0]));这个方法:
protected void load(ApplicationContext context, Object[] sources) {
   if (logger.isDebugEnabled()) {
      logger.debug("Loading source " + StringUtils.arrayToCommaDelimitedString(sources));
   }
   BeanDefinitionLoader loader = createBeanDefinitionLoader(getBeanDefinitionRegistry(context), sources);
   if (this.beanNameGenerator != null) {
      loader.setBeanNameGenerator(this.beanNameGenerator);
   }
   if (this.resourceLoader != null) {
      loader.setResourceLoader(this.resourceLoader);
   }
   if (this.environment != null) {
      loader.setEnvironment(this.environment);
   }
   loader.load();
}
getBeanDefinitionRegistry()
private BeanDefinitionRegistry getBeanDefinitionRegistry(ApplicationContext context) {
   if (context instanceof BeanDefinitionRegistry) {
      return (BeanDefinitionRegistry) context;
   }
   if (context instanceof AbstractApplicationContext) {
      return (BeanDefinitionRegistry) ((AbstractApplicationContext) context).getBeanFactory();
   }
   throw new IllegalStateException("Could not locate BeanDefinitionRegistry");
}
这里将我们前文创建的上下文强转为BeanDefinitionRegistry,他们之间是有继承关系的。BeanDefinitionRegistry定义了很重要的方法registerBeanDefinition(),该方法将BeanDefinition注册进DefaultListableBeanFactory容器的beanDefinitionMap中。
createBeanDefinitionLoader()
BeanDefinitionLoader(BeanDefinitionRegistry registry, Object... sources) {
   Assert.notNull(registry, "Registry must not be null");
   Assert.notEmpty(sources, "Sources must not be empty");
   this.sources = sources;
   //注解形式的Bean定义读取器 比如:@Configuration @Bean @Component @Controller @Service等等
   this.annotatedReader = new AnnotatedBeanDefinitionReader(registry);
   //XML形式的Bean定义读取器
   this.xmlReader = new XmlBeanDefinitionReader(registry);
   if (isGroovyPresent()) {
      this.groovyReader = new GroovyBeanDefinitionReader(registry);
   }
   //类路径扫描器
   this.scanner = new ClassPathBeanDefinitionScanner(registry);
   //扫描器添加排除过滤器
   this.scanner.addExcludeFilter(new ClassExcludeFilter(sources));
}
先记住上面的三个属性,上面三个属性在,BeanDefinition的Resource定位,和BeanDefinition的注册中起到了很重要的作用。
loader.load();
private int load(Object source) {
   Assert.notNull(source, "Source must not be null");
   if (source instanceof Class<?>) {
      return load((Class<?>) source);
   }
   if (source instanceof Resource) {
      return load((Resource) source);
   }
   if (source instanceof Package) {
      return load((Package) source);
   }
   if (source instanceof CharSequence) {
      return load((CharSequence) source);
   }
   throw new IllegalArgumentException("Invalid source type " + source.getClass());
}
当前我们的主类会按Class加载。继续跟进load()方法
private int load(Class<?> source) {
   if (isGroovyPresent() && GroovyBeanDefinitionSource.class.isAssignableFrom(source)) {
      // Any GroovyLoaders added in beans{} DSL can contribute beans here
      GroovyBeanDefinitionSource loader = BeanUtils.instantiateClass(source, GroovyBeanDefinitionSource.class);
      load(loader);
   }
   if (isComponent(source)) {
      //将 启动类的 BeanDefinition注册进 beanDefinitionMap
      this.annotatedReader.register(source);
      return 1;
   }
   return 0;
}
isComponent(source)判断主类是不是存在@Component注解,主类@SpringBootApplication是一个组合注解,包含@Component。
this.annotatedReader.register(source)
private <T> void doRegisterBean(Class<T> annotatedClass, @Nullable Supplier<T>instanceSupplier, @Nullable String name,
@Nullable Class<? extends Annotation>[] qualifiers,
BeanDefinitionCustomizer... definitionCustomizers) {
BeanDefinitionReaderUtils.registerBeanDefinition(definitionHolder, this.registry);
//将指定的类 封装为AnnotatedGenericBeanDefinition
AnnotatedGenericBeanDefinition abd = new
AnnotatedGenericBeanDefinition(annotatedClass);
if (this.conditionEvaluator.shouldSkip(abd.getMetadata())) {
    return;
}
abd.setInstanceSupplier(instanceSupplier);
// 获取该类的 scope 属性
ScopeMetadata scopeMetadata =
this.scopeMetadataResolver.resolveScopeMetadata(abd);
abd.setScope(scopeMetadata.getScopeName());
String beanName = (name != null ? name :
this.beanNameGenerator.generateBeanName(abd, this.registry));
AnnotationConfigUtils.processCommonDefinitionAnnotations(abd);
if (qualifiers != null) {
    for (Class<? extends Annotation> qualifier : qualifiers) {
        if (Primary.class == qualifier) {
            abd.setPrimary(true);
        } else if (Lazy.class == qualifier) {
            abd.setLazyInit(true);
        } else {
            abd.addQualifier(new     AutowireCandidateQualifier(qualifier));
        }
    }
}
for (BeanDefinitionCustomizer customizer : definitionCustomizers){
    customizer.customize(abd);
}
BeanDefinitionHolder definitionHolder = new BeanDefinitionHolder(abd,beanName);
definitionHolder =
AnnotationConfigUtils.applyScopedProxyMode(scopeMetadata,definitionHolder,this.registry);
// 将该BeanDefinition注册到IoC容器的beanDefinitionMap中
BeanDefinitionReaderUtils.registerBeanDefinition(definitionHolder,
this.registry);
}
在该方法中将主类封装成AnnotatedGenericBeanDefinition。
BeanDefinitionReaderUtils.registerBeanDefinition(definitionHolder, this.registry);
方法将BeanDefinition注册进beanDefinitionMap
public static void registerBeanDefinition(BeanDefinitionHolder definitionHolder, BeanDefinitionRegistry registry) throws BeanDefinitionStoreException {
    // Register bean definition under primary name.
    // primary name 其实就是id吧
    String beanName = definitionHolder.getBeanName();
    registry.registerBeanDefinition(beanName,
    definitionHolder.getBeanDefinition());
    // Register aliases for bean name, if any.
    // 然后就是注册别名
    String[] aliases = definitionHolder.getAliases();
    if (aliases != null) {
        for (String alias : aliases) {
            registry.registerAlias(beanName, alias);
        }
    }
}
继续跟进registerBeanDefinition()方法。
@Override
public void registerBeanDefinition(String beanName, BeanDefinition beanDefinition) throws BeanDefinitionStoreException {
    Assert.hasText(beanName, "Bean name must not be empty");
    Assert.notNull(beanDefinition, "BeanDefinition must not be null");
    if (beanDefinition instanceof AbstractBeanDefinition) {
        try {
            // 最后一次校验了
            // 对bean的Overrides进行校验,还不知道会在哪处理这些overrides
            ((AbstractBeanDefinition) beanDefinition).validate();
        } catch (BeanDefinitionValidationException ex) {
            throw new BeanDefinitionStoreException(beanDefinition.getResourceDescription(), beanName, "Validation of bean definition failed", ex);
        }
    }
    // 判断是否存在重复名字的bean,之后看允不允许override
    // 以前使用synchronized实现互斥访问,现在采用ConcurrentHashMap
    BeanDefinition existingDefinition = this.beanDefinitionMap.get(beanName);
    if (existingDefinition != null) {
        //如果该类不允许 Overriding 直接抛出异常
        if (!isAllowBeanDefinitionOverriding()) {
            throw new BeanDefinitionStoreException(beanDefinition.getResourceDescription(), beanName, "Cannot register bean definition [" + beanDefinition + "] for bean '" + beanName + "': There is already [" + existingDefinition + "] bound.");
        } else if (existingDefinition.getRole() < beanDefinition.getRole()) {
            // e.g. was ROLE_APPLICATION, now overriding with ROLE_SUPPORT or ROLE_INFRASTRUCTURE
            if (logger.isWarnEnabled()) {
                logger.warn("Overriding user-defined bean definition for bean '" + beanName + "' with a framework-generated bean definition: replacing [" + existingDefinition + "] with [" + beanDefinition + "]");
            }
        } else if (!beanDefinition.equals(existingDefinition)) {
            if (logger.isInfoEnabled()) {
                logger.info("Overriding bean definition for bean '" + beanName + "' with a different definition: replacing [" + existingDefinition + "] with [" + beanDefinition + "]");
            }
        } else {
            if (logger.isDebugEnabled()) {
                logger.debug("Overriding bean definition for bean '" + beanName + "' with an equivalent definition: replacing [" + existingDefinition + "] with [" + beanDefinition + "]");
            }
        }
        //注册进beanDefinitionMap
        this.beanDefinitionMap.put(beanName, beanDefinition);
    } else {
        if (hasBeanCreationStarted()) {
            // Cannot modify startup-time collection elements anymore (for stable iteration)
            synchronized (this.beanDefinitionMap) {
                this.beanDefinitionMap.put(beanName, beanDefinition);
                List<String> updatedDefinitions = new ArrayList<>
                (this.beanDefinitionNames.size() + 1);
                updatedDefinitions.addAll(this.beanDefinitionNames);
                updatedDefinitions.add(beanName);
                this.beanDefinitionNames = updatedDefinitions;
                if (this.manualSingletonNames.contains(beanName)) {
                    Set<String> updatedSingletons = new LinkedHashSet<>(this.manualSingletonNames);
                    updatedSingletons.remove(beanName);
                    this.manualSingletonNames = updatedSingletons;
                }
            }
        } else {
            // Still in startup registration phase
            //如果仍处于启动注册阶段,注册进beanDefinitionMap
            this.beanDefinitionMap.put(beanName, beanDefinition);
            this.beanDefinitionNames.add(beanName);
            this.manualSingletonNames.remove(beanName);
        }
        this.frozenBeanDefinitionNames = null;
    }
    if (existingDefinition != null || containsSingleton(beanName)) {
        resetBeanDefinition(beanName);
    }
}
最终来到DefaultListableBeanFactory类的registerBeanDefinition()方法,DefaultListableBeanFactory类还熟悉吗?相信大家一定非常熟悉这个类了。DefaultListableBeanFactory是IoC容器的具体产品。
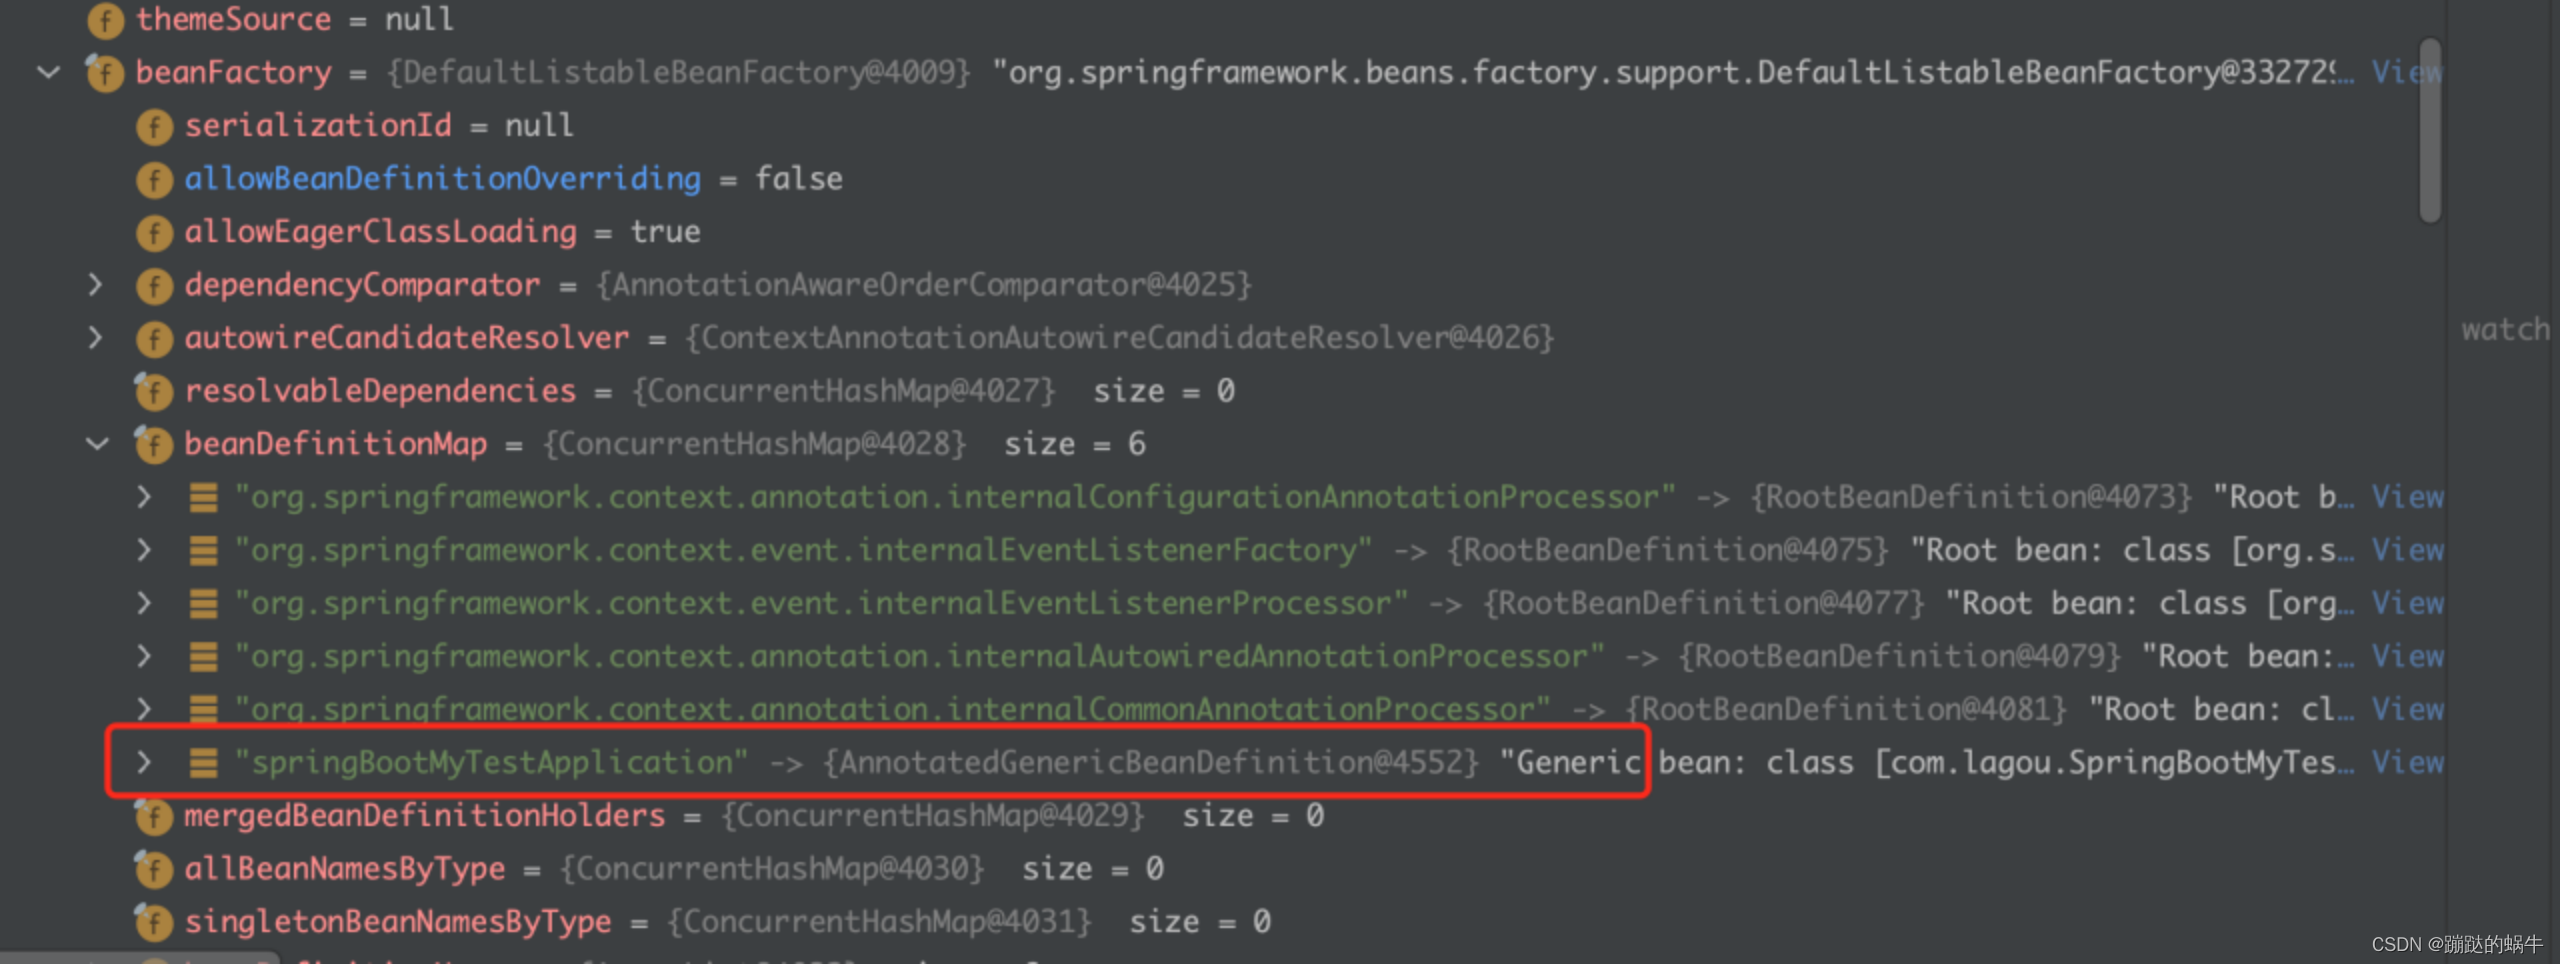
debug到prepareContext()方法,可以看到,此时启动类还没有注册进来: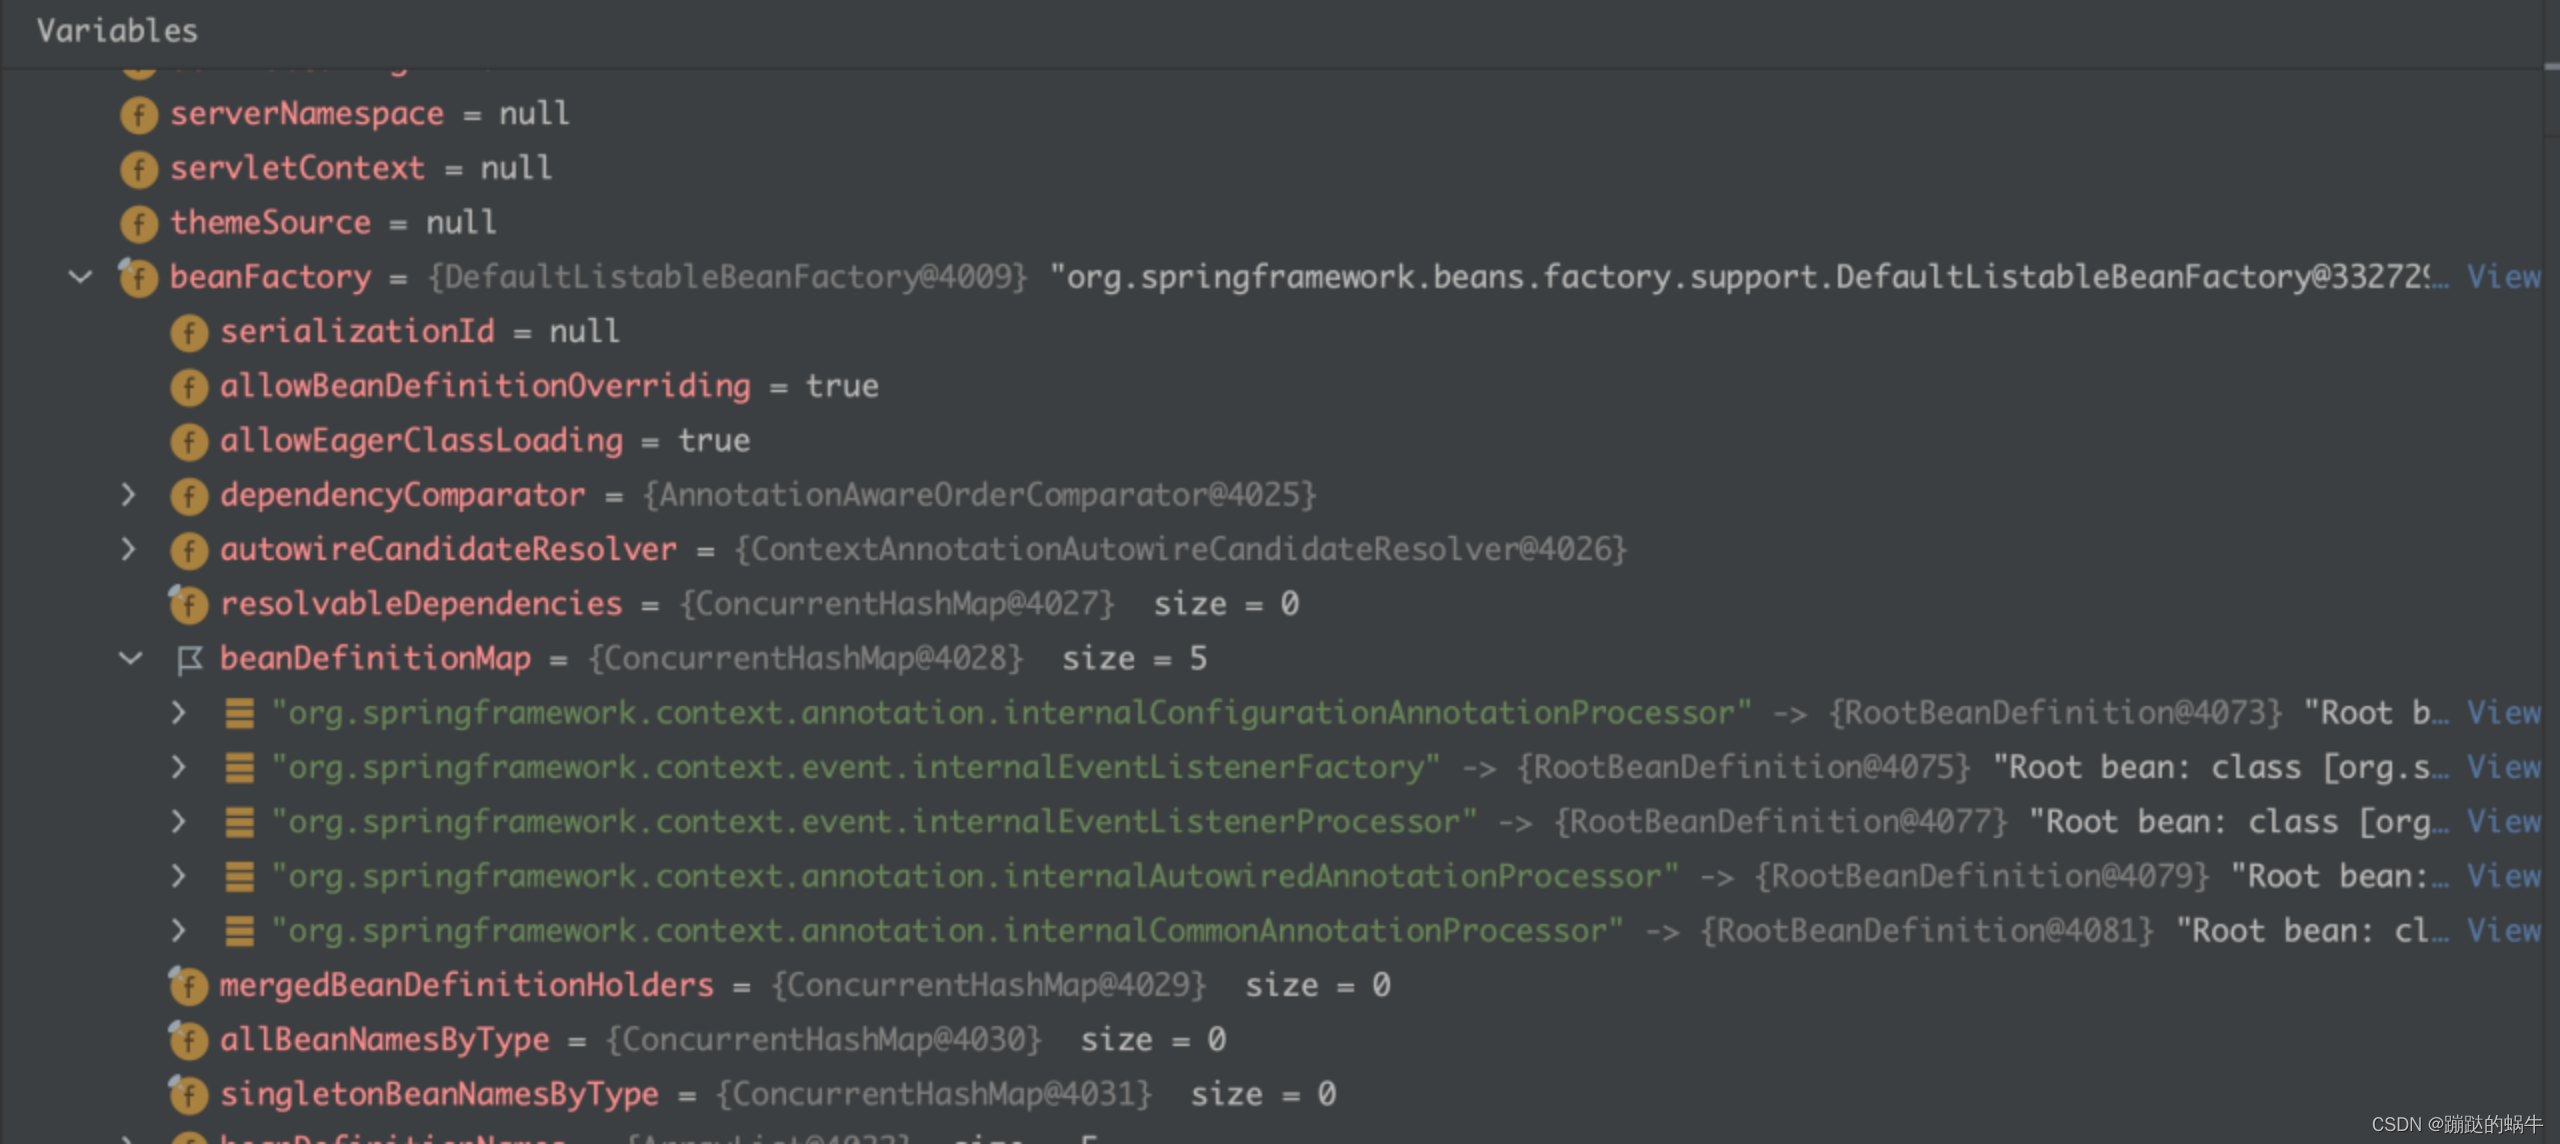
执行prepareContext方法后,启动类的BeanDefinition已经注册进来了。
OK,到这里启动流程的第四步就算讲完了,其实在这没必要讲这么细,因为启动类BeanDefinition的注册流程和后面我们自定义的BeanDefinition的注册流程是一样的。
5 刷新应用上下文(IOC容器的初始化过程)
首先我们要知道到IoC容器的初始化过程,主要分下面三步:
1 BeanDefinition的Resource定位
2 BeanDefinition的载入
3 向IoC容器注册BeanDefinition
接下来我们主要从refresh()方法中总结IoC容器的初始化过程。从run方法的,refreshContext()方法一路跟下去,最终来到AbstractApplicationContext类的refresh()方法。
@Override
public void refresh() throws BeansException, IllegalStateException {
    synchronized (this.startupShutdownMonitor) {
        // Prepare this context for refreshing.
        // 刷新上下文环境
        prepareRefresh();
        // Tell the subclass to refresh the internal bean factory.
        // 这里是在子类中启动 refreshBeanFactory() 的地方
        ConfigurableListableBeanFactory beanFactory = obtainFreshBeanFactory();
        // Prepare the bean factory for use in this context.
        // 准备bean工厂,以便在此上下文中使用
        prepareBeanFactory(beanFactory);
        try {
            // Allows post-processing of the bean factory in contextsubclasses.
            // 设置 beanFactory 的后置处理
            postProcessBeanFactory(beanFactory);
            // Invoke factory processors registered as beans in the context.
            // 调用 BeanFactory 的后处理器,这些处理器是在Bean 定义中向容器注册的
            invokeBeanFactoryPostProcessors(beanFactory);
            // Register bean processors that intercept bean creation.
            // 注册Bean的后处理器,在Bean创建过程中调用
            registerBeanPostProcessors(beanFactory);
            // Initialize message source for this context.
            // 对上下文中的消息源进行初始化
            initMessageSource();
            // Initialize event multicaster for this context.
            // 初始化上下文中的事件机制
            initApplicationEventMulticaster();
            // Initialize other special beans in specific context subclasses.
            // 初始化其他特殊的Bean
            onRefresh();
            // Check for listener beans and register them.
            // 检查监听Bean并且将这些监听Bean向容器注册
            registerListeners();
            // Instantiate all remaining (non-lazy-init) singletons.
            // 实例化所有的(non-lazy-init)单件
            finishBeanFactoryInitialization(beanFactory);
            // Last step: publish corresponding event.
            // 发布容器事件,结束Refresh过程
            finishRefresh();
        } catch (BeansException ex) {
            if (logger.isWarnEnabled()) {
                logger.warn("Exception encountered during context initialization - " + "cancelling refresh attempt: " + ex);
            }
            // Destroy already created singletons to avoid dangling resources.
            destroyBeans();
            // Reset 'active' flag.
            cancelRefresh(ex);
            // Propagate exception to caller.
            throw ex;
        } finally {
            // Reset common introspection caches in Spring's core, since we might not ever need metadata for singleton beans anymore...
            resetCommonCaches();
        }
    }
}
这一部分涉及到了Spring初始化容器的代码,这里只介绍一下主要的方法。
obtainFreshBeanFactory()
在启动流程的第三步:初始化应用上下文。中我们创建了应用的上下文,并触发了GenericApplicationContext类的构造方法如下所示,创建了beanFactory,也就是创建了DefaultListableBeanFactory类。
public GenericApplicationContext() {
    this.beanFactory = new DefaultListableBeanFactory();
}
关于obtainFreshBeanFactory()方法,其实就是拿到我们之前创建的beanFactory。
protected ConfigurableListableBeanFactory obtainFreshBeanFactory() {
   // 刷新BeanFactory
   refreshBeanFactory();
   // 获取BeanFactory
   return getBeanFactory();
}
从上面代码可知,在该方法中主要做了三个工作,刷新beanFactory,获取beanFactory,返回beanFactory。
prepareBeanFactory(beanFactory)
从字面意思上去理解,就是准备BeanFactory。
postProcessBeanFactory(beanFactory)
向上下文中添加了一系列的Bean的后置处理器。后置处理器工作的时机是在所有的beanDenifition加载完成之后,bean实例化之前执行。简单来说Bean的后置处理器可以修改BeanDefinition的属性信息。
invokeBeanFactoryPostProcessors(beanFactory)-重点要分析的方法
IoC容器的初始化过程包括三个步骤,在invokeBeanFactoryPostProcessors()方法中完成了IoC容器初始化过程的三个步骤。
- 第一步:Resource定位
在SpringBoot中,我们都知道他的包扫描是从主类所在的包开始扫描的,prepareContext()方法中,会先将主类解析成BeanDefinition,然后在refresh()方法的invokeBeanFactoryPostProcessors()方法中解析主类的BeanDefinition获取basePackage的路径。这样就完成了定位的过程。其次SpringBoot的各种starter是通过SPI扩展机制实现的自动装配,SpringBoot的自动装配同样也是在invokeBeanFactoryPostProcessors()方法中实现的。还有一种情况,在SpringBoot中有很多的@EnableXXX注解,细心点进去看的应该就知道其底层是@Import注解,在invokeBeanFactoryPostProcessors()方法中也实现了对该注解指定的配置类的定位加载。
常规的在SpringBoot中有三种实现定位,第一个是主类所在包的,第二个是SPI扩展机制实现的自动装配(比如各种starter),第三种就是@Import注解指定的类。(对于非常规的不说了)。 - 第二步:BeanDefinition的载入
在第一步中说了三种Resource的定位情况,定位后紧接着就是BeanDefinition的分别载入。所谓的载入就是通过上面的定位得到的basePackage,SpringBoot会将该路径拼接成:classpath:com/lagou/**/.class这样的形式,然后一个叫做XPathMatchingResourcePatternResolver的类会将该路径下所有的.class文件都加载进来,然后遍历判断是不是有@Component注解,如果有的话,就是我们要装载的BeanDefinition。大致过程就是这样的了。
TIPS:
@Configuration,@Controller,@Service等注解底层都是@Component注解,只不过包装了一层罢了。
- 第三个过程:注册BeanDefinition
这个过程通过调用上文提到的BeanDefinitionRegister接口的实现来完成。这个注册过程把载入过程中解析得到的BeanDefinition向IoC容器进行注册。通过上文的分析,我们可以看到,在IoC容器中将BeanDefinition注入到一个ConcurrentHashMap中,IoC容器就是通过这个HashMap来持有这些BeanDefinition数据的。比如DefaultListableBeanFactory 中的beanDefinitionMap属性。
OK,总结完了,接下来我们通过代码看看具体是怎么实现的。
// AbstractApplicationContext类
protected void invokeBeanFactoryPostProcessors(ConfigurableListableBeanFactory beanFactory) {
   PostProcessorRegistrationDelegate.invokeBeanFactoryPostProcessors(beanFactory, getBeanFactoryPostProcessors());

   // Detect a LoadTimeWeaver and prepare for weaving, if found in the meantime
   // (e.g. through an @Bean method registered by ConfigurationClassPostProcessor)
   if (beanFactory.getTempClassLoader() == null && beanFactory.containsBean(LOAD_TIME_WEAVER_BEAN_NAME)) {
      beanFactory.addBeanPostProcessor(new LoadTimeWeaverAwareProcessor(beanFactory));
      beanFactory.setTempClassLoader(new ContextTypeMatchClassLoader(beanFactory.getBeanClassLoader()));
   }
}

// PostProcessorRegistrationDelegate类
public static void invokeBeanFactoryPostProcessors(
        ConfigurableListableBeanFactory beanFactory, List<BeanFactoryPostProcessor> beanFactoryPostProcessors) {
    // ...
    invokeBeanDefinitionRegistryPostProcessors(currentRegistryProcessors, registry);
    // ...
}
// PostProcessorRegistrationDelegate类
private static void invokeBeanDefinitionRegistryPostProcessors(
      Collection<? extends BeanDefinitionRegistryPostProcessor> postProcessors, BeanDefinitionRegistry registry) {

   for (BeanDefinitionRegistryPostProcessor postProcessor : postProcessors) {
      postProcessor.postProcessBeanDefinitionRegistry(registry);
   }
}
// ConfigurationClassPostProcessor类
@Override
public void postProcessBeanDefinitionRegistry(BeanDefinitionRegistry registry) {
   int registryId = System.identityHashCode(registry);
   if (this.registriesPostProcessed.contains(registryId)) {
      throw new IllegalStateException(
            "postProcessBeanDefinitionRegistry already called on this post-processor against " + registry);
   }
   if (this.factoriesPostProcessed.contains(registryId)) {
      throw new IllegalStateException(
            "postProcessBeanFactory already called on this post-processor against " + registry);
   }
   this.registriesPostProcessed.add(registryId);

   processConfigBeanDefinitions(registry);
}
// ConfigurationClassPostProcessor类
public void processConfigBeanDefinitions(BeanDefinitionRegistry registry) {
    // ...
    do {
        // ...
        parser.parse(candidates);
        parser.validate();
        // ...
    }
    // ...
}
一路跟踪调用栈,来到ConfigurationClassParser类的parse()方法。
// ConfigurationClassParser类
public void parse(Set<BeanDefinitionHolder> configCandidates) {
   for (BeanDefinitionHolder holder : configCandidates) {
      BeanDefinition bd = holder.getBeanDefinition();
      try {
          // 如果是SpringBoot项目进来的,bd其实就是前面主类封装成的AnnotatedGenericBeanDefinition(AnnotatedBeanDefinition接口的实现类)
         if (bd instanceof AnnotatedBeanDefinition) {
            parse(((AnnotatedBeanDefinition) bd).getMetadata(), holder.getBeanName());
         }
         else if (bd instanceof AbstractBeanDefinition && ((AbstractBeanDefinition) bd).hasBeanClass()) {
            parse(((AbstractBeanDefinition) bd).getBeanClass(), holder.getBeanName());
         }
         else {
            parse(bd.getBeanClassName(), holder.getBeanName());
         }
      }
      catch (BeanDefinitionStoreException ex) {
         throw ex;
      }
      catch (Throwable ex) {
         throw new BeanDefinitionStoreException(
               "Failed to parse configuration class [" + bd.getBeanClassName() + "]", ex);
      }
   }
   // 加载默认的配置---》(对springboot项目来说这里就是自动装配的入口了)
   this.deferredImportSelectorHandler.process();
}
继续沿着parse(((AnnotatedBeanDefinition) bd).getMetadata(), holder.getBeanName());方法跟下去:
//ConfigurationClassParser类
protected void processConfigurationClass(ConfigurationClass configClass, Predicate<String> filter) throws IOException {
    // ...
    // Recursively process the configuration class and its superclass hierarchy.
    // 递归地处理配置类及其父类层次结构
    SourceClass sourceClass = asSourceClass(configClass, filter);
    do {
        // 递归处理Bean,如果有父类,递归处理,直到顶层父类
        sourceClass = doProcessConfigurationClass(configClass, sourceClass, filter);
    }
    while (sourceClass != null);

    this.configurationClasses.put(configClass, configClass);
}
//ConfigurationClassParser类
protected final SourceClass doProcessConfigurationClass(
      ConfigurationClass configClass, SourceClass sourceClass, Predicate<String> filter)
      throws IOException {
   if (configClass.getMetadata().isAnnotated(Component.class.getName())) {
      // Recursively process any member (nested) classes first
      // 首先递归处理内部类,(SpringBoot项目的主类一般没有内部类)
      processMemberClasses(configClass, sourceClass, filter);
   }
   // Process any @PropertySource annotations
   // 针对 @PropertySource 注解的属性配置处理
   for (AnnotationAttributes propertySource : AnnotationConfigUtils.attributesForRepeatable(
         sourceClass.getMetadata(), PropertySources.class,
     org.springframework.context.annotation.PropertySource.class)) {
      if (this.environment instanceof ConfigurableEnvironment) {
         processPropertySource(propertySource);
      }
      else {
         logger.info("Ignoring @PropertySource annotation on [" + sourceClass.getMetadata().getClassName() +
               "]. Reason: Environment must implement ConfigurableEnvironment");
      }
   }
   // Process any @ComponentScan annotations
   // 根据 @ComponentScan 注解,扫描项目中的Bean(SpringBoot 启动类上有该注解)
   Set<AnnotationAttributes> componentScans = AnnotationConfigUtils.attributesForRepeatable(
         sourceClass.getMetadata(), ComponentScans.class, ComponentScan.class);
   if (!componentScans.isEmpty() &&
 !this.conditionEvaluator.shouldSkip(sourceClass.getMetadata(), ConfigurationPhase.REGISTER_BEAN)) {
      for (AnnotationAttributes componentScan : componentScans) {
         // The config class is annotated with @ComponentScan -> perform the scan immediately
         // 立即执行扫描,(SpringBoot项目为什么是从主类所在的包扫描,这就是关键了)
         Set<BeanDefinitionHolder> scannedBeanDefinitions =
               this.componentScanParser.parse(componentScan, sourceClass.getMetadata().getClassName());
         // Check the set of scanned definitions for any further config classes and parse recursively if needed
         for (BeanDefinitionHolder holder : scannedBeanDefinitions) {
            BeanDefinition bdCand = holder.getBeanDefinition().getOriginatingBeanDefinition();
            if (bdCand == null) {
               bdCand = holder.getBeanDefinition();
            }
// 检查是否是ConfigurationClass(是否有configuration/component两个注解),如果是,递归查找该类相关联的配置类。
// 所谓相关的配置类,比如@Configuration中的@Bean定义的bean。或者在有@Component注解的类上继续存在@Import注解。
 if(ConfigurationClassUtils.checkConfigurationClassCandidate(bdCand, this.metadataReaderFactory)) {
               parse(bdCand.getBeanClassName(), holder.getBeanName());
            }
         }
      }
   }
   // Process any @Import annotations
   //递归处理 @Import 注解(SpringBoot项目中经常用的各种@Enable*** 注解基本都是封装的@Import)
   processImports(configClass, sourceClass, getImports(sourceClass), filter, true);
   // Process any @ImportResource annotations
   AnnotationAttributes importResource =
 AnnotationConfigUtils.attributesFor(sourceClass.getMetadata(), ImportResource.class);
   if (importResource != null) {
      String[] resources = importResource.getStringArray("locations");
      Class<? extends BeanDefinitionReader> readerClass = importResource.getClass("reader");
      for (String resource : resources) {
         String resolvedResource = this.environment.resolveRequiredPlaceholders(resource);
         configClass.addImportedResource(resolvedResource, readerClass);
      }
   }
   // Process individual @Bean methods
   Set<MethodMetadata> beanMethods = retrieveBeanMethodMetadata(sourceClass);
   for (MethodMetadata methodMetadata : beanMethods) {
      configClass.addBeanMethod(new BeanMethod(methodMetadata, configClass));
   }
   // Process default methods on interfaces
   processInterfaces(configClass, sourceClass);
   // Process superclass, if any
   if (sourceClass.getMetadata().hasSuperClass()) {
      String superclass = sourceClass.getMetadata().getSuperClassName();
      if (superclass != null && !superclass.startsWith("java") &&
            !this.knownSuperclasses.containsKey(superclass)) {
         this.knownSuperclasses.put(superclass, configClass);
         // Superclass found, return its annotation metadata and recurse
         return sourceClass.getSuperClass();
      }
   }
   // No superclass -> processing is complete
   return null;
}
我们大致说一下这个方法里面都干了什么
TIPS:
在以上代码的parse(bdCand.getBeanClassName(), holder.getBeanName());会进行递归调用,因为当Spring扫描到需要加载的类会进一步判断每一个类是否满足是@Component/@Configuration注解的类,如果满足会递归调用parse()方法,查找其相关的类。同样的processImports(configClass, sourceClass,getImports(sourceClass),true);通过@Import注解查找到的类同样也会递归查找其相关的类。两个递归在debug的时候会很乱,用文字叙述起来更让人难以理解,所以,我们只关注对主类的解析,及其类的扫描过程。
上面代码中 for (AnnotationAttributes propertySource :AnnotationConfigUtils.attributesForRepeatable(… 获取主类上的@PropertySource注解),解析该注解并将该注解指定的properties配置文件中的值存储到Spring的 Environment中,Environment接口提供方法去读取配置文件中的值,参数是properties文件中定义的key值。Set componentScans = AnnotationConfigUtils.attributesForRepeatable(sourceClass.getMetadata(), ComponentScans.class, ComponentScan.class); 解析主类上的@ComponentScan注解,后面的代码将会解析该注解并进行包扫描。processImports(configClass, sourceClass, getImports(sourceClass), true); 解析主类上的@Import注解,并加载该注解指定的配置类。
TIPS:
在spring中好多注解都是一层一层封装的,比如@EnableXXX,是对@Import注解的二次封装。
@SpringBootApplication注解
=@ComponentScan+@EnableAutoConfiguration+@Import+@Configuration+@Component。
@Controller,@Service等等是对@Component的二次封装。
@ComponentScan注解所标注类的解析和注册
Set<BeanDefinitionHolder> scannedBeanDefinitions =
      this.componentScanParser.parse(componentScan, sourceClass.getMetadata().getClassName());
进入该方法:
// ComponentScanAnnotationParser类
public Set<BeanDefinitionHolder> parse(AnnotationAttributes componentScan, final String declaringClass) {
    ClassPathBeanDefinitionScanner scanner = new ClassPathBeanDefinitionScanner(this.registry,
            componentScan.getBoolean("useDefaultFilters"), this.environment, this.resourceLoader);
    // ...
    if (basePackages.isEmpty()) {
    // 根据 declaringClass (如果是SpringBoot项目,则参数为主类的全路径名)
    basePackages.add(ClassUtils.getPackageName(declaringClass));
    }
    // ...
    // 根据basePackages扫描类
    return scanner.doScan(StringUtils.toStringArray(basePackages));
}
这里重点看一下根据declaringClass获取basePackages,验证一下:
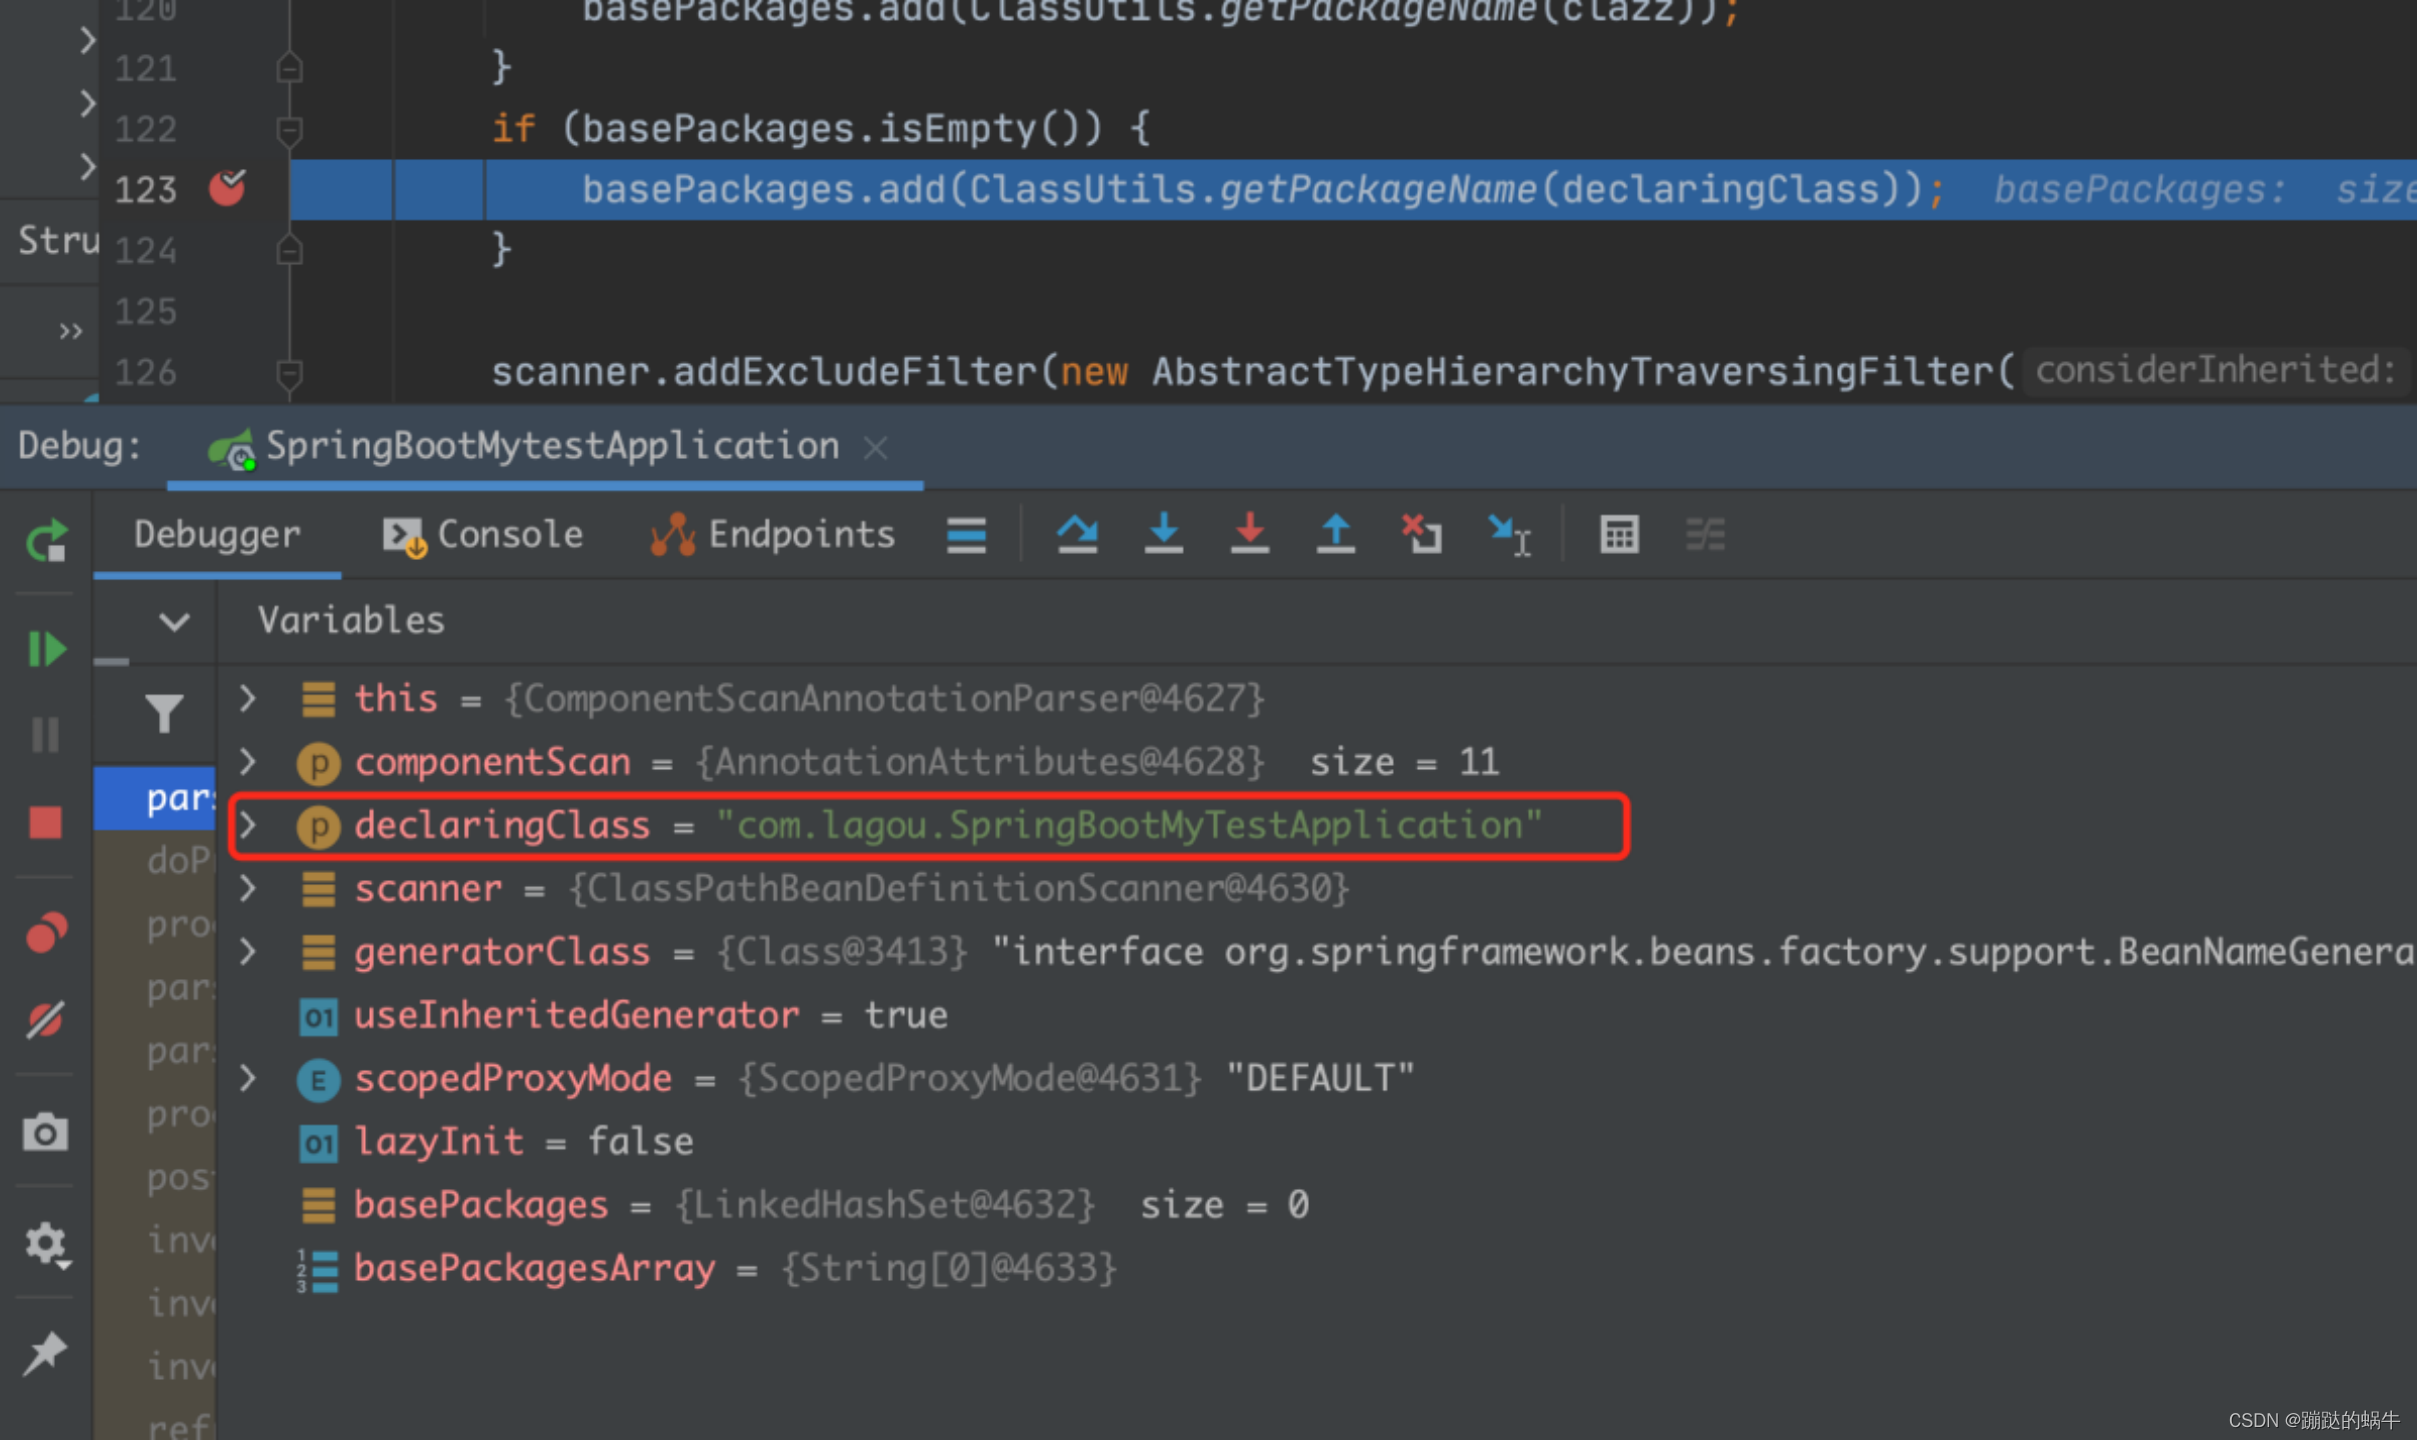
执行这一步后,看一下basePackages的值:
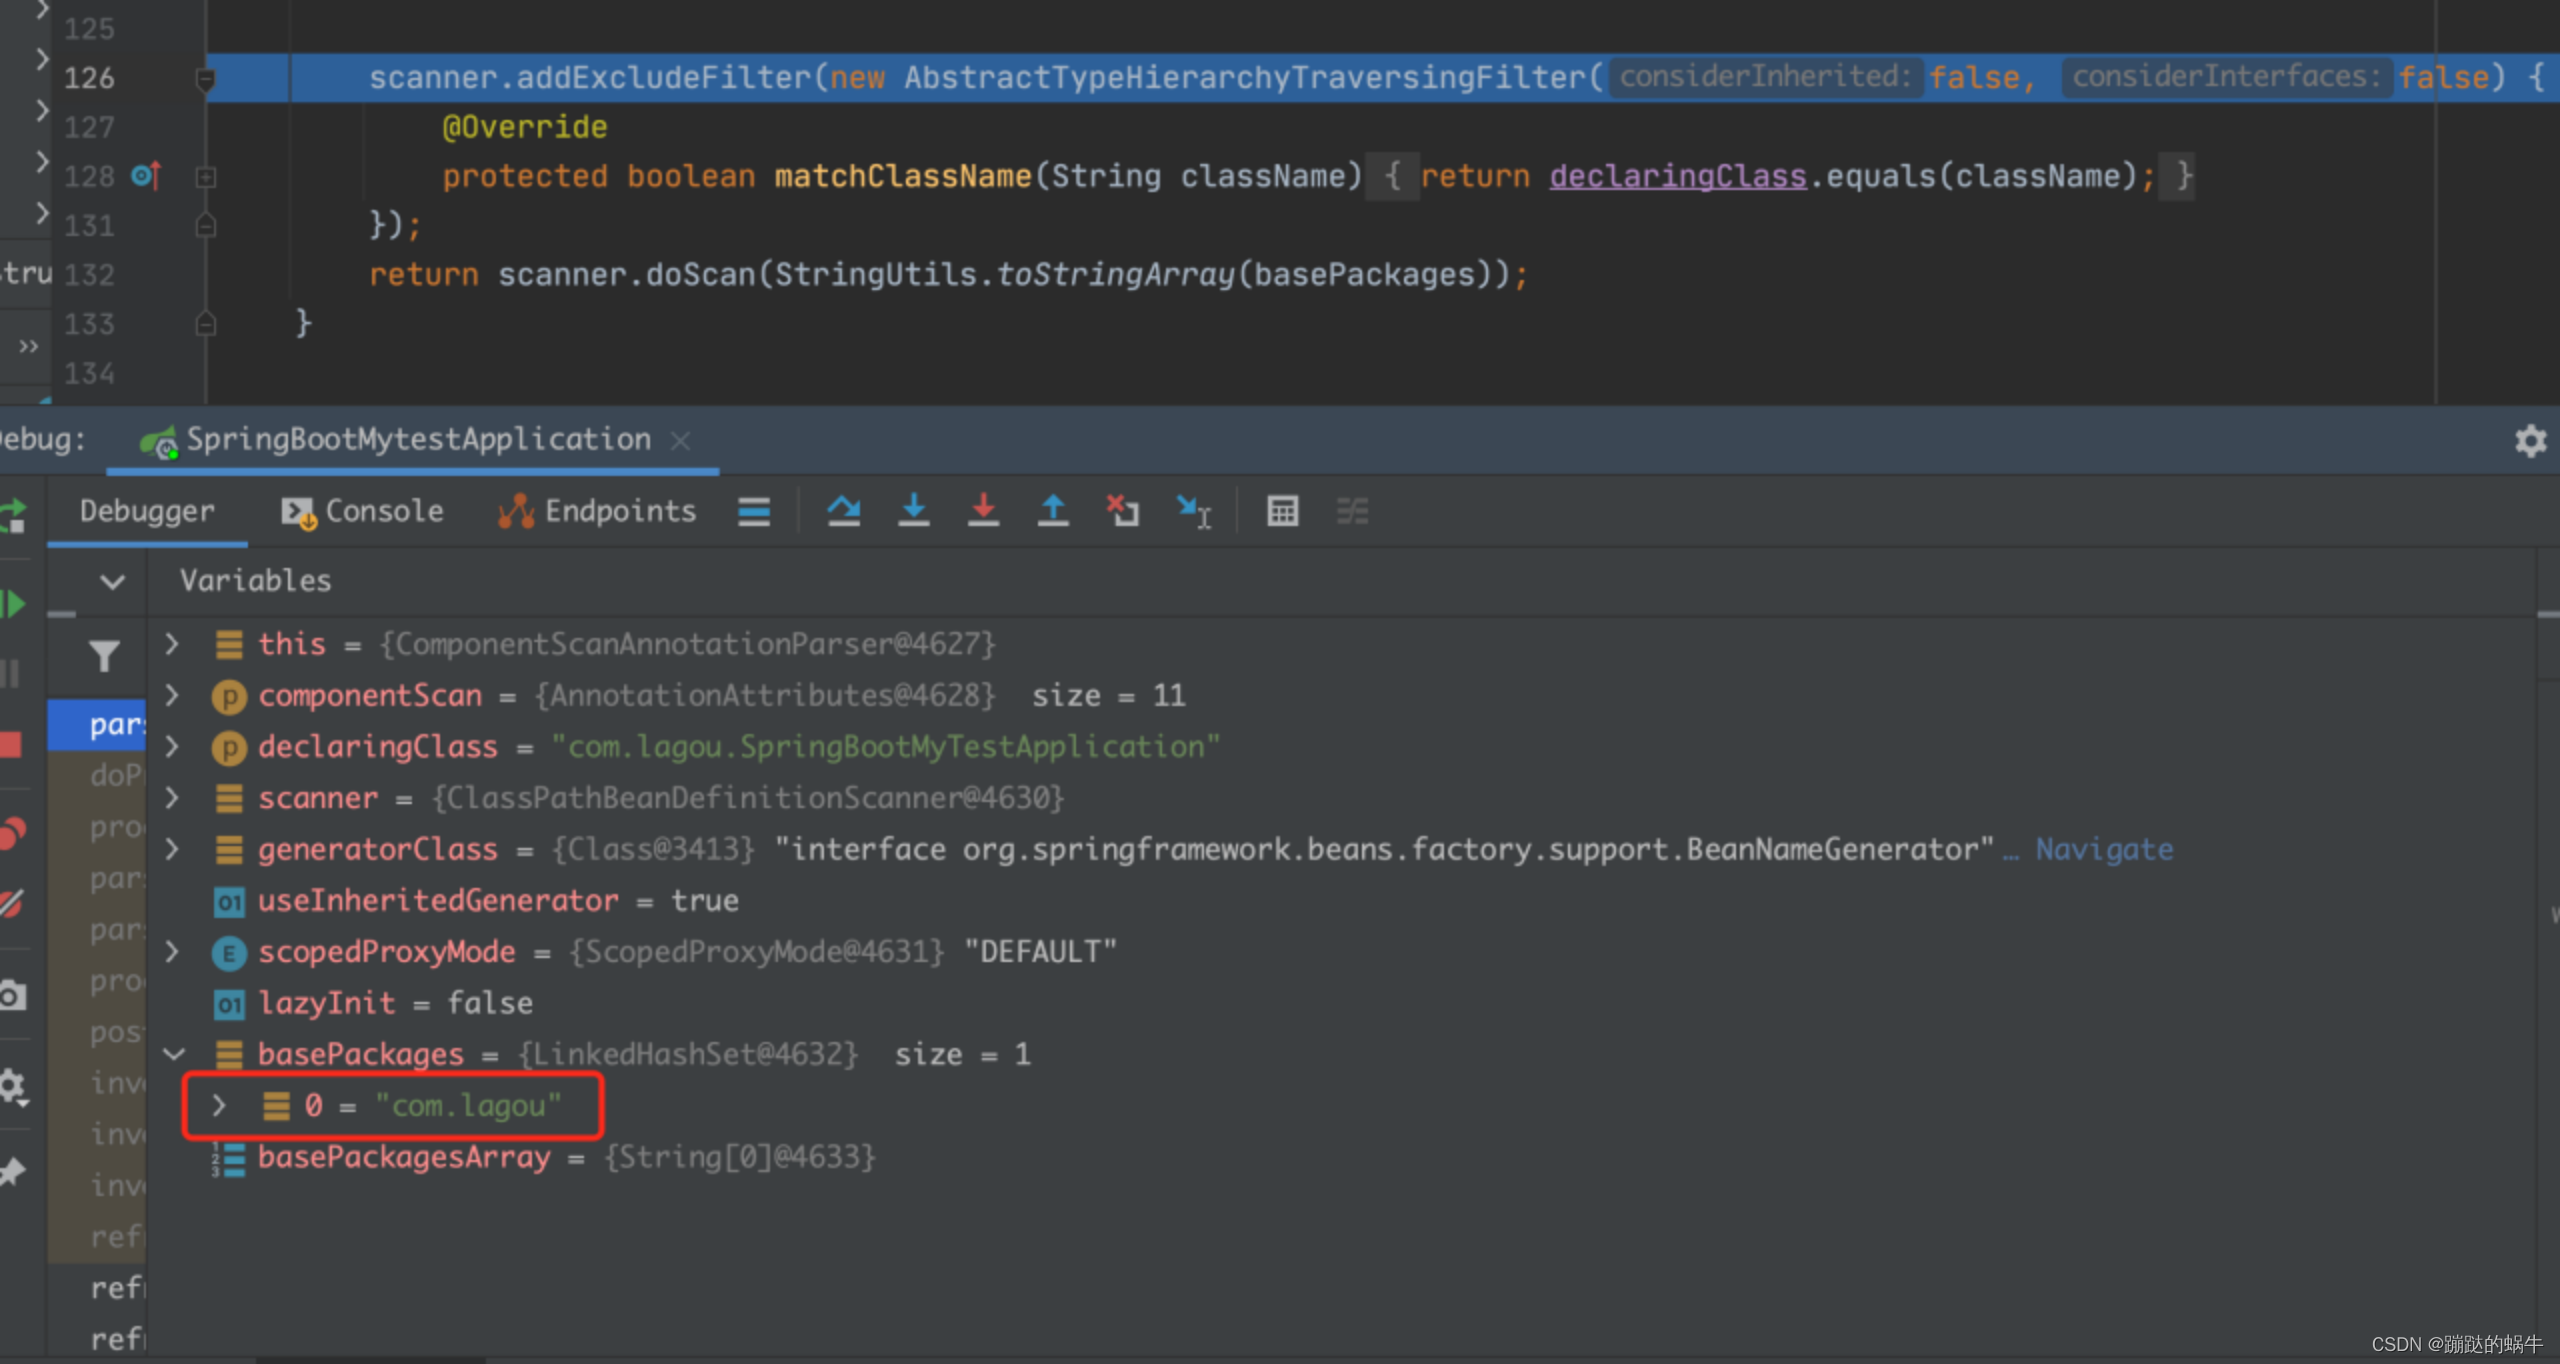
到这里呢IoC容器初始化三个步骤的第一步,Resource定位就完成了,成功定位到了主类所在的包。
接着往下看 return scanner.doScan(StringUtils.toStringArray(basePackages)); Spring是如何进行类扫描的。进入doScan()方法。
// ComponentScanAnnotationParser类
protected Set<BeanDefinitionHolder> doScan(String... basePackages) {
   Assert.notEmpty(basePackages, "At least one base package must be specified");
   Set<BeanDefinitionHolder> beanDefinitions = new LinkedHashSet<>();
   for (String basePackage : basePackages) {
      // 从指定的包中扫描需要装载的Bean
      Set<BeanDefinition> candidates = findCandidateComponents(basePackage);
      for (BeanDefinition candidate : candidates) {
         ScopeMetadata scopeMetadata = this.scopeMetadataResolver.resolveScopeMetadata(candidate);
         candidate.setScope(scopeMetadata.getScopeName());
         String beanName = this.beanNameGenerator.generateBeanName(candidate, this.registry);
         if (candidate instanceof AbstractBeanDefinition) {
            postProcessBeanDefinition((AbstractBeanDefinition) candidate, beanName);
         }
         if (candidate instanceof AnnotatedBeanDefinition) {
            AnnotationConfigUtils.processCommonDefinitionAnnotations((AnnotatedBeanDefinition) candidate);
         }
         if (checkCandidate(beanName, candidate)) {
            BeanDefinitionHolder definitionHolder = new BeanDefinitionHolder(candidate, beanName);
            definitionHolder =
                  AnnotationConfigUtils.applyScopedProxyMode(scopeMetadata, definitionHolder, this.registry);
            beanDefinitions.add(definitionHolder);
            // 将该 Bean 注册进 IoC容器(beanDefinitionMap)
            registerBeanDefinition(definitionHolder, this.registry);
         }
      }
   }
   return beanDefinitions;
}
这里有两个方法比较重要:
(1) Set candidates =findCandidateComponents(basePackage): 从basePackage中扫描类并解析成BeanDefinition。
// ClassPathScanningCandidateComponentProvider类
private Set<BeanDefinition> scanCandidateComponents(String basePackage) {
    Set<BeanDefinition> candidates = new LinkedHashSet<>();
    try {
        // 拼接扫描路径,比如:classpath*:com/lagou/**/*.class
        String packageSearchPath = ResourcePatternResolver.CLASSPATH_ALL_URL_PREFIX +
                resolveBasePackage(basePackage) + '/' + this.resourcePattern;
        // 从packageSearchPath路径中扫描所有的类
        Resource[] resources = getResourcePatternResolver().getResources(packageSearchPath);
        boolean traceEnabled = logger.isTraceEnabled();
        boolean debugEnabled = logger.isDebugEnabled();
        for (Resource resource : resources) {
            if (traceEnabled) {
                logger.trace("Scanning " + resource);
            }
            if (resource.isReadable()) {
                try {
                    MetadataReader metadataReader = getMetadataReaderFactory().getMetadataReader(resource);
                    // 判断该类是不是 @Component 注解标注的类,并且不是需要排除掉的类
                    if (isCandidateComponent(metadataReader)) {
                        //将该类封装成ScannedGenericBeanDefinition(BeanDefinition接口的实现类)类
                        ScannedGenericBeanDefinition sbd = new ScannedGenericBeanDefinition(metadataReader);
                        sbd.setSource(resource);
                        if (isCandidateComponent(sbd)) {
                            if (debugEnabled) {
                                logger.debug("Identified candidate component class: " + resource);
                            }
                            candidates.add(sbd);
                        }
                        else {
                            if (debugEnabled) {
                                logger.debug("Ignored because not a concrete top-level class: " + resource);
                            }
                        }
                    }
                    else {
                        if (traceEnabled) {
                            logger.trace("Ignored because not matching any filter: " + resource);
                        }
                    }
                }
                catch (Throwable ex) {
                    throw new BeanDefinitionStoreException(
                            "Failed to read candidate component class: " + resource, ex);
                }
            }
            else {
                if (traceEnabled) {
                    logger.trace("Ignored because not readable: " + resource);
                }
            }
        }
    }
    catch (IOException ex) {
        throw new BeanDefinitionStoreException("I/O failure during classpath scanning", ex);
    }
    return candidates;
}
(2) registerBeanDefinition(definitionHolder, this.registry):将该类注册进IoC容器。
protected void registerBeanDefinition(BeanDefinitionHolder
definitionHolder, BeanDefinitionRegistry registry) {
BeanDefinitionReaderUtils.registerBeanDefinition(definitionHolder,
registry);
}
OK,到这里IOC容器的初始化过程的三个步骤就梳理完了。当然这只是针对SpringBoot的包扫描的定位方式的BeanDefinition的定位,加载,和注册过程。
@Import注解的解析和注册过程
现在大家也应该知道了,各种@EnableXXX注解,很大一部分都是对@Import的二次封装(其实也是为了解耦,比如当@Import导入的类发生变化时,我们的业务系统也不需要改任何代码)。我们又要回到上文中的ConfigurationClassParser类的doProcessConfigurationClass方法:
processImports(configClass, sourceClass, getImports(sourceClass), filter, true);
上面解释过,我们只针对主类进行分析,因为这里有递归。
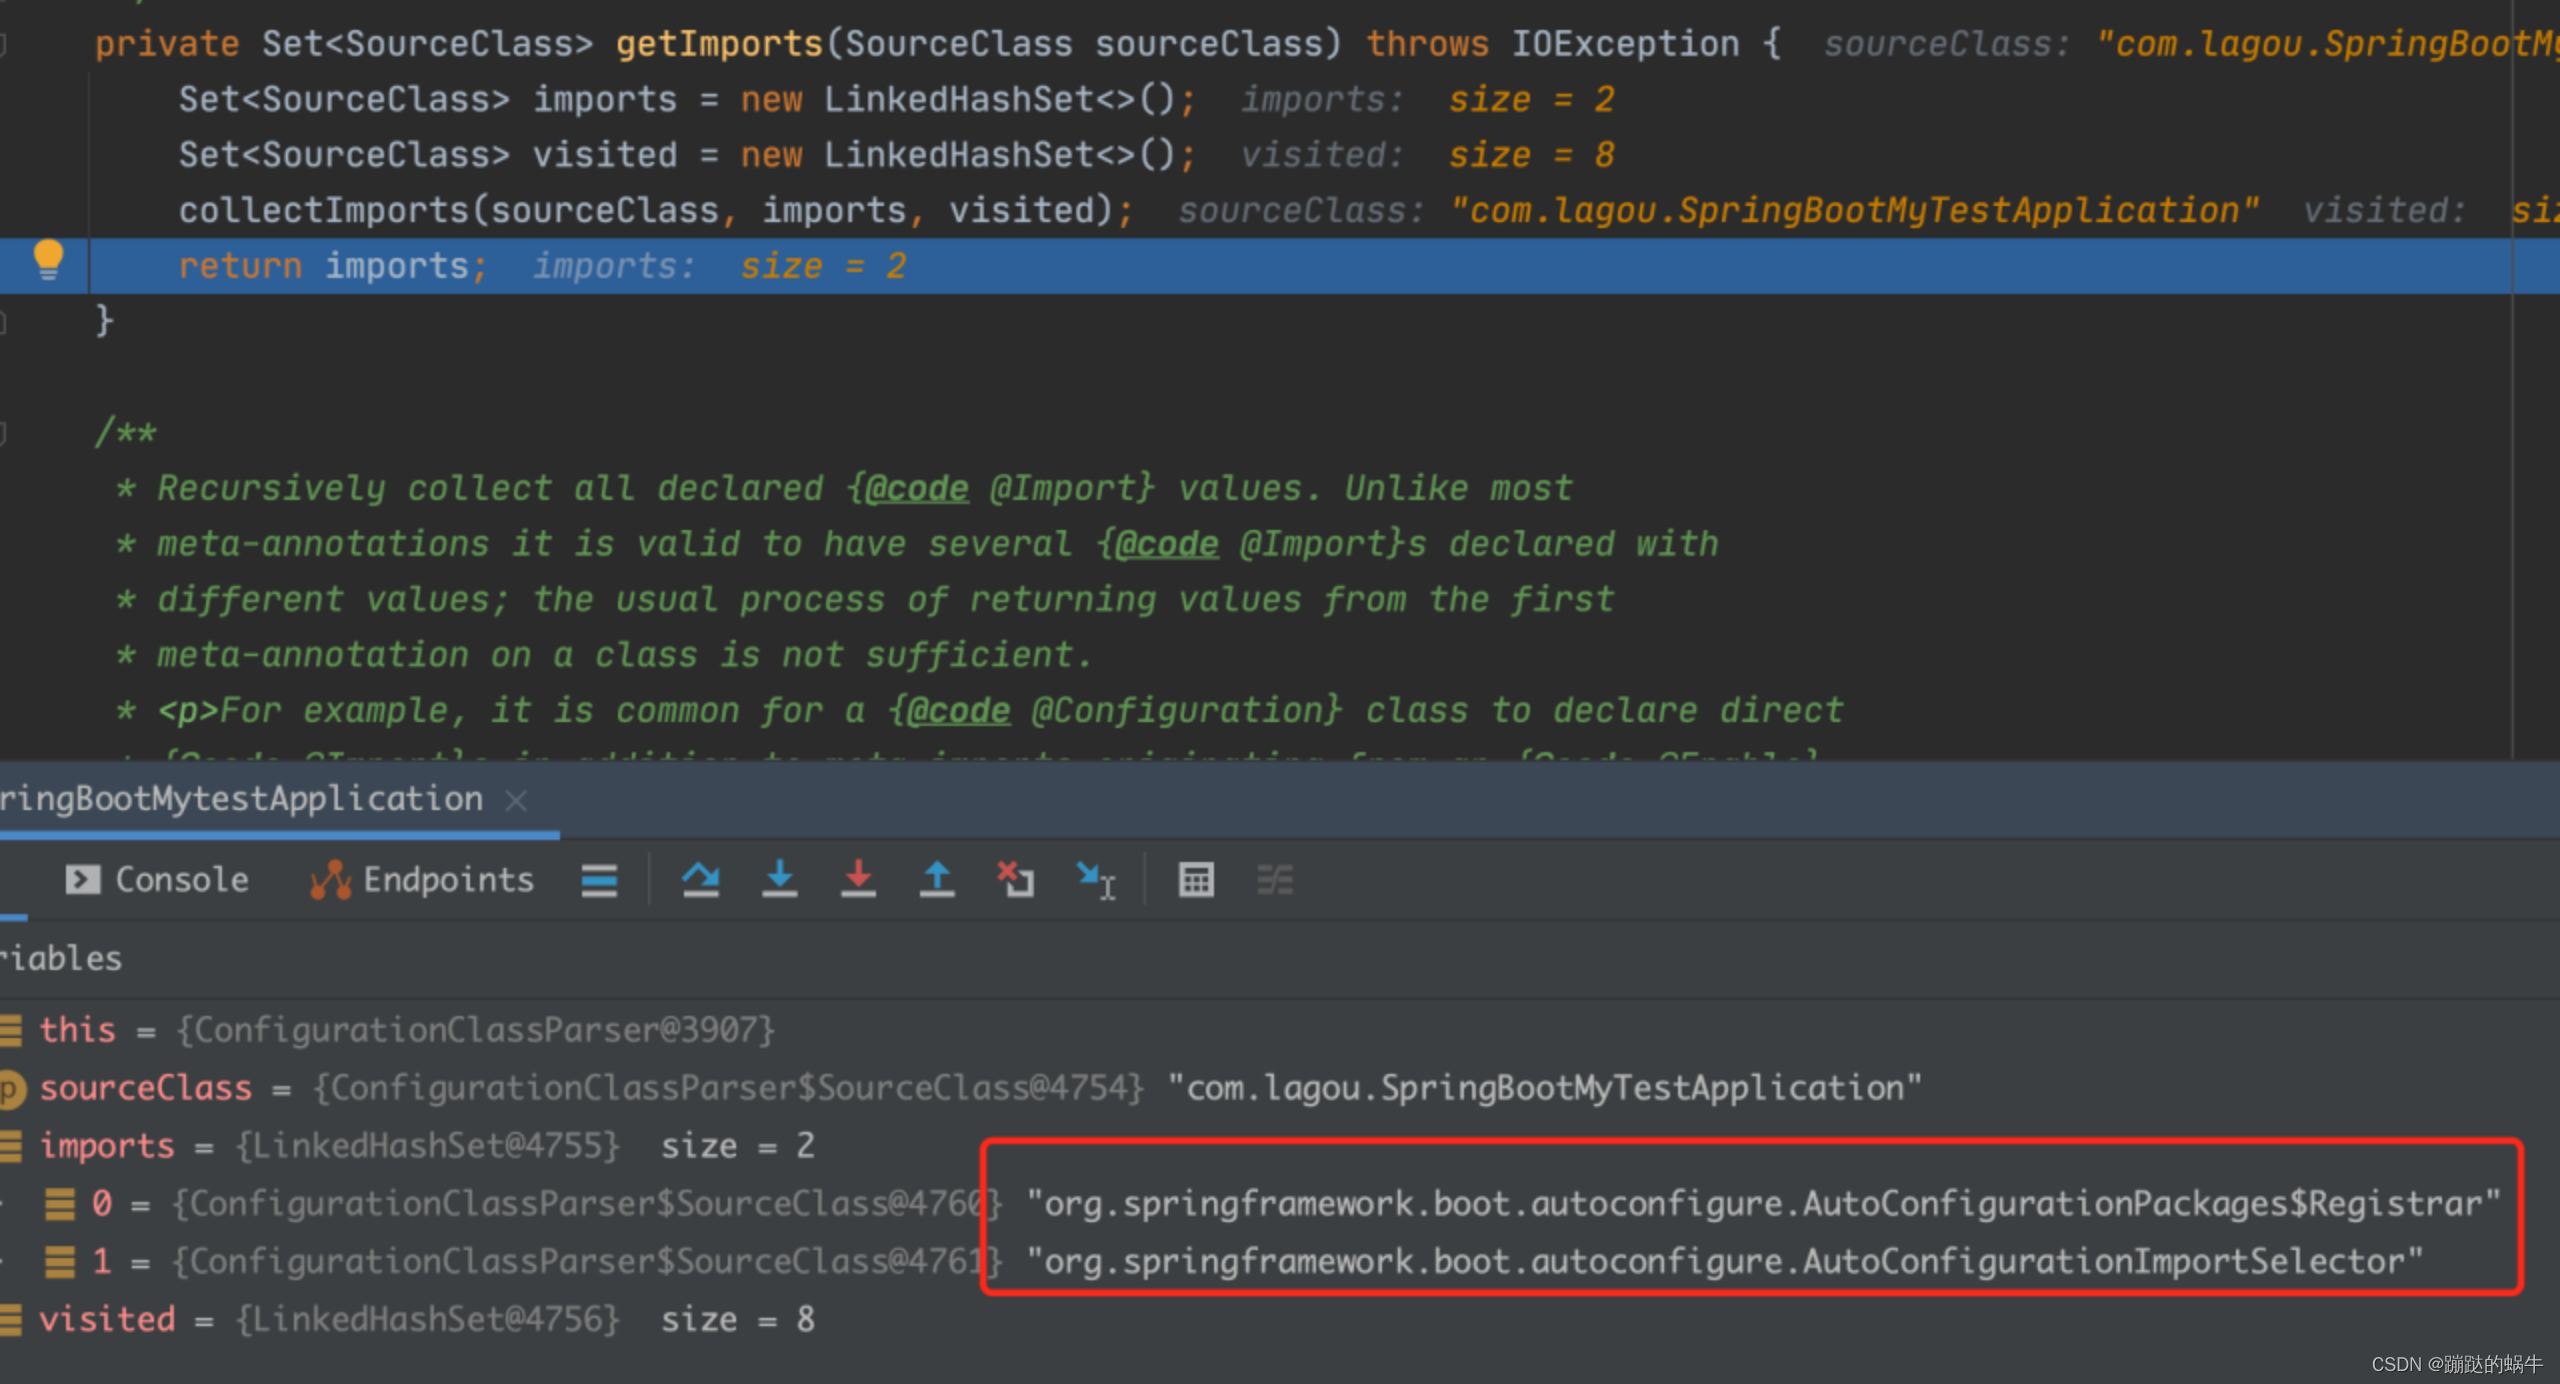
看一下getImports(sourceClass)方法
private Set<SourceClass> getImports(SourceClass sourceClass) throws IOException {
   Set<SourceClass> imports = new LinkedHashSet<>();
   Set<SourceClass> visited = new LinkedHashSet<>();
   collectImports(sourceClass, imports, visited);
   return imports;
}
debug一下,看到有两个类,这个是启动类上注入进来的两个类:
OK,当然这只是针对SpringBoot的@Import方式的BeanDefinition的定位,加载,和注册过程。
SPI扩展机制实现的自动装配(比如各种starter)
// 执行
this.deferredImportSelectorHandler.process()
点击进入process方法:
// ConfigurationClassParser.DeferredImportSelectorHandler类
public void process() {
   List<DeferredImportSelectorHolder> deferredImports = this.deferredImportSelectors;
   this.deferredImportSelectors = null;
   try {
      if (deferredImports != null) {
         DeferredImportSelectorGroupingHandler handler = new DeferredImportSelectorGroupingHandler();
         deferredImports.sort(DEFERRED_IMPORT_COMPARATOR);
         deferredImports.forEach(handler::register);
         // 继续点击进入
         handler.processGroupImports();
      }
   }
   finally {
      this.deferredImportSelectors = new ArrayList<>();
   }
}
// ConfigurationClassParser.DeferredImportSelectorGroupingHandler
public void processGroupImports() {
   for (DeferredImportSelectorGrouping grouping : this.groupings.values()) {
      Predicate<String> exclusionFilter = grouping.getCandidateFilter();
      // 查看调用的getimports
     grouping.getImports().forEach(entry -> {
         ConfigurationClass configurationClass = this.configurationClasses.get(entry.getMetadata());
         try {
            processImports(configurationClass, asSourceClass(configurationClass, exclusionFilter),
                  Collections.singleton(asSourceClass(entry.getImportClassName(), exclusionFilter)),
                  exclusionFilter, false);
         }
         catch (BeanDefinitionStoreException ex) {
            throw ex;
         }
         catch (Throwable ex) {
            throw new BeanDefinitionStoreException(
                  "Failed to process import candidates for configuration class [" +
                        configurationClass.getMetadata().getClassName() + "]", ex);
         }
      });
   }
}

//ConfigurationClassParser.DeferredImportSelectorGrouping类,到这里应该很熟悉了,就是之前我们分析自动配置原理时的入口了,继续往下看
public Iterable<Group.Entry> getImports() {
   for (DeferredImportSelectorHolder deferredImport : this.deferredImports) {
// 调用process方法
this.group.process(deferredImport.getConfigurationClass().getMetadata(),
            deferredImport.getImportSelector());
   }
   return this.group.selectImports();
}
// AutoConfigurationImportSelector.AutoConfigurationGroup类
@Override
public void process(AnnotationMetadata annotationMetadata, DeferredImportSelector deferredImportSelector) {
   Assert.state(deferredImportSelector instanceof AutoConfigurationImportSelector,
         () -> String.format("Only %s implementations are supported, got %s",
               AutoConfigurationImportSelector.class.getSimpleName(),
               deferredImportSelector.getClass().getName()));
   // [1] 调用 getAutoConfigurationEntry方法得到自动配置类放到autoConfigurationEntry对象中
   AutoConfigurationEntry autoConfigurationEntry = ((AutoConfigurationImportSelector) deferredImportSelector)
         .getAutoConfigurationEntry(getAutoConfigurationMetadata(), annotationMetadata);
   // [2] 又将封装了自动配置类的autoConfigurationEntry对象装进autoConfigurationEntries集合
   this.autoConfigurationEntries.add(autoConfigurationEntry);
   // 这里符合条件的自动配置类作为key,annotationMetadata作为值放进entries集合
   for (String importClassName : autoConfigurationEntry.getConfigurations()) {
      this.entries.putIfAbsent(importClassName, annotationMetadata);
   }
}
好了,到这里基本也就看到了再刷新应用上下文过程中,IOC容器的初始化以及通过@ComponentScan包扫描机制、@Import机制、以及SPI机制引入的对象是如何初始化和装配到IOC容器的过程。
6 刷新应用上下文后的扩展接口
protected void afterRefresh(ConfigurableApplicationContext context,ApplicationArguments args) {
}
扩展接口,设计模式中的模板方法,默认为空实现。如果有自定义需求,可以重写该方法。比如打印一些启动结束log,或者一些其它后置处理。


 被折叠的 条评论
为什么被折叠?
被折叠的 条评论
为什么被折叠?
 到【灌水乐园】发言


