


 这篇博客详细介绍了EasyUI的使用,包括环境搭建、基础组件如linkbutton按钮、Panel面板、DataGrid数据表格的使用,以及布局如tabs标签、tree树的实现,适合初学者快速掌握EasyUI。
1、入门
1.1. 简介
封装大量的jQuery插件(简化ajax,jquery,css样式,布局)
- 学习内容
插件实现:
   ① HTML标签+插件的class样式。
       <a href="#" class="easyui-linkbutton">我是讲文明</a>
   ② HTML标签+基于编程的插件实现
       <a href='#' id="btn">我是洪世鹏</a>
       js代码: $("#btn").linkbutton();

插件内容:
   属性:设置插件的样式。图标,宽度,高度。
   事件:单击事件,双击
   方法:修改插件属性,状态。
- 学习方法
1. 掌握easyui插件开发模板[记住]
2. 通过文档配合,学习他的属性 事件 方法。[查看文档]
1.2. 环境搭建
- 资源文件介绍
[外链图片转存失败,源站可能有防盗链机制,建议将图片保存下来直接上传(img-qBrpBa8n-1632141642930)(https://static01.imgkr.com/temp/3f4fcc3d9c494f198775fe7e96f12dc0.png)]
- 搭建环境的步骤
1. 导入需要的css样式文件。easyui.css    icon.css

2. 导入相关的js文件
   jquery.min.js
   jquery.easyui.min.js
   jquery.easyui-lang-zh_CN.js

3. 注意:
   themes中的文件相对路径不能变。

2、第一个插件
2.1. linkbutton 按钮
-
标准开发步骤
[外链图片转存失败,源站可能有防盗链机制,建议将图片保存下来直接上传(img-aUbZeKF5-1632141642933)(https://static01.imgkr.com/temp/687f11eb007745feb430d14fa6c17a61.png)]
标签: <a href="#">按钮</a>

样式名: 规范: easyui-样式名
       <a href="#" class="easyui-linkbutton">按钮</a>
js插件名:
   $("选中超链接").插件名();
   $("a").linkbutton();
2.2. 代码模板
- 实现方式1
HTML标签+样式

- 实现方式2
HTML标签+编程插件方法
[外链图片转存失败,源站可能有防盗链机制,建议将图片保存下来直接上传(img-RHjYi8dC-1632141642937)(https://static01.imgkr.com/temp/b4d4186900b54112b90b4d3e70b740c2.png)]
实例:
	<!-- HTML标签 + esyui-样式 -->
  	<a href="#" class="easyui-linkbutton" data-options="iconCls:'icon-cancel',size:'large',onClick:testEvent">黄浩</a>

  	<!-- HTML标签+ easyui 插件方法 -->
  	<a style="color:green;" id="btn1" href="#">王惠凯</a>

  	<script>
  		//使用easyui按钮插件
  		$("#btn1").linkbutton({
  			onClick:function(){
  				//alert("王惠凯,被点了。");
  				//调用改变大小的resize方法。
  				$("#btn1").linkbutton('resize',{width:300,height:100});
  			}
  		});


		function testEvent(){
			alert("我被点了!!!!!!!!!!!!!!!!!!!!!!!!!!!!!!!!");
			//调用按钮的 disable方法。
			//$("按钮").linkbutton('disable');
			$("a:first").linkbutton('disable');
		}
  	</script>
2.3. EasyUI插件核心模板
[外链图片转存失败,源站可能有防盗链机制,建议将图片保存下来直接上传(img-lVymOgOi-1632141642938)(https://static01.imgkr.com/temp/8f5c0292ac1d49ec89114181a0406b44.png)]
- 属性
基于标签规范:
<标签 class="easyui-样式名" data-options="属性名:值,属性名:值"></标签>

基于编程的规范:
<标签 id="tag"></标签>

$("#tag").插件名({
   属性名:值,
   属性名:值,
   ……
}
-
事件
[外链图片转存失败,源站可能有防盗链机制,建议将图片保存下来直接上传(img-bisbGFoJ-1632141642939)(https://static01.imgkr.com/temp/29d031bfc3024f7795e9c6d2e2461206.png)]
基于标签的规范:
<标签 class="easyui-样式名" data-options="属性名:值,属性名:值,事件名:事件函数名"></标签>

基于编程的方式:
<标签 id="tag"></标签>

$("#tag").插件名({
   属性名:值,
   属性名:值,
   事件名:事件函数名,
   事件名:function(){
   ……
   }
});
- 方法
调用模板:[重要]
$("标签").easyui插件('方法名',方法传入的参数);

例如:
$("a").linkbutton('resize',{width:300,height:100});
3、基本插件库
3.1. Panel面板
- 效果

- 代码
标签: div

class样式名: easyui-panel

插件方法: $("div").panel();
[外链图片转存失败,源站可能有防盗链机制,建议将图片保存下来直接上传(img-zmPz4hv4-1632141642940)(https://static01.imgkr.com/temp/d2adc234d8a540b6a4dbe4ffa5d9bc5b.png)]
实例:
	<!-- 标签div+easyui-panel -->
  	<div class="easyui-panel" data-options="title:'我是标题',iconCls:'icon-man'">路征信</div>
  	<hr />
  	<!-- 准备按钮 -->
  	<div id="tt">
  		<a href="#" class="easyui-linkbutton" data-options="iconCls:'icon-ok'"></a>
  	</div>
  	<!-- div+panel() -->
  	<div id="p1">刘远远远远远远远远远远远远远远远远远远,来啦老弟。</div>
  	<script>
  		/* 生效一个panel插件 */

  		$("#p1").panel({
  			title:"玉龙标题",//标题
  			iconCls:"icon-man",//标题图标
  			width:600,//宽度 400
  			height:300,//高度 300
  			closable:true,//显示关闭按钮
  			maximizable:true,//最大化按钮
  			tools:'#tt',//引用按钮组
  			href:"${pageContext.request.contextPath}/index.jsp",//引用远程页面,写目标页面的URI
  		});
  	</script>
[外链图片转存失败,源站可能有防盗链机制,建议将图片保存下来直接上传(img-i8ovG1BY-1632141642941)(https://static01.imgkr.com/temp/5afacd4213294a5ea346ab3ba06d7e17.png)]
3.2. window面板
- 代码
标签 div

样式名 easyui-window

插件方法名 $("div").window()

重要:

window继承panel,panel的属性,事件,方法都可以在window中使用

实例:
	<!-- 定义按钮组 -->
	<div id="tt1">
		<a href="#" class="easyui-linkbutton" data-options="iconCls:'icon-ok'"></a>
		<a href="#" class="easyui-linkbutton" data-options="iconCls:'icon-save'"></a>
	</div>

	<a href="#" class="easyui-linkbutton">我是一个按钮</a>
	<!-- div + window() -->

	<div id="d1">常帅宇</div>

	<script>
		/*
		window窗口
		*/

		$("#d1").window({
			title : "新闻",
			iconCls : "icon-man",
			width : 300,
			height : 400,
			href : "${pageContext.request.contextPath}/index.jsp",
			modal : true,//灯罩效果
			draggable : false,//是否可拖拽
			tools:'#tt1'
		});
	</script>
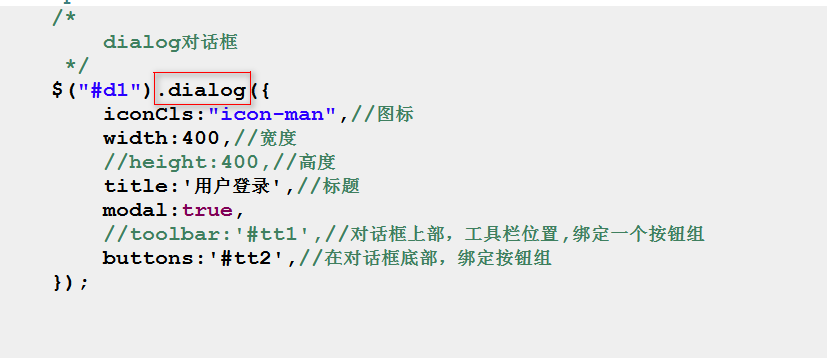
3.3. dialog对话框
- 代码
标签: div

样式名: easyui-dialog

插件方法名: $("div").dialog()
实例:
    <!-- 定义按钮组 -->
	<div id="tt1">
		<a href="#" class="easyui-linkbutton" data-options="iconCls:'icon-ok'"></a>
		<a href="#" class="easyui-linkbutton"
			data-options="iconCls:'icon-save'"></a>
	</div>

	<!-- 底部按钮组 -->
	<div id="tt2">
		<a href="#" class="easyui-linkbutton" data-options="iconCls:'icon-man',onClick:login">登录</a>
		<a href="#" class="easyui-linkbutton" data-options="iconCls:'icon-cancel'">取消</a>
	</div>

	<a href="#" class="easyui-linkbutton">我是一个按钮</a>
	<!-- div + window() -->

	<div id="d1">
		<!-- 登录表单 -->
		<form action="#">
			<fieldset>
				<legend>登录</legend>
				<table align="center">
					<tr>
						<td>用户名</td>
						<td><input type="text" name="username" id="username" /></td>
					</tr>
					<tr>
						<td>密码</td>
						<td><input type="text" name="password" id="password" /></td>
					</tr>
				</table>
			</fieldset>
		</form>
	</div>
	<script>
		/*
		dialog对话框
		*/
		$("#d1").dialog({
			iconCls:"icon-man",//图标
			width:400,//宽度
			//height:400,//高度
			title:'用户登录',//标题
			modal:true,
			//toolbar:'#tt1',//对话框上部,工具栏位置,绑定一个按钮组
			buttons:'#tt2',//在对话框底部,绑定按钮组
		});
	</script>
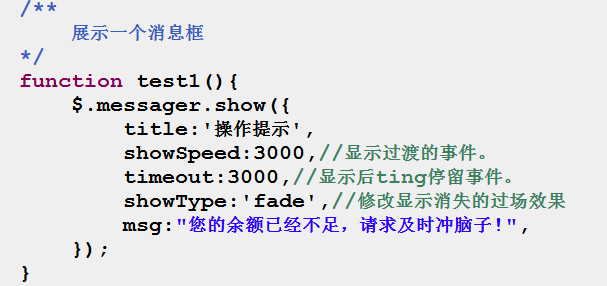
3.4. messager消息框
- 代码
消息框
$.messager.show({
属性名:值,
属性名:值
});
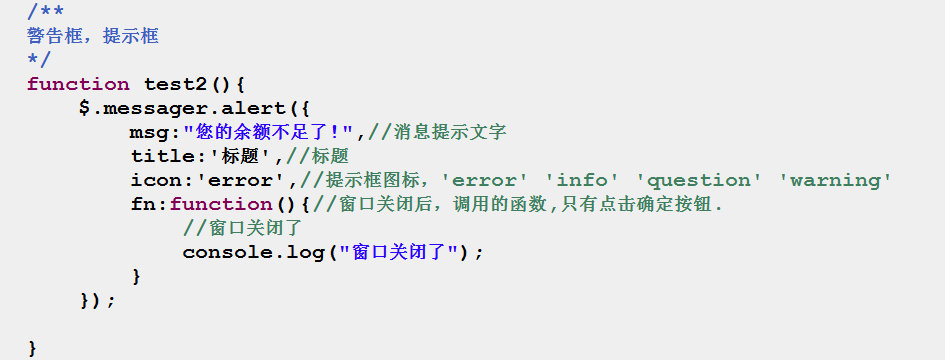
提示框
$.messager.alert({
属性名:值,
属性名:值
});
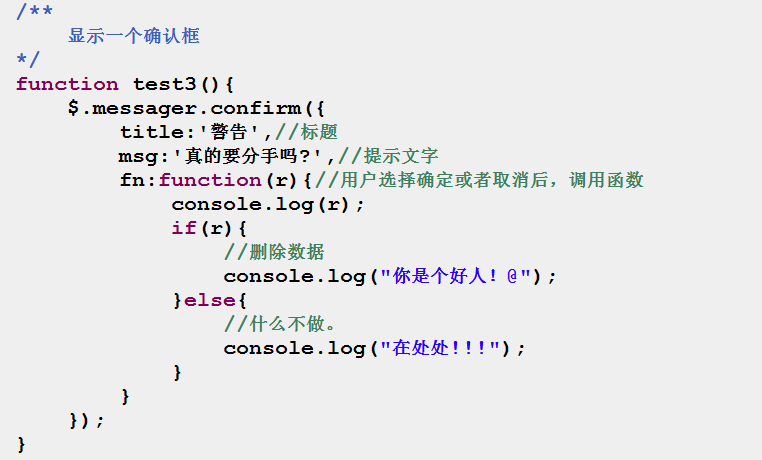
确认框
$.messager.confirm({
属性名:值,
属性名:值
});
实例:
<a href="#" class="easyui-linkbutton" data-options="iconCls:'icon-ok',onClick:test1">测试消息框</a>
	<a href="#" class="easyui-linkbutton" data-options="iconCls:'icon-save',onClick:test2">测试提示框</a>
	<a href="#" class="easyui-linkbutton" data-options="iconCls:'icon-man',onClick:test3">测试确认框</a>
	<script>
		/**
		展示一个消息框
		*/
		function test1(){
			$.messager.show({
				title:'操作提示',
				showSpeed:3000,//显示过渡的事件。
				timeout:3000,//显示后ting停留事件。
				showType:'fade',//修改显示消失的过场效果
				msg:"您的余额已经不足,请求及时冲脑子!",
			});
		}

		/**
		警告框,提示框
		*/
		function test2(){
			$.messager.alert({
				msg:"您的余额不足了!",//消息提示文字
				title:'标题',//标题
				icon:'error',//提示框图标,'error' 'info' 'question' 'warning'
				fn:function(){//窗口关闭后,调用的函数,只有点击确定按钮.
					//窗口关闭了
					console.log("窗口关闭了");
				}
			});
		}
		/**
		显示一个确认框
		*/
		function test3(){
			$.messager.confirm({
				title:'警告',//标题
				msg:'真的要分手吗?',//提示文字
				fn:function(r){//用户选择确定或者取消后,调用函数
					console.log(r);
					if(r){
						//删除数据
						console.log("你是个好人!@");
					}else{
						//什么不做。
						console.log("在处处!!!");
					}
				}
			});
		}
	</script>
4、表单相关
4.1. textbox 文本输入框
[外链图片转存失败,源站可能有防盗链机制,建议将图片保存下来直接上传(img-rwAwObId-1632141642945)(https://static01.imgkr.com/temp/1f6bac5e7d3b4b3cb79a0977ac321606.png)]
- 代码
HTML标签: input:text

easyui插件方法: $("input").textbox();
4.2. numberbox 数字输入框
- 代码
标签: input:text

easyui插件: $("input").numberbox();
4.3. datebox 日期框
- 代码
标签: input:text

easyui插件: $('input').datebox()
4.4. filebox 文件
- 代码
标签:input:text

easyui插件:$("input").filebox()
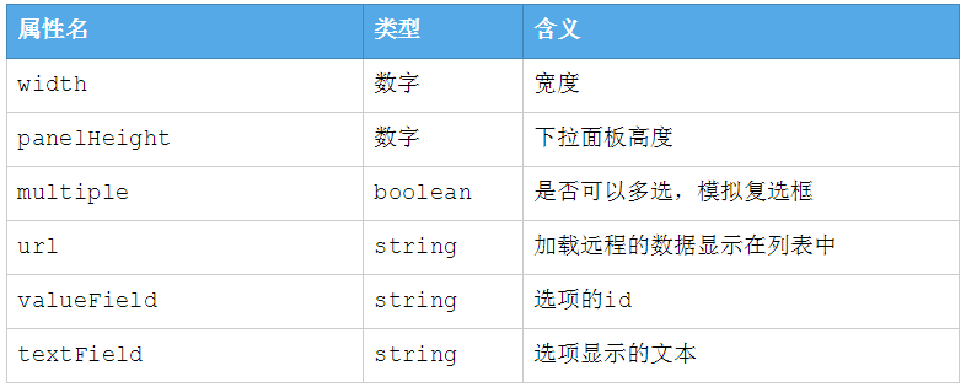
4.5. combobox下拉列表
- 注意
单选钮[下拉列表+单选],复选框[下拉列表+多选],下拉列表框
- 代码
1. HTML的方式
   <select class="easyui-combobox">
     <option value="1001">男</option>
     <option value="1001">男</option>
   </select>

2. 动态加载的方式
   <input type="text" id="deptId" name="deptId">
$("input").combobox({
   url:"",自动请求url,响应的结果json数据填充在下拉列表中
   valueField:"作为每个选项的value的值的json属性名"
   textField:"要作为显示文本的响应的json属性名"
});
- 属性列表
- Form 表单
- 事件
$("form").form({
   OnSubmit:function(){//
        //表单提交之前,运行。
       //return false;//禁用表单提交
       //return true;//允许提交表单
   },
   success:function(str){//表单提交完毕,且服务器正常响应回浏览器,执行
       //表单提交完毕之后,的执行.
       //str参数,是服务器响应给浏览器的json字符串数据。
       var msg = JSON.parse(str);
   }
});
- 方法
1. 提交表单的方法
$("from").form("submit");//默认提交方式是 异步请求,且只有表单符合验证要求才提交数据

2. 清空的方法
$("form").form("clear");//清空表单数据

3. 将数据填充在表单中。
   ① 将js的json对象数据直接填充在表单中。
   注意: 要求:json对象中属性名必须和表单控件的name值保持一致
   $("form").form('load',{json对象的数据});

   ② 将控制器url响应回的对象的json串格式数据,转化为js对象,自动添冲表单中。
   注意: 要求:响应的json对象中属性名必须和表单控件的name值保持一致
   $("form").form('load',"响应json数据的控制器的uri");
[外链图片转存失败,源站可能有防盗链机制,建议将图片保存下来直接上传(img-JID1ClmP-1632141642946)(https://static01.imgkr.com/temp/e559717f55ab4d79a2fccce2b78895c5.png)]
	<!-- ~~~~~~~~~~~~~~~~~~~~~~~~~~~按钮组~~~~~~~~~~~~~~~~~~~~~~~~~~~~~~~ -->
	<!-- 添加客户信息表单的按钮组 -->
	<div id="addPersonBtn">
		<a href="javascript:void(0)" class="easyui-linkbutton" data-options="onClick:person.add">添加</a>
		<a href="javascript:void(0)" class="easyui-linkbutton" data-options="onClick:person.clear">清空</a>
	</div>

	<!-- ~~~~~~~~~~~~~~~~~~~~~~~~~~~按钮组~~~~~~~~~~~~~~~~~~~~~~~~~~~~~~~ -->
	<a href="javascript:void(0)" class="easyui-linkbutton" data-options="onClick:person.showUpdate">修改</a>


	<div id="fmdiv" style="text-align: center;">
		<form id="fmPersonAdd" action="${pageContext.request.contextPath }/person/add.do" >
			<fieldset>
				<legend>添加客户信息</legend>
				<table align="center" >
					<tr>
						<td>姓名</td>
						<td><input type="text"  name="username" id="name" /></td>
					</tr>
					<tr>
						<td>年龄</td>
						<td><input type="text"  name="age" id="age" /></td>
					</tr>
					<tr>
						<td>性别</td>
						<td><input type="text"  name="sex" id="sex" /></td>
					</tr>
					<tr>
						<td>手机号</td>
						<td><input type="text"  name="mobile" id="mobile" /></td>
					</tr>
					<tr>
						<td>地址</td>
						<td><input type="text" name="address" id="address" /></td>
					</tr>
				</table>
			</fieldset>
		</form>
	</div>

	<script>
		/* person相关的函数 */
		var person = {
			add:function(){
				//将表单数据提交.
				alert("asd");
				//$("form").form('submit');
				$("#fmPersonAdd").form("submit");
			},
			clear:function(){
				//清空表单数据
				$("#fmPersonAdd").form("clear");
			},
			showUpdate:function(){
				//将服务器查询到perosn信息--->json串--->JS对象?
				/**
					$.ajax({
						url
						tyoe
						success:function(json){

						}
					});
				*/

				//var ps = {"id":"1001","name":"王惠凯","age":18,"sex":1,"mobile":"12345678901","address":"河南郑州,中南海!"};
				//将ps对象数据加载到表单中,
				//$("#fmPersonAdd").form('load',ps);
				$("#fmPersonAdd").form('load','${pageContext.request.contextPath}/person/getById.do?id=100035');
			}
		};

		/**
		表单绑定success事件?
		*/
		$("#fmPersonAdd").form({
			success:function(data){
				console.log(typeof(data));
				var json = JSON.parse(data);
				if(json.code==200){
					location.href="${pageContext.request.contextPath}/index.jsp";
				}
			}
		});

		/**
		easyui插件初始化工作
		*/
		$("#fmdiv").dialog({
			title:"客户添加",
			iconCls:"icon-man",
			width:300,
			buttons:'#addPersonBtn',
		});

		$("#username").textbox({
			required:true,
		});

		$("#age").numberbox({
			required:true,
			precision:0,
			min:0,
			max:120,
		});


		$("#sex").numberbox({
			required:true,
			precision:0,
			min:0,
			max:1,
		});

		$("#mobile").numberbox({
			required:true,
			precision:0,
			validType:'length[11,11]',
			invalidMessage:'手机号,必须是11位',
		});

		$("#address").textbox({
			multiline:true,
			height:50,
		});
	</script>
- 登录案例编码思路
[外链图片转存失败,源站可能有防盗链机制,建议将图片保存下来直接上传(img-SUlxQfQQ-1632141642947)(https://static01.imgkr.com/temp/652ac185fd174fd7a7d40a34b761dd65.png)]
5、表格相关
5.1. DataGrid 数据表格
- HTML代码
<table>
   <thead>
       <tr>
           <th>ID</th>
           <th>名字</th>
           <th>性别</th>
           <th>年龄</th>
           <th>手机号</th>
           <th>地址</th>
           <th>操作</th>
       </tr>
   </thead>
</table>
- 方法
$("#dg").datagrid();
[外链图片转存失败,源站可能有防盗链机制,建议将图片保存下来直接上传(img-PE0nEtNQ-1632141642947)(https://static01.imgkr.com/temp/05be14d121be4d498f30242d0c20d6d7.png)]
- column列属性
sortable:true,
作用:
   效果,列可以被点击。
   点击,自动请求datagrid的url,自定携带请求参数: sort=该列的field&order=asc|desc

服务器修改:
   控制器接受sort和order参数。

formatter:
   datagrid在渲染每行数据的时候,会调用一次该函数。
   会将row,index,value参数传给函数。
   将function的返回值,显示在当前列的位置
5.2. 分页
- 属性
datagrid的属性
   pagination:true; //添加分页效果。
   分页会每次自动请求datagrid的url,并且携带 page 和rows的参数
- 思路
[外链图片转存失败,源站可能有防盗链机制,建议将图片保存下来直接上传(img-M1JEqlDB-1632141642948)(https://static01.imgkr.com/temp/de0e5279eca44a64bb1145e6dff04ce4.png)]
- 其他方法
1. reload:
   重新加载datagrid的url的数据,且会携带上一次请求的所有参数。
2. load:
   重新加载datagrid的url的数据,且会携带上一次请求的所有参数,但是分页的参数只会加载第一页的参数。
3. getChecked:
   获得被复选框选中的行的json数据的数组信息。
6、布局相关
6.1. tabs标签
- 代码
1. html标签。
<div>
   <div></div>
   <div></div>
</div>
2. easyUI插件名.
6.2. accordion手风琴
- 代码
1. html标签
<div>
    <div>区域1</div>
    <div>区域1</div>
</div>

2. easyui插件名 $("外部div").accordion()
6.3. layui 布局
允许用户将页面切割为上下左右中5个部分。
1. 标签
    <body class="easyui-layout">
        <div><div>
        <div><div>
        <div><div>
        <div><div>
        <div><div>
    </body>

2. 插件名easyui-layout
<body class="easyui-layout">
     <div data-options="title:'标题',region:'north',height:120,">上</div>
     <div data-options="title:'底部信息',region:'south',height:80,">下</div>
     <div data-options="title:'菜单',region:'west',width:150,">左</div>
     <div data-options="title:'通知',region:'east',width:200">右</div>
     <div data-options="title:'主页',region:'center'">中</div>
 </body>
6.4. tree树
- 代码
1. 标签
<ul>
   <li></li>
   <li></li>
   <li></li>
</ul>
2. easyui插件名。$("ul").tree();
- 思路
[外链图片转存失败,源站可能有防盗链机制,建议将图片保存下来直接上传(img-JFLyj5XP-1632141642949)(https://static01.imgkr.com/temp/879e50262df0469e80081fe0577a47e1.png)]
- 远程异步加载
1. tree指定一个属性:url


2. 要求服务器端响应的数据
   ① 数据必须是相应成数组形式的数据。
   ② 每个节点信息属性要求
       id属性:
       text属性: 节点显示的文本.
       children属性: 子节点信息
               {id   text   children}
  例如:
[
   {id:"1000",text:"图书",
    children:
        [{id:"10001",text:"小说"},{id:"10002",text:"计算机图书"}]
   },
   {id:"2000",text:"电子产品"},
   {id:"3000",text:"衣服"},

]

3. 通过标签引用url响应的结果,填充在tree中。
   <ul id="tree"></ul>
   $("#tree").tree({
       url:"响应tree需要的数据的控制器路径uri".
   });
 <div data-options="title:'通知',region:'east',width:200">右</div>
     <div data-options="title:'主页',region:'center'">中</div>
 </body>
6.4. tree树
- 代码
1. 标签
<ul>
   <li></li>
   <li></li>
   <li></li>
</ul>
2. easyui插件名。$("ul").tree();
- 思路
[外链图片转存中…(img-JFLyj5XP-1632141642949)]
- 远程异步加载
1. tree指定一个属性:url


2. 要求服务器端响应的数据
   ① 数据必须是相应成数组形式的数据。
   ② 每个节点信息属性要求
       id属性:
       text属性: 节点显示的文本.
       children属性: 子节点信息
               {id   text   children}
  例如:
[
   {id:"1000",text:"图书",
    children:
        [{id:"10001",text:"小说"},{id:"10002",text:"计算机图书"}]
   },
   {id:"2000",text:"电子产品"},
   {id:"3000",text:"衣服"},

]

3. 通过标签引用url响应的结果,填充在tree中。
   <ul id="tree"></ul>
   $("#tree").tree({
       url:"响应tree需要的数据的控制器路径uri".
   });


 652
652

 被折叠的 条评论
为什么被折叠?
被折叠的 条评论
为什么被折叠?
 到【灌水乐园】发言


