


-
前提条件
- 需要安装 Git、cURL、Docker 和 Docker Compose
- 推荐使用 Linux 或 macOS 系统
- 安装样例、二进制文件和 Docker 镜像
- 使用 curl 命令下载并执行安装脚
- 脚本会克隆 fabric-samples 仓库并下载特定版本的 Fabric 二进制文件和 Docker 镜像
-
安装 Git:
sudo yum install git -
安装 cURL:
sudo yum install curl -
安装 Docker:
sudo yum install -y yum-utils sudo yum-config-manager --add-repo https://download.docker.com/linux/centos/docker-ce.repo sudo yum install docker-ce docker-ce-cli containerd.io sudo systemctl start docker sudo systemctl enable docker -
安装 Docker Compose:
sudo curl -L "https://github.com/docker/compose/releases/download/1.29.2/docker-compose-$(uname -s)-$(uname -m)" -o /usr/local/bin/docker-compose sudo chmod +x /usr/local/bin/docker-compose -
验证安装:
git --version curl --version docker --version docker-compose --version -
确保当前用户可以运行 Docker 命令:
sudo usermod -aG docker $USER(注意:执行此命令后需要注销并重新登录)
-
下载 Fabric 样例和二进制文件:
curl -sSL https://bit.ly/2ysbOFE | bash -s -
验证 Fabric 二进制文件:
fabric-samples/bin/peer version -
测试网络
- 进入 fabric-samples/test-network 目录
- 使用 ./network.sh 脚本启动测试网络
- 可以创建通道、部署智能合约等
-
部署智能合约
- 使用 ./network.sh deployCC 命令部署示例智能合约
- 解释了智能合约的基本概念和部署过程
-
与网络交互
- 设置环境变量以使用 peer CLI
- 示范如何调用智能合约和查询账本
-
关闭网络
- 使用 ./network.sh down 命令关闭测试网络
-
进入测试网络目录:
cd fabric-samples/test-network -
启动测试网络:
plainText
./network.sh up -
创建通道:
plainText
./network.sh createChannel -
部署智能合约:
plainText
./network.sh deployCC -ccn basic -ccp ../asset-transfer-basic/chaincode-go -ccl go -
设置环境变量以与 Org1 交互:
plainText
export PATH=${PWD}/../bin:$PATH export FABRIC_CFG_PATH=$PWD/../config/ export CORE_PEER_TLS_ENABLED=true export CORE_PEER_LOCALMSPID="Org1MSP" export CORE_PEER_TLS_ROOTCERT_FILE=${PWD}/organizations/peerOrganizations/org1.example.com/peers/peer0.org1.example.com/tls/ca.crt export CORE_PEER_MSPCONFIGPATH=${PWD}/organizations/peerOrganizations/org1.example.com/users/Admin@org1.example.com/msp export CORE_PEER_ADDRESS=localhost:7051 -
调用智能合约(初始化账本):
plainText
peer chaincode invoke -o localhost:7050 --ordererTLSHostnameOverride orderer.example.com --tls --cafile "${PWD}/organizations/ordererOrganizations/example.com/orderers/orderer.example.com/msp/tlscacerts/tlsca.example.com-cert.pem" -C mychannel -n basic --peerAddresses localhost:7051 --tlsRootCertFiles "${PWD}/organizations/peerOrganizations/org1.example.com/peers/peer0.org1.example.com/tls/ca.crt" --peerAddresses localhost:9051 --tlsRootCertFiles "${PWD}/organizations/peerOrganizations/org2.example.com/peers/peer0.org2.example.com/tls/ca.crt" -c '{"function":"InitLedger","Args":[]}' -
查询智能合约:
plainText
peer chaincode query -C mychannel -n basic -c '{"Args":["GetAllAssets"]}' -
关闭测试网络:
plainText
./network.sh down
其他有用的命令:
-
启动网络并创建通道(一步完成):
plainText
./network.sh up createChannel -
启动网络、创建通道并部署智能合约(一步完成):
plainText
./network.sh up createChannel -ca -c mychannel -s couchdb -
查看网络日志:
plainText
docker logs -f <container_name>
+ peer lifecycle chaincode checkcommitreadiness --channelID mychannel --name basic --version 1.0 --sequence 1 --output json
+ res=0
{
"approvals": {
"Org1MSP": true,
"Org2MSP": false
}
}
Checking the commit readiness of the chaincode definition successful on peer0.org1 on channel 'mychannel'
Using organization 2
Checking the commit readiness of the chaincode definition on peer0.org2 on channel 'mychannel'...
Attempting to check the commit readiness of the chaincode definition on peer0.org2, Retry after 3 seconds.
+ peer lifecycle chaincode checkcommitreadiness --channelID mychannel --name basic --version 1.0 --sequence 1 --output json
+ res=0
{
"approvals": {
"Org1MSP": true,
"Org2MSP": false
}
}
Checking the commit readiness of the chaincode definition successful on peer0.org2 on channel 'mychannel'
Using organization 2
+ peer lifecycle chaincode approveformyorg -o localhost:7050 --ordererTLSHostnameOverride orderer.example.com --tls --cafile /usr/local/chain-demo/fabric-samples/test-network/organizations/ordererOrganizations/example.com/tlsca/tlsca.example.com-cert.pem --channelID mychannel --name basic --version 1.0 --package-id basic_1.0:29cafe2e5576ddf8ca872875fb58b46b1f501a954627b27eab72d87ed756a8be --sequence 1
+ res=0
2025-01-14 16:06:59.748 CST 0001 INFO [chaincodeCmd] ClientWait -> txid [d34c5484235df88e34d43ed589fde93614b8511294ec177efb62e98748d02eb5] committed with status (VALID) at localhost:9051
Chaincode definition approved on peer0.org2 on channel 'mychannel'
Using organization 1
Checking the commit readiness of the chaincode definition on peer0.org1 on channel 'mychannel'...
Attempting to check the commit readiness of the chaincode definition on peer0.org1, Retry after 3 seconds.
+ peer lifecycle chaincode checkcommitreadiness --channelID mychannel --name basic --version 1.0 --sequence 1 --output json
+ res=0
{
"approvals": {
"Org1MSP": true,
"Org2MSP": true
}
}
Checking the commit readiness of the chaincode definition successful on peer0.org1 on channel 'mychannel'
Using organization 2
Checking the commit readiness of the chaincode definition on peer0.org2 on channel 'mychannel'...
Attempting to check the commit readiness of the chaincode definition on peer0.org2, Retry after 3 seconds.
+ peer lifecycle chaincode checkcommitreadiness --channelID mychannel --name basic --version 1.0 --sequence 1 --output json
+ res=0
{
"approvals": {
"Org1MSP": true,
"Org2MSP": true
}
}
Checking the commit readiness of the chaincode definition successful on peer0.org2 on channel 'mychannel'
Using organization 1
Using organization 2
+ peer lifecycle chaincode commit -o localhost:7050 --ordererTLSHostnameOverride orderer.example.com --tls --cafile /usr/local/chain-demo/fabric-samples/test-network/organizations/ordererOrganizations/example.com/tlsca/tlsca.example.com-cert.pem --channelID mychannel --name basic --peerAddresses localhost:7051 --tlsRootCertFiles /usr/local/chain-demo/fabric-samples/test-network/organizations/peerOrganizations/org1.example.com/tlsca/tlsca.org1.example.com-cert.pem --peerAddresses localhost:9051 --tlsRootCertFiles /usr/local/chain-demo/fabric-samples/test-network/organizations/peerOrganizations/org2.example.com/tlsca/tlsca.org2.example.com-cert.pem --version 1.0 --sequence 1
+ res=0
2025-01-14 16:07:08.200 CST 0001 INFO [chaincodeCmd] ClientWait -> txid [dbb1c83b3b0839ee6a30bd2a4b1b6aada0813240849ae6da4c2381b98b04d419] committed with status (VALID) at localhost:7051
2025-01-14 16:07:08.257 CST 0002 INFO [chaincodeCmd] ClientWait -> txid [dbb1c83b3b0839ee6a30bd2a4b1b6aada0813240849ae6da4c2381b98b04d419] committed with status (VALID) at localhost:9051
Chaincode definition committed on channel 'mychannel'
Using organization 1
Querying chaincode definition on peer0.org1 on channel 'mychannel'...
Attempting to Query committed status on peer0.org1, Retry after 3 seconds.
+ peer lifecycle chaincode querycommitted --channelID mychannel --name basic
+ res=0
Committed chaincode definition for chaincode 'basic' on channel 'mychannel':
Version: 1.0, Sequence: 1, Endorsement Plugin: escc, Validation Plugin: vscc, Approvals: [Org1MSP: true, Org2MSP: true]
Query chaincode definition successful on peer0.org1 on channel 'mychannel'
Using organization 2
Querying chaincode definition on peer0.org2 on channel 'mychannel'...
Attempting to Query committed status on peer0.org2, Retry after 3 seconds.
+ peer lifecycle chaincode querycommitted --channelID mychannel --name basic
+ res=0
Committed chaincode definition for chaincode 'basic' on channel 'mychannel':
Version: 1.0, Sequence: 1, Endorsement Plugin: escc, Validation Plugin: vscc, Approvals: [Org1MSP: true, Org2MSP: true]
Query chaincode definition successful on peer0.org2 on channel 'mychannel'
Chaincode initialization is not required
[root@cdn-156-230-62-101 test-network]# export PATH=${PWD}/../bin:$PATH
PATH=$PWD/../config/
export CORE_PEER_TLS_ENABLED=[root@cdn-156-230-62-101 test-network]# export FABRIC_CFG_PATH=$PWD/../config/
true
export CORE_PEER_LOCALMSPID="Org1MSP"
export CORE_PEER_TLS_ROOTCERT_FILE=${PWD}/organizations/p[root@cdn-156-230-62-101 test-network]# export CORE_PEER_TLS_ENABLED=true
eerOrganizations/org1.example.com/peers/peer0.org1.example.com/tls/ca.crt
export CORE_PEER_MSPCONFIGPATH=${PWD}/organizations/peerOrganizations/org1.e[root@cdn-156-230-62-101 test-network]# export CORE_PEER_LOCALMSPID="Org1MSP"
xample.com/users/Admin@org1.example.com/msp
export[root@cdn-156-230-62-101 test-network]# export CORE_PEER_TLS_ROOTCERT_FILE=${PWD}/organizations/peerOations/org1.example.com/peers/peer0.org1.example.com/tls/ca.crt
[root@cdn-156-230-62-101 test-network]# export CORE_PEER_MSPCONFIGPATH=${PWD}/organizations/peerOrganizations/org1.example.com/users/Admin@org1.example.com/msp
[root@cdn-156-230-62-101 test-network]# export CORE_PEER_ADDRESS=localhost:7051
[root@cdn-156-230-62-101 test-network]# peer chaincode invoke -o localhost:7050 --ordererTLSHostnameOverride orderer.example.com --tls --cafile "${PWD}/organizations/ordererOrganizations/example.com/orderers/orderer.example.com/msp/tlscacerts/tlsca.example.com-cert.pem" -C mychannel -n basic --peerAddresses localhost:7051 --tlsRootCertFiles "${PWD}/organizations/peerOrganizations/org1.example.com/peers/peer0.org1.example.com/tls/ca.crt" --peerAddresses localhost:9051 --tlsRootCertFiles "${PWD}/organizations/peerOrganizations/org2.example.com/peers/peer0.org2.example.com/tls/ca.crt" -c '{"function":"InitLedger","Args":[]}'
2025-01-14 16:07:31.955 CST 0001 INFO [chaincodeCmd] chaincodeInvokeOrQuery -> Chaincode invoke successful. result: status:200
[root@cdn-156-230-62-101 test-network]# peer chaincode query -C mychannel -n basic -c '{"Args":["GetAllAssets"]}'
[{"AppraisedValue":300,"Color":"blue","ID":"asset1","Owner":"Tomoko","Size":5},{"AppraisedValue":400,"Color":"red","ID":"asset2","Owner":"Brad","Size":5},{"AppraisedValue":500,"Color":"green","ID":"asset3","Owner":"Jin Soo","Size":10},{"AppraisedValue":600,"Color":"yellow","ID":"asset4","Owner":"Max","Size":10},{"AppraisedValue":700,"Color":"black","ID":"asset5","Owner":"Adriana","Size":15},{"AppraisedValue":800,"Color":"white","ID":"asset6","Owner":"Michel","Size":15}]
[root@cdn-156-230-62-101 test-network]# ./network.sh down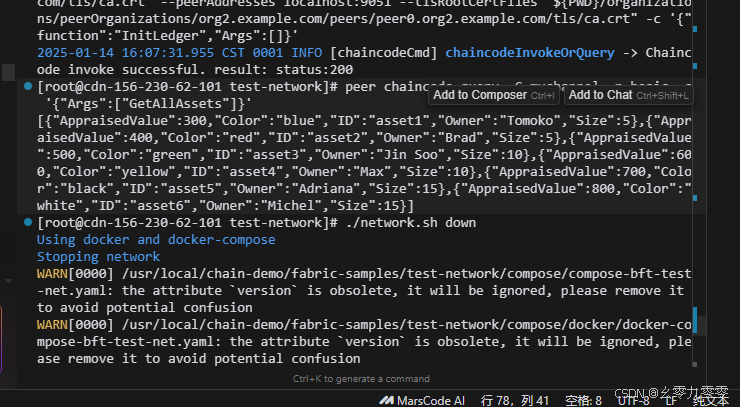
安装jd
-
安装 EPEL 仓库(如果尚未安装):
plainText
sudo yum install epel-release -
安装 jq:
plainText
sudo yum install jq -
验证安装:
plainText
jq --version
Hyperledger Fabric 网络中的链码(智能合约)确实提供了一种类似于数据库的操作方式,允许程序员通过定义和调用链码中的函数来实现数据的增删改查操作。不过,它与传统数据库还是有一些区别的,以下是详细的对比和解释:
类似数据库的方面
-
数据存储:
- 链码状态(World State):Fabric 中的链码状态可以看作是一个键值存储,类似于数据库中的表。每个键对应一个值,这些键值对存储在账本的状态数据库中(默认是 LevelDB,也可以配置为 CouchDB)。
- 增删改查操作:
- PutState:类似于数据库中的
INSERT和UPDATE操作,用于添加或更新键值对。 - GetState:类似于数据库中的
SELECT操作,用于查询键对应的值。 - DelState:类似于数据库中的
DELETE操作,用于删除键值对。
- PutState:类似于数据库中的
-
事务处理:
- 事务提交:链码中的操作(如
PutState和GetState)会被封装在一个事务中,事务提交后,所有操作才会生效。这类似于数据库中的事务处理机制。 - 原子性:事务要么全部成功,要么全部失败,确保数据的一致性。
- 事务提交:链码中的操作(如
与传统数据库的不同
-
分布式账本:
- 去中心化:Fabric 是一个分布式账本技术,数据存储在多个节点上,每个节点都维护一份账本的副本。这与传统数据库的集中式存储不同。
- 共识机制:在 Fabric 中,事务需要通过共识机制(如 PBFT、SBFT、Kafka 等)来确保所有节点上的账本状态一致。传统数据库通常不需要这样的共识机制。
-
不可篡改:
- 区块链特性:Fabric 的账本是不可篡改的,一旦数据被写入账本,就无法修改。这与传统数据库中的数据可以被修改不同。
- 历史记录:Fabric 保留了所有历史交易的记录,可以通过区块链查询历史数据。传统数据库通常只保留当前状态,历史数据需要额外的机制来管理。
-
智能合约:
- 链码逻辑:链码(智能合约)定义了数据的操作逻辑,这些逻辑是自动执行的,确保交易的业务规则被正确执行。传统数据库通常需要应用程序来实现业务逻辑。
- 自动执行:链码中的函数在事务提交时自动执行,确保数据的一致性和业务规则的遵守。
示例
假设你有一个简单的投票应用,链码中定义了以下函数:
- Vote:为候选人投票,更新候选人的票数。
- GetVotes:查询候选人的票数。
在链码中,这些函数可以这样实现:
go
// Vote 为候选人投票
func (s *VoteContract) Vote(ctx contractapi.TransactionContextInterface, candidate string) error {
    votes, err := ctx.GetStub().GetState(candidate)
    if err != nil {
        return fmt.Errorf("failed to read votes: %v", err)
    }
    if votes == nil {
        votes = []byte("1")
    } else {
        voteCount := int(votes[0])
        votes = []byte{byte(voteCount + 1)}
    }
    err = ctx.GetStub().PutState(candidate, votes)
    if err != nil {
        return fmt.Errorf("failed to update votes: %v", err)
    }
    return nil
}

// GetVotes 查询候选人的票数
func (s *VoteContract) GetVotes(ctx contractapi.TransactionContextInterface, candidate string) (int, error) {
    votes, err := ctx.GetStub().GetState(candidate)
    if err != nil {
        return 0, fmt.Errorf("failed to read votes: %v", err)
    }
    if votes == nil {
        return 0, nil
    }
    return int(votes[0]), nil
}
通过 peer chaincode invoke 和 peer chaincode query 命令,你可以在链码上调用这些函数,实现数据的增删改查操作。
总结
Hyperledger Fabric 网络中的链码确实提供了一种类似于数据库的操作方式,但它是基于分布式账本和智能合约的,具有去中心化、不可篡改和自动执行业务逻辑的特点。这些特性使得 Fabric 适用于需要高透明度和数据不可篡改的场景,如供应链管理、金融交易等


 1240
1240

 被折叠的 条评论
为什么被折叠?
被折叠的 条评论
为什么被折叠?
 到【灌水乐园】发言


