


电脑优化及环境搭建
一、背景
换电脑后开机优化及基础开发环境需要搭建,写一篇攻略,大佬们就不用看了
二、需求
电脑第一次开机优化和开发环境搭建
三、实现
(一)下载必须的资源
360(一会解释)、JDK(有zip就不要exe的)、Maven、JetBrains开发工具、Chrome浏览器(也可以不下,现在Edge也挺好用)、VS Code(建议下载System64位版本之后省事)
(二)配置优化
- 360
电脑装360是有争议的,但感觉设置启动项还是很详细的,管理普通进程也比较方便(没错,我用360主要就是用这俩功能…),而且把360设置调一下也是可用的(其实就是关掉一些鸡肋的功能,优化完后觉得电脑会卡就两个选择:1.换电脑,2.卸360再撑一下)
安装位置:建议系统盘(大多数是C盘)
开始优化:
a. 先重启
b. 启动项优化,把你需要的留下,其他直接全选上禁用掉就ok。有些360不会扫出来(比如360管家亲儿子“360软件助手”),优化完后再手动点开下图“启动项管理”给手动禁用一遍(自己心里没把不敢禁就算了)

c. 设置360(选择卸360的可以直接跳过了),这个太多了,一条一条看吧,把你不需要的都取消勾选。 - 安装JDK
zip版:直接解压
exe版:下图这步之后就是安装了,安装完后就可以直接关掉了,不用下载后面的jre

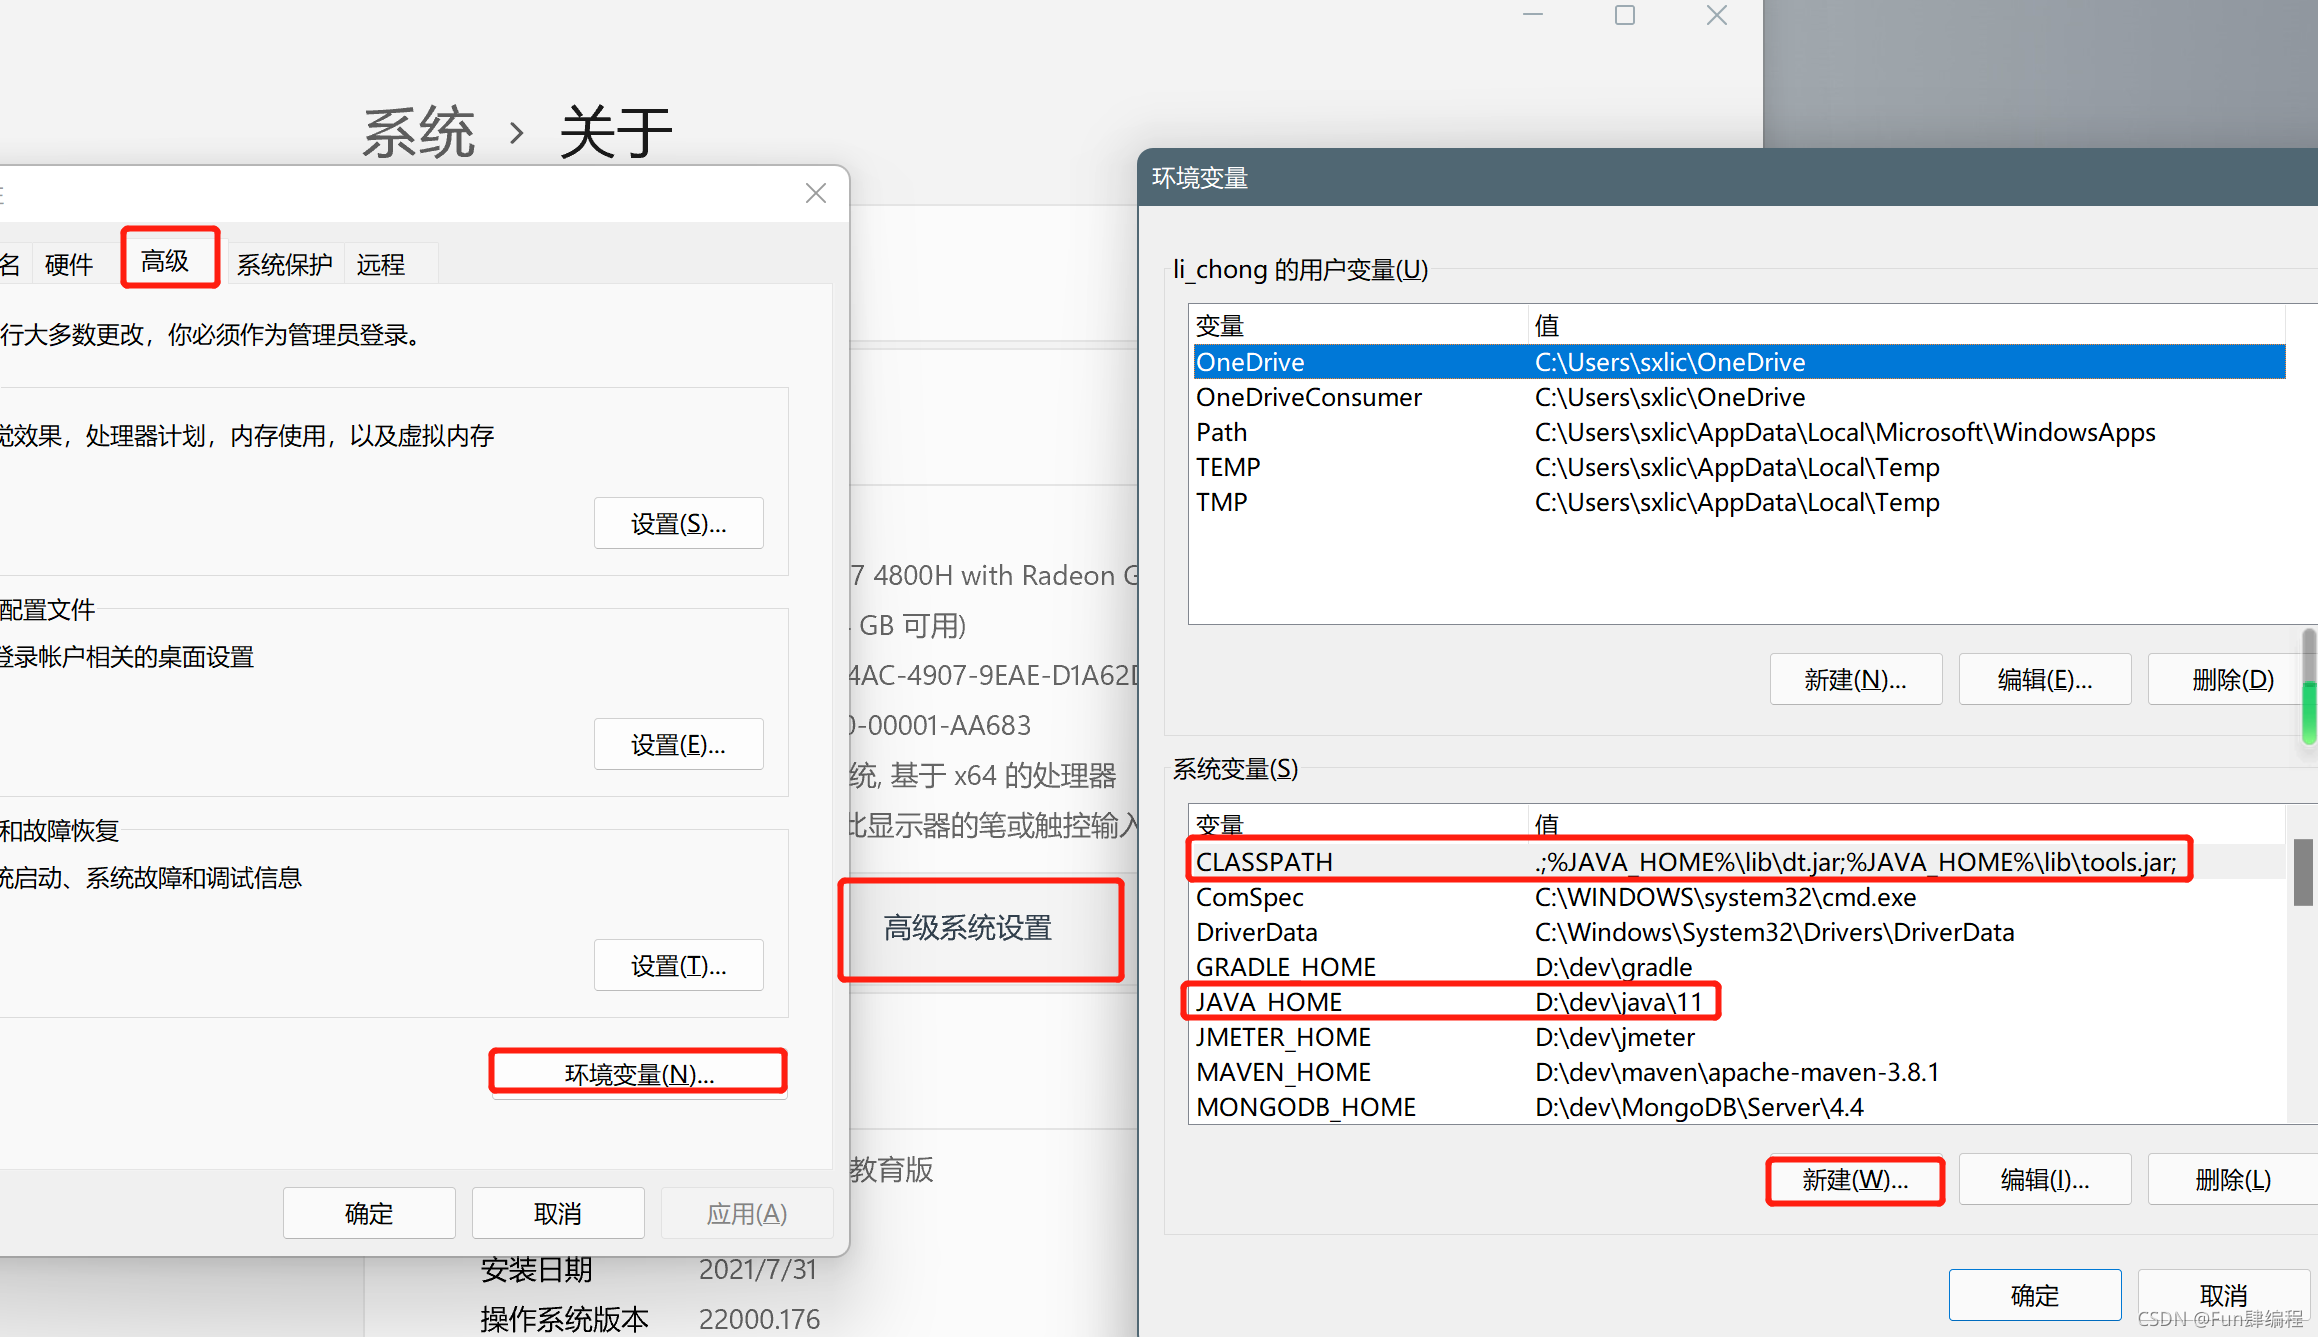
设置环境变量:
此电脑右键->属性->高级系统设置->环境变量->新建系统变量JAVA_HOME和CLASSPATH->配置PATH->确定
JAVA_HOME:JDK解压或安装路径
CLASSTHPATH:.;%JAVA_HOME%\lib\dt.jar;%JAVA_HOME%\lib\tools.jar;
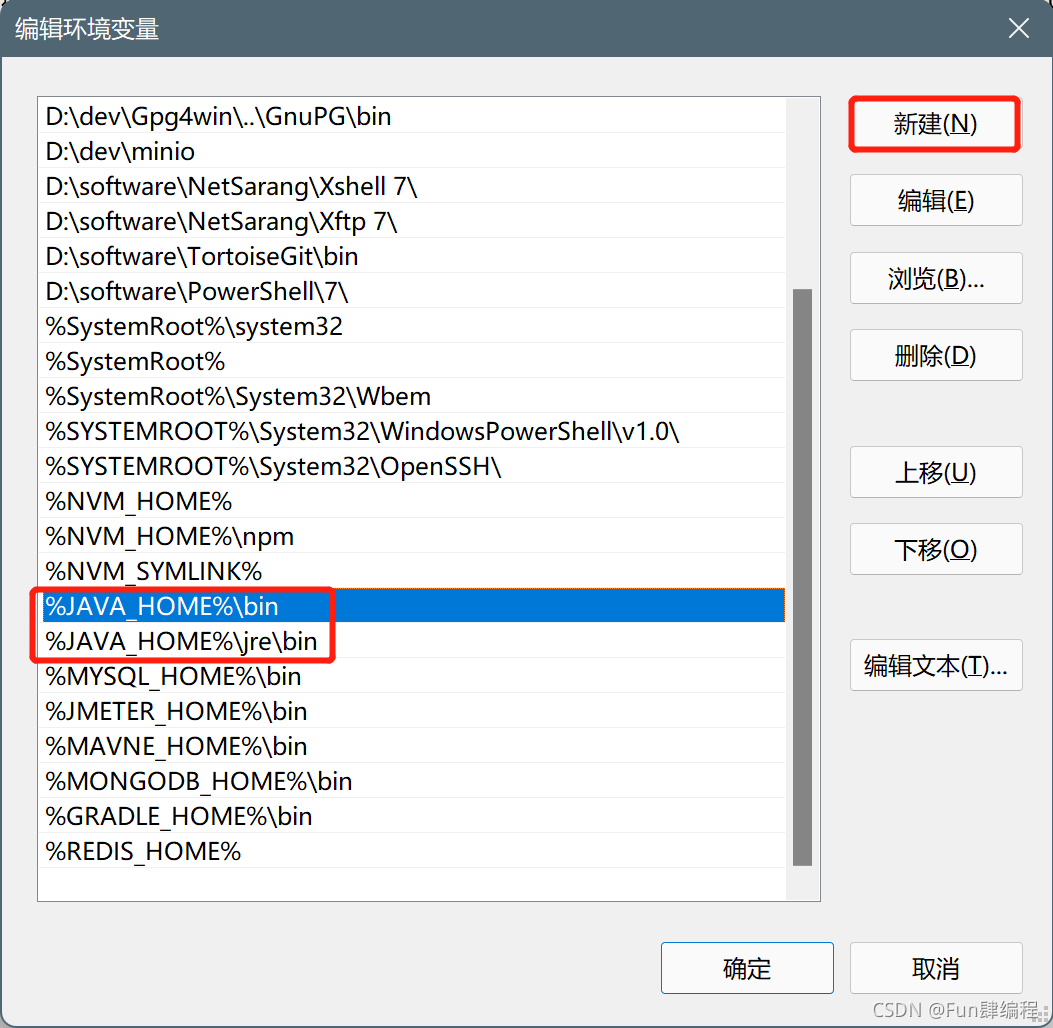
PATH新增:%JAVA_HOME%\bin和%JAVA_HOME%\jre\bin
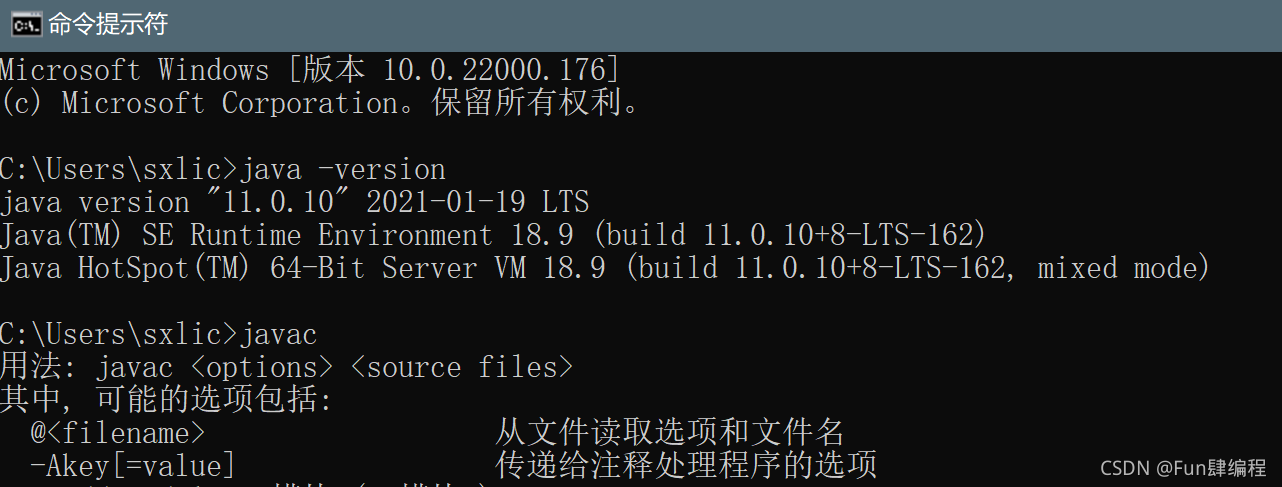
验证:
java -version
javac
- 配置Maven
直接解压
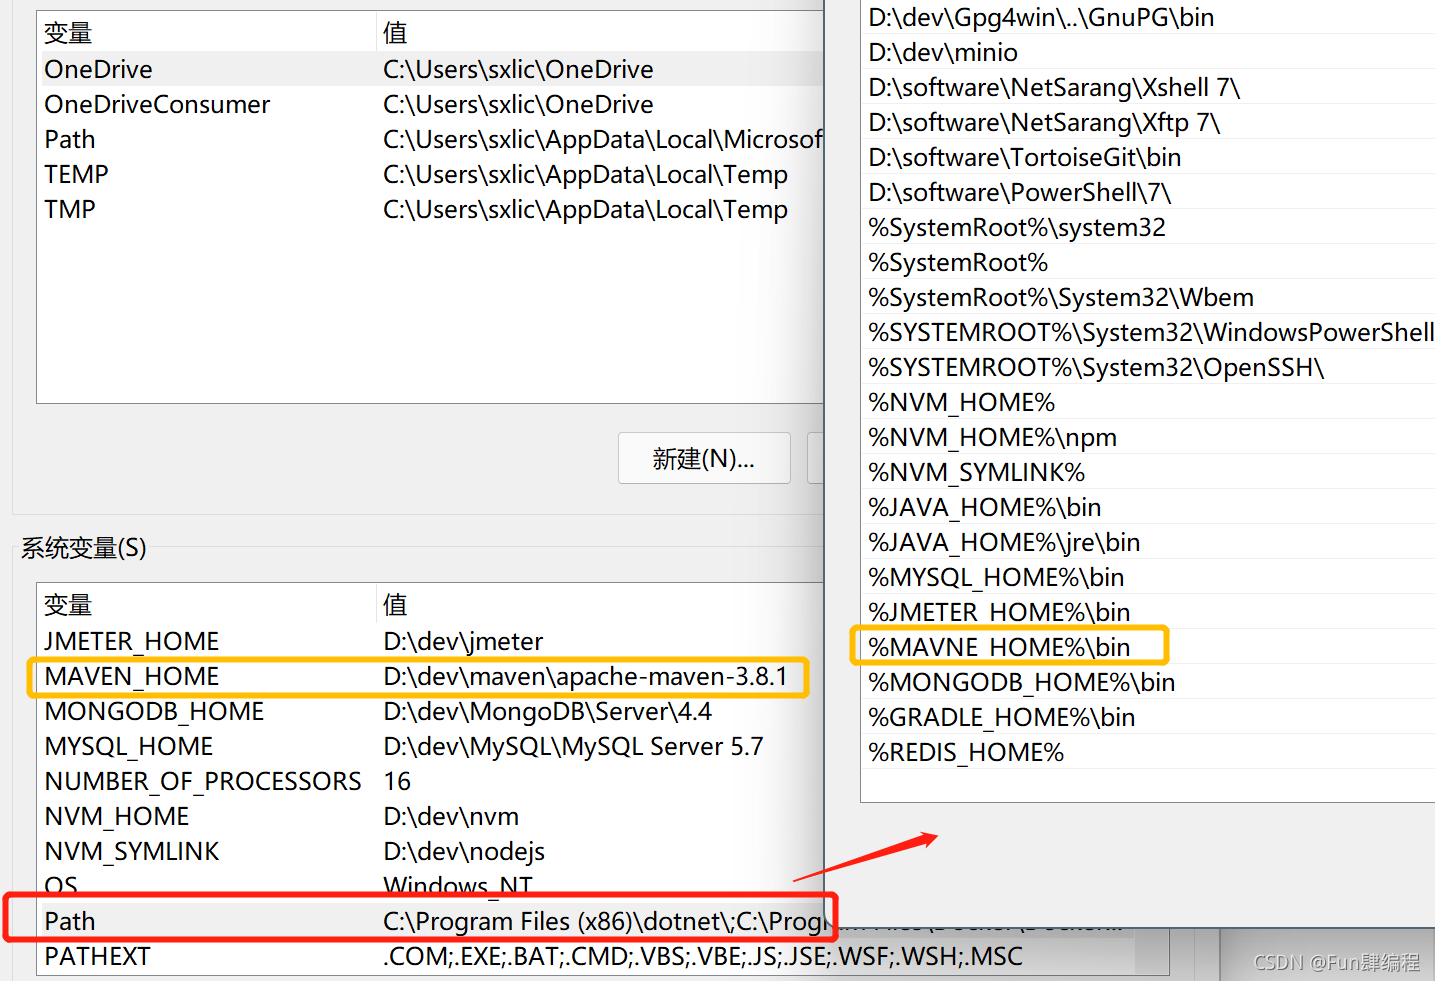
配置环境变量:
修改maven设置
直接改全局(C:\Users\用户.m2\settings.xml),附上settings.xml:
<?xml version="1.0" encoding="UTF-8"?>

<settings xmlns="http://maven.apache.org/SETTINGS/1.0.0"
          xmlns:xsi="http://www.w3.org/2001/XMLSchema-instance"
          xsi:schemaLocation="http://maven.apache.org/SETTINGS/1.0.0 http://maven.apache.org/xsd/settings-1.0.0.xsd">
	<!-- 本地仓库路径 -->
    <localRepository>D:\localRepository</localRepository>

    <pluginGroups>
    </pluginGroups>
    <proxies>
    </proxies>

    <servers>
        <server>
            <id>releases</id>
            <username>admin</username>
            <password>123123</password>
        </server>
        <server>
            <id>snapshots</id>
            <username>admin</username>
            <password>123123</password>
        </server>
    </servers>

	<!-- 镜像 -->
    <mirrors>
		<!-- 阿里镜像 -->
        <mirror>
            <id>nexus-aliyun</id>
            <mirrorOf>public</mirrorOf>
            <name>阿里云</name>
            <url>https://maven.aliyun.com/nexus/content/groups/public</url>
        </mirror>
    </mirrors>

    <!-- 环境 -->
    <profiles>
        <profile>
            <id>jdk-1.8</id>
            <activation>
				<!--默认激活配置-->
                <activeByDefault>false</activeByDefault>
                <jdk>1.8</jdk>
            </activation>
            <properties>
                <maven.compiler.source>1.8</maven.compiler.source>
                <maven.compiler.target>1.8</maven.compiler.target>
                <maven.compiler.compilerVersion>1.8</maven.compiler.compilerVersion>
            </properties>
        </profile>
        <profile>
            <id>env-dev</id>
            <activation>
                <!--<activeByDefault>true</activeByDefault>-->
            </activation>
            <repositories>
                <repository>
                    <id>nexus-releases</id>
                    <url>https://maven.aliyun.com/nexus/content/groups/public</url>
                    <releases>
                        <enabled>true</enabled>
                    </releases>
                    <snapshots>
                        <enabled>true</enabled>
                    </snapshots>
                </repository>
            </repositories>
            <pluginRepositories>
                <pluginRepository>
                    <id>nexus-snapshots</id>
                    <url>https://maven.aliyun.com/nexus/content/groups/public</url>
                    <releases>
                        <enabled>true</enabled>
                    </releases>
                    <snapshots>
                        <enabled>true</enabled>
                    </snapshots>
                    <layout>default</layout>
                </pluginRepository>
            </pluginRepositories>
        </profile>
    </profiles>
    <activeProfiles>
        <activeProfile>jdk-1.8</activeProfile>
        <activeProfile>env-dev</activeProfile>
    </activeProfiles>
</settings>
-
配置NodeJS和NPM
建议NVM,见【前端-开发环境】使用NVM实现不同nodejs版本的自由切换(NVM完整使用手册) -
设置IDEA
安装就不讲了,一直下一步选对自己要安装的位置就行
安装常用插件
Maven Helper、MybatisX、SonarLint、Alibaba Java Coding Guidelines、GitToolBox、中文语言包
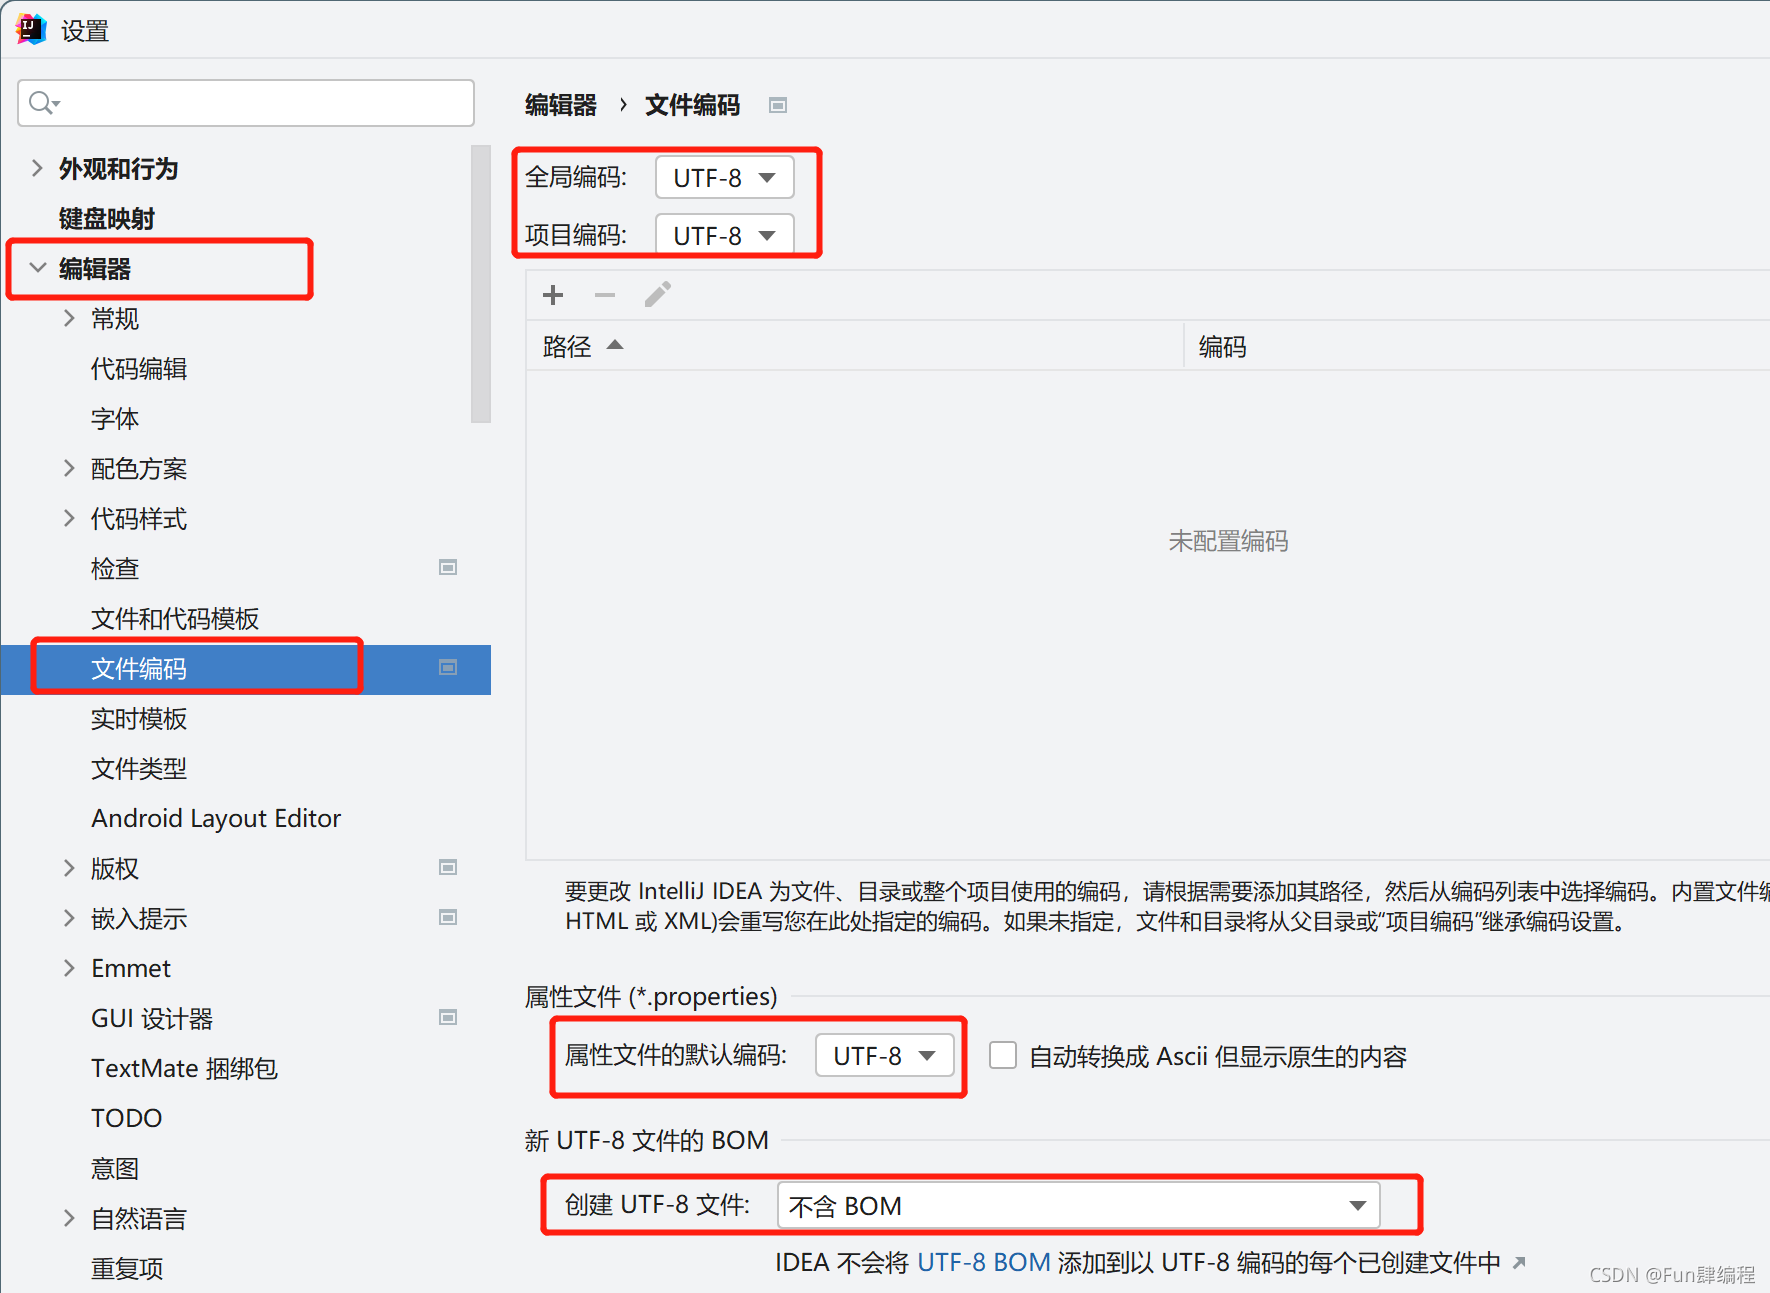
文件编码设置
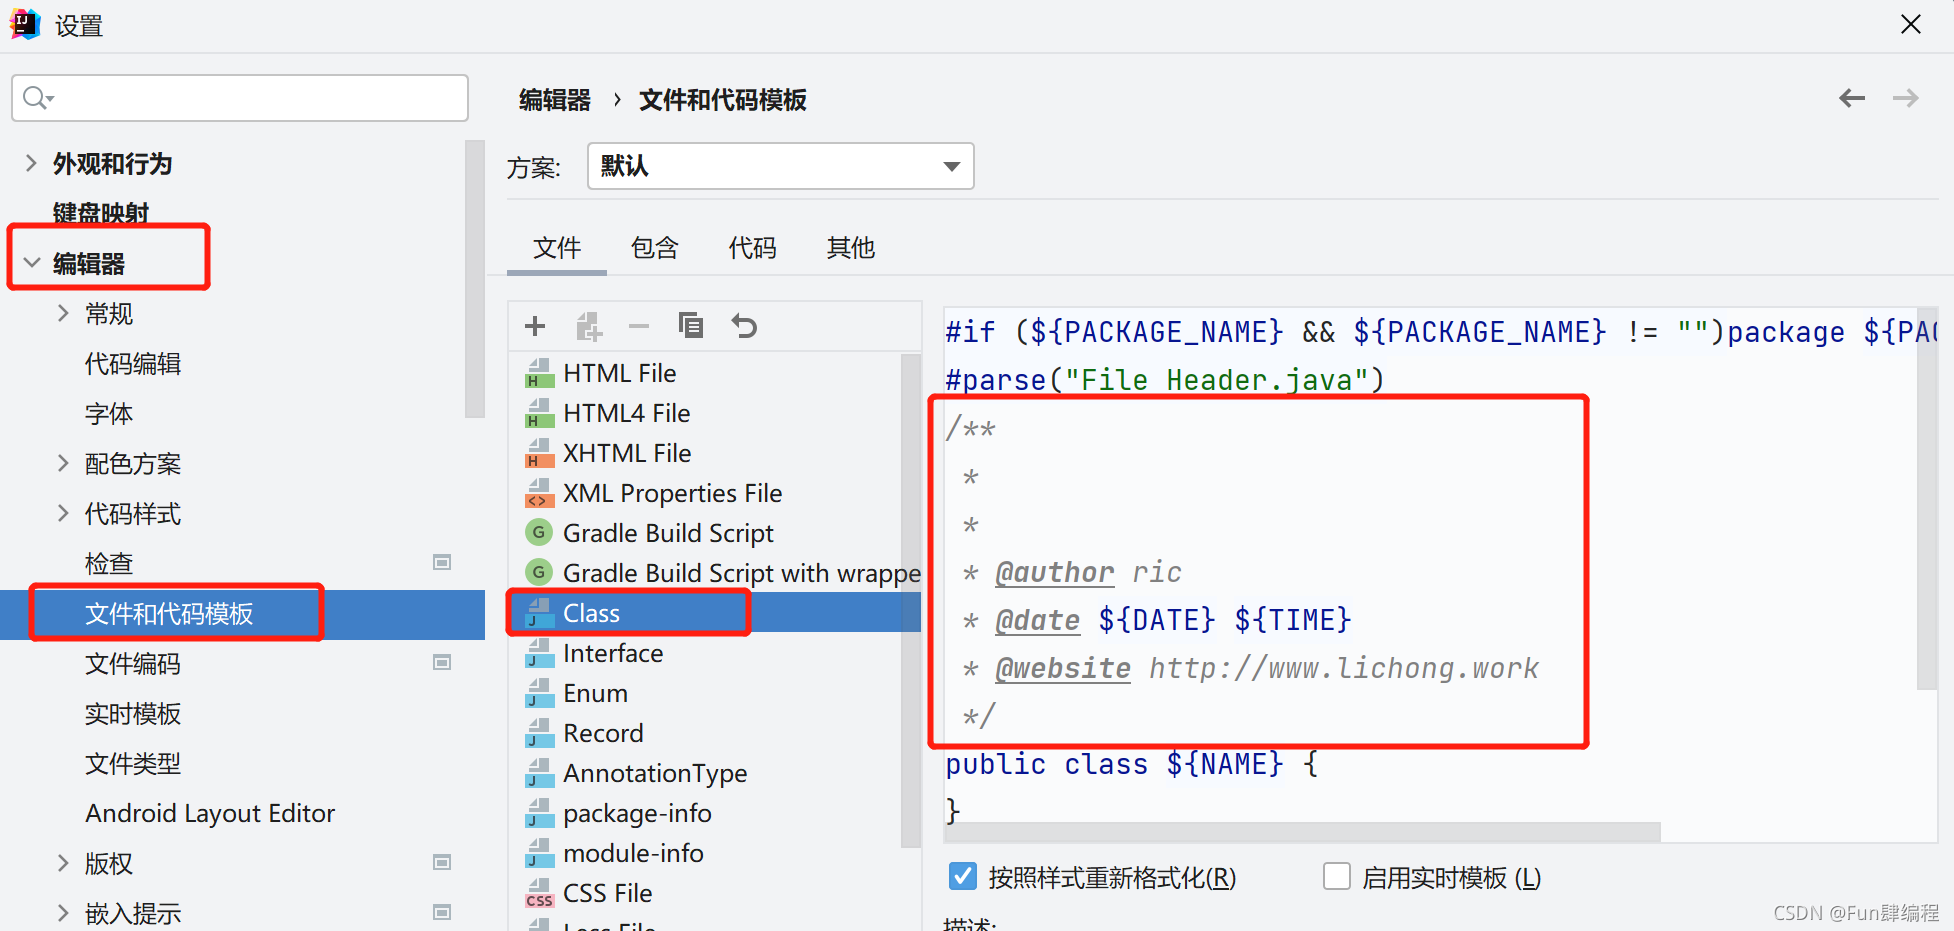
自定义文件模板
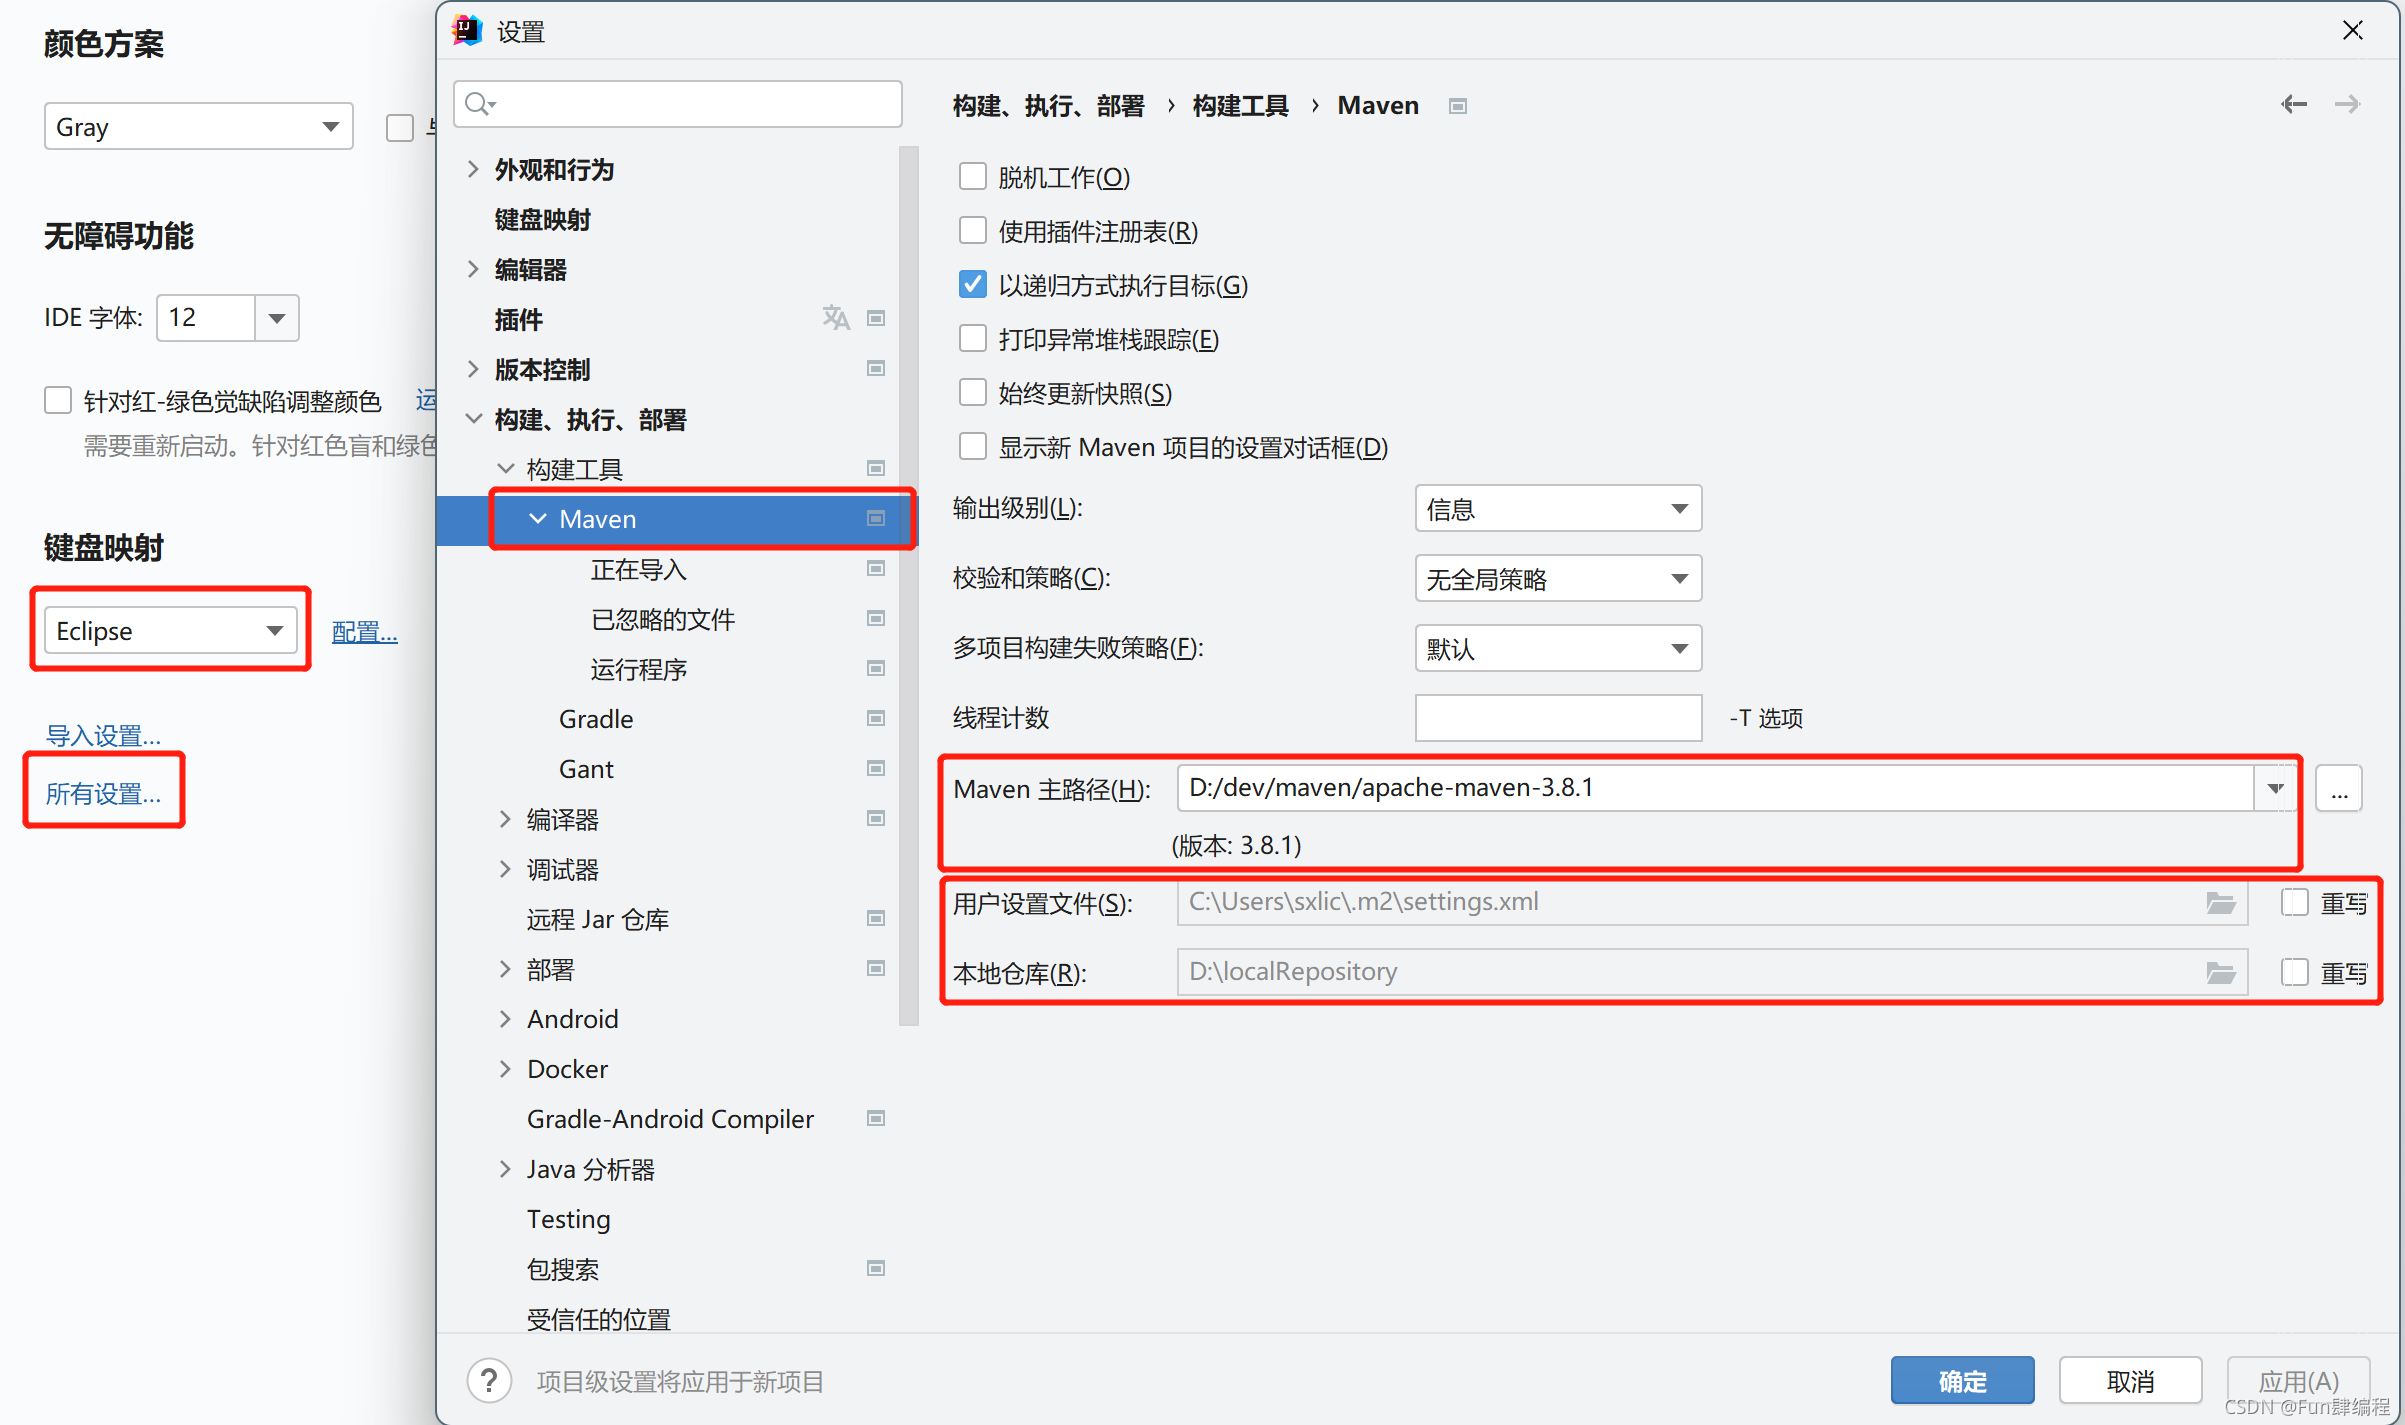
设置全局maven
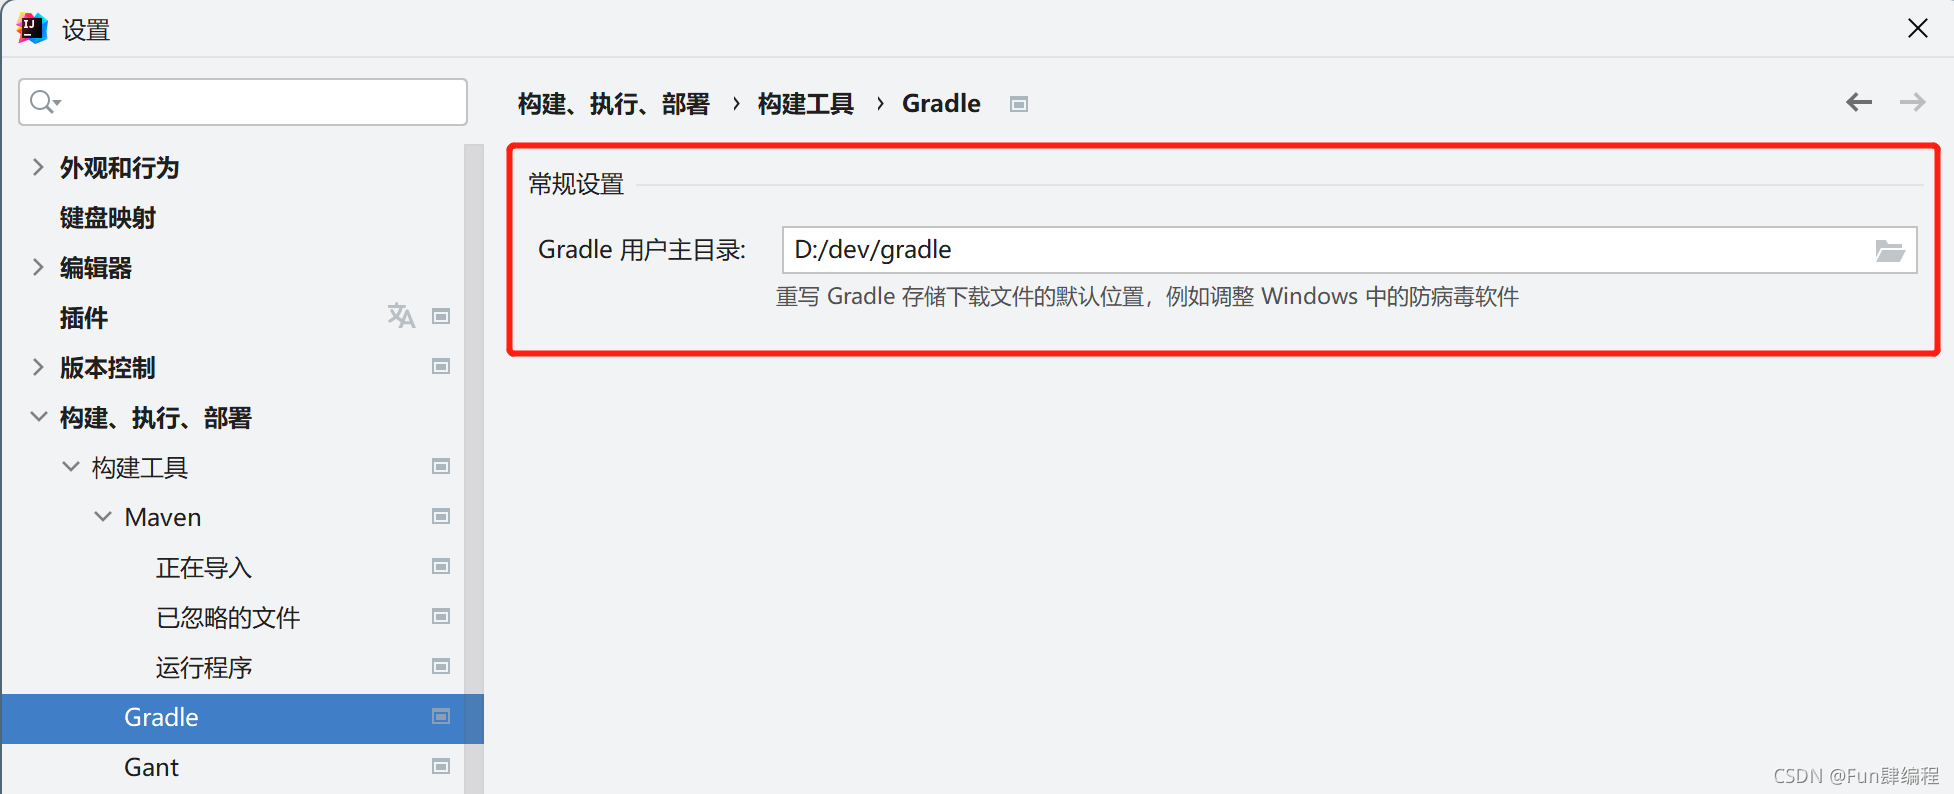
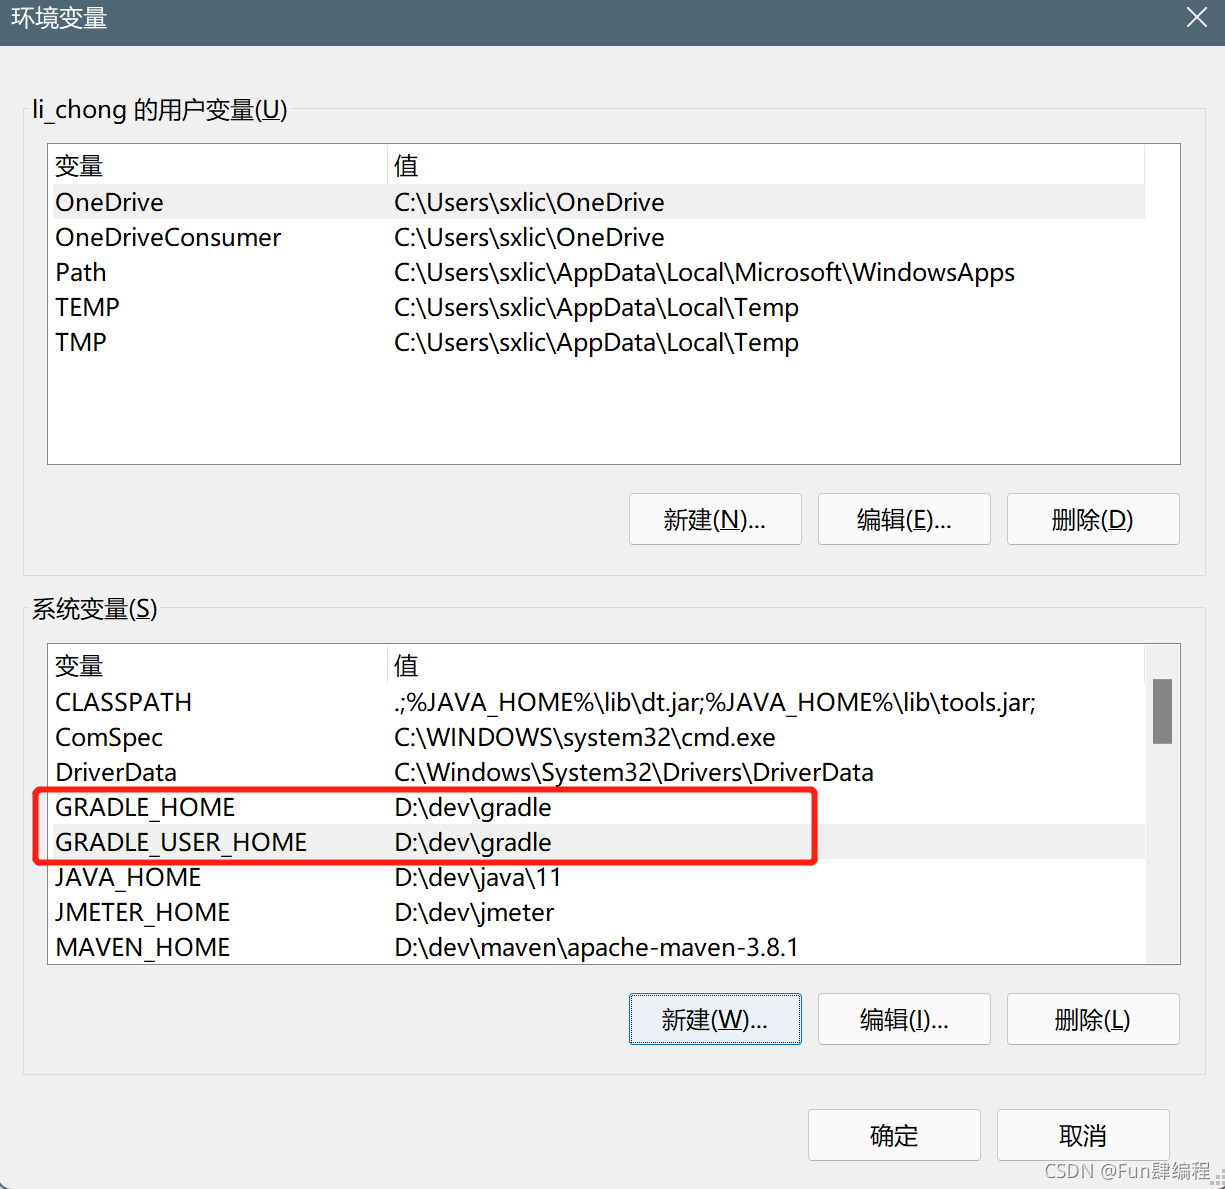
修改gradle位置
默认在C:\Users\用户.gradle
应该修改idea默认设置,并增加GRADLE_HOME和GRADLE_USER_HOME的环境变量
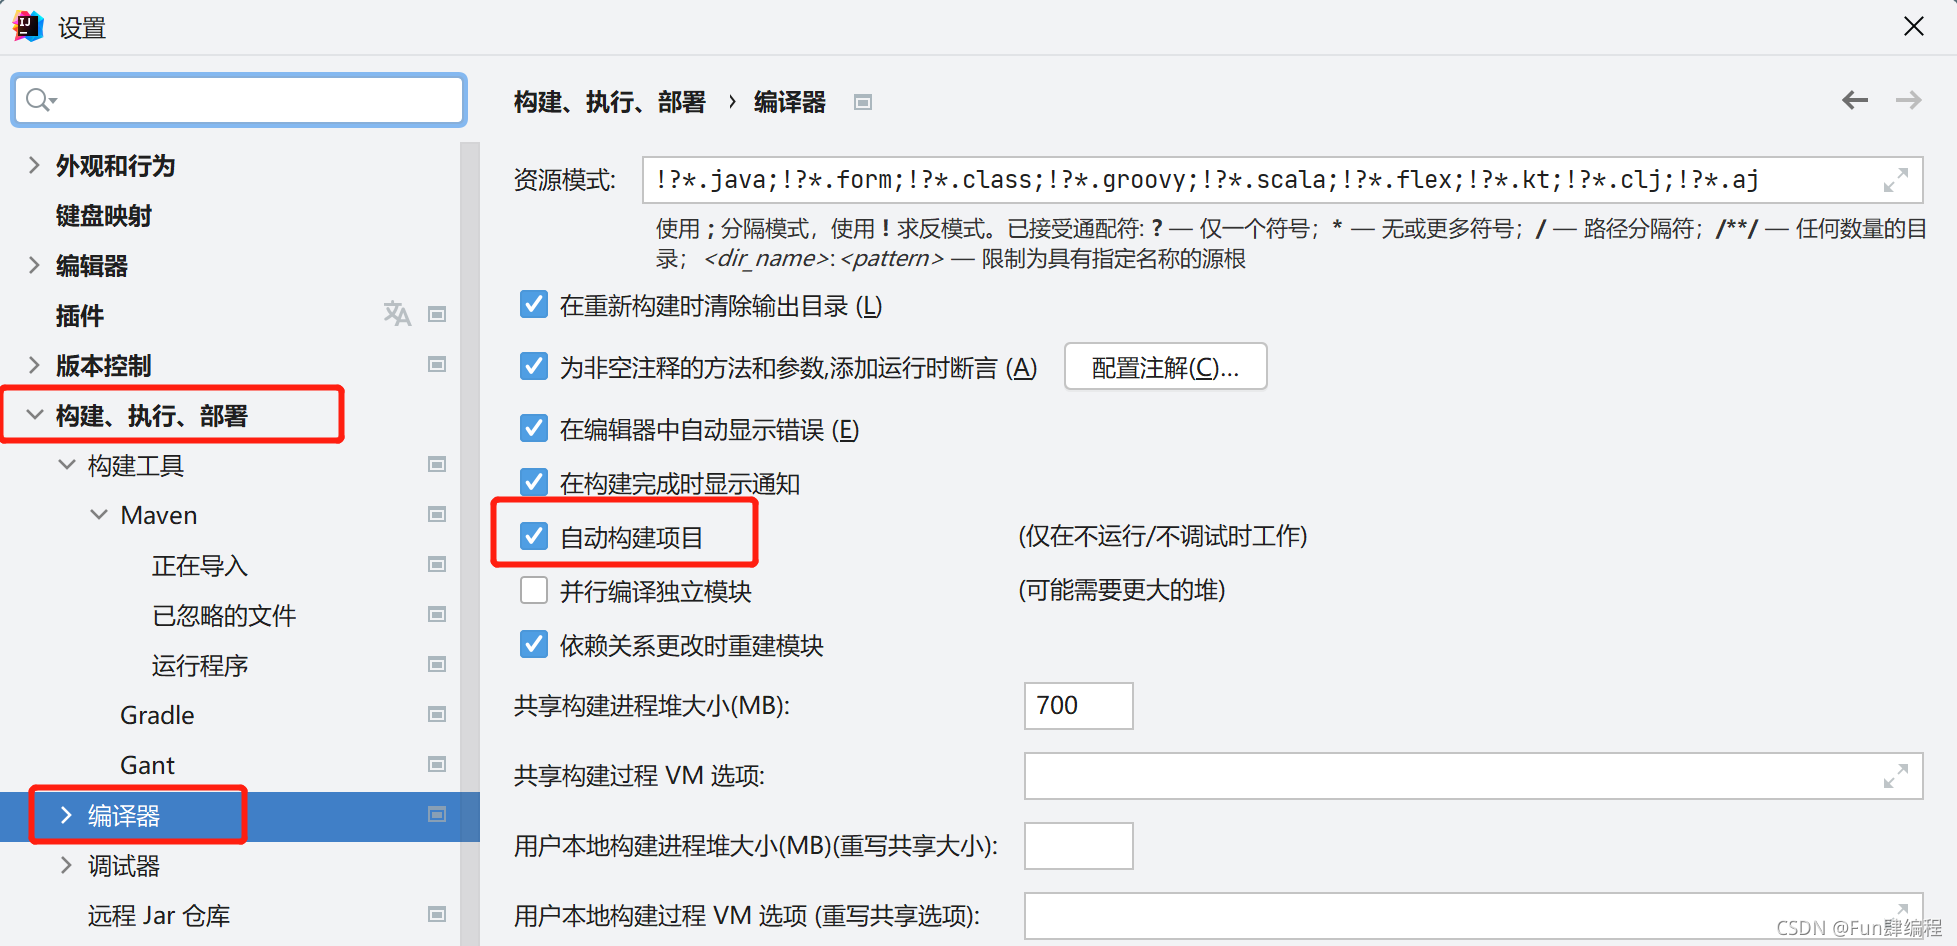
打开自动构建项目
配置受信任的位置
新版idea增加了这个功能,不是信任区的访问不到,为了开发省事,建议直接把根盘符加进去

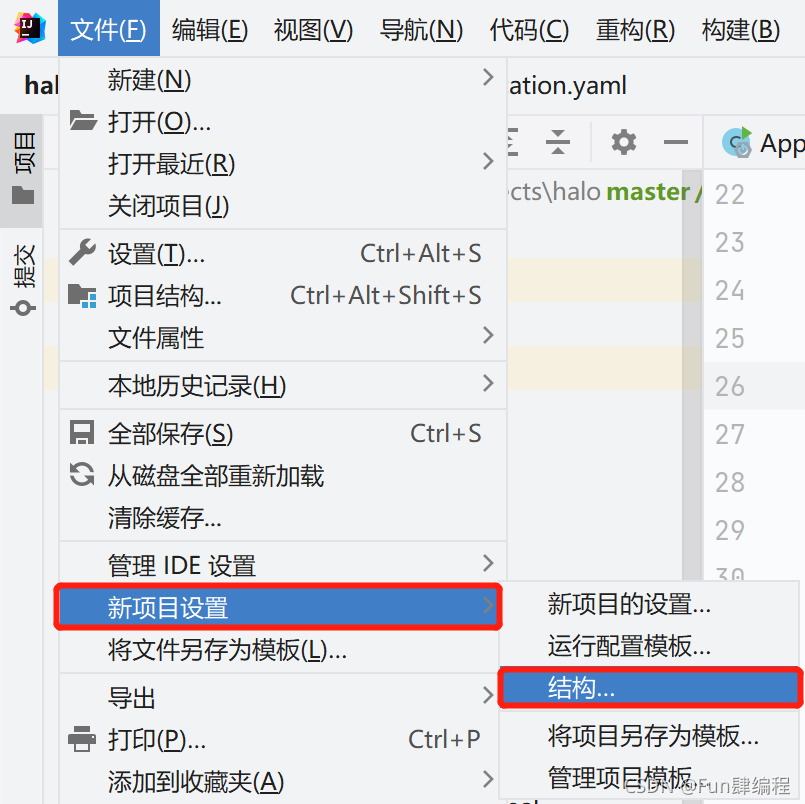
新项目结构设置
随便先建个工程进去点击菜单栏文件->新项目设置->结构
在这里加上你本地的JDK
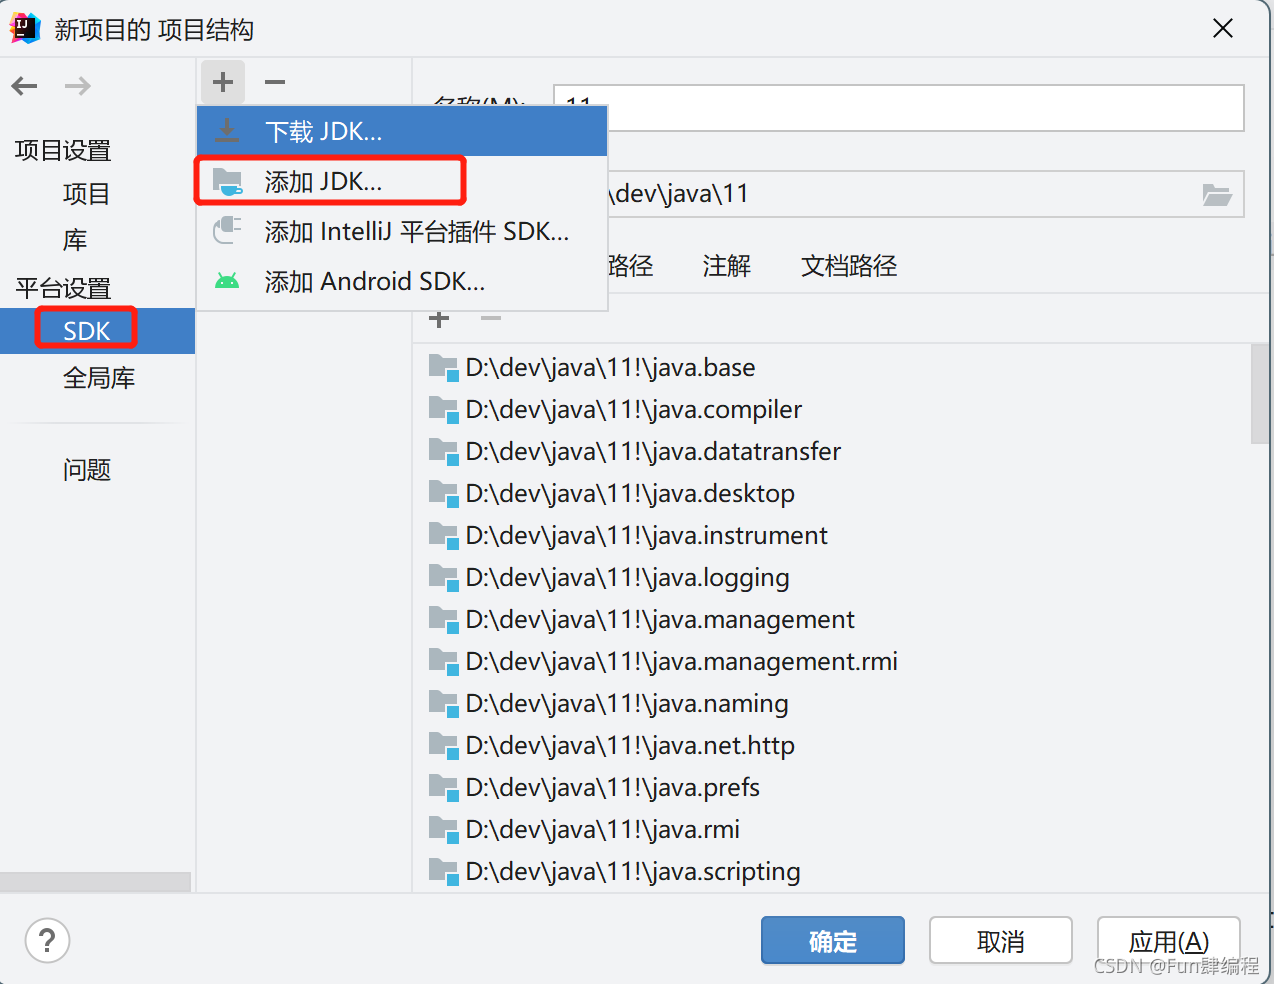
设置新项目默认的SDK

终于Over -
安装Chrome
一键安装 -
配置VS Code
安装掠过,直接进入设置
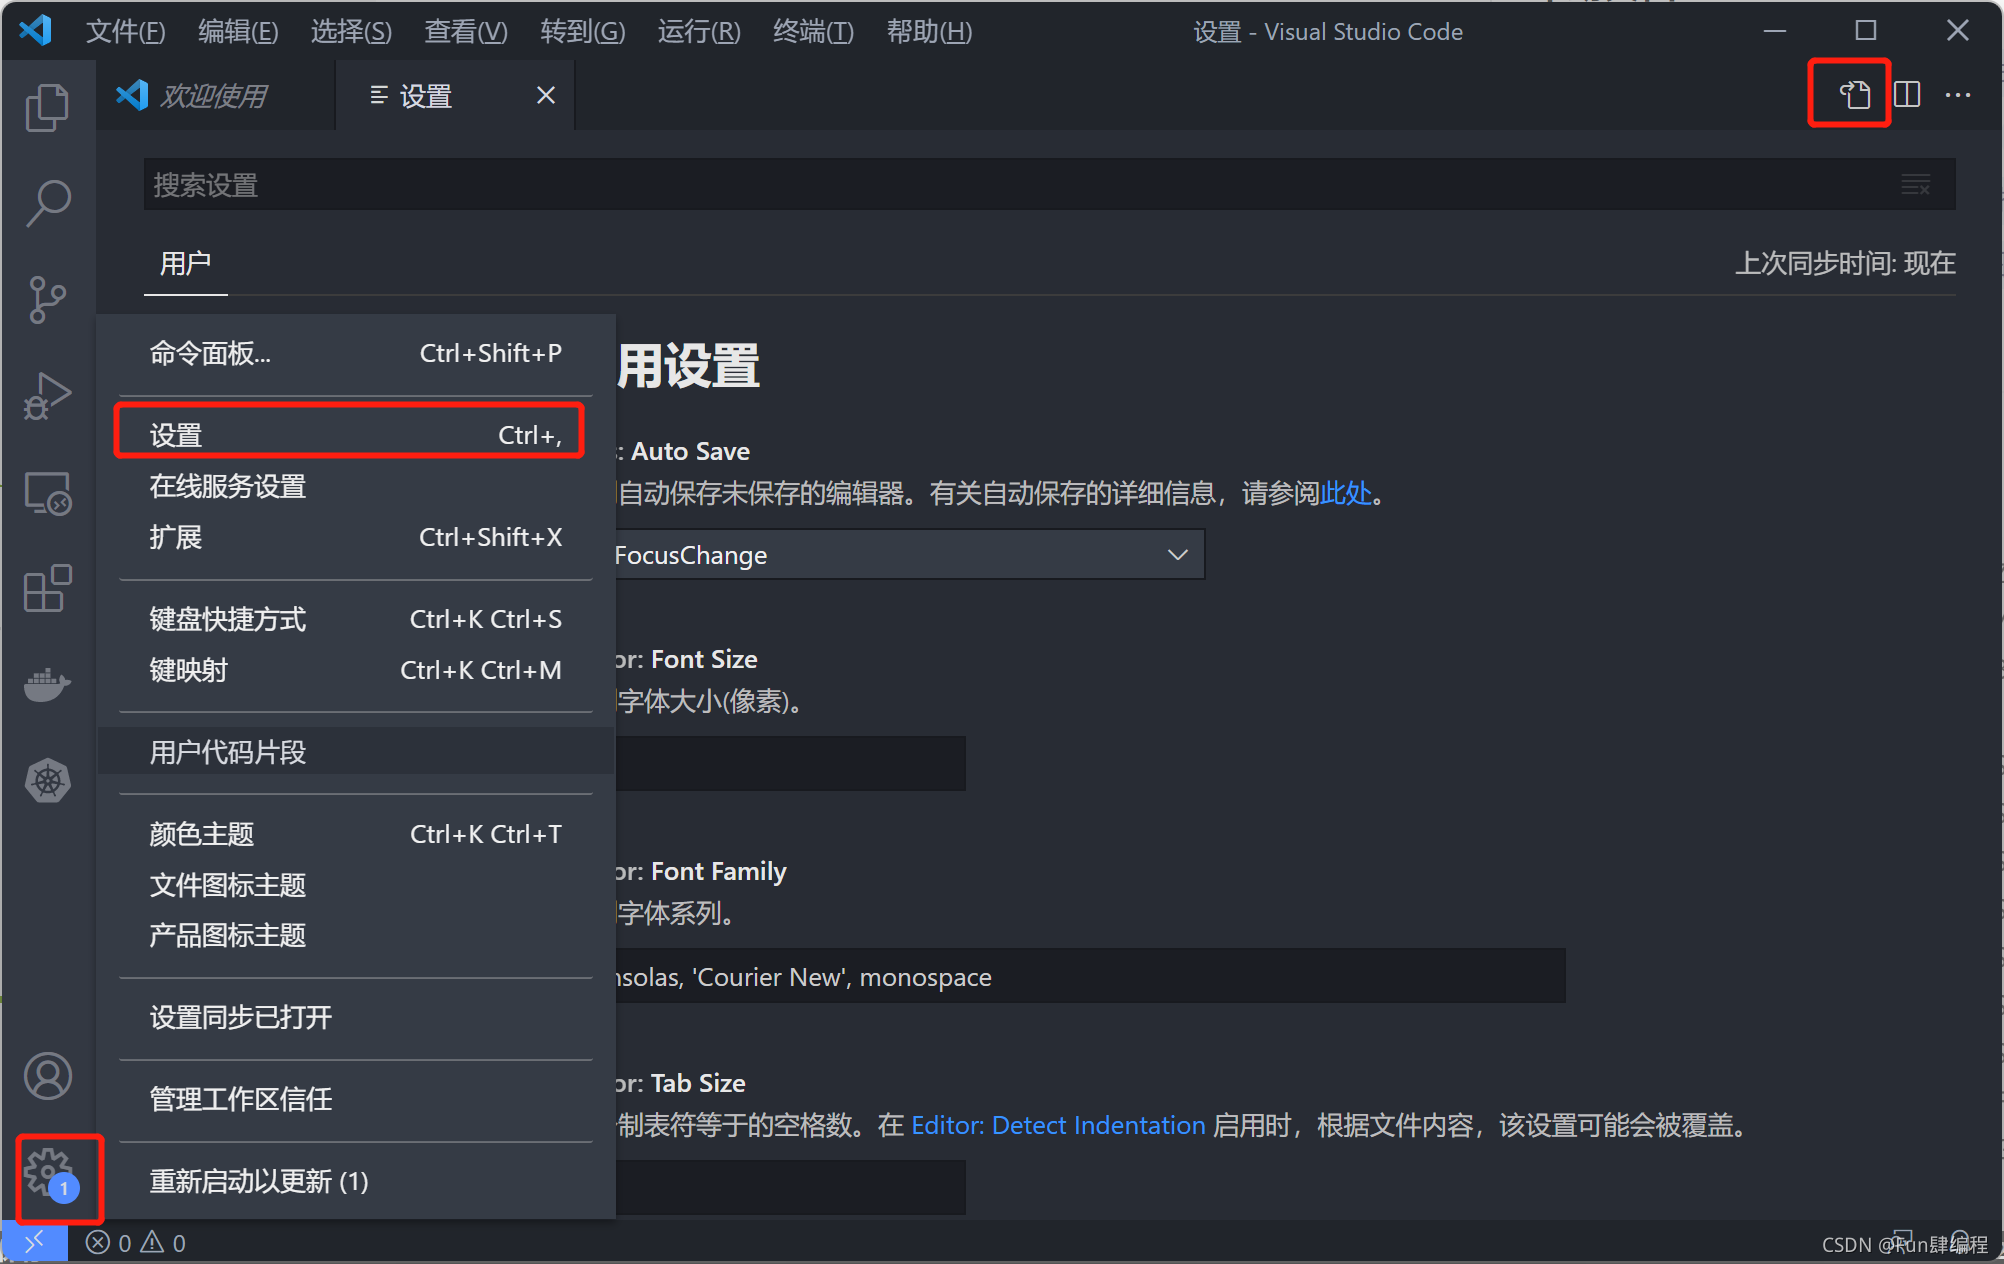
附上我的设置文件做参考,具体怎么配需要根据个人习惯(文件位置:C:\Users\用户\AppData\Roaming\Code\User\settings.json)
{
    "editor.suggestSelection": "first",
    "vsintellicode.modify.editor.suggestSelection": "automaticallyOverrodeDefaultValue",
    "editor.renderWhitespace": "all",
    "editor.renderControlCharacters": true,
    "files.trimTrailingWhitespace": true,
    "files.encoding": "utf8bom",
    "files.autoGuessEncoding": true,
    "[powershell]": {
        "files.encoding": "utf8bom",
        "files.autoGuessEncoding": true
    },
    "workbench.colorTheme": "Atom One Dark",
    "redhat.telemetry.enabled": true,
    //失去焦点后自动保存
    "files.autoSave": "onFocusChange",
    "editor.tabCompletion": "on",
    "editor.codeActionsOnSave": {
        "source.organizeImports": true
    },
    "emmet.includeLanguages": {
        "vue-html": "html",
        "vue": "html",
        "wpy": "html"
    },
    "emmet.triggerExpansionOnTab": true,
    "files.associations": {
        "*.vue": "vue",
        "*.wpy": "vue",
        "*.wxml": "html",
        "*.wxss": "css"
    },
    "explorer.confirmDelete": false,
    "editor.wordWrap": "on",
    // #值设置为true时,每次保存的时候自动格式化;
    "editor.detectIndentation": false,
    // #每120行就显示一条线
    "editor.rulers": [
    ],
    // #在使用搜索功能时,将这些文件夹/文件排除在外
    "search.exclude": {
        "**/node_modules": true,
        "**/bower_components": true,
        "**/logs": true,
        "**/target": true
    },
    // #让vue中的js按"prettier"格式进行格式化
    "vetur.format.defaultFormatter.html": "js-beautify-html",
    "vetur.format.defaultFormatter.js": "prettier",
    "vetur.format.defaultFormatterOptions": {
        "js-beautify-html": {
            // #vue组件中html代码格式化样式
            "wrap_attributes": "force-aligned", // 也可以设置为“auto”,效果会不一样
            "wrap_line_length": 200,
            "end_with_newline": false,
            "semi": false,
            "singleQuote": true
        },
        "prettier": {
            "semi": false,
            "singleQuote": true
        }
    },
    "svn.path": "D:\\dev\\TortoiseSVN\\bin",
    "maven.terminal.useJavaHome": true,
    "maven.pomfile.autoUpdateEffectivePOM": true,
    "maven.executable.preferMavenWrapper": false,
    "vs-kubernetes": {
        "vscode-kubernetes.minikube-path.windows": "C:\\Users\\sxlic\\.vs-kubernetes\\tools\\minikube\\windows-amd64\\minikube.exe",
        "vscode-kubernetes.helm-path.windows": "C:\\Users\\sxlic\\.vs-kubernetes\\tools\\helm\\windows-amd64\\helm.exe"
    },
    "powershell.powerShellDefaultVersion": "terminal-powershell7",
    "terminal.integrated.profiles.windows": {
        "PowerShell": {
            "source": "PowerShell",
            "icon": "terminal-powershell"
        },
        "Git-Bash": {
            "path": "E:\\dev\\Git\\bin\\bash.exe",
            "args": []
        },
        "PowerShell7": {
            "path": "D:\\software\\PowerShell\\7\\pwsh.exe",
            "args": []
        }
    },
    "terminal.integrated.defaultProfile.windows": "Command Prompt",
    "java.configuration.maven.globalSettings": "C:\\Users\\sxlic\\.m2\\setting.xml",
    "java.configuration.maven.userSettings": "C:\\Users\\sxlic\\.m2\\setting.xml",
    "files.exclude": {
        "**/.classpath": true,
        "**/.project": true,
        "**/.settings": true,
        "**/.factorypath": true
    },
    "update.showReleaseNotes": false,
    "telemetry.enableCrashReporter": false,
    "telemetry.enableTelemetry": false,
    "npm.fetchOnlinePackageInfo": false,
    "search.followSymlinks": false,
    "editor.tabSize": 2
}


 被折叠的 条评论
为什么被折叠?
被折叠的 条评论
为什么被折叠?
 到【灌水乐园】发言


