


 本文详细介绍了如何使用Microsoft Visual Studio 2010专业版编译libiconv 1.14源码,包括获取源码、创建项目、配置编译选项以及修改源文件等步骤,帮助开发者实现根据自己的需求优化编译libiconv。
代码在github:https://github.com/langresser/iconv1.14-for-vs2010
参考这篇文章:http://www.codeproject.com/Articles/302012/How-to-Build-libiconv-with-Microsoft-Visual-Studio
摘录如下:
Introduction
Libiconv is one of the most useful and famous libraries that converts texts between encodings and has been developed under GNU projects. However, now it does not provide the way to build it with Microsoft Visual Studio but with gcc. Before, it had provided but now stopped explaining how to build it with Microsoft Visual Studio. However, many of the computer programmers are using Microsoft Visual Studio and want to build libiconv with Microsoft Visual Studio. So, this article is about how to build libiconv with Microsoft Visual Studio. If you can buildlibiconv with Microsoft Visual Studio, you will be able to change various compilation options and build it in order to optimize libiconv according to your preference and needs.
Background
If you have no idea about libiconv, you can refer to it here or you can Google for it. You may be confused withiconv and libiconv. Iconv is the executable program that uses libiconv while libiconv is the library for converting text strings between two different encodings. This article is related to libiconv. However, this article is not about libiconv but about how to build libiconv with Microsoft Visual Studio. The GNU library libiconv is under LGPL license. So, you have to be really careful when you use libiconv for your commercial use or when you don't want to publicize your source code. About LPGL license, you can refer here.
How to Get the Source Code of libiconv
At the moment, the most recent version of libiconv is 1.14. You can download the source code of libiconv1.14 here and here. Of course, you can get the older versions of libiconv here.
How to Build
I am going to explain the case of Microsoft Visual Studio 2010 professional edition but the explanation can be applied to the earlier versions of Microsoft Visual Studio and to the express edition of each of them.
First Step
You download the most recent version of libiconv which is 1.14 from here or here. And unzip the downloaded file "libiconv-1.14.tar.gz" on your certain folder.
Second Step
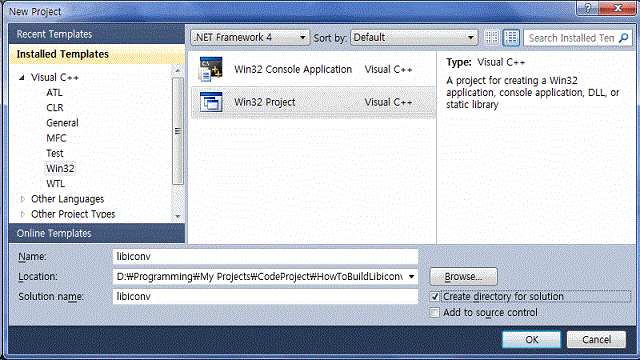
You run your Microsoft Visual Studio. Then, you make a new WIN32 project. Let's say "libiconv" as the project name. Check to create directory for solution. Choose DLL as the application type and check Empty project for additional options. Click the button "finish" to generate the new project.

Third Step
Now, you have to copy some files from the folders generated by unzipping "libiconv-1.14.tar.gz" to the project folders. To build "libiconv", you need to compile three files "localcharset.c", "relocatable.c" and "iconv.c". That is the key idea!
Copy three files "relocatable.h", "relocatable.c" and "iconv.c" in the folder "...\libiconv-1.14\lib\" to the project folder "...\libiconv\libiconv\".
Copy "...\libiconv-1.14\libcharset\lib\localcharset.c" to the project folder "...\libiconv\libiconv\".
Copy "...\libiconv-1.14\libcharset\include\localcharset.h.build.in" to the project folder "...\libiconv\libiconv\" and then, rename the copied "localcharset.h.build.in" to "localcharset.h.
Copy "...\libiconv-1.14\windows\libiconv.rc" to the project folder "...\libiconv\libiconv\".
Make folder "include" under the project folder "...\libiconv\" so to make "...\libiconv\include".
Copy "...\libiconv-1.14\include\iconv.h.build.in" to the project include folder "...\libiconv\include" and then, rename the copied "iconv.h.build.in" to "iconv.h".
Copy "...\libiconv-1.14\config.h.in" to the project include folder "...\libiconv\include" and then, rename the copied "config.h.in" to "config.h".
And then, copy all the header files (*.h) and definition files (*.def) in the folder "...\libiconv-1.14\lib" to the project include folder "...\libiconv\include".
Fourth Step
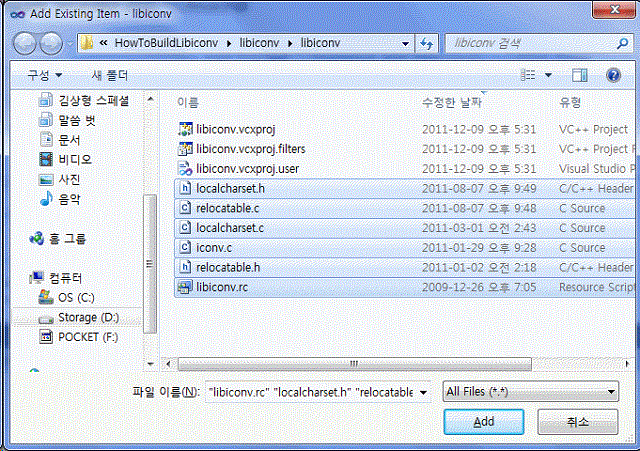
Now, you have to add existing items to the project "libiconv" that we made at the second step. Execute "project > Add Existing items..." at the main menu to add existing items to the project.
Fifth Step
You can make 64-bit platform through configuration manager in order to generate libiconv.dll for 64-bit system. You can also make two other configurations "ReleaseStatic" and "DebugStatic" in order to generatelibiconvStatic.lib as a static link library.
At the project properties, change Output Directory as "$(SolutionDir)$(Configuration)_$(Platform)\" and Intermediate Directory as "$(SolutionDir)obj\$(ProjectName)\$(Configuration)_$(Platform)\".

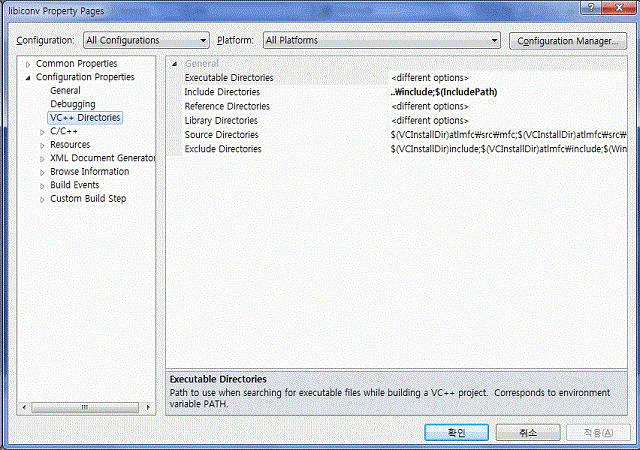
Change Include Directories as "..\include;$(IncludePath)":
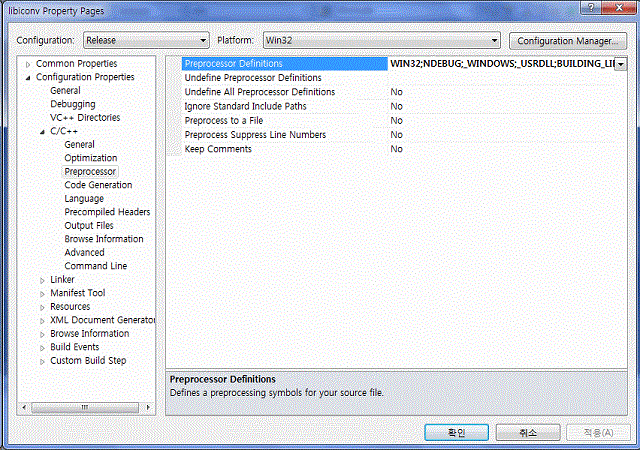
You have to add "BUILDING_LIBICONV" and "BUILDING_LIBCHARSET" to Peprocessor Definitions of all Platforms and of all configurations.
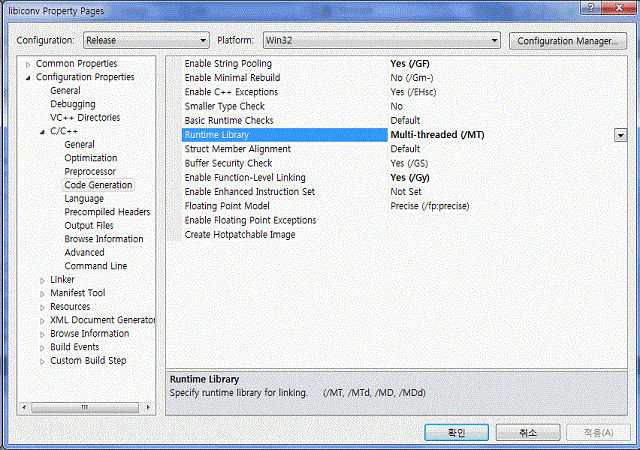
You'd better set Runtime Library to "Multi-threaded" when building dynamic link library libiconv.dll. Then, the dependency on VC Runtime library can be controlled by the applications that will be built and dynamically linked withlibiconv.dll because libiconv.dll does not need VC Runtime library but only the application that uses libiconv.dll may or may not need VC Runtime library. However, when building the static link library libiconvStatic.lib, you can choose Runtime Library option for libiconvStatic.lib depending on the application that uses libiconvStatic.lib.
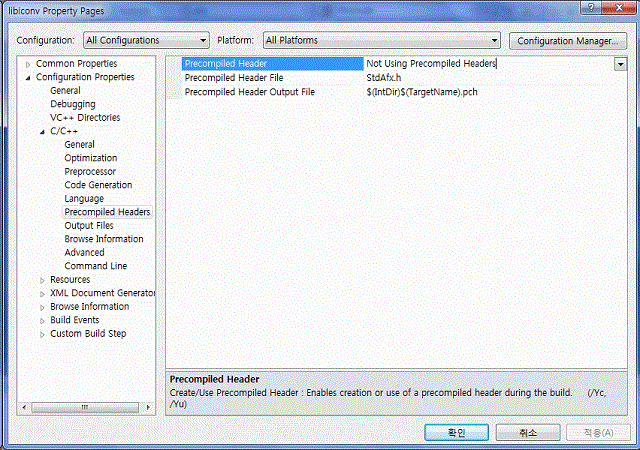
You have to change Precompiled Header option to "Not Using Precompiled Headers".
Sixth Step
Now, it is the time to tweak the source code of the libiconv.
libiconv.rc
Open libiconv.rc with text editor or the source code editor of Visual Studio IDE by double-clicking libiconv.rc in the Solution explorer and insert some code at line 4 as follows:
///////////////////////// 추가 / ADD / ДОВАВЛЯТЬ //////////////////////
#define PACKAGE_VERSION_MAJOR       1
#define PACKAGE_VERSION_MINOR       14
#define PACKAGE_VERSION_SUBMINOR    0
#define PACKAGE_VERSION_STRING      "1.14"
////////////////////////////////////////////////////////////////////////////////
You may be asked to change Line endings to "Windows (CR LF)". Then, let it do so. It will be more convenient for you if you mainly use Windows.
localcharset.c
Open localcharset.c and delete or comment the lines 76 - 79 as follows:
///////////////////////// 삭제 / DELETE / удалить ///////////////////////
///* Get LIBDIR.  */
//#ifndef LIBDIR
//# include "configmake.h"
//#endif
////////////////////////////////////////////////////////////////////////////////
iconv.c
Open iconv.c and delete or comment the lines 246 - 248 and add three lines there as follows:
///////////////////////// 삭제 / DELETE / УДАЛИТЬ ///////////////////////
//size_t iconv (iconv_t icd,
//              ICONV_CONST char* * inbuf, size_t *inbytesleft,
//              char* * outbuf, size_t *outbytesleft)
///////////////////////// ?? / ADD / ????????? //////////////////////
size_t iconv (iconv_t icd,
              const char* * inbuf, size_t *inbytesleft,
              char* * outbuf, size_t *outbytesleft)
////////////////////////////////////////////////////////////////////////////////
localcharset.h
Open localcharset.h and delete or comment the lines 23 - 27 and add 7 lines there as follows:
///////////////////////// 삭제 / DELETE / УДАЛИТЬ ///////////////////////
//#if @HAVE_VISIBILITY@ && BUILDING_LIBCHARSET
//#define LIBCHARSET_DLL_EXPORTED __attribute__((__visibility__("default")))
//#else
//#define LIBCHARSET_DLL_EXPORTED
//#endif
///////////////////////// ?? / ADD / ????????? //////////////////////
#ifdef BUILDING_LIBCHARSET
#define LIBCHARSET_DLL_EXPORTED __declspec(dllexport)
#elif USING_STATIC_LIBICONV
#define LIBCHARSET_DLL_EXPORTED
#else
#define LIBCHARSET_DLL_EXPORTED __declspec(dllimport)
#endif
////////////////////////////////////////////////////////////////////////////////
config.h
Open config.h in the project include folder "...\libiconv\include" and delete or comment the lines 29 - 30 as follows:
///////////////////////// 삭제 / DELETE / УДАЛИТЬ ///////////////////////
///* Define as good substitute value for EILSEQ. */
//#undef EILSEQ
////////////////////////////////////////////////////////////////////////////////
Otherwise you can redefine EILSEQ as good substitute value.
iconv.h
Open iconv.h in the project include folder "...\libiconv\include" and delete or comment the line 175 and add 1 line as follows:
///////////////////////// 삭제 / DELETE / УДАЛИТЬ ///////////////////////
//#if @HAVE_WCHAR_T@
///////////////////////// 추가 / ADD / ДОВАВЛЯТЬ //////////////////////
#if HAVE_WCHAR_T
////////////////////////////////////////////////////////////////////////////////
Delete or comment the line 128 and add 1 line as follows:
///////////////////////// 삭제 / DELETE / УДАЛИТЬ ///////////////////////
//#if @USE_MBSTATE_T@
///////////////////////// 추가 / ADD / ДОВАВЛЯТЬ //////////////////////
#if USE_MBSTATE_T
////////////////////////////////////////////////////////////////////////////////
Delete or comment the lines 107-108 and add 2 lines as follows:
///////////////////////// 삭제 / DELETE / УДАЛИТЬ ///////////////////////
//#if @USE_MBSTATE_T@
//#if @BROKEN_WCHAR_H@
///////////////////////// 추가 / ADD / ДОВАВЛЯТЬ //////////////////////
#if USE_MBSTATE_T
#if BROKEN_WCHAR_H
////////////////////////////////////////////////////////////////////////////////
Delete or comment the line 89 and add 2 lines as follows:
///////////////////////// 삭제 / DELETE / УДАЛИТЬ ///////////////////////
//extern LIBICONV_DLL_EXPORTED size_t iconv (iconv_t cd, @ICONV_CONST@ char* * inbuf,
//size_t *inbytesleft, char* * outbuf, size_t *outbytesleft);
///////////////////////// 추가 / ADD / ДОВАВЛЯТЬ //////////////////////
extern LIBICONV_DLL_EXPORTED size_t iconv (iconv_t cd, const char* * inbuf,
	size_t *inbytesleft, char* * outbuf, size_t *outbytesleft);
////////////////////////////////////////////////////////////////////////////////
Delete or comment the lines 26 - 31 and add 8 lines as follows:
///////////////////////// 삭제 / DELETE / УДАЛИТЬ ///////////////////////
//#if @HAVE_VISIBILITY@ && BUILDING_LIBICONV
//#define LIBICONV_DLL_EXPORTED __attribute__((__visibility__("default")))
//#else
//#define LIBICONV_DLL_EXPORTED
//#endif
//extern LIBICONV_DLL_EXPORTED @DLL_VARIABLE@ int _libiconv_version; /* Likewise */
///////////////////////// 추가 / ADD / ДОВАВЛЯТЬ //////////////////////
#if BUILDING_LIBICONV
#define LIBICONV_DLL_EXPORTED __declspec(dllexport)
#elif USING_STATIC_LIBICONV
#define LIBICONV_DLL_EXPORTED
#else
#define LIBICONV_DLL_EXPORTED __declspec(dllimport)
#endif
extern LIBICONV_DLL_EXPORTED int _libiconv_version; /* Likewise */
////////////////////////////////////////////////////////////////////////////////
How to Use
When you use newly built libiconv, the only header file that you need is iconv.h. You will need to link either the import library libiconv.lib or the static library libiconvStatic.lib in your project property or write the code in one of your source file as follows:
#pragma comment (lib, "libiconv.lib")
or
#pragma comment (lib, "libiconvStatic.lib")
In the source of the application that uses this library either libiconv.dll or libiconvStatic.lib, if you don't define anything but only include iconv.h, your application will use libiconv.dll while it will use libiconvStatic.lib if you defineUSING_STATIC_LIBICONV before you include iconv.h in your application as follows:
//#define USING_STATIC_LIBICONV
#include <iconv.h>
Copyright Issues
The original libiconv is under LGPL licence. So, the tweaked libiconv has also to be under LGPL. If you develop any application that uses libiconv, you have to be careful about copyright issues. If your application is linked withlibiconv.dll dynamically, you don't have to publicize your source code of your application. However, if your application is linked statically with libiconvStatic.lib, you have to publicize either the source code of the application or the object files (*.obj) of the application so that others can build the application that is linked statically with the library under LGPL license.
License
This article, along with any associated source code and files, is licensed under The GNU Lesser General Public License (LGPLv3)


 827
827

 被折叠的 条评论
为什么被折叠?
被折叠的 条评论
为什么被折叠?
 到【灌水乐园】发言


