


1,下载Nexus3,上传至服务器
下载地址:
链接:https://pan.baidu.com/s/13G56-C8FjCt2pRMx5BOrTQ
提取码:psm7
[root@VM-0-6-centos local]# tar xf nexus-3.12.0-01-unix.tar.gz
[root@VM-0-6-centos local]# cd nexus-3.12.0-01
[root@VM-0-6-centos nexus-3.12.0-01]#
2,添加环境变量export RUN_AS_USER=root:
[root@VM-0-6-centos nexus-3.12.0-01]# echo "export RUN_AS_USER=root" >> /etc/profile
[root@VM-0-6-centos nexus-3.12.0-01]# source /etc/profile
[root@VM-0-6-centos nexus-3.12.0-01]#
3,启动Nexus3
[root@VM-0-6-centos nexus-3.12.0-01]# cd bin
[root@VM-0-6-centos bin]# ./nexus start
WARNING: ************************************************************
WARNING: Detected execution as "root" user.  This is NOT recommended!
WARNING: ************************************************************
Starting nexus
4,访问系统并创建用户、仓库
4.1 登录系统
访问地址:http://IP:8081/nexus
默认端口是8081
默认用户名/密码:admin/admin123
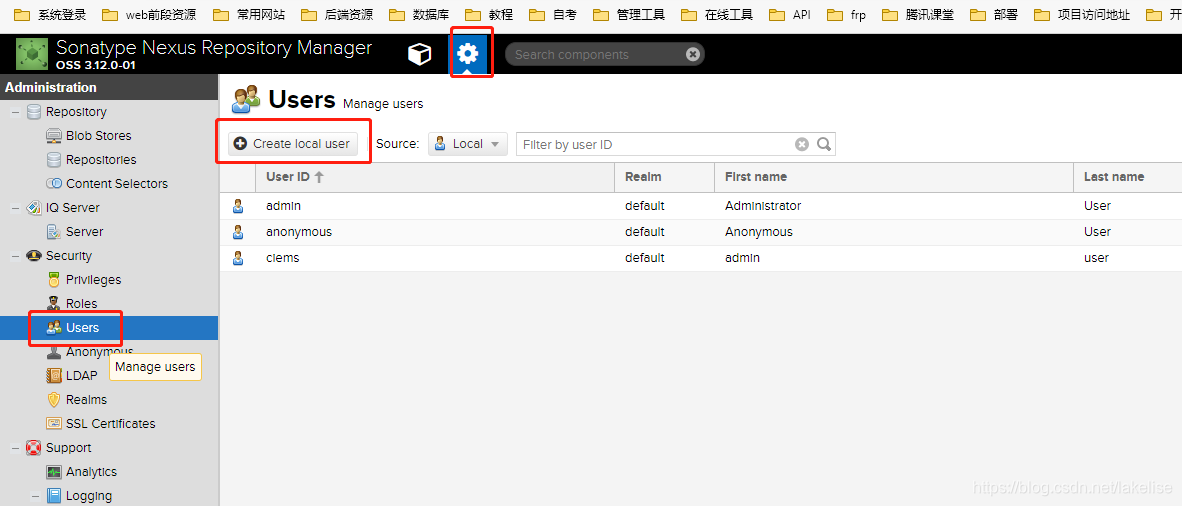
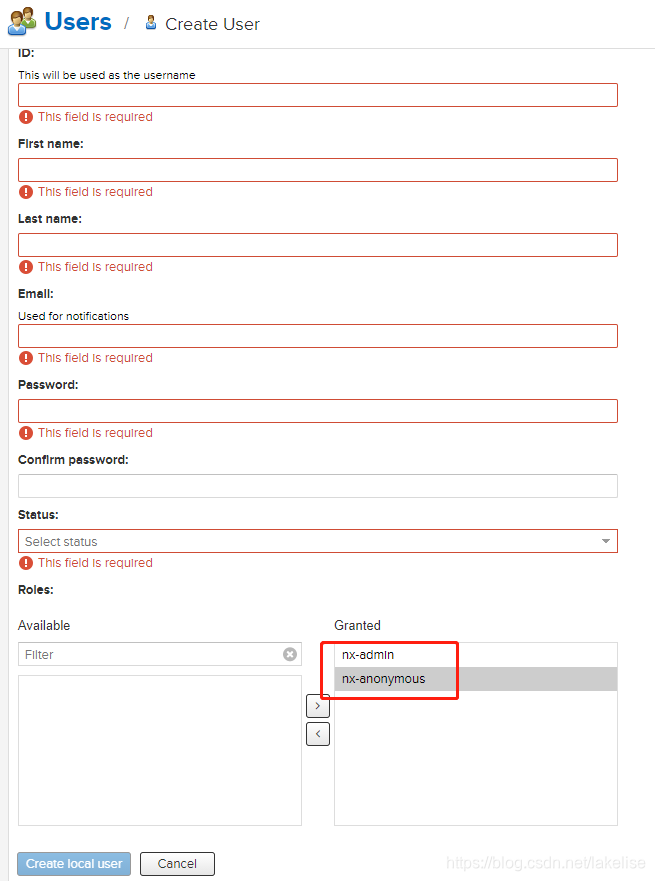
4.2 创建用户:
4.3 退出账户,使用刚创建的用户登录。
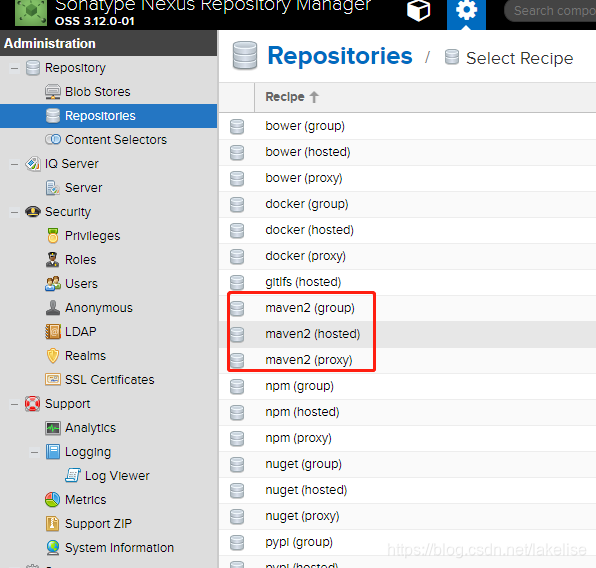
4.4 创建仓库:
4.4.1、四种仓库类型介绍
默认仓库介绍
1)maven-central: maven中央库,默认从https://repo1.maven.org/maven2/拉取jar
2)maven-releases: 私库发行版jar
3)maven-snapshots:私库快照(调试版本)jar
4)maven-public: 仓库分组,把上面三个仓库组合在一起对外提供服务,在本地maven基础配置settings.xml中使用。
Nexus默认的仓库类型有以下四种:(上面的名字可以随便取,关键是它对应的是什么仓库类型)
1)group(仓库组类型):又叫组仓库,用于方便开发人员自己设定的仓库;
2)hosted(宿主类型):内部项目的发布仓库(内部开发人员,发布上去存放的仓库);
3)proxy(代理类型): 从远程中央仓库中寻找数据的仓库(可以点击对应的仓库的Configuration页签下Remote Storage Location属性的值即被代理的远程仓库的路径);
4)virtual(虚拟类型): 虚拟仓库(这个基本用不到,重点关注上面三个仓库的使用);
Policy(策略):表示该仓库为发布(Release)版本仓库还是快照(Snapshot)版本仓库;
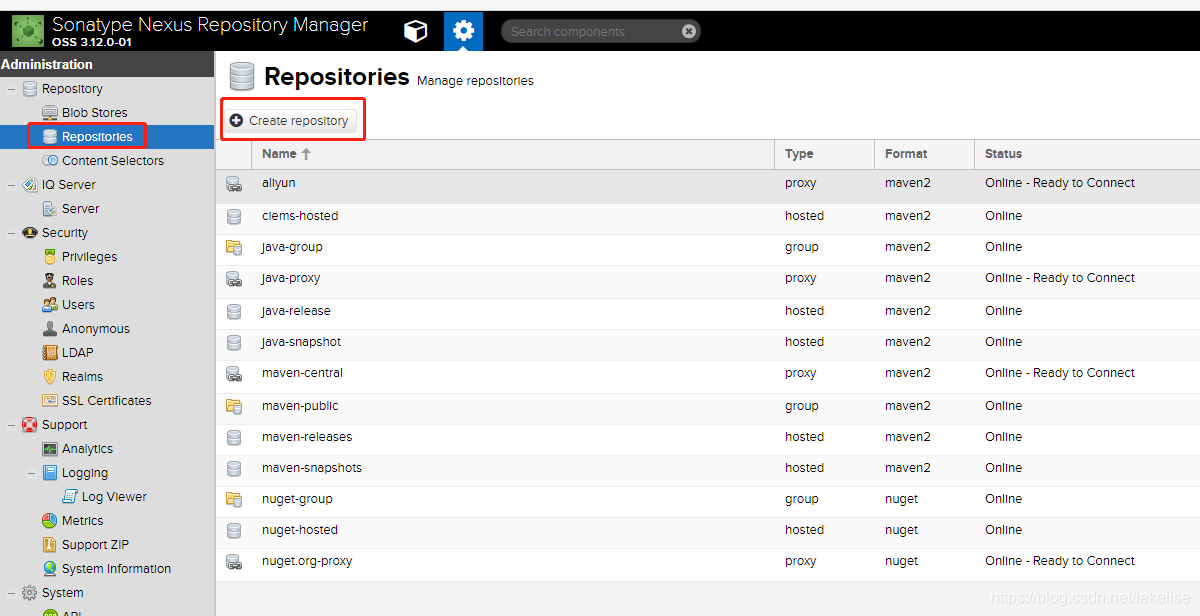
创建1个proxy代理仓库,2个hosted宿主仓库,1个group仓库组。
其中代理仓库代理地址填写阿里云:http://maven.aliyun.com/nexus/content/groups/public/
创建仓库组时注意把其他几个仓库添加进去:
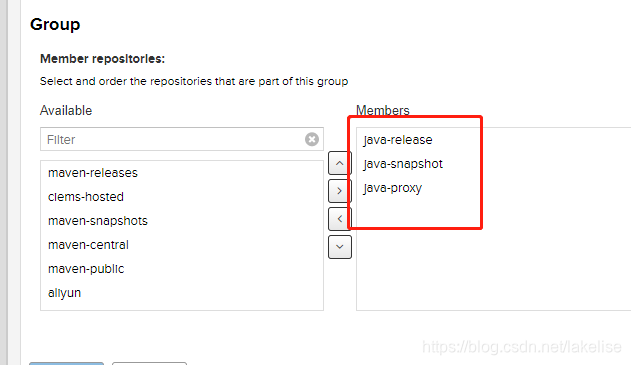
创建完成后的样子:

5,将jar发送到私服上
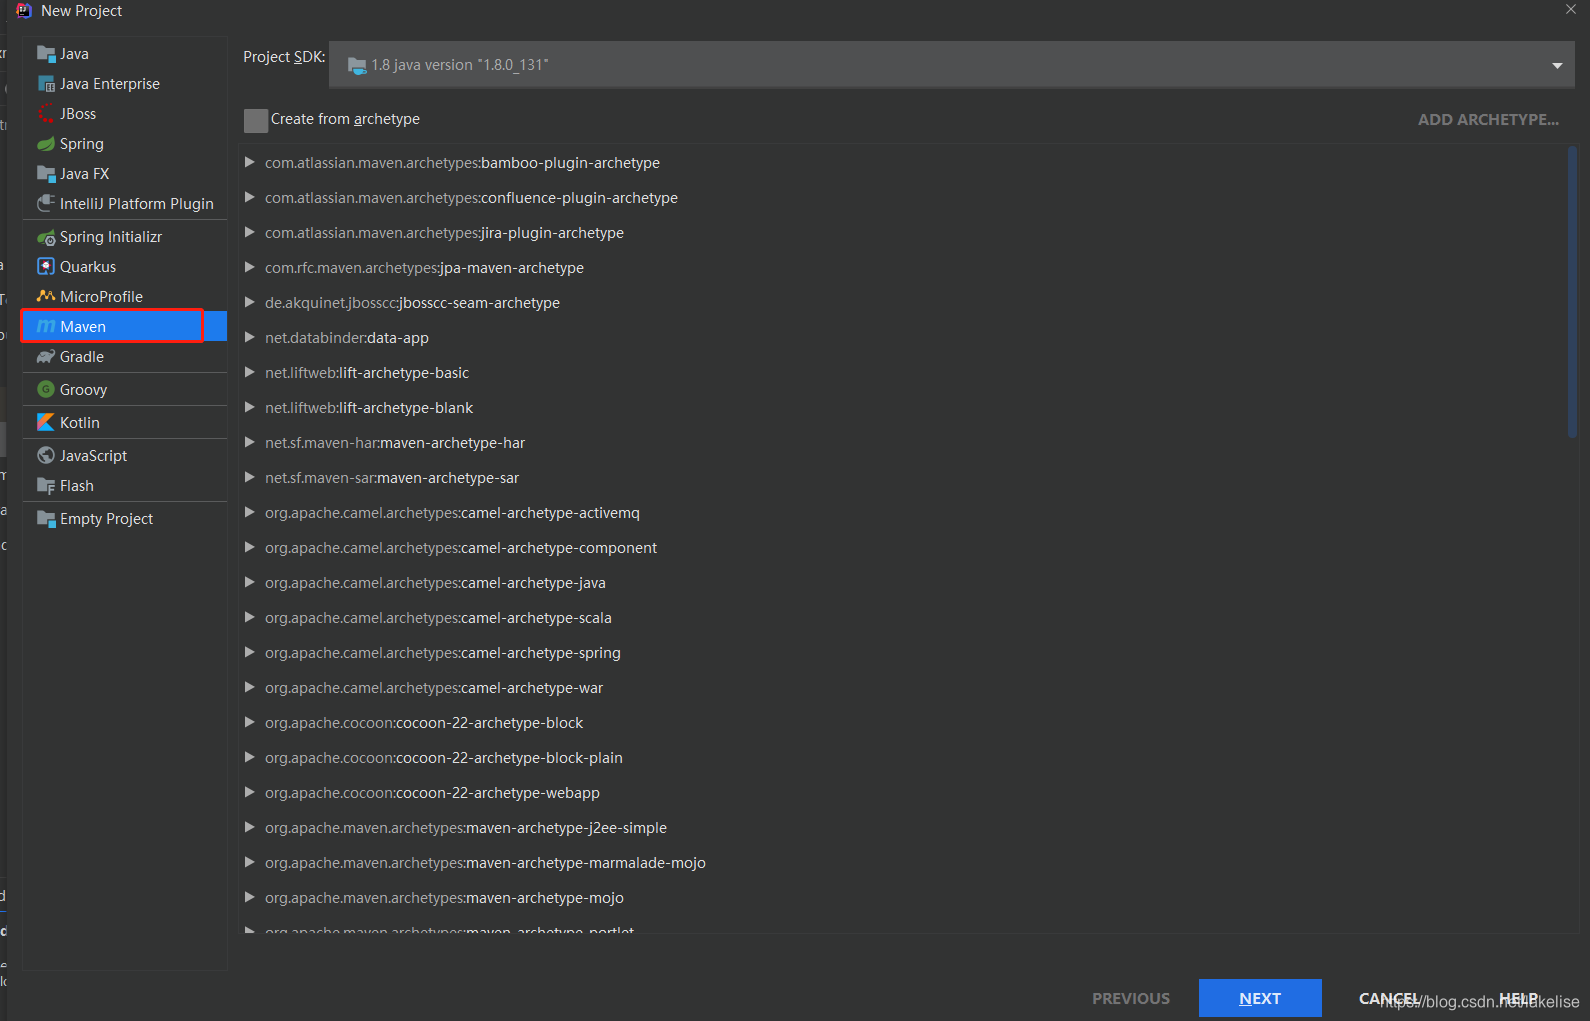
5.1 创建maven项目
使用idea 创建一个普通的maven项目:
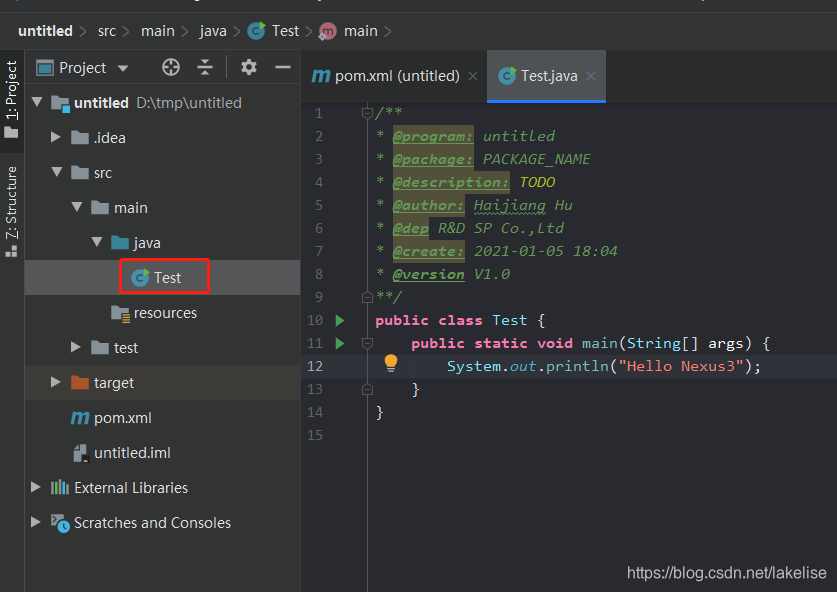
在项目中创建一个Test.java(使项目能够打成jar包并上传到私服上)
5.2 编辑pom.xml文件
<?xml version="1.0" encoding="UTF-8"?>
<project xmlns="http://maven.apache.org/POM/4.0.0"
         xmlns:xsi="http://www.w3.org/2001/XMLSchema-instance"
         xsi:schemaLocation="http://maven.apache.org/POM/4.0.0 http://maven.apache.org/xsd/maven-4.0.0.xsd">
    <modelVersion>4.0.0</modelVersion>

    <groupId>org.example</groupId>
    <artifactId>untitled</artifactId>
    <version>1.0-SNAPSHOT</version>
    <packaging>jar</packaging>

    <name>demo</name>
    <description>Demo project for Spring Boot</description>

    <properties>
        <project.build.sourceEncoding>UTF-8</project.build.sourceEncoding>
        <project.reporting.outputEncoding>UTF-8</project.reporting.outputEncoding>
        <java.version>1.8</java.version>
    </properties>
    <!-- 配置jar向私服推送的仓库地址,推送时会根据版本不同推送到不同的仓库中  -->
    <distributionManagement>
        <repository>
            <id>releases</id>
            <url>http://IP:8081/repository/java-release/</url>
        </repository>
        <snapshotRepository>
            <id>snapshots</id>
            <url>http://IP:8081/repository/java-snapshot/</url>
        </snapshotRepository>
    </distributionManagement>
</project>
5.3 编辑本地maven的setting.xml
<servers>
   <server>
      <id>releases</id>  <!--对应pom.xml的id=releases的仓库-->
      <username>ciems</username>
      <password>ciems123</password>
    </server>
     <server>
      <id>snapshots</id> <!--对应pom.xml中id=snapshots的仓库-->
      <username>ciems</username>
      <password>ciems123</password>
    </server>
  </servers>


<profiles>
	<profile>
	<!--ID用来确定该profile的唯一标识-->
	   <id>jdk-1.8</id>
	   <activation>
		   <activeByDefault>true</activeByDefault>
		   <jdk>1.8</jdk>
	   </activation>
	   <properties>
		   <maven.compiler.source>1.8</maven.compiler.source>
		   <maven.compiler.target>1.8</maven.compiler.target>
		   <maven.compiler.compilerVersion>1.8</maven.compiler.compilerVersion>
	   </properties>
   </profile>

	<profile>
		<id>nexus-pr</id>
		   <!-- 远程仓库列表 -->
	  <repositories>
		<repository>
		  <id>nexus-xu</id>
		  <name>Nexus Central</name>
		 <!-- 虚拟的URL形式,指向镜像的URL-->
		  <url>http://IP:8081/repository/java-group/</url>
		  <layout>default</layout>
		 <!-- 表示可以从这个仓库下载releases版本的构件-->
		  <releases>
			<enabled>true</enabled>
		  </releases>
		 <!-- 表示可以从这个仓库下载snapshot版本的构件 -->
		  <snapshots>
			<enabled>true</enabled>
		  </snapshots>
		</repository>
	  </repositories>
	   <!-- 插件仓库列表 -->
	  <pluginRepositories>
		<pluginRepository>
		  <id>nexus-xu</id>
		  <name>Nexus Central</name>
		  <url>http://IP:8081/repository/java-group/</url>
		  <layout>default</layout>
		  <snapshots>
			<enabled>true</enabled>
		  </snapshots>
		  <releases>
			 <enabled>true</enabled>
		  </releases>
		</pluginRepository>
	  </pluginRepositories>
	</profile>
  </profiles>

  <activeProfiles>
     <!--需要激活 <profile>中的ID才生效-->
    <activeProfile>nexus-pr</activeProfile>
    <activeProfile>jdk-1.8</activeProfile>
  </activeProfiles>
使用idea中的maven插件推送jar到私服上
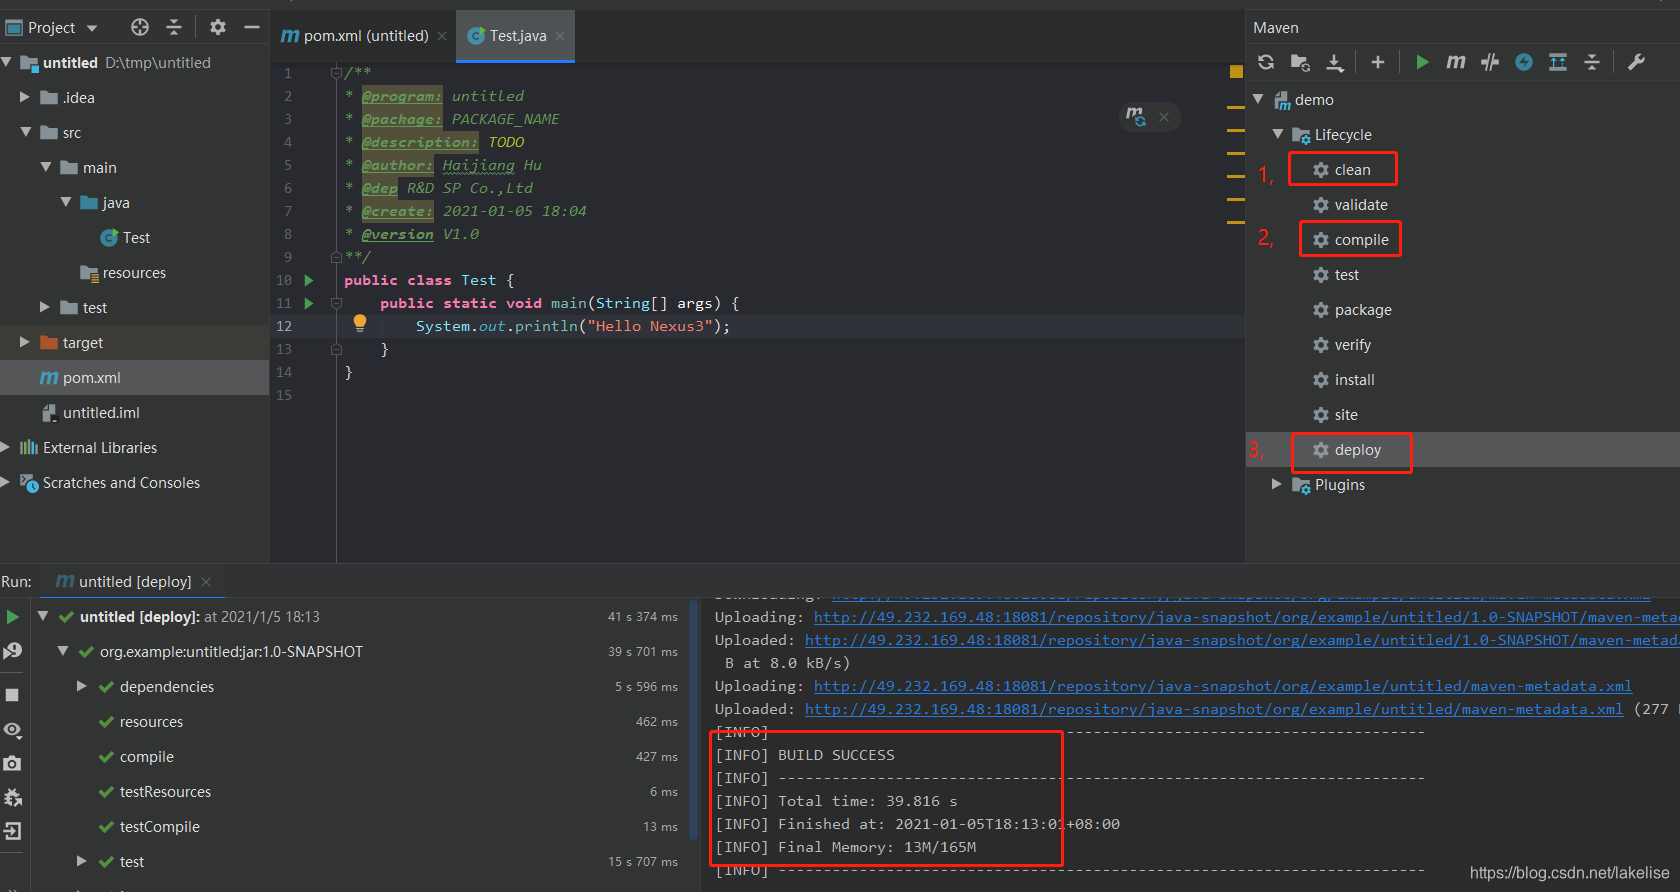
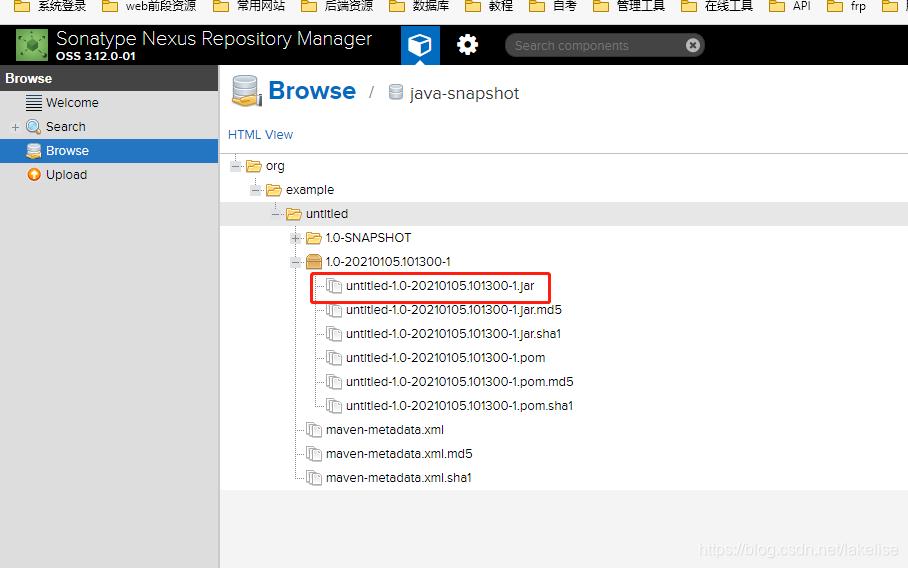
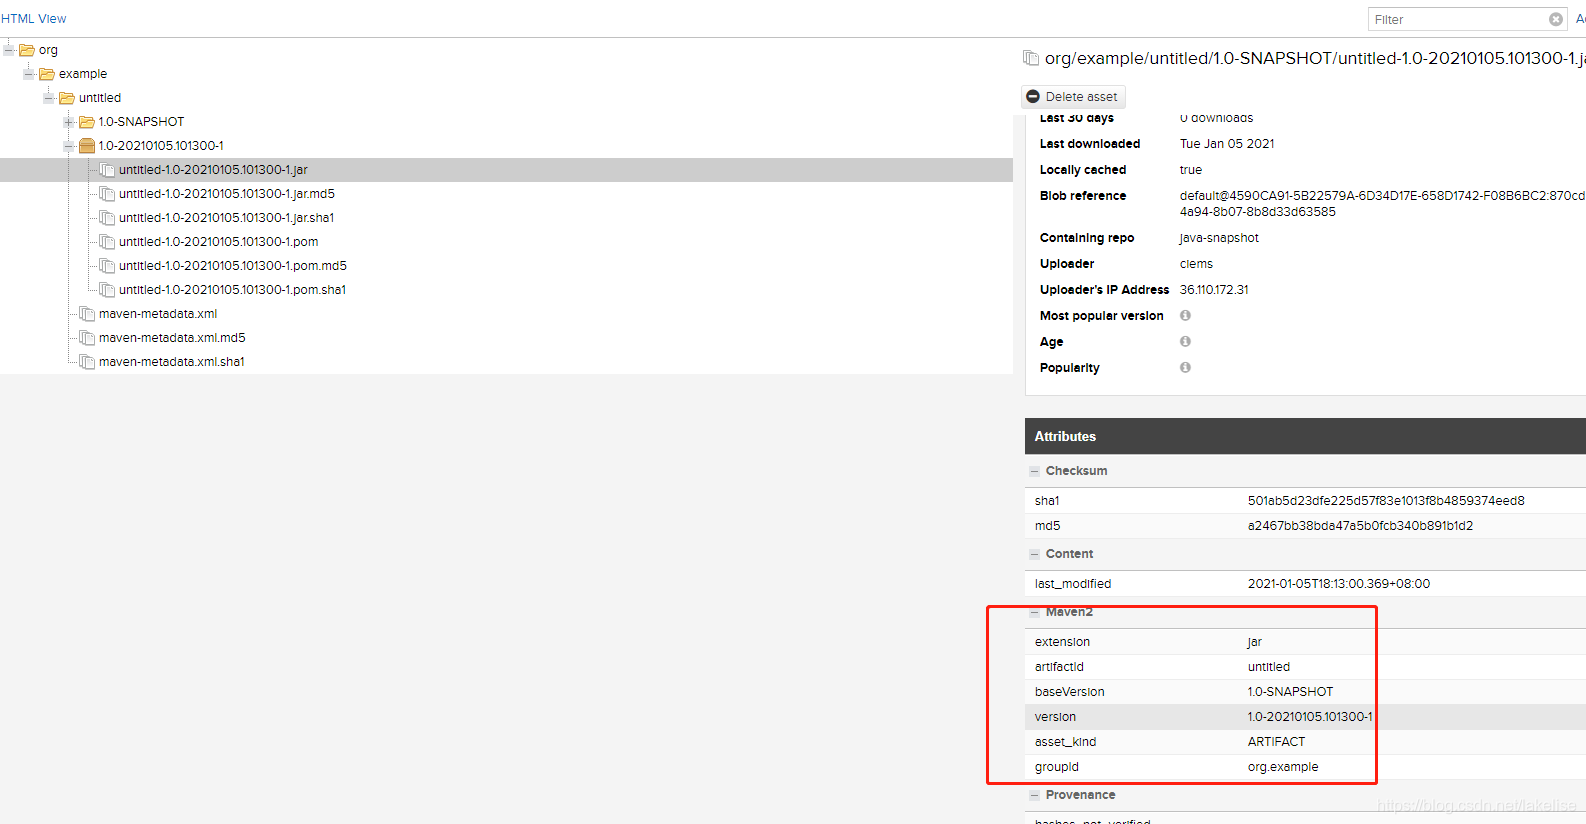
查看仓库:
6,从服务器上拉取jar文件
6.1 settings.xml完整版
<?xml version="1.0" encoding="UTF-8"?>

<settings xmlns="http://maven.apache.org/SETTINGS/1.0.0"
          xmlns:xsi="http://www.w3.org/2001/XMLSchema-instance"
          xsi:schemaLocation="http://maven.apache.org/SETTINGS/1.0.0 http://maven.apache.org/xsd/settings-1.0.0.xsd">
	<localRepository>D:/project/shengzong/repository/repo3</localRepository>

  <pluginGroups>
  </pluginGroups>

  <!-- proxies
   | This is a list of proxies which can be used on this machine to connect to the network.
   | Unless otherwise specified (by system property or command-line switch), the first proxy
   | specification in this list marked as active will be used.
   |-->
  <proxies>

  </proxies>

 <servers>
	<!--第一个nexus-xu要和下面的mirror中的id一致,代表拉取是也需要进行身份校验-->
    <server>
      <id>nexus-xu</id>
      <username>ciems</username>
      <password>ciems123</password>
    </server>
 <!--这两个前面讲过,是jar上传时候进行的验证,id对应的是pom中id属性的值-->
     <server>
      <id>releases</id>  <!--对应pom.xml的id=releases的仓库-->
      <username>ciems</username>
      <password>ciems123</password>
    </server>
     <server>
      <id>snapshots</id> <!--对应pom.xml中id=snapshots的仓库-->
      <username>ciems</username>
      <password>ciems123</password>
    </server>
  </servers>

  <mirrors>
    <mirror>
        <id>nexus-xu</id>
        <name>internal nexus repository</name>
        <!--镜像采用配置好的组的地址-->
        <url>http://IP:8081/repository/java-group/</url>
        <mirrorOf>!internal.repo,*</mirrorOf>
    </mirror>
  </mirrors>


  <profiles>
	<profile>
	<!--ID用来确定该profile的唯一标识-->
	   <id>jdk-1.8</id>
	   <activation>
		   <activeByDefault>true</activeByDefault>
		   <jdk>1.8</jdk>
	   </activation>
	   <properties>
		   <maven.compiler.source>1.8</maven.compiler.source>
		   <maven.compiler.target>1.8</maven.compiler.target>
		   <maven.compiler.compilerVersion>1.8</maven.compiler.compilerVersion>
	   </properties>
   </profile>

	<profile>
		<id>nexus-pr</id>
		   <!-- 远程仓库列表 -->
	  <repositories>
		<repository>
		  <id>nexus-xu</id>
		  <name>Nexus Central</name>
		 <!-- 虚拟的URL形式,指向镜像的URL-->
		  <url>http://IP:8081/repository/java-group/</url>
		  <layout>default</layout>
		 <!-- 表示可以从这个仓库下载releases版本的构件-->
		  <releases>
			<enabled>true</enabled>
		  </releases>
		 <!-- 表示可以从这个仓库下载snapshot版本的构件 -->
		  <snapshots>
			<enabled>true</enabled>
		  </snapshots>
		</repository>
	  </repositories>
	   <!-- 插件仓库列表 -->
	  <pluginRepositories>
		<pluginRepository>
		  <id>nexus-xu</id>
		  <name>Nexus Central</name>
		  <url>http://IP:8081/repository/java-group/</url>
		  <layout>default</layout>
		  <snapshots>
			<enabled>true</enabled>
		  </snapshots>
		  <releases>
			 <enabled>true</enabled>
		  </releases>
		</pluginRepository>
	  </pluginRepositories>
	</profile>
  </profiles>

  <activeProfiles>
     <!--需要激活 <profile>中的ID才生效-->
    <activeProfile>nexus-pr</activeProfile>
    <activeProfile>jdk-1.8</activeProfile>
  </activeProfiles>
</settings>
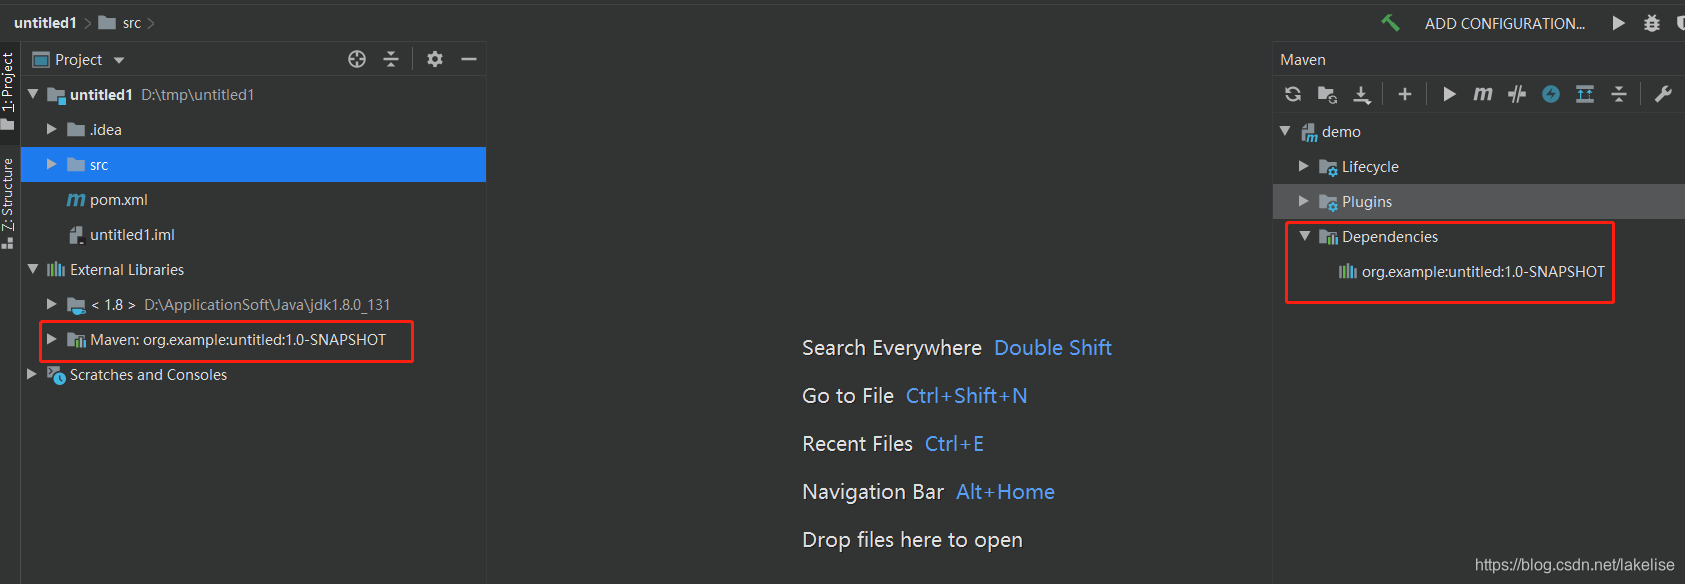
6.2 新建一个项目,并添加刚才推送上去的依赖
6.3 pom.xml 完整版
<?xml version="1.0" encoding="UTF-8"?>
<project xmlns="http://maven.apache.org/POM/4.0.0"
         xmlns:xsi="http://www.w3.org/2001/XMLSchema-instance"
         xsi:schemaLocation="http://maven.apache.org/POM/4.0.0 http://maven.apache.org/xsd/maven-4.0.0.xsd">
    <modelVersion>4.0.0</modelVersion>

    <groupId>org.example</groupId>
    <artifactId>untitled1</artifactId>
    <version>1.0-SNAPSHOT</version>

    <name>demo</name>
    <description>Demo project for Spring Boot</description>

    <properties>
        <project.build.sourceEncoding>UTF-8</project.build.sourceEncoding>
        <project.reporting.outputEncoding>UTF-8</project.reporting.outputEncoding>
        <java.version>1.8</java.version>
    </properties>

    <dependencies>
        <dependency>
            <groupId>org.example</groupId>
            <artifactId>untitled</artifactId>
            <version>1.0-SNAPSHOT</version>
        </dependency>
    </dependencies>

    <build>
        <plugins>
            <plugin>
                <groupId>org.springframework.boot</groupId>
                <artifactId>spring-boot-maven-plugin</artifactId>
                <version>2.4.0</version>
            </plugin>
        </plugins>
    </build>
    <distributionManagement>
        <repository>
            <id>releases</id>
            <url>http://IP:8081/repository/java-release/</url>
        </repository>
        <snapshotRepository>
            <id>snapshots</id>
            <url>http://IP:8081/repository/java-snapshot/</url>
        </snapshotRepository>
    </distributionManagement>
</project>
6.4 查看maven 依赖是否拉取下来
6.5 调用测试是否引入成功
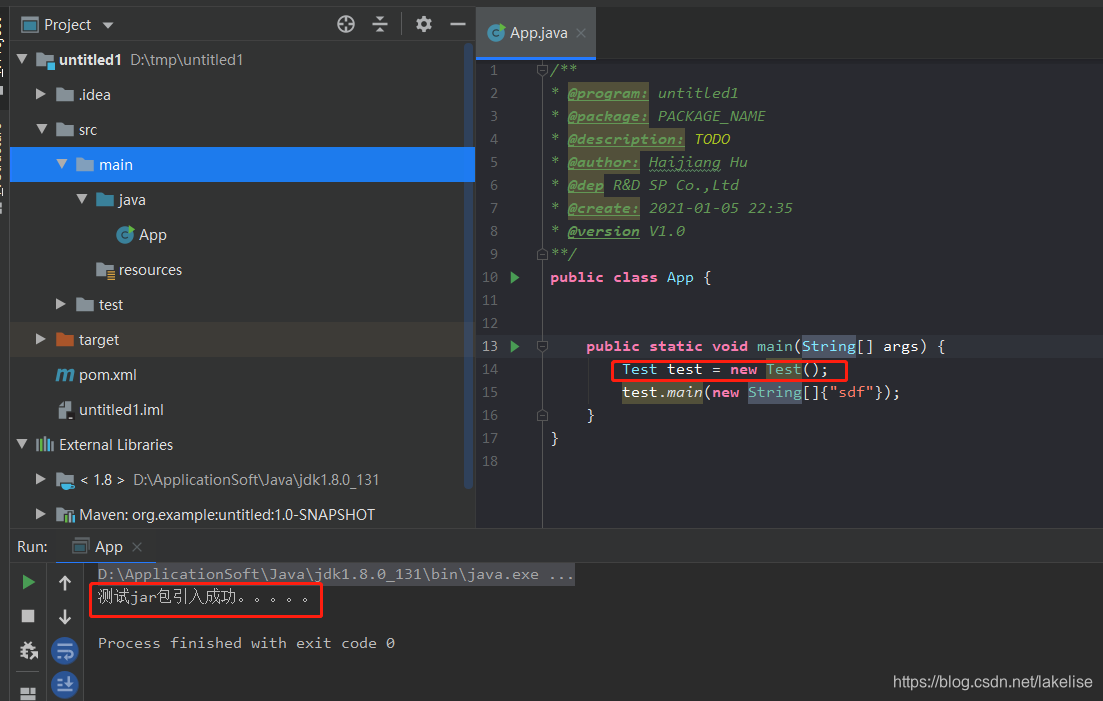
jar 包拉取完成
参考博文:https://www.cnblogs.com/qdhxhz/p/9808642.html
博主写的更详细


 870
870

 被折叠的 条评论
为什么被折叠?
被折叠的 条评论
为什么被折叠?
 到【灌水乐园】发言


