


SpringBoot简介
什么是spring
Spring是一个开源框架,2003 年兴起的一个轻量级的Java 开发框架,作者:Rod Johnson 。
Spring是为了解决企业级应用开发的复杂性而创建的,简化开发。
spring是如何简化开发的
为了降低Java开发的复杂性,Spring采用了以下4种关键策略:
1、基于POJO的轻量级和最小侵入性编程,所有东西都是bean;
2、通过IOC,依赖注入(DI)和面向接口实现松耦合;
3、基于切面(AOP)和惯例进行声明式编程;
4、通过切面和模版减少样式代码,RedisTemplate,xxxTemplate;
什么是SpringBoot
学过javaweb的同学就知道,开发一个web应用,从最初开始接触Servlet结合Tomcat, 跑出一个Hello Wolrld程序,是要经历特别多的步骤;
然后SSM框架的出现,帮助我们简化了很多步骤,包括代码的编写,但是仍然需要配置很多配置文件
再然后就出现了SpringBoot,帮助我们简化开发
什么是SpringBoot呢?
就是一个javaweb的开发框架,和SpringMVC类似,对比其他javaweb框架的好处,官方说是简化开发,约定大于配置, you can "just run",能迅速的开发web应用,几行代码开发一个http接口。
所有的技术框架的发展似乎都遵循了一条主线规律:
从一个复杂应用场景 衍生 一种规范框架,人们只需要进行各种配置而不需要自己去实现它,这时候强大的配置功能成了优点;
发展到一定程度之后,人们 根据实际生产应用情况,选取其中实用功能和设计精华,重构出一些轻量级的框架;
之后为了提高开发效率,嫌弃原先的各类配置过于麻烦,于是开始提倡“约定大于配置”,进而衍生出一些一站式的解决方案。
是的这就是Java企业级应用->J2EE->spring->springboot的过程。
随着 Spring 不断的发展,涉及的领域越来越多,项目整合开发需要配合各种各样的文件,慢慢变得不那么易用简单,违背了最初的理念,甚至人称配置地狱。
Spring Boot 正是在这样的一个背景下被抽象出来的开发框架,目的为了让大家更容易的使用 Spring 、更容易的集成各种常用的中间件、开源软件;
Spring Boot 基于 Spring 开发,Spirng Boot 本身并不提供 Spring 框架的核心特性以及扩展功能,只是用于快速、敏捷地开发新一代基于 Spring 框架的应用程序。
也就是说,它并不是用来替代 Spring 的解决方案,而是和 Spring 框架紧密结合用于提升 Spring 开发者体验的工具。
Spring Boot 以约定大于配置的核心思想,默认帮我们进行了很多设置,多数 Spring Boot 应用只需要很少的 Spring 配置。同时它集成了大量常用的第三方库配置(例如 Redis、MongoDB、Jpa、RabbitMQ、Quartz 等等),Spring Boot 应用中这些第三方库几乎可以零配置的开箱即用。
Spring Boot的主要优点:
为所有Spring开发者更快的入门
开箱即用,提供各种默认配置来简化项目配置内嵌式容器简化Web项目
没有冗余代码生成和XML配置的要求
SpringBoot的HelloWorld
环境 jdk1.8 maven springboot
工具 IDEA
创建项目
spring官方提供了一个快速构建应用网址 https://start.spring.io/

创建好以后,把项目解压,用idea打开,第一次需要加载包,需要下载依赖。
有点慢
以下目录文件可以删除


创建好项目后,在HelloWorldApplication同级目录下,创建包,将来的pojo、service、controller都要保持和这个启动文件同级
创建一个controller包,写一个HelloController
@RestController
public class HelloController {

    @RequestMapping("/hello")
    public String hello(){
        return "Hello Spring....";
    }
}
或者直接在Idea中创建
new Project


第三种创建方式
直接创建一个空的Maven项目,不勾选web
在新项目的pom中,加入parent标签和依赖

然后在项目包位置创建启动类

这样也能实现springBoot项目创建
替换banner
在resource下面,创建一个banner.txt ,复制进去,重新启动即可
Springboot原理
springboot帮我们做了什么
通常搭建一个基于spring的web应用,我们需要做以下工作:
1、pom文件中引入相关jar包,包括spring、springmvc、redis、mybaits、log4j、mysql-connector-java 等等相关jar ...
2、配置web.xml,Listener配置、Filter配置、Servlet配置、log4j配置、error配置 ...
3、配置数据库连接、配置spring事务
4、配置视图解析器
5、开启注解、自动扫描功能
6、配置完成后部署tomcat、启动调试
在springboot中我们只需要引入下面简单的几步就可以完成一个ssm后台项目的初始搭建。
1、引入jar

父依赖
主要依赖一个父项目,主要是管理项目资源过滤及插件
<parent>
   <groupId>org.springframework.boot</groupId>
   <artifactId>spring-boot-starter-parent</artifactId>
   <version>2.4.4</version>
   <relativePath/> <!-- lookup parent from repository -->
</parent>
点进去发现还有一个父依赖
这个才是真正管理springBoot应用里面所有依赖版本的地方,SpringBoot的版本控制中心
<parent>
  <groupId>org.springframework.boot</groupId>
  <artifactId>spring-boot-dependencies</artifactId>
  <version>2.4.4</version>
</parent>
启动器spring-boot-starter
<dependency>
   <groupId>org.springframework.boot</groupId>
   <artifactId>spring-boot-starter-web</artifactId>
</dependency>
spring-boot-starter-xxx:都是springboot的场景启动器
springboot 将所有功能场景抽取出来,做成了一个个的starter(启动器),只需要在项目中引入这些starter即可使用,所有相关的依赖都会导入进来,我们需要什么功能,就导入什么样的场景启动器。
将来可以自己自定义starter
spring-boot-starter-web包自动帮我们引入了web模块开发需要的相关jar包,
mybatis-spring-boot-starter帮我们引入了dao开发相关的jar包。
spring-boot-starter-xxx是官方提供的starter,
xxx-spring-boot-starter是第三方提供的starter。
查看依赖,可以看出在这个mybatis-spring-boot-starter 中,并没有任何源码,只有一个pom文件,它的作用就是帮我们引入了相关jar包。


stater机制帮我们完成了项目起步所需要的的相关jar包。
那问题又来了,传统的spring应用中不是要在application.xml中配置很多bean的吗,比如dataSource的配置,transactionManager的配置 ... springboot是如何帮我们完成这些bean的配置的?下面我们来分析这个过程
自动配置
基于java代码的bean配置
以mybatis为例,在上面的截图中,我们发下mybatis-spring-boot-starter这个包帮我们引入了mybatis-spring-boot-autoconfigure这个包,如下图:

里面有MybatisAutoConfiguration这个类,打开这个类看看有什么东西。

熟悉@Configuration&、@Bean这两个bean的同学或许已经知道了。
这两个注解一起使用就可以创建一个基于java代码的配置类,可以用来替代相应的xml配置文件。
@Configuration注解的类可以看作是能生产让Spring IoC容器管理的Bean实例的工厂。
所以上面的MybatisAutoConfiguration这个类,自动帮我们生成了SqlSessionFactory这些Mybatis的重要实例并交给spring容器管理,从而完成bean的自动注册。
从MybatisAutoConfiguration这个类中使用的注解可以看出,要完成自动配置是有依赖条件的。

这些是springboot特有的,常见的条件依赖注解有:
@ConditionalOnBean,仅在当前上下文中存在某个bean时,才会实例化这个Bean。
@ConditionalOnClass,某个class位于类路径上,才会实例化这个Bean。
@ConditionalOnExpression,当表达式为true的时候,才会实例化这个Bean。
@ConditionalOnMissingBean,仅在当前上下文中不存在某个bean时,才会实例化这个Bean。
@ConditionalOnMissingClass,某个class在类路径上不存在的时候,才会实例化这个Bean。
@ConditionalOnNotWebApplication,不是web应用时才会实例化这个Bean。
@AutoConfigureAfter,在某个bean完成自动配置后实例化这个bean。
@AutoConfigureBefore,在某个bean完成自动配置前实例化这个bean。
所以要完成Mybatis的自动配置,需要在类路径中存在SqlSessionFactory.class、SqlSessionFactoryBean.class这两个类,需要存在DataSource这个bean且这个bean完成自动注册。
进入DataSourceAutoConfiguration这个类,可以看到这个类属于这个包:
org.springframework.boot.autoconfigure.jdbc
这个包又属于spring-boot-autoconfigure-2.0.4.RELEASE.jar这个包,自动配置这个包帮们引入了jdbc、kafka、logging、mail、mongo等包。很多包需要我们引入相应jar后自动配置才生效。
bean参数获取
到此我们已经知道了bean的配置过程,但是还没有看到springboot是如何读取yml或者properites配置文件的的属性来创建数据源的?
在DataSourceAutoConfiguration类里面,我们注意到使用了EnableConfigurationProperties这个注解。

DataSourceProperties中封装了数据源的各个属性,且使用了注解ConfigurationProperties指定了配置文件的前缀。

@ConfigurationProperties注解的作用是把yml或者properties配置文件转化为bean。
@EnableConfigurationProperties注解的作用是使@ConfigurationProperties注解生效。
如果只配置@ConfigurationProperties注解,在spring容器中是获取不到yml或者properties配置文件转化的bean的。
通过这种方式,把yml或者properties配置参数转化为bean,这些bean又是如何被发现与加载的?
bean发现
springboot默认扫描启动类所在的包下的主类与子类的所有组件,但并没有包括依赖包的中的类,那么依赖包中的bean是如何被发现和加载的?
我们通常在启动类中加@SpringBootApplication这个注解,点进去看

实际上重要的只有三个Annotation:
@Configuration(@SpringBootConfiguration里面还是应用了@Configuration)
@EnableAutoConfiguration
@ComponentScan
@Configuration的作用上面我们已经知道了,被注解的类将成为一个bean配置类。
@ComponentScan的作用就是自动扫描并加载符合条件的组件,比如@Component和@Repository等,最终将这些bean定义加载到spring容器中。
@EnableAutoConfiguration 这个注解的功能很重要,借助@Import的支持,收集和注册依赖包中相关的bean定义。
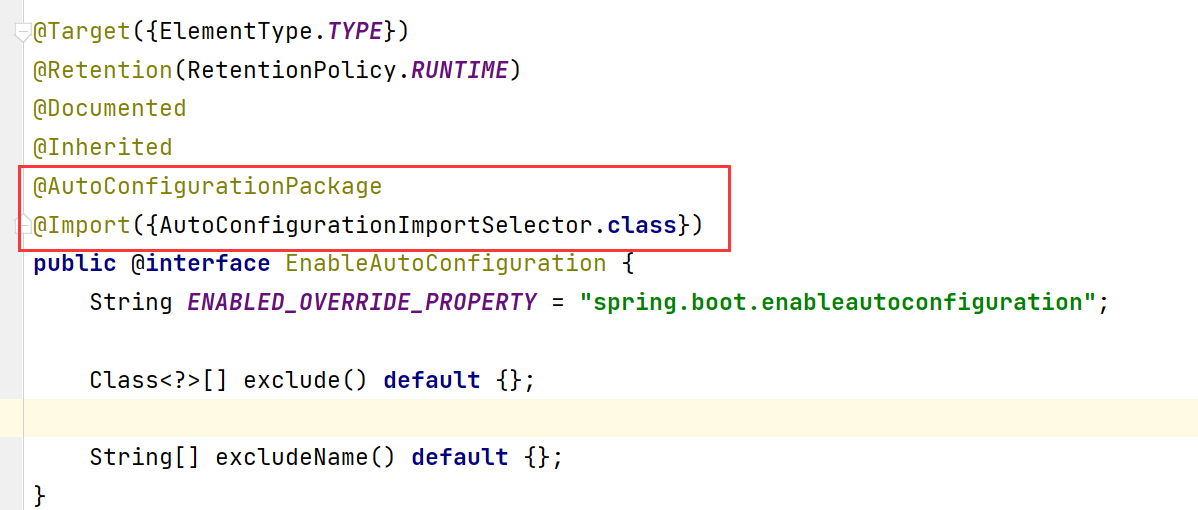
如上源码,@EnableAutoConfiguration注解引入了@AutoConfigurationPackage和@Import这两个注解。@AutoConfigurationPackage的作用就是自动配置的包,@Import导入需要自动配置的组件。
进入@AutoConfigurationPackage,发现也是引入了@Import注解

点开Registrar.class

new AutoConfigurationPackages.PackageImport(metadata)).getPackageName()
new AutoConfigurationPackages.PackageImport(metadata)
这两句代码的作用就是加载启动类所在的包下的主类与子类的所有组件注册到spring容器,这就是前文所说的springboot默认扫描启动类所在的包下的主类与子类的所有组件。
那问题又来了,要搜集并注册到spring容器的那些beans来自哪里?
进入 AutoConfigurationImportSelector类

AutoConfigurationImportSelector类中,
SpringFactoriesLoader.loadFactoryNames方法调用loadSpringFactories方法
从所有的jar包中读取META-INF/spring.factories文件信息。


下面是spring-boot-autoconfigure这个jar中spring.factories文件部分内容,
其中有一个key为org.springframework.boot.autoconfigure.EnableAutoConfiguration的值定义了需要自动配置的bean,通过读取这个配置获取一组@Configuration类。

每个xxxAutoConfiguration都是一个基于java的bean配置类。实际上,这些xxxAutoConfiguratio不是所有都会被加载,会根据xxxAutoConfiguration上的@ConditionalOnClass等条件判断是否加载。
在loadSpringFactories方法的下方,有个instantiateFactory

如上代码段,通过反射机制将spring.factories中@Configuration类实例化为对应的java实列。
到此我们已经知道怎么发现要自动配置的bean了,最后一步就是怎么样将这些bean加载到spring容器。
bean加载
如果要让一个普通类交给Spring容器管理,通常有以下方法:
1、使用 @Configuration与@Bean 注解
2、使用@Controller @Service @Repository @Component 注解标注该类,然后启用@ComponentScan自动扫描
3、使用@Import 方法
springboot中使用了@Import 方法
@EnableAutoConfiguration注解中使用了@Import({AutoConfigurationImportSelector.class})注解,AutoConfigurationImportSelector实现了DeferredImportSelector接口,
DeferredImportSelector接口继承了ImportSelector接口,ImportSelector接口只有一个selectImports方法。
我们先通过一个简单例子看看@Import注解是如何将bean导入到spring容器的。
1、新建一个bean
public class User {
private String name;
private String password;
}
2、创建一个ItpscSelector类继承ImportSelector接口并实现selectImports方法
public class ItpscSelector implements ImportSelector {
public String[] selectImports(AnnotationMetadata importingClassMetadata) {
return new String[]{"com.itpsc.entity.User"};
}
}
3、创建ImportConfig类,使用@Configuration、@Import(ItpscSelector.class)注解。
@Configuration
@Import(ItpscSelector.class)
public class ImportConfig {
}
4、从容器获取bean
@RunWith(SpringRunner.class)
@SpringBootTest
public class ImportSelectorTests {
@Test
public void testSelectImport() {
ApplicationContext ctx = new AnnotationConfigApplicationContext(ImportConfig.class);
String[] beanDefinitionNames = ctx.getBeanDefinitionNames();
for (String name : beanDefinitionNames) {
System.out.println(name);
}
}
}
查看结果,很直观,selectImports方法返回一组bean,@EnableAutoConfiguration注解借助@Import注解将这组bean注入到spring容器中,springboot正式通过这种机制来完成bean的注入的。
总结
我们可以将自动配置的关键几步以及相应的注解总结如下:
1、@Configuration&与@Bean->基于java代码的bean配置
2、@Conditional->设置自动配置条件依赖
3、@EnableConfigurationProperties与@ConfigurationProperties->读取配置文件转换为bean。
4、@EnableAutoConfiguration、@AutoConfigurationPackage 与@Import->实现bean发现与加载。
面试问题:
springboot的加载原理?
1,springboot中,集成了很多的starter,每个外部的starter,下载之后,jar包中都存在对应的一个xxxautoconfiguration类,在这个类中,加上了@Configuration以及@Bean直接,完成对于需要的一些bean的配置
2,启动类的注解@SpringBootApplication,
@SpringBootConfiguration
@EnableAutoConfiguration :自动配置,通过@Import 和 @AutoConfigurationPackage完成自动配置查找和自动配置bean
@ComponentScan
Springboot打jar包方式


控制台输入项目启动命令(需要配置java变量全局可用):
java -jar xxx.jar
Yaml语法学习
SpringBoot 使用一个全局配置文件,配置文件名是固定的
application.properties
语法: key=value
application.yml
语法: key: 空格 value
配置文件的作用:修改SpringBoot自动配置的默认值,因为SpringBoot底层都给我们配置好了
比如,修改端口号
server.port=8081
yaml概述
yaml语言是以数据操作为中心,而不是以标记语言为重点
写法:
xml文件配置端口号:
<server>
<port>8081</port>
</server>
yaml写法:
server:
port: 8081
yaml的基础语法:
1,空格不能省略
2,以缩进来控制层级关系,只要左边对齐的一列数据,表示同一个级别
3,属性和值的大小写都是十分敏感的
字面量 : 普通的值[数字、布尔值、字符串]
字面量直接写再后面即可,字符串默认不用加双引号单引号
name: zhangsan
age: 20
name: "zhangsan \n nihao" ==> zhangsan 换行 nihao
对象、map(键值对)
key:
v1:
v2:
比如User对象
user:
name: zhangsan
age: 10
数组(list、set)
arrays:
-v1: 值
-v2: 值
-v3: 值
yaml注入配置文件
普通的实体类值注入方式
新建实体类,加上注解
@Component //注册bean到容器中
public class Dog {
@Value("旺财")
private String name;
@Value("3")
private String age;
无参、有参、get、set、tostring
到测试类中测试
@Autowired //将实体类自动注入
Dog dog;
@Test
public void contextLoads() {
System.out.println(dog);
}
可用实现@value的注入

使用yaml注入
创建一个person实体类
//@ConfigurationProperties(prefix = "person"):
    //将配置文件中的每一个属性的值,映射到组件中。
@Component
@ConfigurationProperties(prefix = "person")
public class Person {
    private String name;
    private Integer age;
    private Boolean happy;
    private Date birthday;
    private Map<String,Object> maps;
    private List<Object> lists;
    private Dog dog;

    public Person() {
    }

    public Person(String name, Integer age, Boolean happy, Date birthday, Map<String, Object> maps, List<Object> lists, Dog dog) {
        this.name = name;
        this.age = age;
        this.happy = happy;
        this.birthday = birthday;
        this.maps = maps;
        this.lists = lists;
        this.dog = dog;
    }

    public String getName() {
        return name;
    }

    public void setName(String name) {
        this.name = name;
    }

    public Integer getAge() {
        return age;
    }

    public void setAge(Integer age) {
        this.age = age;
    }

    public Boolean getHappy() {
        return happy;
    }

    public void setHappy(Boolean happy) {
        this.happy = happy;
    }

    public Date getBirthday() {
        return birthday;
    }

    public void setBirthday(Date birthday) {
        this.birthday = birthday;
    }

    public Map<String, Object> getMaps() {
        return maps;
    }

    public void setMaps(Map<String, Object> maps) {
        this.maps = maps;
    }

    public List<Object> getLists() {
        return lists;
    }

    public void setLists(List<Object> lists) {
        this.lists = lists;
    }

    public Dog getDog() {
        return dog;
    }

    public void setDog(Dog dog) {
        this.dog = dog;
    }

    @Override
    public String toString() {
        return "Person{" +
                "name='" + name + '\'' +
                ", age=" + age +
                ", happy=" + happy +
                ", birthday=" + birthday +
                ", maps=" + maps +
                ", lists=" + lists +
                ", dog=" + dog +
                '}';
    }
}
配置application.yml的信息

配置好信息后,测试

测试如果返回有乱码,将文件格式都改掉,到settings中,file-encoding中把编码格式改为utf-8

properties注入方式
1,创建实体类
@Component //注册bean
public class User {
private String name;
private int age;
private String sex;
2,编写properties文件
user.name=zhangsan
user.age=18
user.sex=男
3,实体类上注入值 ,使用@value
@Component //注册bean
@PropertySource(value ="classpath:user.properties")
public class User {
@Value("${user.name}")
private String name;
@Value("${user.age}")
private int age;
@Value("${user.sex}")
private String sex;
4,写测试
@Autowired //将实体类自动注入
User user;@Test
public void contextLoads() {
System.out.println(user);
}
对比起来,yaml注入方式更方便
yaml还支持 松散语法、JSR303数据校验....
对于yml和properties,推荐使用yml
如果在某个业务中,只需要获取配置文件中的某一个值,可以使用@value
JSR303数据校验
SpringBoot 中可以使用 @validated 来校验数据,如果数据异常,则会抛出异常


先引入依赖
<dependency>
<groupId>org.springframework.boot</groupId>
<artifactId>spring-boot-starter-validation</artifactId>
</dependency>
使用之前再实体类上加上@validated注解
@Component
@ConfigurationProperties(prefix = "person")
@Validated   //数据校验
public class Person {
    @Email(message = "邮箱格式错误")
    private String lastName;
    @Max(value = 120,message = "年龄最大不能超过120")
    private Integer age;
    private Boolean happy;
    private Date birthday;
    private Map<String,Object> maps;
    private List<Object> lists;
    private Dog dog;
使用的时候,可以在字段上指定规范,如果注入值的时候不符合规范就会报错
Springboot中的热部署

按下 ctrl+alt+shift +/


Springboot统一异常处理
在SpringBoot的开发中,我们经常需要对各种程序异常进行处理,但是如果在每个出异常的地方进行单独处理的话,这会引入大量业务不相关的异常处理代码,增加了程序的耦合,同时未来想改变异常的处理逻辑,也变得比较困难
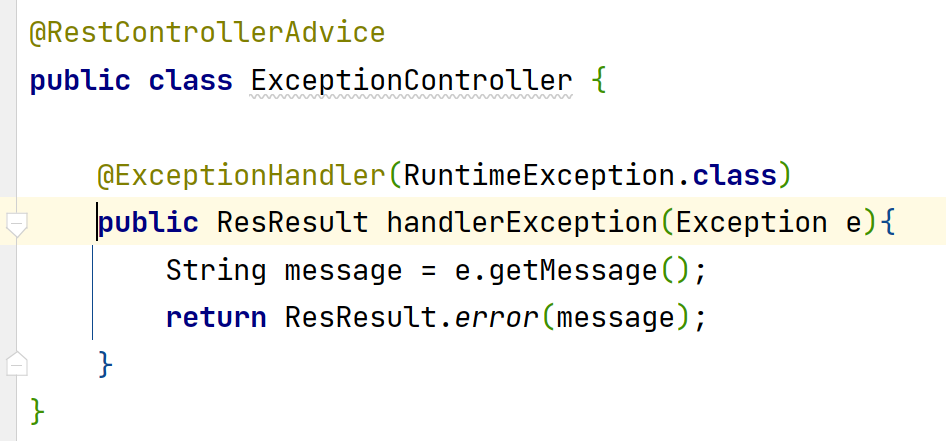
为了实现全局拦截,Spring中提供的两个注解,@RestControllerAdvice和@ExceptionHandler,结合使用可以拦截程序中产生的异常,并且根据不同的异常类型分别处理。
使用方式:
创建一个异常控制类,在里面写入方法,加入异常处理器,在处理器注解中,传入需要捕获的异常类型即可
使用方式
将来在业务处理service层中,直接加入异常判断即可

SpringBoot中数据库的使用
对于数据访问层,无论是sql还是nosql,spring底层都是采用spring data 的方式统一处理
SpringData 也是Spring中一个重要项目
集成JDBC
创建数据库
创建表
插入数据
CREATE TABLE department(
id INT(10) NOT NULL AUTO_INCREMENT COMMENT '部门id',
department_name VARCHAR(20) NOT NULL COMMENT '部门名称',
PRIMARY KEY (id)
)
INSERT INTO department(id,department_name)VALUES
(101,'技术部'),(102,'市场部'),(103,'后勤部'),(104,'行政部'),(105,'售后部');

CREATE TABLE employee(
id INT(5) NOT NULL AUTO_INCREMENT COMMENT '员工id',
last_name VARCHAR(50) NOT NULL COMMENT '姓名',
email VARCHAR(50) NOT NULL COMMENT '邮箱',
gender INT(2) NOT NULL COMMENT '性别 1男 0女',
department INT(3) NOT NULL COMMENT '部门id',
birth DATETIME NOT NULL COMMENT '生日',
PRIMARY KEY(id)
)

INSERT INTO employee(id,last_name,email,gender,department,birth)
VALUES(1001,'张三','2131232@qq.com',1,102,'1998-03-05'),
	(1002,'李四','2131232@qq.com',0,103,'1998-04-05'),
	(1003,'王五','14124124@qq.com',1,104,'1998-05-05'),
	(1004,'赵六','124214@qq.com',0,105,'1998-06-05'),
	(1005,'孙七','21521232@qq.com',1,105,'1998-07-05');
创建项目测试数据源
创建项目勾选

等待依赖导入
编写yaml配置文件连接数据库

直接测试数据源连接
//注入数据源
@Autowired
DataSource dataSource;
@Test
void contextLoads() throws SQLException {
    //输出一下默认的数据源
    System.out.println(dataSource.getClass());
    //获取连接
    Connection connection = dataSource.getConnection();
    System.out.println(connection);
    //关闭连接
    connection.close();
}
输出结果发现,默认数据源是:
class com.zaxxer.hikari.HikariDataSource
springboot下,数据源的自动配置,都在DataSrourceAutoConfiguration
HikariDataSource号称目前javaweb中最快数据源
Jdbc Template
1,有了数据源以后,可以拿到数据库连接,有了连接,就可以使用JDBC来操作数据库了
2,即使不用第三方的数据库框架,比如mybatis,spring本身也对原生JDBC做了封装,Jdbc Template
3,数据库操作的所有CRUD方法,都在jdbc template中
4,spring 把JDBCtemplate也放在了容器中,使用的时候自己注入就可以使用
JdbcTemplate主要方法
execute方法:执行任何sql语句
update方法:执行增删改
query方法queryForXXX :执行查询
call方法:执行存储过程
使用
新建一个controller,测试CRUD
@RestController
@RequestMapping("/jdbc")
public class JdbcController {
    //JdbcTemplate中会自动注入数据源
    @Autowired
    JdbcTemplate jdbcTemplate;
    //查询employee表所有数据
    //List中的一个Map对应数据库的一行数据
    //Map中的key对应数据的字段名,value对应数据库的字段值
    @GetMapping("/list")
    public List<Map<String, Object>> empList(){
        String sql = "select * from employee";
        List<Map<String, Object>> maps = jdbcTemplate.queryForList(sql);
        return maps;
    }
    //新增一个用户
    @GetMapping("/add")
    public String addUser(){
        String sql = "INSERT INTO employee(last_name,email,gender,department,birth)\n" +
                "VALUES('赵敏','2131232@qq.com',0,102,'"+new Date().toLocaleString() +"')";
        jdbcTemplate.update(sql);
        return "增加成功";
    }
    //修改用户
    @GetMapping("/update/{id}")
    public String updateEmp(@PathVariable("id") int id){
        //sql
        String sql = "update employee set last_name = ?,email=? where id="+id;
        //设置数据
       Object[] objects = new Object[2];
       objects[0] = "小昭";
       objects[1] = "4124@qq.com";
       jdbcTemplate.update(sql,objects);
       //返回
        return "更新成功";
    }
    //删除用户
    @GetMapping("/delete/{id}")
    public String delEmp(@PathVariable("id") int id){
        //sql
        String sql = "delete from employee where id = ?";
        jdbcTemplate.update(sql,id);
        //返回
        return "删除成功";
    }
}
集成 Druid
1,先添加Druid依赖
<dependency>
<groupId>com.alibaba</groupId>
<artifactId>druid</artifactId>
<version>1.2.6</version>
</dependency>
2,切换数据源 ,springboot 2.0以上默认用com.zaxxer.hikari.HikariDataSource
如果向使用Druid,得手动指定

3,数据源切换以后,再测试类中注入DataSrouce,获取查看

4,切换成功,可以设置连接池的大小、连接数量、等待时间...
Druid 配置 yaml格式
spring:
  datasource:
    username: root
    password: 123456
    driver-class-name: com.mysql.jdbc.Driver
    url: jdbc:mysql://localhost:3306/springboot?serverTimezone=GMT%2B8&useSSL=false&useUnicode=true&characterEncoding=utf-8
    type: com.alibaba.druid.pool.DruidDataSource
    #初始化大小
    initial-size: 8
    #连接池最小值
    min-idle: 8
    #连接池最大值
    max-active: 12
    #配置获取连接等待超时的时间(单位:毫秒)
    max-wait: 60000
    #配置间隔多久才进行一次检测,检测需要关闭的空闲连接(单位:毫秒)
    time-between-eviction-runs-millis: 2000
    #配置一个连接在池中(含空闲)最小生存的时间(单位:毫秒)
    min-evictable-idle-time-millis: 60000
    #配置一个连接在池中空闲最大生存的时间(单位:毫秒)
    max-evictable-idle-time-millis: 90000
    #检测连接是否有效的测试语句
    validation-query: select 1
    #申请连接时执行validationQuery检测连接是否有效。此配置会造成一定性能降低
    test-on-borrow: false
    #申请连接的时候,如果空闲时间大于timeBetweenEvictionRunsMillis,执行validationQuery检测连接是否有效
    test-while-idle: true
    #归还连接时执行validationQuery检测连接是否有效。此配置会造成一定性能降低
    test-on-return: false
    #打开后,增强timeBetweenEvictionRunsMillis的周期性连接检查,minIdle内的空闲连接,每次检查强制验证连接有效性. 参考:https://github.com/alibaba/druid/wiki/KeepAlive_cn
    keep-alive: true
    #是否缓存preparedStatement(也就是PSCache),PSCache对支持游标的数据库性能提升巨大,如:oracle,在mysql下建议关闭。具体查阅PSCache相关资料
    pool-prepared-statements: false
    #配置提交方式(默认值:true)
    default-auto-commit: true
    #连接泄露检查,打开removeAbandoned功能 , 连接从连接池借出后,长时间不归还,将触发强制回连接。回收周期随timeBetweenEvictionRunsMillis进行,如果连接为从连接池借出状态,并且未执行任何sql,并且从借出时间起已超过removeAbandonedTimeout时间,则强制归还连接到连接池中
    remove-abandoned: true
    #检查连接泄露依据(超时时间)
    remove-abandoned-timeout-millis: 300000
    #abanded连接时输出错误日志,方便出现连接泄露时可以通过错误日志定位忘记关闭连接的位置
    log-abandoned: true
    #配置监控统计拦截的filters
    #stat 监控统计
    #log4j:日志记录
    #wall 防御sql注入
    #filters:
    #配置监控统计日志的输出间隔(单位:毫秒),每次输出所有统计数据会重置,酌情开启
    #time-between-log-stats-millis: 5000
    filters: stat,wall,log4j
    maxPoolPreparedStatementPerConnectionSize: 20
    useGlobalDataSourceStat: true
    connectionProperties: druid.stat.mergeSql=true;druid.stat.slowSqlMillis=500
5,导入log4j的依赖
<dependency>
<groupId>log4j</groupId>
<artifactId>log4j</artifactId>
<version>1.2.17</version>
</dependency>
6,绑定数据源参数
@Configuration
public class DruidConfig {
    //将自定义的Druid数据源添加到容器中,不让springboot自动创建

    //绑定全局配置文件中的druid数据源到DruidDataSource从而让它们生效

    //ConfigurationProperties作用是将全局配置文件中的
    //前缀为spring datasource的属性注入到DruidDataSource的同名参数中
    @ConfigurationProperties(prefix = "spring.datasource")
    @Bean
    public DataSource druidDataSource(){
        return new DruidDataSource();
    }
}
7, 测试 返回数据源的最大连接数量
//注入数据源
@Autowired
DataSource dataSource;
@Test
void contextLoads() throws SQLException {
    //输出一下默认的数据源
    System.out.println(dataSource.getClass());
    //获取连接
    Connection connection = dataSource.getConnection();
    System.out.println(connection);
    DruidDataSource druidDataSource = (DruidDataSource) dataSource;
    System.out.println("最大连接数:"+druidDataSource.getMaxActive());
    System.out.println("初始化数量:"+druidDataSource.getInitialSize());
    //关闭连接
    connection.close();
}
配置Druid数据源监控
Druid数据源具有监控功能,提供了一个web页面
第一步先设置Druid后台管理页面,设置登录账号、密码等
@Configuration
public class DruidConfig {
    //将自定义的Druid数据源添加到容器中,不让springboot自动创建

    //绑定全局配置文件中的druid数据源到DruidDataSource从而让它们生效

    //ConfigurationProperties作用是将全局配置文件中的
    //前缀为spring datasource的属性注入到DruidDataSource的同名参数中
    @ConfigurationProperties(prefix="spring.datasource")
    @Bean
    public DataSource druidDataSource(){
        return new DruidDataSource();
    }

    //配置Druid监控
    //1.配置管理后台的Servlet
    @Bean
    public ServletRegistrationBean statViewServlet(){
        ServletRegistrationBean bean = new ServletRegistrationBean(new StatViewServlet(),"/druid/*");
        Map<String,String> initParams = new HashMap<>();

        initParams.put("loginUsername","admin");
        initParams.put("loginPassword","123456");
        initParams.put("allow","");//默认允许所有访问
        initParams.put("deny","192.168.15.21");

        bean.setInitParameters(initParams);
        return bean;
    }

    //2.配置一个web监控的filter
    @Bean
    public FilterRegistrationBean webStatFilter(){
        FilterRegistrationBean bean = new FilterRegistrationBean();
        bean.setFilter(new WebStatFilter());

        Map<String,String> initParams = new HashMap<>();
        initParams.put("exclusions","*.js,*.css,/druid/*");

        bean.setInitParameters(initParams);

        bean.setUrlPatterns(Arrays.asList("/*"));

        return bean;
    }

}开启服务,访问地址:http://localhost:8080/druid/index.html
主要作用就是监控使用!
整合mybatis
1,导入mybatis依赖
<dependency>
<groupId>org.mybatis.spring.boot</groupId>
<artifactId>mybatis-spring-boot-starter</artifactId>
<version>2.1.1</version>
</dependency>
2,配置数据库连接信息(原有的连接信息,不变)
3,创建实体类,导入Lombok

4,创建Mapper目录以及对应的Mapper接口

5,在resources下创建一个mapper目录,目录中创建映射文件.xml
<?xml version="1.0" encoding="UTF-8" ?>
<!DOCTYPE mapper
        PUBLIC "-//mybatis.org//DTD Mapper 3.0//EN"
        "http://mybatis.org/dtd/mybatis-3-mapper.dtd">
<mapper namespace="com.iweb.springboot_03.dao.BookMapper">

    <select id="getAllBook" resultType="com.iweb.springboot_03.pojo.Book">
        select * from tb_books
    </select>

    <select id="getOneBook" resultType="com.iweb.springboot_03.pojo.Book">
        select * from tb_books where bookname = #{bookname}
    </select>
</mapper>
6,创建service对象

7、告诉springboot,配置文件的位置,在yml文件下面配置
mybatis:
type-aliases-package: com.iweb.springboot_03.pojo
mapper-locations: classpath:mapper/*.xml
# 开启驼峰转换
configuration:
map-underscore-to-camel-case: true
8、编写controller,测试

开发环境的切换
spring:
profiles:
active: dev
---
server:
port: 8082
spring:
profiles:test
---
server:
port: 8083
spring:
profiles: dev
properties配置方式
创建一个 application-test.properties代表测试环境
配置内容: server.port=8081
创建一个 application-dev.properties代表测试环境
配置内容: server.port=8082
application.properties中使用
spring.profiles.active=dev 表示使用dev中的配置环境
springboot整合web项目
1,创建springboot,选择需要的模块,springboot会将我们需要的模块自动配置好
2,手动在配置文件中配置部分配置项目就可以了
3,自己专注于业务代码,不需要再去配置之前mvc时候的大量配置了
静态资源的处理

resources
resources/static/
resources/public/
自定义静态资源路径
一旦配置自定义的静态文件夹路径,原来的自动配置就会失效
spring:
resources:
static-locations: classpath:/地址
模板引擎
之前使用jsp页面,现在springboot中,打包是jar包,不是war包,而且用的是嵌入式的tomcat,默认是不支持jsp的。
springboot中,推荐使用了一个模板引擎:thymeleaf
thymeleaf引入
1,引入依赖
<dependency>
<groupId>org.springframework.boot</groupId>
<artifactId>spring-boot-starter-thymeleaf</artifactId>
</dependency>
自动配置
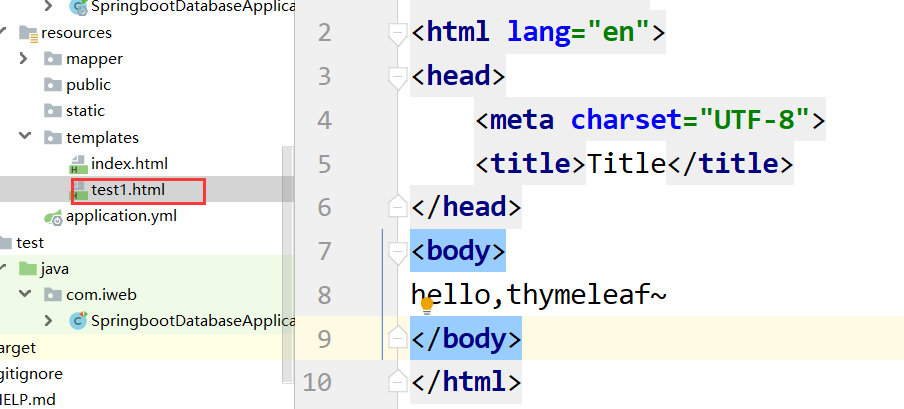
自动给我们默认分配了模版的前缀和后缀,我们只需要按部就班的将模版丢进去即可

写一个controller
@Controller
public class TestController {
    @RequestMapping("/test1")
    public String test1(){
        return "test1";
    }
}
在templates下新建一个test1.html
访问地址

数据传递
语法:
controller中修改
public String test1(Model model){
    model.addAttribute("msg","你好,这是thymeleaf传递的信息!");
    return "test1";
}
在html开头引入
<html lang="en" xmlns:th="http://thymeleaf.org">
前端页面
<div th:text="${msg}"></div>
关闭缓存
spring:
thymeleaf:
cache: false
测试thymeleaf简单用法
@RequestMapping("/test2")
public String test2(Map<String, Object> map){
    map.put("msg","<h1>Hello</h1>");
    map.put("users", Arrays.asList("zhangsan","lisi"));
    return "test2";
}
html代码
<!--    不转义标签-->
    <div th:text="${msg}"></div>

    <div th:utext="${msg}"></div>

<!--遍历数据-->
<h2 th:each="user:${users}" th:text="${user}"></h2>
<h2>zhangsan</h2>
<h2>lisi</h2>
<!--行内写法-->
<h3 th:each="user:${users}">[[${user}]]</h3>
运行结果

整理项目
中英文切换
第一步:导入静态资源

第二步:引入thymeleaf调整样式的引入方式

第三步:调整登录中英文切换
resources下创建目录,i18n

在目录下创建3个properties文件

在login和login_zh中加入内容
log.btn=登录
login.password=密码
login.Remember=记住我
login.username=用户名
login.tip=请登录
在login_en里面加入
log.btn=Sign In
login.password=Password
login.Remember=Remember me
login.username=Username
login.tip=Please sign in
在yml中配置一下
spring:
messages:
basename: i18n.login
前端index修改


定义一个解析器

写入代码

在写一个config配置类,注册bean

登录功能
前端修改请求地址

写Controller

UserMapper

UserMapper.xml

UserService

UserServiceImpl

前端页面加个p标签,展示错误信息

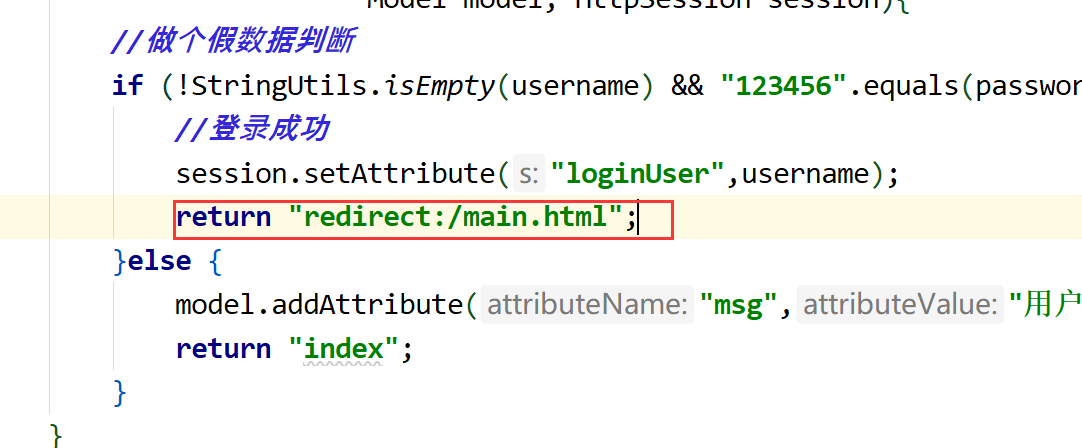
配置一下视图控制映射,在MyConfig类中

将LoginController中改为重定向
拦截
先写一个拦截器类

将拦截器注册到spring中
在MyConfig类中加入拦截器方法

登录用户信息展示
员工列表
先修改首页
把多余的块删除掉
增加员工列表的导航请求地址

将list.html移动到新建的emp目录下

Controller代码做修改

抽取公共页面 common.html
<!DOCTYPE html>
<html lang="en" xmlns:th="http://thymeleaf.org">
<head>
<meta charset="UTF-8">
<title>Title</title>
</head>
<body>
<!--头部-->
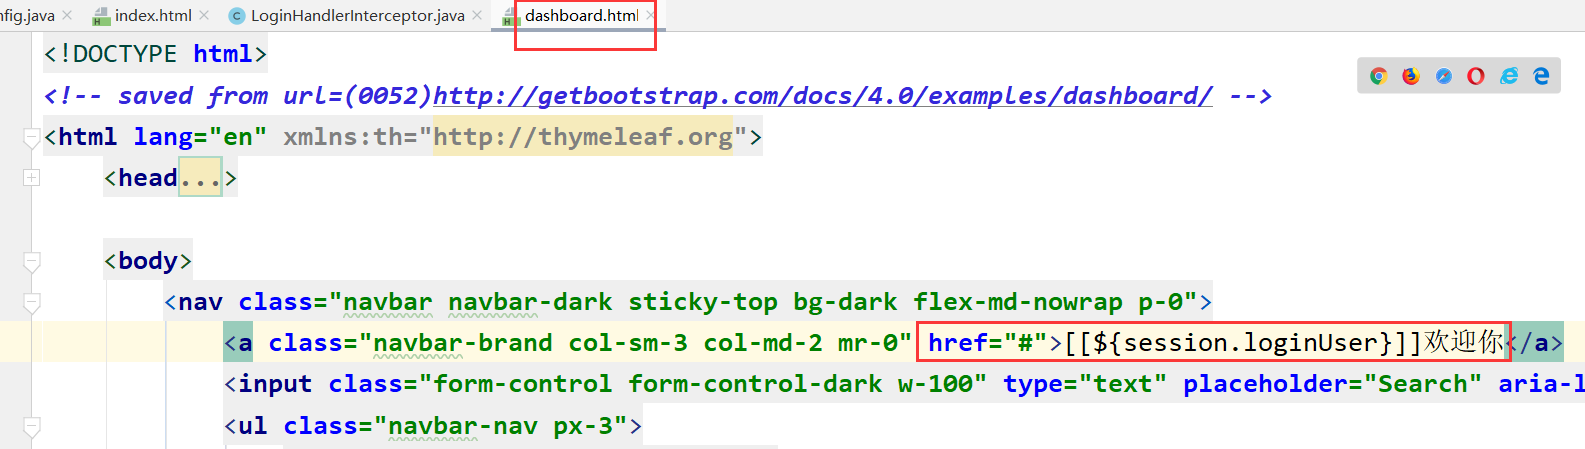
<nav class="navbar navbar-dark sticky-top bg-dark flex-md-nowrap p-0">
<a class="navbar-brand col-sm-3 col-md-2 mr-0" href="#">[[${session.loginUser}]]欢迎你</a>
<input class="form-control form-control-dark w-100" type="text" placeholder="Search" aria-label="Search">
<ul class="navbar-nav px-3">
<li class="nav-item text-nowrap">
<a class="nav-link" href="http://getbootstrap.com/docs/4.0/examples/dashboard/#">Sign out</a>
</li>
</ul>
</nav>
<!--左侧导航内容部分-->
<div class="container-fluid">
<div class="row">
<nav class="col-md-2 d-none d-md-block bg-light sidebar">
<div class="sidebar-sticky">
<ul class="nav flex-column">
<li class="nav-item">
<a class="nav-link active" href="../main.html">
<svg xmlns="http://www.w3.org/2000/svg" width="24" height="24" viewBox="0 0 24 24" fill="none" stroke="currentColor" stroke-width="2" stroke-linecap="round" stroke-linejoin="round" class="feather feather-home">
<path d="M3 9l9-7 9 7v11a2 2 0 0 1-2 2H5a2 2 0 0 1-2-2z"></path>
<polyline points="9 22 9 12 15 12 15 22"></polyline>
</svg>
首页<span class="sr-only">(current)</span>
</a>
</li>
<li class="nav-item">
<!-- 员工列表导航-->
<a class="nav-link" th:href="@{/emps}">
<svg xmlns="http://www.w3.org/2000/svg" width="24" height="24" viewBox="0 0 24 24" fill="none" stroke="currentColor" stroke-width="2" stroke-linecap="round" stroke-linejoin="round" class="feather feather-users">
<path d="M17 21v-2a4 4 0 0 0-4-4H5a4 4 0 0 0-4 4v2"></path>
<circle cx="9" cy="7" r="4"></circle>
<path d="M23 21v-2a4 4 0 0 0-3-3.87"></path>
<path d="M16 3.13a4 4 0 0 1 0 7.75"></path>
</svg>
员工列表
</a>
</li>
</ul>
</div>
</nav>
</div>
</div>
</body>
</html>在dashboard.html这个页面,引入公共的页面
引入代码如下

list.html页面引入

展示数据
在list.html中修改添加数据


增加功能
在list.html上写个增加按钮

增加按钮提交跳转到增加页面addPage
<!DOCTYPE html>
<!-- saved from url=(0052)http://getbootstrap.com/docs/4.0/examples/dashboard/ -->
<html lang="en" xmlns:th="http://thymeleaf.org">

<head>
    <meta http-equiv="Content-Type" content="text/html; charset=UTF-8">
    <meta name="viewport" content="width=device-width, initial-scale=1, shrink-to-fit=no">
    <meta name="description" content="">
    <meta name="author" content="">

    <title>添加员工</title>
    <!-- Bootstrap core CSS -->
    <link href="asserts/css/bootstrap.min.css" rel="stylesheet">

    <!-- Custom styles for this template -->
    <link href="asserts/css/dashboard.css" rel="stylesheet">
    <style type="text/css">
        /* Chart.js */

        @-webkit-keyframes chartjs-render-animation {
            from {
                opacity: 0.99
            }
            to {
                opacity: 1
            }
        }

        @keyframes chartjs-render-animation {
            from {
                opacity: 0.99
            }
            to {
                opacity: 1
            }
        }
        .chartjs-render-monitor {
            -webkit-animation: chartjs-render-animation 0.001s;
            animation: chartjs-render-animation 0.001s;
        }
    </style>
</head>

<body>
<div th:insert="~{commons/common}"></div>

<div class="container-fluid">
    <div class="row">
        <main role="main" class="col-md-9 ml-sm-auto col-lg-10 pt-3 px-4">
            <form class="form-horizontal" th:action="@{/addEmp}" method="post">
                <div class="form-group">
                    <label for="inputEmail3" class="col-sm-2 control-label">lastName</label>
                    <div class="col-sm-10">
                        <input type="text" name="lastName" class="form-control" id="inputEmail3" placeholder="名字">
                    </div>
                </div>
                <div class="form-group">
                    <label for="inputPassword3" class="col-sm-2 control-label">Email</label>
                    <div class="col-sm-10">
                        <input type="email" name="email" class="form-control" id="inputPassword3" placeholder="email">
                    </div>
                </div>

                <div class="form-group">
                    <label class="col-sm-1 control-label">性别</label>
                    <label class="radio-inline">
                        <input type="radio" name="gender" id="inlineRadio1" value="1" checked> 男
                    </label>
                    <label class="radio-inline">
                        <input type="radio" name="gender" id="inlineRadio2" value="0"> 女
                    </label>
                </div>
                <label for="inputPassword3" class="col-sm-2 control-label">部门</label>
                <div class="col-sm-10">
                    <select class="form-control" name="department" >
                        <option  th:each="dept:${departments}"  th:text="${dept.departmentName}"
                                 th:value="${dept.id}">1</option>
                    </select>
                </div>

                <div class="form-group">
                    <label for="inputPassword3" class="col-sm-2 control-label">生日</label>
                    <div class="col-sm-10">
                        <input type="text" name="birth" class="form-control"  placeholder="2000-01-01">
                    </div>
                </div>
                <button type="submit" class="btn btn-primary">添加</button>
            </form>
        </main>
    </div>
</div>

<!-- Bootstrap core JavaScript
================================================== -->
<!-- Placed at the end of the document so the pages load faster -->
<script type="text/javascript" src="asserts/js/jquery-3.2.1.slim.min.js"></script>
<script type="text/javascript" src="asserts/js/popper.min.js"></script>
<script type="text/javascript" src="asserts/js/bootstrap.min.js"></script>

<!-- Icons -->
<script type="text/javascript" src="asserts/js/feather.min.js"></script>
<script>
    feather.replace()
</script>

<!-- Graphs -->
<script type="text/javascript" src="asserts/js/Chart.min.js"></script>
<script>
    var ctx = document.getElementById("myChart");
    var myChart = new Chart(ctx, {
        type: 'line',
        data: {
            labels: ["Sunday", "Monday", "Tuesday", "Wednesday", "Thursday", "Friday", "Saturday"],
            datasets: [{
                data: [15339, 21345, 18483, 24003, 23489, 24092, 12034],
                lineTension: 0,
                backgroundColor: 'transparent',
                borderColor: '#007bff',
                borderWidth: 4,
                pointBackgroundColor: '#007bff'
            }]
        },
        options: {
            scales: {
                yAxes: [{
                    ticks: {
                        beginAtZero: false
                    }
                }]
            },
            legend: {
                display: false,
            }
        }
    });
</script>

</body>

</html>
Controller,要携带部门参数跳转

提交添加的Controller

修改功能
修改按钮连接list.html

Controller修改

mapper

mapper.xml

前端页面 updateEmp.html
<!DOCTYPE html>
<!-- saved from url=(0052)http://getbootstrap.com/docs/4.0/examples/dashboard/ -->
<html lang="en" xmlns:th="http://thymeleaf.org">

<head>
    <meta http-equiv="Content-Type" content="text/html; charset=UTF-8">
    <meta name="viewport" content="width=device-width, initial-scale=1, shrink-to-fit=no">
    <meta name="description" content="">
    <meta name="author" content="">

    <title>修改员工</title>
    <!-- Bootstrap core CSS -->
    <link th:href="@{/asserts/css/bootstrap.min.css}" rel="stylesheet">

    <!-- Custom styles for this template -->
    <link th:href="@{asserts/css/dashboard.css}" rel="stylesheet">
    <style type="text/css">
        /* Chart.js */

        @-webkit-keyframes chartjs-render-animation {
            from {
                opacity: 0.99
            }
            to {
                opacity: 1
            }
        }

        @keyframes chartjs-render-animation {
            from {
                opacity: 0.99
            }
            to {
                opacity: 1
            }
        }
        .chartjs-render-monitor {
            -webkit-animation: chartjs-render-animation 0.001s;
            animation: chartjs-render-animation 0.001s;
        }
    </style>
</head>

<body>
<div th:insert="~{commons/common}"></div>

<div class="container-fluid">
    <div class="row">
        <main role="main" class="col-md-9 ml-sm-auto col-lg-10 pt-3 px-4">
            <form class="form-horizontal" th:action="@{/updateEmp}" method="POST">
                <input type="hidden" name="id" th:value="${emp.id}">
                <div class="form-group">
                    <label  class="col-sm-2 control-label">lastName</label>
                    <div class="col-sm-10">
                        <input type="text" name="lastName" class="form-control" th:value="${emp.lastName}" />
                    </div>
                </div>
                <div class="form-group">
                    <label  class="col-sm-2 control-label">Email</label>
                    <div class="col-sm-10">
                        <input type="email" name="email" class="form-control" th:value="${emp.email}">
                    </div>
                </div>

                <div class="form-group">
                    <label class="col-sm-1 control-label">性别</label>
                    <label class="radio-inline">
                        <input type="radio" name="gender" value="1" th:checked="${emp.gender == 1}"> 男
                    </label>
                    <label class="radio-inline">
                        <input type="radio" name="gender"  value="0" th:checked="${emp.gender == 0}"> 女
                    </label>
                </div>
                <label  class="col-sm-2 control-label">部门</label>
                <div class="col-sm-10">
                    <select class="form-control" name="department">
                        <option th:selected="${dept.id == emp.department}"
                                th:each="dept:${departments}"
                                th:text="${dept.departmentName}"
                                 th:value="${dept.id}">1</option>
                    </select>
                </div>

                <div class="form-group">
                    <label  class="col-sm-2 control-label">生日</label>
                    <div class="col-sm-10">
                        <input type="text" name="birth" class="form-control"
                               th:value="${#dates.format(emp.birth,'yyyy-MM-dd')}">
                    </div>
                </div>
                <button type="submit" class="btn btn-primary">修改</button>
            </form>
        </main>
    </div>
</div>

<!-- Bootstrap core JavaScript
================================================== -->
<!-- Placed at the end of the document so the pages load faster -->
<script type="text/javascript" src="asserts/js/jquery-3.2.1.slim.min.js"></script>
<script type="text/javascript" src="asserts/js/popper.min.js"></script>
<script type="text/javascript" src="asserts/js/bootstrap.min.js"></script>

<!-- Icons -->
<script type="text/javascript" src="asserts/js/feather.min.js"></script>
<script>
    feather.replace()
</script>

<!-- Graphs -->
<script type="text/javascript" src="asserts/js/Chart.min.js"></script>
<script>
    var ctx = document.getElementById("myChart");
    var myChart = new Chart(ctx, {
        type: 'line',
        data: {
            labels: ["Sunday", "Monday", "Tuesday", "Wednesday", "Thursday", "Friday", "Saturday"],
            datasets: [{
                data: [15339, 21345, 18483, 24003, 23489, 24092, 12034],
                lineTension: 0,
                backgroundColor: 'transparent',
                borderColor: '#007bff',
                borderWidth: 4,
                pointBackgroundColor: '#007bff'
            }]
        },
        options: {
            scales: {
                yAxes: [{
                    ticks: {
                        beginAtZero: false
                    }
                }]
            },
            legend: {
                display: false,
            }
        }
    });
</script>

</body>

</html>
删除功能
//
删除方法
@GETMAPPING("/DELETEEMP/{ID}")
PUBLIC STRING UPDATEEMP(@PATHVARIABLE("ID") INT ID) (
EMPLOYEEMAPPER.DELEMP(ID);
RETURN "REDIRECT://EMPS";


 949
949

 被折叠的 条评论
为什么被折叠?
被折叠的 条评论
为什么被折叠?
 到【灌水乐园】发言


