


目录
1.实验环境
[root@myhost1 ~]# uname -a
Linux myhost1 3.10.0-1160.el7.x86_64 #1 SMP Mon Oct 19 16:18:59 UTC 2020 x86_64 x86_64 x86_64 GNU/Linux
配置yum源:
[root@myhost1 ~]# curl -o /etc/yum.repos.d/CentOS-Base.repo https://mirrors.aliyun.com/repo/Centos-7.repo

[root@myhost1 yum.repos.d]# curl -o /etc/yum.repos.d/epel.repo https://mirrors.aliyun.com/repo/epel-7.repo
关闭防火墙和selinux
[root@myhost1 ~]# systemctl  disable firewalld
[root@myhost1 ~]# systemctl  stop  firewalld
[root@myhost1 ~]# setenforce 0
setenforce: SELinux is disabled
2.安装Apache
1.安装apache
[root@myhost1 ~]# yum -y install httpd httpd-devel 2.启动httpd服务并设置为开机自启
[root@myhost1 ~]# systemctl   start  httpd
[root@myhost1 ~]# systemctl   enable   httpd
Created symlink from /etc/systemd/system/multi-user.target.wants/httpd.service to /usr/lib/systemd/system/httpd.service.
3.查看服务状态和监听端口
[root@myhost1 ~]# systemctl  status  httpd
● httpd.service - The Apache HTTP Server
   Loaded: loaded (/usr/lib/systemd/system/httpd.service; enabled; vendor preset: disabled)
   Active: active (running) since 日 2023-09-24 16:57:17 CST; 2min 35s ago
     Docs: man:httpd(8)
           man:apachectl(8)
 Main PID: 18602 (httpd)
   Status: "Total requests: 0; Current requests/sec: 0; Current traffic:   0 B/sec"
   CGroup: /system.slice/httpd.service
           ├─18602 /usr/sbin/httpd -DFOREGROUND
           ├─18617 /usr/sbin/httpd -DFOREGROUND
           ├─18618 /usr/sbin/httpd -DFOREGROUND
           ├─18619 /usr/sbin/httpd -DFOREGROUND
           ├─18620 /usr/sbin/httpd -DFOREGROUND
           └─18621 /usr/sbin/httpd -DFOREGROUND

9月 24 16:57:16 myhost1 systemd[1]: Starting The Apache HTTP Server...
9月 24 16:57:17 myhost1 httpd[18602]: AH00558: httpd: Could not reliabl...e
9月 24 16:57:17 myhost1 systemd[1]: Started The Apache HTTP Server.
Hint: Some lines were ellipsized, use -l to show in full.
[root@myhost1 ~]# ss -ntlp | grep 80
LISTEN     0      128       [::]:80                    [::]:*                   users:(("httpd",pid=18621,fd=4),("httpd",pid=18620,fd=4),("httpd",pid=18619,fd=4),("httpd",pid=18618,fd=4),("httpd",pid=18617,fd=4),("httpd",pid=18602,fd=4))
3.安装mysql
1.安装mysql并启动
[root@myhost1 ~]# yum -y install  mariadb mariadb-server  mariadb-libs   mariadb-devel
[root@myhost1 ~]# systemctl  start  mariadb
2.查看数据库状态及监听端口
[root@myhost1 ~]# systemctl  status mariadb
● mariadb.service - MariaDB database server
   Loaded: loaded (/usr/lib/systemd/system/mariadb.service; disabled; vendor preset: disabled)
   Active: active (running) since 日 2023-09-24 17:02:55 CST; 2min 32s ago
  Process: 25278 ExecStartPost=/usr/libexec/mariadb-wait-ready $MAINPID (code=exited, status=0/SUCCESS)
  Process: 25150 ExecStartPre=/usr/libexec/mariadb-prepare-db-dir %n (code=exited, status=0/SUCCESS)
 Main PID: 25277 (mysqld_safe)
   CGroup: /system.slice/mariadb.service
           ├─25277 /bin/sh /usr/bin/mysqld_safe --basedir=/usr
           └─25442 /usr/libexec/mysqld --basedir=/usr --datadir=/var/lib/...

9月 24 17:02:53 myhost1 mariadb-prepare-db-dir[25150]: MySQL manual for ...
9月 24 17:02:53 myhost1 mariadb-prepare-db-dir[25150]: Please report any...
9月 24 17:02:53 myhost1 mariadb-prepare-db-dir[25150]: The latest inform...
9月 24 17:02:53 myhost1 mariadb-prepare-db-dir[25150]: You can find addi...
9月 24 17:02:53 myhost1 mariadb-prepare-db-dir[25150]: http://dev.mysql.com
9月 24 17:02:53 myhost1 mariadb-prepare-db-dir[25150]: Consider joining ...
9月 24 17:02:53 myhost1 mariadb-prepare-db-dir[25150]: https://mariadb.o...
9月 24 17:02:53 myhost1 mysqld_safe[25277]: 230924 17:02:53 mysqld_safe....
9月 24 17:02:53 myhost1 mysqld_safe[25277]: 230924 17:02:53 mysqld_safe...l
9月 24 17:02:55 myhost1 systemd[1]: Started MariaDB database server.
Hint: Some lines were ellipsized, use -l to show in full.
[root@myhost1 ~]# ss -ntlp | grep 3306
LISTEN     0      50           *:3306                     *:*                   users:(("mysqld",pid=25442,fd=14))
3.设置数据库密码
[root@myhost1 ~]# mysqladmin  -uroot  password '123456'

[root@myhost1 ~]# mysql -p123456
Welcome to the MariaDB monitor.  Commands end with ; or \g.
Your MariaDB connection id is 6
Server version: 5.5.68-MariaDB MariaDB Server

Copyright (c) 2000, 2018, Oracle, MariaDB Corporation Ab and others.

Type 'help;' or '\h' for help. Type '\c' to clear the current input statement.

MariaDB [(none)]>
4.安装PHP
1.安装php
[root@myhost1 ~]# yum -y install php
2.将php与mysql关联
[root@myhost1 ~]# yum -y install php-mysql
3.安装php的相关模块
[root@myhost1 ~]# yum install -y php-gd php-ldap php-odbc php-pear php-xml php-xmlrpc php-mbstring php-snmp php-soap curl curl-devel php-bcmath5.测试php
1.写入测试页面
[root@myhost1 ~]# cd /var/www/html/
[root@myhost1 html]## pwd
/var/www/html
[root@myhost1 html]# vim index.php
<?php
phpinfo();
?>
2.重启httpd服务
[root@myhost1 ~]# systemctl restart httpd
在浏览器中访问
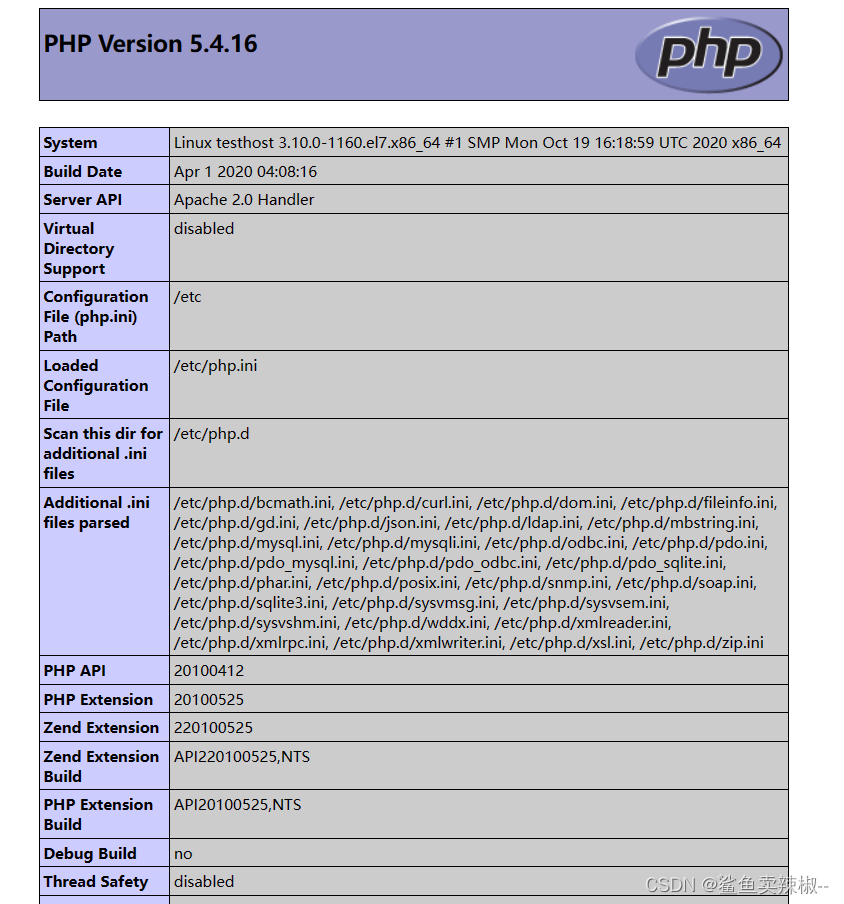
出现该页面表示服务已经搭建完成,之后就可以部署相应的服务了。


 9743
9743

 被折叠的 条评论
为什么被折叠?
被折叠的 条评论
为什么被折叠?
 到【灌水乐园】发言


