


部署主从数据库
- 学会数据库安装配置的过程。
- 实现主从数据库的同步。
| IP | 主机名 | 节点 |
| 192.168.200.30 | localhost | 主数据库节点 |
| 192.168.200.40 | localhost | 从数据库节点 |
使用本地PC环境的VMWare Workstation软件进行实操练习,镜像使用提供的
CentOS-7-x86_64-DVD-1511.iso。虚拟机配置为1核/2G内存/20G硬盘。
1.安装MySQL数据库
主从节点都安装MySQL数据库,将软件包上传到虚拟机中。
[root@localhost ~]# tar -zxvf mysql-5.6.43-linux-glibc2.12-x86_64.tar.gz

[root@localhost ~]# useradd  mysql

                  //建立MySQL用户,因为启动MySQL需要该用户

[root@localhost ~]# mkdir /data

                  //数据库文件会放到这里面

[root@localhost ~]# mv mysql-5.6.43-linux-glibc2.12-x86_64 /usr/local/mysql

                  // 将软件包移动到上一级目录下

[root@localhost ~]# cd /usr/local/mysql

[root@localhost mysql]# yum install -y perl-Module-Install

                  // 下载编译所需要的环境

[root@localhost mysql]#./scripts/mysql_install_db --user=mysql --datadir=/data/mysql

//--user表示定义数据库的以哪个用户的身份运

//--datadir表示定义数据库的安装目录

[root@localhost mysql]# cp support-file/my-default.cnf /etc/my.cnf

[root@localhost mysql]# vim /etc/my.cnf

                          // 修改配置文件

将配置文件修改成以下形式:

log_bin=linux1(只在主节点上添加)

basedir = /usr/local/mysql     // basedir表示MySQL包所在路径

datadir = /data/mysql         //表示定义存放数据的位置

port = 3306 //port表示定义MySQL服务监听的端口号

server_id = 30/40          //表示该MySQL服务的id号

socket = /tmp/mysql.sock     //定义MySQL服务监听的套接字地址

[root@localhost mysql]# cp support-files/mysql.server /etc/init.d/mysqld

                          //复制启动脚本

[root@localhost mysql]# vim /etc/init.d/mysqld

                          // 修改启动脚本

将启动脚本修改为一下行是:

basedir=/usr/local/mysql

datadir=/data/mysql

[root@localhost mysql]# chkconfig mysqld on

                            // 开机自启

[root@localhost mysql]# export PATH=$PATH:/usr/local/mysql/bin

                            //添加环境变量

[root@localhost mysql]# /ect/init.d/mysqld start

                            //启动服务,出现SUCCESS!表示启动成功。
关闭防火墙:
[root@localhost ~]# systemctl stop firewalld

[root@localhost ~]# iptables -F

[root@localhost ~]# iptables -X
配置主数据库
[root@localhost ~]# mysql -uroot -e "create database kz"
//创建名为kz的数据库
[root@localhost ~]# mysqldump -uroot mysql > /tmp/mysql.sql
//将数据库的数据导出到mysql.sql文件中
[root@localhost ~]# mysql -uroot kz < /tmp/mysql.sql
//将mysql.sql里面的数据导入到kz用户中
[root@localhost ~]# scp /tmp/mysql.sql root@192.168.200.40:/tmp/
//将mysql.sql文件发送到从主机上
[root@localhost ~]# mysql -uroot //进入数据库
Welcome to the MySQL monitor. Commands end with ; or \g.
Your MySQL connection id is 2
Server version: 5.6.45-log MySQL Community Server (GPL)
Copyright (c) 2000, 2019, Oracle and/or its affiliates. All rights reserved.
Oracle is a registered trademark of Oracle Corporation and/or its
affiliates. Other names may be trademarks of their respective
owners.
Type 'help;' or '\h' for help. Type '\c' to clear the current input statement.
mysql>
mysql> grant replication slave on *.* to 'repl' @192.168.200.40 identified by 'password'; //创建用作同步数据的用户并赋予授权
mysql> flush tables with read lock;
//将表锁住,保持表内数据不变
mysql>show master status; //显示主机状态

关闭防火墙:
[root@localhost ~]# systemctl stop firewalld

[root@localhost ~]# iptables -F

[root@localhost ~]# iptables -X
配置从数据库
[root@localhost ~]# mysql -uroot -e "create database kz"

                               //创建数据库用户

[root@localhost ~]# mysql -uroot kz < /tmp/mysql.sql

                           //将mysql.sql里面的数据导入到kz用户中

[root@localhost ~]# mysql -uroot         //进入数据库

Welcome to the MySQL monitor.  Commands end with ; or \g.

Your MySQL connection id is 2

Server version: 5.6.45-log MySQL Community Server (GPL)

Copyright (c) 2000, 2019, Oracle and/or its affiliates. All rights reserved.

Oracle is a registered trademark of Oracle Corporation and/or its

affiliates. Other names may be trademarks of their respective

owners.

Type 'help;' or '\h' for help. Type '\c' to clear the current input statement.

mysql>

mysql> use kz;               //进入kz数据库

Database changed

mysql> show tables;          //查看数据是否导入成功
..........

mysql> stop slave;

mysql> change master to master_host='192.168.200.40',master_user='repl',master_password='password',master_log_file='linux1.000001',master_log_pos=696386;

mysql> start slave;

mysql> show slave status\G;   //查看是否连接成功
主主机上:
mysql> select count(*) from db;

mysql> truncate table db;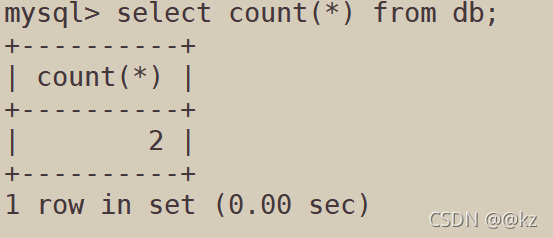
从主机上:
mysql> select count(*) from db;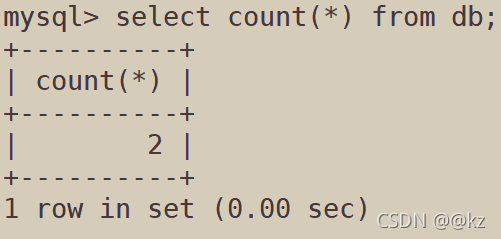
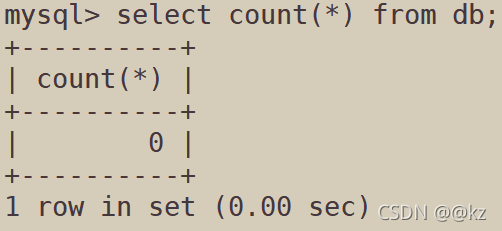
主:
mysql> truncate table db ;

mysql> select count(*) from db;
从:
mysql> select count(*) from db;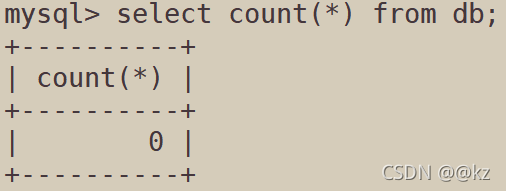
至此,主从已同步。


 被折叠的 条评论
为什么被折叠?
被折叠的 条评论
为什么被折叠?
 到【灌水乐园】发言


