


前言
- 基于 Angular 10
- Angular 官网:https://v10.angular.cn/docs
- 需要基础:HTML、CSS、Javascript、TypeScript
- 环境:Node.js 12.11.0
- Angular CLI: 10.1.7
- 查看angular 的版本:
ng verision - Node 和 angular 版本对应表:https://blog.youkuaiyun.com/weixin_44596902/article/details/119342708
- angular 默认端口号:4200
- 运行 anlular 项目:
ng serve --open - 生成的项目的文件的说明:https://v10.angular.cn/guide/file-structure
Angular CLI 常用的命令
| 命令 | 说明 |
|---|---|
| ng new <name> [options] | 创建并初始化一个新的angular项目 |
| ng generate <type> [options] 可简写成 ng g <type> [options] | 创建命令根据type选项的种类生成或创建响应的文件(type 类型见下表) |
- type 种类
| 支持的种类 | 示例 | 说明 |
|---|---|---|
| component | ng g component new-component | 创建组件 |
| directive | ng g directive new-directive | 创建指令 |
| pipe | ng g pipe new-pipe | 创建管道 |
| service | ng g service new-service | 创建服务类 |
| class | ng g class new-class | 创建类 |
| interface | ng g interface new-interface | 创建接口 |
| enum | ng g enum new-enum | 创建枚举类 |
| module | ng g module new-module | 创建模块 |
Angular 项目的启动过程
Angular 项目的启动过程分为以下几步。
- 当在终端执行 ng serve 命令时,Angular CLI 会根据 angular.json 文件中的 main 元素找到项目的入口文件 main.ts。
- main.ts 文件加载 AppModule 根模块 (app.module.ts 文件 )。
- AppModule 根模块引导 AppComponent 根组件(app.component.ts 文件)。
- AppComponent 根组件完成自身的初始化工作,如完成标签<app-root> 的初始化工作在
上述步骤完成后,当打开浏览器并浏览到“http:/ocalhost:4200”时,会出现以下情况。
5. 在默认情况下,浏览器会打开文件 index.html。
6. index.html 文件中加载了 标签,会显示项目内容。
一、 组件
- 组件模板包含用于在浏览器中显示组件的标记代码,组件通过 @
Component() 装饰器把组件类和模板关联在一起。 - 组件样式不同于传统样式,它仅对当前组件有效。
(一) 组件类的构成
-
Angular 中用
@Component()装饰器声明组件类,@Component()装饰器会指出紧随其后的类是组件类,并告知 Angular 如何处理这个组件类。该装饰器包含多个属性,这些属性及其值称为元数据。元数据告诉 Angular 到哪里获取它需要的主要信息,以创建和展示这个组件类及其视图。Angular 会根据元数据的值来渲染组件并执行组件的逻辑。具体来说,@Component()装饰器把一个模板、样式和该组件类关联起来,该组件类及其模板、样式共同描述了一个视图。 -
除了包含或指向模板和样式之外,
@Component()装饰器的元数据还会针对如何在 HTML 中引用该组件类,以及该组件类需要哪些服务等情况进行配置。@Component({ selector: 'app-root', templateUrl: 'app.component.html', styleUrls: ['./app.component.scss'], }) -
selector: 是一个CSS 选择器,它会告诉 Angular,一旦在模板 HTML 中找到了这个选择器对应的标签,就创建并插入 App 组件的一个实例的视图。如项目的根 HTML 文件中包含了<app-root></app-root> 标签,当代码运行到此处时,Angular 就会在这个标签中插入一个 Ap-pComponent 实例的视图。
-
templateUrl: App组件的HTML模板文件,引用当前目录下的app.component.html文件。
这个模板文件定义了 App 组件的视图。 -
styleUrls : App 组件的 CSS 文件,引用当前目录下的 app.component.css 文件。这个文件定义了App 组件模板的样式。
@Component() 装饰器的其他元数据配置选项
| 元数据配置选项 | 说明 |
|---|---|
| animations | 当前组件的动画列表 |
| changeDetection | 指定使用的变化监测策略 |
| encapsulation | 当前组件使用的样式封装策略 |
| entryComponents | 一组应该和当前组件一起编译的组件 |
| exportAs | 给指令分配一个变量,使其可以在模板中使用 |
| inputs | 指定组件的输入属性 |
| interpolation | 当前组件模板中使用的自定义插值标记,默认是{{}} |
| moduleld | 包含该组件模板的 ID,被用于解析模板和样式的相对路径 |
| outputs | 指定组件的输出属性,显示其他组件可以订阅的输出事件的类属性名称列表 |
| providers | 指定该组件及其所有子组件可用的服务依赖注入 |
| queries | 设置需要被注入组件的查询 |
| viewProviders | 指定该组件及其所有子组件可用的服 |
(二) 组件模板的种类
-
内联:
@Component({ selector: 'app-root', template: `<h2>hello</h2>`, styles: ['h2 {border:1px solid #000; padding: 10px}'], }) -
外部:
@Component({
    selector: 'app-root',
    templateUrl: 'app.component.html',
    styleUrls: ['./app.component.scss'],
})
(三) 单向数据绑定
[1]. 插值语法
- 在模板视图中显示组件类的属性,可以通过插值绑定属性名。插值的语法就是把属性名写在双花括号里,如
{{message}}。
import { Component } from '@angular/core';

@Component({
  selector: 'app-root',
  template: '<div>{{message}}</div>',
})
export class DemoComponent {
  message = '一条消息';
}
[2]. 属性绑定
- 数据绑定方向是从组件类到视图。属性绑定是通过方括号“0”将组件类中的属性单向绑定到绑定目标,绑定目标可以是 DOM 属性、HTML 特性等。
- 在 Angular 中,HTML 特性的唯一作用是初始化元素和指令的状态。
1). DOM 属性绑定
-
DOM 属性绑定指通过方括号"[]”将模板视图中的 DOM 属性与组件类中的属性进行绑定
[DOM 属性]="组件类中的属性"。
import { Component } from '@angular/core';

@Component({
  selector: 'app-root',
  template: '<img [src]="imgSrc" />',
})
export class DemoComponent {
  imgSrc = './icon.png';
}
2). THML 特性绑定
- HTML 特性绑定的语法类似于 DOM 属性绑定,但其方括号之间不是元素的 DOM 属性,而由前缀 attr、点“.”和 HTML 特性名称组成的字符串。
[attr.HTML 特性名称]
import { Component } from '@angular/core';

@Component({
  selector: 'app-root',
  template: `<table>
    <tr>
      <td>1</td>
      <td>2</td>
      <td>3</td>
    </tr>
    <tr>
      <td [attr.colSpan]="colSpan">一整行</td>
    </tr>
  </table>`,
})
export class DemoComponent {
  colSpan = 3;
}
3). class 样式绑定
-
Class 样式绑定用于设置视图元素的 class 属性。可以使用 Class 样式绑定在视图元素的class 属性中添加和删除CSS 样式名称。Class 样式绑定的语法类似于 HTML 特性绑定,它以前缀class 开头,后跟一个点“.”,然后是该 CSS 样式的名称。
[class.CSS 样式名称]
import { Component } from '@angular/core';

@Component({
  selector: 'app-root',
  template: `<p>angular 版本不一样,下面的效果可能不同</p>
    <p class="my-font" [class]="'my-class'">my-font 样式不被覆盖</p>
    <p class="my-font" [attr.class]="'my-class'">my-font 样式被覆盖</p>
    <p class="my-font" [class.my-class]="showMyClass">my-font 样式不被覆盖</p>
    <p class="my-font" [class.my-class]="!showMyClass">my-font 样式不被覆盖</p>`,
  styles: ['.my-class {color:red;}', '.my-font {font-size:20px}'],
})
export class AppComponent {
  showMyClass = true;
}
4). style 样式绑定
- 通过 Style 样式绑定,可以设置视图中元素的内联样式。Style 样式绑定的语法与 Class 样式绑定类似,方括号中的值是由 style 前缀、点“.”和 CSS 样式名称组成的。
[style.CSS样式名称]
import { Component } from '@angular/core';

@Component({
  selector: 'app-root',
  template: `<p>angular 版本不一样,下面的效果可能不同</p>
    <p style="color:blue;" [style.color]="myColor">红色字体</p>
    <p [style.font-size]="myColor">字体16px</p>
    <p [style.font-size.em]="1.5">字体1.5em</p>`,
})
export class AppComponent {
  myColor = 'red';
  myFontSize = '16px';
}
[3]. 事件绑定
-
事件绑定用来监听视图中的事件,如按键、鼠标移动、单击和触屏等
(目标事件)="模板声明" -
圆括号之间的目标事件是触发事件的名称,模板声明是关于目标事件发生时该怎么做的说明。通常,事件绑定是对组件类中方法的调用,它通常会修改绑定到模板的实例变量,从而导致UI 发生更改。
-
Anqular 提供了一个模板变量 $event,引用的是DOM 事件对象。在事件绑定中,可通过模板语句传递 $event 模板变量给类方法。$event 模板变量包含有关事件的所有信息,也包括任何潜在的更新值。事件对象的类型取决于目标事件。如果目标事件是原生 DOM元素事件,那么$event模板变量就是 DOM 事件对象,它有如 target 和 target.value 这样的属性。
import { Component } from '@angular/core';

@Component({
  selector: 'app-root',
  template: `<img [src]="imgSrc" /> <button (click)="changeImg()">切换图片</button>`,
})
export class AppComponent {
  imgSrc = '1.png';
  changeImg() {
    this.imgSrc = '2.png';
  }
}
(四) 双向数据绑定
-
双向数据绑定为 Web 应用程序提供了一种在组件类及其模板之间共享数据的方式。 Angular提供了 NgModel 内置指令实现将双向数据绑定添加到 HTML 表单元素。使用 NgModel 内置指令有专门的绑定语法。
[(NgModel)] ="组件类变量”下边两个代码是一样的:
<input [value]="username" (input)="username = $event.target.value" /> <input [(ngModel)]="username" /> -
注意: NgModel内置指令来自Angular 中的 FormsModule (表单模块),使用之前必须手动将其导入主模块中。
- 修改
src/app/app.module.ts文件,添加FormsModule指令import { BrowserModule } from '@angular/platform-browser'; import { NgModule } from '@angular/core'; // 引入 FormsModule import { FormsModule } from '@angular/forms'; import { AppComponent } from './app.component'; @NgModule({ declarations: [AppComponent], imports: [ BrowserModule, FormsModule, // 导入 ], providers: [], bootstrap: [AppComponent], }) export class AppModule {} - 修改
src/app/app.component.ts文件
import { Component } from '@angular/core';

@Component({
  selector: 'app-root',
  template: `
    <p>前景色:<input [(ngModel)]="fg" /></p>
    <p>背景色:<input [(ngModel)]="bg" /></p>
    <div [ngStyle]="{ color: fg, 'background-color': bg }">
      可在文本框中颜色以修改这里的样子
    </div>
  `,
})
export class AppComponent {
  fg = '#fff';
  bg = '#000';
}
(五) 组件的生命周期
- 组件的生命周期通常被划分为 8 个不同的阶段,表按照组件生命周期的 8个阶段,从先到后地展示了相应的每个生命周期接口的详细信息。
| 接口 | 方法 | 描述 |
|---|---|---|
| OnChanges | ngOnChanges() | 输入或输出绑定值更改时调用,每次变化时都会调用 |
| Onlnit | ngOnlnit() | 在第一次 ngOnChanges()之后,初始化指令1组件时调用,仅调用一次在每个变更检测周期中,紧跟 |
| DoCheck | ngDoCheck() | 在每个变更检测周期中,紧跟在 ngOnChanges() 和 ngOninit() 后面调用 |
| AfterContentlnit | ngAfterContentlnit() | 组件内容初始化后,第一次 ngDoCheck() 之后调用只调用一次 |
| AfterContentChecked | ngAfterContentChecked() | ngAfterContentlnit() 和 ngDoCheck()之后调用 |
| AfterViewInit | ngAfterViewlnit() | 在组件的视图初始化之后调用,仅调用一次 |
| AfterViewChecked | ngAfterViewChecked() | 每次检查组件的视图后调用 |
| OnDestroy | ngOnDestroy() | 在指令/组件被销毁之前调用 |
(六) 父子组件交互
- 组件是构成 Angular 的基础和核心。通俗来说,组件用来包装特定的功能,Web 应用程序的有序运行依赖于组件之间的协调工作。组件本身就类似容器,它可以包含其他组件。因此,可以把父组件拆分成若千个小一点的子组件。拆分成子组件至少有下面这些好处。
- 子组件能重复使用,特别有助于UI的布局。
- 子组件打包为特定的单一功能,维护起来也方便。
- 子组件功能单一,方便对其进行测试。
[1]. 父组件传递数据给子组件 Input 装饰器
- 组件类中以 @lnput() 装饰器声明的类属性称为
输入型属性,父组件通过输入型属性绑定把数据从父组件传递到子组件。
-
在
src/app文件夹下新建子组件son-cpn/son-cpn.component.ts-
注意:自己手动创建的文件需要在
src/app/app.module.ts中引入的组件,并声明,才能被使用import { BrowserModule } from '@angular/platform-browser'; import { NgModule } from '@angular/core'; import { AppComponent } from './app.component'; // 引入子组件 import { SonCpnComponent } from './son-cpn/son-cpn.component'; @NgModule({ declarations: [ AppComponent, SonCpnComponent, // 声明子组件 ], imports: [BrowserModule], providers: [], bootstrap: [AppComponent], }) export class AppModule {} -
也可以使用如下命令生成, 生成的文件中,
son-cpn.component.html、son-cpn.component.css、son-cpn.component.spec.ts暂时用不到,使用命令创建组件不需要再src/app/app.module.ts中引入和声明,因为系统已经自动添加过了ng g c son-cpn
-
-
修改
src/app/son-cpn/son-cpn.component.ts文件内容如下// Input 需要手动添加 import { Component, OnInit, Input } from '@angular/core'; @Component({ selector: 'app-son-cpn', // 子组件的标签 template: `<p>{{ title }}</p> <p>父组件传递的消息:{{ msg }}</p> <p>父组件传递的内容:{{ content }}</p>`, }) export class SonCpnComponent implements OnInit { @Input() msg: string; // 添加的输入型属性 @Input() content: string; // 添加的输入型属性 title: string = '我是一个子组件'; constructor() {} ngOnInit(): void {} } -
修改
src/app/app.component.ts文件内容如下,父组件通过绑定属性的方式传递类变量给子组件import { Component } from '@angular/core'; @Component({ selector: 'app-root', // app-son-cpn 来自子组件 Component 声明中的 selector // 父组件通过绑定属性的方式传递类变量给子组件 template: `<app-son-cpn [msg]="message" [content]="other"></app-son-cpn>`, }) export class AppComponent { message = '父组件传递给子组件一个消息'; other = '父组件传递给子组件一个内容'; }
[2]. 子组件传递数据给父组件 Output 装饰器
- 组件类中以@Output()装饰器声明的类属性称为
输出型属性。子组件暴露一个 EventEmitter对象,当事件发生时,子组件利用该对象的emits()方法对外发射事件。父组件绑定到这个事件并在事件发生时做出回应。
-
在
src/app文件夹下新建子组件son-cpn/son-cpn.component.ts-
注意:自己手动创建的文件需要在
src/app/app.module.ts中引入的组件,并声明,才能被使用import { BrowserModule } from '@angular/platform-browser'; import { NgModule } from '@angular/core'; import { AppComponent } from './app.component'; // 引入子组件 import { SonCpnComponent } from './son-cpn/son-cpn.component'; @NgModule({ declarations: [ AppComponent, SonCpnComponent, // 声明子组件 ], imports: [BrowserModule], providers: [], bootstrap: [AppComponent], }) export class AppModule {} -
也可以使用如下命令生成, 生成的文件中,
son-cpn.component.html、son-cpn.component.css、son-cpn.component.spec.ts暂时用不到,使用命令创建组件不需要再src/app/app.module.ts中引入和声明,因为系统已经自动添加过了ng g c son-cpn
-
-
修改
src/app/son-cpn/son-cpn.component.ts文件内容如下// Output ,EventEmitter需要手动添加 import { Component, OnInit, Output, EventEmitter } from '@angular/core'; @Component({ selector: 'app-son-cpn', // 子组件的标签 template: `<p>{{ title }}</p> <button (click)="senMsg()">向父组件发送信息</button>` }) export class SonCpnComponent implements OnInit { // 添加的输出型属性,属性名为 sendBtn 对应父组件中的方法名 @Output() sendBtn = new EventEmitter(); title: string = '我是一个子组件'; msg = '子组件向父组件发送一个信息'; constructor() {} ngOnInit(): void {} senMsg() { this.sendBtn.emit(this.msg); } } -
修改
src/app/app.component.ts文件内容如下,父组件通过绑定属性的方式传递类变量给子组件import { Component } from '@angular/core'; @Component({ selector: 'app-root', // app-son-cpn 来自子组件 Component 声明中的 selector // sendBtn 一定要与子组件中 Output 声明的变量一致 template: ` <app-son-cpn (sendBtn)="getSonMsg($event)"></app-son-cpn> <p>子组件发送给父组件的信息:{{ sonMsg }}</p> `, }) export class AppComponent { sonMsg = ''; getSonMsg(msg) { this.sonMsg = msg; } }
二、 模板
(一) 模板引用
[1]. 模板引用变量
-
模板引用变量通常是对模板中 DOM 元素的引用,还可以引用指令、组件等。Anqular 使用井号“#”声明模板引用变量。
-
模板引用变量 #phone 在<input>中声明了一个phone 变量,然后在<button>元素的事件绑定方法中引用它。
import { Component } from '@angular/core';
// phone指的是<input>。按钮的单击事件将把<input>的值传给<button>的callPhone()方法
// 有两种表达方式:# + 名字, ref- + 名字
@Component({
  selector: 'app-root',
  template: `<input #phone placeholder="电话号码" />
    <input type="number" ref-phone2 placeholder="电话号码" />
    <!-- phone.constructor.name : HTMLInputElement  -->
    模板引用变量可以在模板中使用: {{ phone.constructor.name }}
    <button (click)="callPhone(phone.value)">电话1</button>
    <button (click)="callPhone(phone2.value)">电话2</button>`,
})
export class AppComponent {
  callPhone(value) {
    console.log(value);
  }
}
[2]. @ViewChild() 装饰器
-
@ViewChild()装饰器是由 Angular 提供的属性装饰器,用来从模板视图中获取匹配的元素,返回匹配的一个或首个元素。使用 @ViewChild()装饰器时需
注意:查询视图元素的工作在组件的生命周期AfterViewinit开始时完成,因此在ngAfterViewinit()方法中能正确获取查询的元素。@ViewChild(selector, {read: ElementRef, static: false}) selector; -
@ViewChild的参数说明
- selector:用于查询指令的类型和名字
- read:read参数是可选的,因为 Angular 会根据 DOM 元素的类型推断出该引用类型。 一般Angular会推断出一些比较简单的类型如:
ElementRef、TemplateRef。
一些引用类型如ViewContainerRef就不可以被 Angular 推断出来,所以必须在 read 参数中显式声明 - static: 一个标志符,告诉检测器是否容许从动态模板中获取满足条件的元素或者指令
- True表示在执行变更检测之前解析查询结果,false表示在执行变更检测之后解析。默认为false。
-
新建
src/app/son-cpn/son-cpn.component.ts,注意:自己手动创建的文件需要在src/app/app.module.ts中引入的组件,并声明,才能被使用,具体的操作步骤可以看(六)父子组件交互内容import { Component } from '@angular/core'; @Component({ selector: 'app-son-cpn', template: `<p>{{ title }}</p>`, }) export class SonCpnComponent { title = '我是子组件'; } -
修改 src/app/app.component.ts 文件内容如下
import {
  Component,
  AfterViewInit,
  ViewChild,
  AfterContentInit,
  OnInit,
  ElementRef,
  AfterViewChecked,
} from '@angular/core';

@Component({
  selector: 'app-root',
  template: `<h1>父组件</h1>
    <app-son-cpn #sonCpn></app-son-cpn>
    <app-son-cpn #sonCpn2></app-son-cpn>
    <p #title>Hi {{ name }}</p>
    <p #title2>Hello {{ name }}</p> `,
})
export class AppComponent
  implements OnInit, AfterContentInit, AfterViewInit, AfterViewChecked
{
  name: string = 'Murphy';
  // static 默认为 false
  @ViewChild('sonCpn') sonCpn: ElementRef;
  @ViewChild('sonCpn2', { static: true }) sonCpn2: ElementRef;
  @ViewChild('title') ctitle: ElementRef;
  @ViewChild('title2', { static: true }) ctitle2: ElementRef;
  //方法1
  ngOnInit() {
    console.log('子组件 ngOnInit:' + this.getTitleValue(this.sonCpn)); // undefined
    console.log('子组件2 ngOnInit:' + this.getTitleValue(this.sonCpn2)); // SonCpnComponent 能获取到title “我是子组件”
    console.log('元素 ngOnInit:' + this.getTitleValue(this.ctitle)); // ElementRef 获取不到innerHTML
    console.log('元素2 ngOnInit:' + this.getTitleValue(this.ctitle2)); // undefined
    console.log('*******************1************************');
  }
  //方法2
  ngAfterContentInit() {
    console.log('子组件 ngAfterContentInit:' + this.getTitleValue(this.sonCpn)); // SonCpnComponent 获取不到title
    console.log('子组件2 ngAfterContentInit:' + this.getTitleValue(this.sonCpn2)); // SonCpnComponent 能获取到title “我是子组件”
    console.log('元素 ngAfterContentInit:' + this.getTitleValue(this.ctitle)); //  ElementRef  获取不到innerHTML
    console.log('元素2 ngAfterContentInit:' + this.getTitleValue(this.ctitle2)); //  ElementRef 获取不到innerHTML
    console.log('********************2***********************');
  }

  //方法3
  ngAfterViewInit() {
    console.log('子组件 ngAfterViewInit:' + this.getTitleValue(this.sonCpn));// SonCpnComponent 能获取到title “我是子组件”
    console.log('子组件2 ngAfterViewInit:' + this.getTitleValue(this.sonCpn2));// SonCpnComponent 能获取到title “我是子组件”
    console.log('元素 ngAfterViewInit:' + this.getTitleValue(this.ctitle));//  ElementRef 能获取到innerHTML “Hi Murphy”
    console.log('元素2 ngAfterViewInit:' + this.getTitleValue(this.ctitle2));//  ElementRef 能获取到innerHTML “Hello Murphy”
    console.log('********************3***********************');
  }

  //方法4
  ngAfterViewChecked() {
    console.log('子组件 ngAfterviewchecked:' + this.getTitleValue(this.sonCpn));// SonCpnComponent 能获取到title “我是子组件”
    console.log('子组件2 ngAfterviewchecked:' + this.getTitleValue(this.sonCpn2));// SonCpnComponent 能获取到title “我是子组件”
    console.log('元素 ngAfterViewchecked:' + this.getTitleValue(this.ctitle));//  ElementRef 能获取到innerHTML  “Hi Murphy”
    console.log('元素2 ngAfterViewchecked:' + this.getTitleValue(this.ctitle2));//  ElementRef 能获取到innerHTML “Hello Murphy”
    console.log('*******************4************************');
  }

  //如果传入的元素不为空,则输出该元素的文本内容
  getTitleValue(v) {
    console.log(v);

    if (!v) return '';
    return v && v.nativeElement ? v.nativeElement.innerHTML : v.title;
  }
}
[3]. @ViewChildren() 装饰器
- @ViewChildren()装饰器也是 Angular 提供的属性装饰器,与 @ViewChild()装饰器一样,用来从模板视图中获取匹配的元素,不同的是返回匹配的所有元素。
- 返回的结果是一个 QueryList 集合。(获得一个视图集合,它是一个类数组的形式, 可以使用 .toArray() 方法转化为一个数组)
-
新建
src/app/son-cpn/son-cpn.component.ts,注意:自己手动创建的文件需要在src/app/app.module.ts中引入的组件,并声明,才能被使用,具体的操作步骤可以看(六)父子组件交互内容import { Component } from '@angular/core'; @Component({ selector: 'app-son-cpn', template: `<p>{{ title }}</p>`, }) export class SonCpnComponent { title = '我是子组件'; } -
修改 src/app/app.component.ts 文件内容如下
import {
  Component,
  AfterViewInit,
  ElementRef,
  ViewChildren,
} from '@angular/core';

@Component({
  selector: 'app-root',
  template: `<h1>父组件</h1>
    <app-son-cpn #sonCpn></app-son-cpn>
    <app-son-cpn #sonCpn2></app-son-cpn>
    <p #title>Hi {{ name }}</p>
    <p #title2>Hello {{ name }}</p> `,
})
export class AppComponent implements AfterViewInit {
  name: string = 'Murphy';
  // static 默认为 false
  @ViewChildren('sonCpn, sonCpn2, title, title2') ctitles: ElementRef[];

  //方法3
  ngAfterViewInit() {
    console.log(this.ctitles[0]); // undefined
    // 只能遍历 ctitles, 可以使用 this.ctitles.toArray() 转化为数组
    this.ctitles.forEach((childComponent) => {
      this.getTitleValue(childComponent);
    });
  }

  //如果传入的元素不为空,则输出该元素的文本内容
  getTitleValue(v) {
    console.log(v);

    if (!v) return '';
    console.log(v && v.nativeElement ? v.nativeElement.innerHTML : v.title);
  }
}
三、 指令
(一) 结构型指令
[1]. NgIf 指令
- 用户可以通过将 Nglf 指令应用在 HTML 元素上来在 DOM 中添加或删除 DOM 元素。Nglf 指的模板表达式接收一个布尔值,如果值为true,DOM 元素里面的内容将显示在视图 DOM 中;如果值为 false,DOM 元素里面的内容将不显示(从视图 DOM 中去除 )。
<div *nglf="模板表达式">
import { Component } from '@angular/core';

@Component({
  selector: 'app-root',
  template: `
    <p *ngIf="showName">显示名字</p>
    <p *ngIf="!showName">不显示名字</p>
    <button (click)="toggle()" type="button">切换</button>
  `,
})
export class AppComponent {
  showName = true;
  toggle() {
    this.showName = !this.showName;
  }
}
[2]. NgFor 指令
-
NgFor 是一个迭代指令,它通过将可迭代的每个子项作为模板的上下文来重复渲染模板 。赋值给*ngFor 的字符串不是模板表达式,而是由 Angular 解释的一种小型语言。
<div *ngFor='let item of items'>ffitem.namel</div> -
NgFor 指令的内置变量
内置变量 描述 item ngFor ="let item of items"中,item 代表迭代的每个子项 index 每个模板上下文的当前循环迭代的索引 last 布尔值,指示当前项是否是迭代中的最后一项 even 布尔值,指示当前索引是否是偶数索引 odd 布尔值,指示当前索引是否是奇数索引
import { Component } from '@angular/core';

@Component({
  selector: 'app-root',
  template: `
    <ul>
      <li
        *ngFor="
          let name of names;
          let index = index;
          let last = last;
          let even = even;
          let odd = odd
        "
      >
        {{ index }}: {{ name }}- {{ even ? '是偶数索引' : '' }} -
        {{ odd ? '是奇数索引' : '' }} -
        {{ last ? '是最后一个' : '' }}
      </li>
    </ul>
  `,
})
export class AppComponent {
  names = ['张三', '李四', '王五'];
}
[3]. NgSwitch 指令
- NgSwitch 指令类似于 JavaScript 的 switch 语句。它根据切换条件显示几个可能的元素中的一个。Angular 只会将选定的元素放入 DOM。
- NgSwitch 指令实际上是3 个协作指令的集合: NgSwitchNgSwitchCase 和 NgSwitchDefault。
<container-element [ngSwitch]="switch_expression">
	<some-element *ngSwitchCase="match expression 1">...</some-element>
	...
	<some-element *ngSwitchDefault>...</some-element>
</container-element>
import { Component } from '@angular/core';

@Component({
  selector: 'app-root',
  template: `
    <button (click)="addDay()">增加天数:{{ day }}</button>
    <ul [ngSwitch]="day">
      <li *ngSwitchCase="1">周一</li>
      <li *ngSwitchCase="2">周二</li>
      <li *ngSwitchDefault>不知道</li>
    </ul>
  `,
})
export class AppComponent {
  day = 1;

  addDay() {
    this.day++;
  }
}
[4]. ng-container 分组元素
- Angular 的 ng-container 是一个分组元素,但它不会影响样式或 DOM布局,因为 Angular不会把它放进 DOM 中。ng-container 是一个由 Angular 解析器负责识别处理的语法元素。它不是一个指令、组件、类或接口,更像是 JavaScript 的 if 块中的花括号。当没有合适的宿主元素时用户可以使用 ng-container 对元素进行分组。
<ng-container>的使用场景之一是,在需要遍历或if判断时,它可以起到一个载体的作用。
import { Component } from '@angular/core';

@Component({
  selector: 'app-root',
  template: `
    <ul>
      <!-- 不会引入其他元素 -->
      <ng-container *ngFor="let day of days">
        <li>{{ day }}</li>
      </ng-container>
    </ul>
  `,
})
export class AppComponent {
  days = ['monday', 'tuesday'];
}
(二) 属性型指令
[1]. NgClass 指令
- NgClass 指令的作用是添加和删除一组样式。NgClass 指令的语法支持 3 种格式的表达式。
- 使用空格分隔的字符串:
[ngClass]="is-info is-item has-border" - 字符串数组:
[ngClass]="['is-info', 'is-item', 'has-border']"。 - 对象:
[ngClass]="{'is-info': true,'is-item': true]"。
- 使用空格分隔的字符串:
import { Component } from '@angular/core';

@Component({
  selector: 'app-root',
  template: `
    <p [ngClass]="infoClass">信息</p>
    <p [ngClass]="successClass">成功</p>
    <p [ngClass]="other">其他</p>
  `,
  styles: [
    '.base:{font-size:16px;}',
    '.info {color: #999}',
    '.success {color: green}',
    '.other {color: #000}',
  ],
})
export class AppComponent {
  infoClass = 'base info';
  successClass = ['base', 'success'];
  other = { base: true, other: true };
}
[2]. NgStyle 指令
-
NgStyle 指令的作用是添加和删除一组 Style 样式。NgStyle 指令接收一个键/值(Key/Value)对的对象表达式,键/值对的键是一个样式属性。
-
用户可以在键上添加一个前缀简化写法
[ngStyle]="{font-size.px: 15}" // 等同于 [ngStyle]="{font-size: 15px}" -
使用 NgStyle 指令需要注意以下几点。
- NgStyle 指令接收键/值对作为输入表达式,前提条件是键必须是有效的属性名称。
- NgStyle 指令可以绑定组件类中的属性
- NgStyle 指令将会重写当前元素的内置样式
import { Component } from '@angular/core';

@Component({
  selector: 'app-root',
  template: `
    <p [ngStyle]="myStyle">一行文字</p>
    <!-- style 中与ngStyle 相同的样式会被覆盖掉,ngStyle 没有的保留 -->
    <p style="font-size: 16px;font-weight: bold;" [ngStyle]="myStyle">一行文字</p>
  `,
})
export class AppComponent {
  myStyle = {
    'font-size': '15px',
    'border-top.px': 5,
    color: '#666',
  };
}
[3]. NgContent 指令
- NgContent 指令的作用是帮助开发者创建可重用和可组合的组件。NgContent 指令的格式
<ng-content></ng-content>。我们可以将<ng-content>理解为动态内容的占位符,在解析模板时,Angular将其替换为动态内容。在 Angular 中,这一操作被称为“内容投影”,意思是将内容从父组件投影到子组件中,子组件中包含NgContent 指令。 - NgContent 指令类似于插值表达式,二者的不同之处在于插值表达式中的值来自组件类,而NgContent 指令的值来自组件的执行上下文。
- 我们可以在组件内放入许多不同的东西,包括 HTML 标签甚至其他组件。
-
新建一个组件
src/app/add-button/add-button.component.ts,手动和通过命令创建可以参考(六) 父子组件交互有详细的说明import { Component, OnInit, Output, EventEmitter } from '@angular/core'; @Component({ selector: 'app-add-button', template: `<button (click)="senMsg()"> <!-- 预留一个占位符,用来显示按钮文本 --> <ng-content></ng-content> </button>`, }) export class AddButtonComponent implements OnInit { @Output() sendBtn = new EventEmitter(); msg = '公用button组件发送的消息'; constructor() {} ngOnInit(): void {} senMsg() { this.sendBtn.emit(this.msg); } } -
将新建的组件引入到
src/app/app.module.ts文件中import { BrowserModule } from '@angular/platform-browser'; import { NgModule } from '@angular/core'; import { AppComponent } from './app.component'; // 引入组件 import { AddButtonComponent } from './add-button/add-button.component'; @NgModule({ declarations: [ AppComponent, AddButtonComponent, // 声明组件 ], imports: [BrowserModule], providers: [], bootstrap: [AppComponent], }) export class AppModule {} -
修改
src/app/app.component.ts文件
import { Component } from '@angular/core';

@Component({
  selector: 'app-root',
  template: `
    <app-add-button (sendBtn)="getMsg($event)"> 添加明细 </app-add-button>
    <app-add-button (sendBtn)="getMsg($event)">
      <span>插入HTML</span>
    </app-add-button>
    <app-add-button (sendBtn)="getMsg($event)">
      <app-add-button>组件插入组件</app-add-button>
    </app-add-button>
  `,
})
export class AppComponent {
  getMsg(msg) {
    console.log(msg);
  }
}
[4]. 使用 @ContentChildren() 装饰器获取 NgContent 中的子组件
-
@ContentChildren()装饰器与内容子节点有关,它用于操作投影进来的内容。@ContentChildren()装饰器与@ViewChild()装饰器的区别是,@ViewChild()装饰器是与模板视图本身的子节点有关的,它用于操作模板自身的视图内容。 -
@ContentChild()和@ContentChildren()都是参数装饰器,分别用于从内容 DOM 中获取子元素或指令的查询对象(Query)和查询列表对象(QueryList )。每当添加或删除子元素/组件时Query 或 QueryList 都会更新。子元素或指令的查询在组件的生命周期 AfterContentlnit 开始时完成,因此在 ngAfterContentlnit() 方法中,就能正确获取查询的元素
-
新建一个子组件
src/app/son-cpn/son-cpn.component.ts,手动和通过命令创建可以参考(六) 父子组件交互有详细的说明import { Component, Input } from '@angular/core'; @Component({ selector: 'app-son-cpn', // 子组件的标签 template: ` <h4>{{ tab.title }}</h4> <p>{{ tab.content }}</p> `, }) export class SonCpnComponent { // 输入属性 @Input() tab: TabInterFace; constructor() {} printTitle() { console.log(this.tab.title); } } // 定义一个 Tab 接口 interface TabInterFace { title: string; content: string; } -
新建一个父组件
src/app/parent-cpn/parent-cpn.component.ts,手动和通过命令创建可以参考(六) 父子组件交互有详细的说明import { Component, AfterContentInit, ContentChildren, QueryList, } from '@angular/core'; // 引入子组件 import { SonCpnComponent } from './../son-cpn/son-cpn.component'; @Component({ selector: 'app-parent-cpn', template: ` <p> <!-- 用来显示父组件(app.component.ts)投影进来的内容 --> <ng-content></ng-content> </p> `, }) export class ParentCpnComponent implements AfterContentInit { constructor() {} // 使用@ContentChildren() 装饰器获取包含子组件 SonCpnComponent 的列表的 QueryList @ContentChildren(SonCpnComponent) tabList: QueryList<SonCpnComponent>; ngAfterContentInit(): void { // 调用子组件的方法 this.tabList.toArray()[0].printTitle(); } } -
在
src/app/app.module.ts文件中引入子组件,如果是通过ng g c命令创建的忽略这步,因为会自动添加import { BrowserModule } from '@angular/platform-browser'; import { NgModule } from '@angular/core'; import { AppComponent } from './app.component'; // 引入组件 import { SonCpnComponent } from './son-cpn/son-cpn.component'; import { ParentCpnComponent } from './parent-cpn/parent-cpn.component'; @NgModule({ declarations: [ AppComponent, SonCpnComponent, // 声明组件 ParentCpnComponent, // 声明组件 ], imports: [BrowserModule], providers: [], bootstrap: [AppComponent], }) export class AppModule {} -
修改
src/app/app.component.ts文件import { Component, OnInit } from '@angular/core'; @Component({ selector: 'app-root', template: ` <app-parent-cpn> <app-son-cpn *ngFor="let tab of tabs" [tab]="tab"></app-son-cpn> </app-parent-cpn> `, }) export class AppComponent implements OnInit { tabs = []; ngOnInit(): void { this.tabs = [ {title: '第一个tab的标题', content: '第一个tab内容'}, {title: '第二个tab的标题', content: '第二个tab内容'}, {title: '第三个tab的标题', content: '第三个tab内容'} ] } }
(三) 创建指令
[1]. 概述
-
指令和组件都是 Angular 对象,它们都对应于模板视图中的元素,并且可以修改生成的视图界面。
-
指令和组件一样,都有对应的 Angular 类,类都有构造函数。指令类用
@Directive()装饰器声明。@Directive()装饰器和@Component()装饰器类似,它接收的也是一个元数据。表列出了@Directive()装饰器的常见元数据配置选项。元数据配置选项 说明 selector 对应的是 HTML 标签的属性名称,名称格式如[appSizer] inputs 列举指令的一组可供数据绑定的输入属性 outputs 列举指令的一组可供事件绑定的输出属性 host 使用一组键/值对,把类的属性映射到宿主元素的绑定属性和事件 -
指令和组件并不完全相同: 如组件需要视图,而指令不需要;指令没有模板,指令将行为添加到现有 DOM 元素上。
-
创建指令的命令:
ng generate directive 指令名称 #简写 ng g d 指令名称 -
指令是 DOM 元素(如属性)上的标记,它告诉 Angular 将指定的行为附加到现有DOM 元素。这意味着我们需要一种方法来访问应用该指令的 DOM 元素,以及修改 DOM 元素的方法。Angular 为我们提供了两个非常有用的对象: ElementRef 对象和 Renderer2 对象。
- ElementRef 对象: 可以通过 ElementRef 对象的 nativeElement 属性直接访问应用该指的 DOM 元素。
- Renderer2 对象: Renderer2 对象可实现自定义渲染器,它提供了许多辅助方法,如可以通过该对象修改 DOM 元素的样式。
-
我们可以将两者通过构造函数注入指令类中,并使每个DOM 元素成为私有实例变量。
constructor(private element: ElementRef, private renderer: Renderer2){}
[2]. 在指令中访问 DOM 属性
-
使用命令创建指令文件
src/app/log.directive.ts,创建指令文件时,会自动在src/app/app.module.ts文件中引入,并在 declarations 中添加ng g d log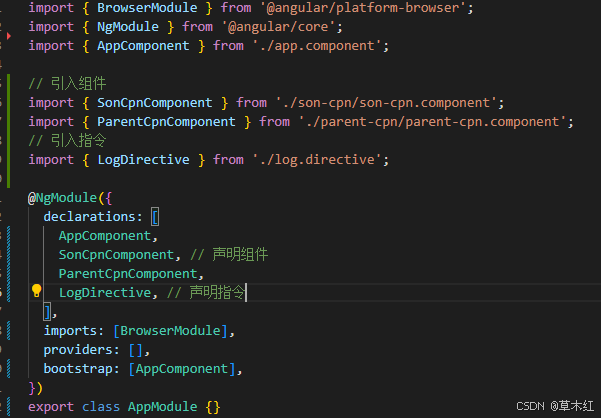
-
修改
src/app/log.directive.ts内容如下:import { Directive, OnInit, Input, ElementRef, Renderer2 } from '@angular/core'; @Directive({ selector: '[log]', // HTML 标签的属性名称 inputs: ['size'], // 绑定指令的输入属性 }) export class LogDirective implements OnInit { // 如果省略了 Directive 中的 inputs , 可以使用@Input() 装饰器进行声明 // @Input() size:string size: string; // 与元数据中的输入属性对应 constructor(private element: ElementRef, private renderer: Renderer2) {} ngOnInit(): void { this.renderer.setStyle(this.element.nativeElement, 'font-size', this.size); } } -
修改
src/app/app.component.ts内容如下:import { Component } from '@angular/core'; @Component({ selector: 'app-root', template: ` <button log size="25px">点击</button> `, }) export class AppComponent {}
[3]. 在指令中监听事件
@Directive()装饰器中的inputs元数据用于绑定属性,它还有一个host元数据,用于绑定事件。@Directive()装饰器中的 host元数据是用来监听宿主元素对象的,host元数据接收一组键/值对数据。当Key为属性时,对应的是宿主元素的 DOM 属性,Value 对应的是具体的 DOM 属性的值; 当 Key 为事件名时,对应的就是监听宿主元素上的 DOM事件,Value 对应的是处理的方法。@Directive()装饰器通过 host 元数据将指令的触发事件与指令类中的方法进行绑定。
-
使用命令创建指令文件
src/app/log.directive.ts,创建指令文件时,会自动在src/app/app.module.ts文件中引入,并在 declarations 中添加ng g d log -
修改
src/app/log.directive.ts内容如下:import { Directive, ElementRef, Renderer2 } from '@angular/core'; @Directive({ selector: '[log]', // HTML 标签的属性名称 host: { // 绑定事件 '(click)': 'onClick($event)', }, }) export class LogDirective { count = 0; textContent = '点击'; constructor(private elementRef: ElementRef, private renderer: Renderer2) {} onClick(event: Event) { console.log('click', event); this.count++; console.log('counts', this.count); // 修改按钮的文本 this.renderer.setProperty( this.elementRef.nativeElement, 'textContent', this.textContent + this.count ); // 修改按钮的背景色 this.renderer.setStyle( this.elementRef.nativeElement, 'background-color', 'yellow' ); } } -
修改
src/app/app.component.ts内容如下:import { Component } from '@angular/core'; @Component({ selector: 'app-root', template: ` <button log>点击</button> `, }) export class AppComponent {}
[4]. 在指令中使用 @HostBinding() 装饰器绑定 DOM 属性
- 前面介绍了如何使用 ElementRef对象的nativeElement属性来访问宿主元素,以及如何使用 Renderer2对象操作其 DOM属性。这么做需要额外注入底层的 ElementRef对象和Renderer2对象。其实,Anqular 提供了一种简单的绑定 DOM 属性的实现方式,我们可以使用
@HostBinding()装饰器绑定宿主元素上的 DOM 属性,从而处理 DOM 属性的值。 - @HostBinding()装饰器仅接收一个元数据属性,hostPropertyName 表示绑定到宿主元素上的 DOM 属性;
@HostBinding("hostPropertyName')
-
使用命令创建指令文件
src/app/log.directive.ts,创建指令文件时,会自动在src/app/app.module.ts文件中引入,并在 declarations 中添加ng g d log -
修改
src/app/log.directive.ts内容如下:使用该指令的DOM元素将会改变字体大小和背景颜色import { Directive, HostBinding, OnInit } from '@angular/core'; @Directive({ // 注意: 这个名字修改过 selector: '[log]', // HTML标签的属性名称 inputs: ['size'], // 绑定指令的输入属性 }) export class LogDirective implements OnInit { size: string; // 与元数据中的输入属性对应 @HostBinding('style.font-size') // 绑定宿主元素的字体样式属性 fontSize: string; @HostBinding('style.background-color') // 绑定宿主元素的背景样式属性 backgroundColor: string; ngOnInit(): void { this.fontSize = this.size; this.backgroundColor = 'yellow'; } } -
修改
src/app/app.component.ts内容如下:import { BrowserModule } from '@angular/platform-browser'; import { NgModule } from '@angular/core'; import { AppComponent } from './app.component'; import { SonCpnComponent } from './son-cpn/son-cpn.component'; import { LogDirective } from './log.directive'; @NgModule({ declarations: [AppComponent, SonCpnComponent, LogDirective], imports: [BrowserModule], providers: [], bootstrap: [AppComponent], }) export class AppModule {}
[5]. 在指令中使用 @HostListener() 装饰器绑监听DOM事件
-
Angular也提供了一种简单的绑定事件的实现方式:使用
@HostListener()装饰器绑定宿主元素上的事件。 -
@HostListener()装饰器接收两个元数据属性,第一个元数据属性 eventName 是要监听的事件名;第二个元数据属性是选项参数,它是当该事件发生时传给组件类方法的一组选项参数(如果有多个参数,参数间以逗号分隔)。@HostListener('eventName',['$event'])
-
使用命令创建指令文件
src/app/log.directive.ts,创建指令文件时,会自动在src/app/app.module.ts文件中引入,并在 declarations 中添加ng g d log -
修改
src/app/log.directive.ts内容如下:使用该指令的DOM元素将会改变字体大小和背景颜色import { Directive, HostBinding, HostListener } from '@angular/core'; @Directive({ // 注意: 这个名字修改过 selector: '[log]', // HTML标签的属性名称 }) export class LogDirective { count = 0; @HostBinding('textContent') // 绑定宿主元素的文本属性 textContent = '点击'; @HostListener('click', ['$event']) // 监听宿主元素的单击事件 onClick(event: Event) { this.count++; this.textContent = '点击' + this.count; } } -
修改
src/app/app.component.ts内容如下:import { Component } from '@angular/core'; @Component({ selector: 'app-root', template: `<button log>点击</button> `, }) export class AppComponent {}
四、 模块
模块是包含一个或多个功能的软件组件或程序的一部分。一个或多个独立开发的模块组成一个完整的 Web 应用程序。企业级软件可能包含几个不同的模块,并且每个模块都提供唯一且独立的业务操作。模块之间没有父子关系,只能相互之间引用。模块是组织 Web 应用程序和使用外部程序库的最佳途径之一。
(一) 模块
[1]. 概述
- 由 Angular 开发的 Web 应用程序是模块化的,它拥有自己的模块化系统,称作
NgModule类。一个NgModule类就是一个容器,用于存放一些内聚的代码块,这些代码块专注于某个应用领域、某个工作流或一组紧密相关的功能。它可以包含一些组件、服务或其他代码文件,其作用域由包含它们的NaModule类定义。它还可以导入其他一些模块中的功能,并导出一些指定的功能供其他NgModule类使用。 - Angular模块系统是将代码捆绑成可重用模块,Angular 系统代码本身使用此模块系统进行模块化。许多第三方软件为 Angular 模块提供了额外的功能,用户可以轻松地将这些模块包含在Web 应用程序中。
- Angular 模块是带有
@NgModule()装饰器声明的类,Angular 模块的主要作用是管理指令、管道、组件。
[2]. 根模块
- 每个由 Angular 开发的 Web 应用程序都至少有一个NgModule 类,也就是根模块,默认命名为 AppModule,它位于一个名叫 app.module.ts 的文件中。引导这个根模块就可以启动由Angular 开发的 Web 应用程序。
- 由 Angular 开发的 Web 应用程序是通过引导根模块 AppModule 来启动的,引导过程还会创建 bootstrap 数组中列出的组件,并把它们逐个插入浏览器的 DOM 中。每个被引导的组件都是它自己的组件树的根组件。插入一个被引导的组件通常会触发一系列组件的创建并形成组件树。虽然也可以在主页面中放置多个组件,但是大多数 Web 应用程序只有一个组件树,并且只从一个根组件开始引导。这个根组件默认为 AppComponent,并且位于根模块的 bootstrap 数组中。
- NgModule 类是一个带有
@NgModule()装饰器的类,也称为 Angular 模块。 NgModule 类把组件、指令和管道打包成内聚的功能块,每个功能块聚焦于一个特定区域、业务领域、工作流或通用工具。 模块还可以把服务加到 Web 应用程序中。这些服务可能是内部开发的(如用户自己写的),或者来自外部(如 Angular 的路由和 HTTP 客户端 )。 @NgModue()装饰器是一个函数,它接收一个元数据对象,该元数据对象的属性用来描述模块,其中最重要的属性如下。- declarations 属性:属于该模块的组件、指令或管道被定义在这个属性中,属性列表中的内容一般都是用户自己创建的。
- exports 属性:导出某些类,以便其他的模块可以使用它们。
- imports 属性:导入其他模块,导入的模块都是使用 @NgModule()装饰器声明的,如 Angular 内置模块 BrowserModule 或第三方的 NaModule 类。
- providers 属性:把提供 Web 应用程序级服务的提供商(Provider)定义在这个属性中提供商负责创建对应的服务,以便 Web 应用程序中的任何组件都能使用它。
- bootstrap属性:Web应用程序的主视图,称为根组件。只有根模块才应该设置bootstrap属性。根据下面的用例,对照上面的描述来理解这些元数据对象的属性。
src/app/app.module.ts文件如下,该文件是创建angualr 项目时自动生成的import { BrowserModule } from '@angular/platform-browser'; import { NgModule } from '@angular/core'; import { AppComponent } from './app.component'; // 自定义的组件 import { SonCpnComponent } from './son-cpn/son-cpn.component'; // 自定义的指令 import { LogDirective } from './log.directive'; @NgModule({ declarations: [AppComponent, SonCpnComponent, LogDirective], imports: [BrowserModule], providers: [], bootstrap: [AppComponent], }) export class AppModule {}
[3]. 特性模块
- Angular 中除了根模块外,其他模块从技术角度来说都是特性模块。特性模块是用来对代码进行组织的模块。随着 Web 应用程序功能数量的增长,我们可能需要组织与特定 Web 应用程序有关的代码,这需要在不同特性之间划出清晰的边界。使用特性模块,可以把与特定的功能或特性有关的代码从其他代码中分离出来,为 Web 应用程序勾勒出清晰的边界,这有助于开发者之间、团队之间的协作,有助于分离各个指令,并帮助开发者管理根模块的大小。
- 特性模块提供了聚焦于特定 Web 应用程序需求的一组功能,如用户工作流、路由或表单等。虽然用户也可以用根模块实现所有功能,但是特性模块可以把 Web 应用程序划分成一些聚焦的功能区。特性模块通过它提供的服务、共享的组件、指令、管道来与根模块和其他模块合作。
- 特性模块具有以下特征。·
- 与根模块一样,特性模块必须在 declarations 属性列表中声明所需的所有组件、指令和管道。
- 特性模块不需要导入 BrowserModule 内置模块,一般导入 CommonModule,该模块包含Angular 的通用指令,如nglf、ngFor、ngClass 等。
- 特性模块也不需要配置 bootstrap 属性。
- 根模块是初始化时自动生成的,特性模块可以使用如下命令创建。
ng g module name #创建特性块
ng g module name --routing #创建带路由的特性模块
(二) 常用内置模块
- 无论是根模块还是特性模块,其实都可以引用这些内置模块。换句话说,内置模块根据需要都可以导入 @NgModule() 装饰器的 imports 属性中。
| 内置模块 | 导入包的路径 | 内置模块介绍 |
|---|---|---|
| BrowserModule | @angular/platform-browser | 默认导入,这是在浏览器中运行该 Web 应用程序所必需的 |
| CommonModule | @angular/common | 包含内置指令,如 Nglf和 NgFor 等 |
| FormsModule | @angular/forms | 当要构建模板驱动表单时采用它包含 NgModel |
| ReactiveFormsModule | @angular/forms | 当要构建响应式表单时采用 |
| RouterModule | @angular/router | 要使用路由功能,并且要用到 RouterLink对象的 forRoot()方法和 forChild()方法 |
| HttpClientModule | @angular/common/http | 当需要访问 HTTP 服务时采用 |
(三) 模块业务分类
- 随着项目功能数量的增长,用户创建的组件、指令和管道越来越多,由于它们必须要被导入根模块中,因此根模块会越来越大,代码开始变得混乱,难以阅读。
- 常规业务角度的分类原则:Angular 模块从业务上可以分为根模块(AppModule)、核心模块(CoreModule)、共享模块(SharedModule)和其他特性模块。
[1]. 理解核心模块
- 核心模块的定位是应该仅包含服务,并且仅被根模块 AppModule 导入。从技术角度分析核心模块,它遵循下面的准则。
- 核心模块中包含使用 Web 应用程序启动时加载的单例服务(全局中仅存在一个实例的服务 )。
- 核心模块是仅在根模块 AppModule 中导入一次,而在其他模块中不再导入的模块。
- 核心模块的 @NgModule()装饰器中的 declarations 属性列表和 exports 属性列表均保持为空。
- 关于 Angular 中的单例服务是这么定义的:把该服务包含在根模块 AppModule 或某个只会被根模块 AppModule 导入的模块中。而核心模块的定义就是仅被根模块 AppModule 导入,因此在核心模块中定义的服务就是单例服务。
- 在开发实践中,有些全局性的类服务也需要放置在核心模块中。如有一个用户模块(User-Module),其中包含注册服务(SinUpService)、登录服务(SianlnService)、认证服务(SocialAuthService)和查询个人信息服务(UserProfileService)之类的服务。如果在核心模块中导入UserModule,那么 UserModule 的所有服务都将在整个 Web 应用程序范围内可用。根据上面的准则,UserModule 不应该具有声明(declarations)或导出(exports),而应该只有服务提供者( providers ).
- 综上所述,核心模块又可以称为核心服务模块。
[2]. 防止重复导入核心模块
-
只有根模块 AppModule 才能导入核心模块。如果一个其他特性模块也导入了它,该 Web 应用程序就会为服务生成多个实例。 要想防止其他特性模块重复导入核心模块,可以在该核心模块中添加如下函数。
constructor (@Optional() @SkipSelf()parentModule: CoreModule){ if (parentModule){ throw new Error( 'CoreModule已加载过了,它仅可以被导入AppModule'); } } -
上述代码中的 CoreModule 可替换为具体的核心模块。该构造函数要求 Angular 把核心模块注入它自己。如果 Angular 在当前注入器(Injector)中查找核心模块,这次注入就会导致死循环。@SkipSelf()装饰器的意思是,在注入器树中层次高于自己的注入器中查找核心模块。
-
正常情况下,该核心模块是第一次被导入根模块 AppModule 中并加载,找不到任何已经注册过的核心模块实例。默认情况下,当注入器找不到服务时,会抛出一个错误。但 @Optional() 装饰器表示找不到服务也无所谓。于是注入器会返回 null,parentModule 参数也就被赋成了空值,构造函数中的 if()方法就不会执行。 如果在根模块 AppModule 中找到了实例,那么 parentModule参数为 true,接着就会抛出一个错误信息。
[3]. 理解共享模块
- 创建共享模块的目的是更好地组织和梳理代码。用户可以把常用的指令、管道和组件放进共享模块中,然后在 Web 应用程序中其他需要这些的地方导入共享模块。从技术角度分析,共享模块遵循下面的准则。
- 把在 Web 应用程序中各处重复使用的组件、指令和管道集中放进一个共享模块。此共享模块应完全由声明组成,并且其中大多数被重新导出,以供其他模块共享。
- 共享模块可能会重新导出 Widget小部件(可以理解为简单的组件、指令和管道的组合),如 CommonModule、FormsModue 和其他的 UI 模块。
- 共享模块不应该具有 providers。它的任何导入或再导出模块都不应具有 providers。
- 共享模块仅被需要的特性模块导入,包括在 Web 应用程序启动时加载的模块和以后加载的模块。
- 如有一个 UIModule 模块,其中包含 ButtonComponent组件、NavComponent组件、SlideshowComponent 组件、HighlightLinkDirective 指令和 CtaPipe 管道。根据上面的准则UIModule 模块中包含的组件、指令和管道需要再次导出,然后在需要使用它的特性模块中导入UIModue 模块,就可以使用其中的一个或者全部 的 Widget 小部件。简单地说,共享模块里仅包含 Widget 小部件,在被特性模块导入后,可以直接在特性模块中使用这些 Widget 小部件。
五、管道
(一) 内置管道
[1]. async 管道
async 管道即异步管道,它会订阅一个可观察对象或 Promise 对象,并返回它发出的最近一个值。当新值到来时,async 管道就会把组件标记为需要进行变更检测。当组件被销毁时async 管道就会自动取消订阅,以消除潜在的内存泄漏隐患。
import { Component } from '@angular/core';
import { interval, Observable, of } from 'rxjs';
@Component({
selector: 'app-root',
template: `
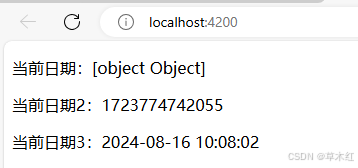
<p>当前日期:{{ currentTime$ }}</p>
<p>当前日期2:{{ currentTime$ | async }}</p>
<p>当前日期3:{{ currentTime$ | async | date : 'yyyy-MM-dd HH:MM:ss' }}</p>
`,
styles: []
})
export class AppComponent {
currentTime$: Observable<number>;
constructor() {
// 每秒触发一下订阅
interval(1000).subscribe(() => {
this.currentTime$ = of(Date.now());
});
}
}
[2]. currency 管道
currency 管道负责把数值转换成金额,currency 管道相对其他管道来说比较灵活,它可以根据配置项进行灵活的格式化。currency 管道的使用语法如下。
{{ 数值表达式 | currency [ : currencyCode [ : display [ : digitsInfo[ : locale ]]]]}}
| 配置选项 | 类型 | 说明 |
|---|---|---|
| currencyCode(可选) | string | 货币代码,如 JPY 表示日元,USD 表示美元(默认) |
| display ( 可选) | string boolean | 货币指示器的格式(可选,默认值是 symbol),有效值如下 code:显示货币代码(如 USD) symbol(默认):显示货币符号(如$) symbol-narrow:使用区域的窄化符号。如加拿大元的符号是CA$,而其窄化符号是 $ String :使用指定的字符串值代替货币代码或符号。空字符串将会去掉货币代码或符号 |
| digitsInfo ( 可选) | string | 数字展现的选项,通过格式为 {a}.{b}-{c}的字符串指定 a:小数点前的最小位数,默认为 1 b:小数点后的最小位数,默认为 0 c:小数点后的最大位数,默认为 3 |
| locale(可选) | string | 要使用的本地化格式代码;如果未提供,默认为 en-US |
import { Component } from '@angular/core';

@Component({
  selector: 'app-root',
  template: `
    <!-- $0.26 -->
    <p>{{ a | currency }}</p>
    <!-- $123.00 -->
    <p>{{ b | currency }}</p>
    <!-- $45.60 -->
    <p>{{ c | currency }}</p>
    <hr />
    <!-- ¥0 -->
    <p>{{ a | currency : 'JPY' }}</p>
    <!-- ¥123 -->
    <p>{{ b | currency : 'JPY' }}</p>
    <!-- ¥46 -->
    <p>{{ c | currency : 'JPY' }}</p>
    <hr />
    <!-- ¥0.26 -->
    <p>{{ a | currency : 'JPY' : 'symbol' : '1.1-2' }}</p>
    <!-- ¥123.0 -->
    <p>{{ b | currency : 'JPY' : 'symbol' : '1.1-2' }}</p>
    <!-- ¥45.6 -->
    <p>{{ c | currency : 'JPY' : 'symbol' : '1.1-2' }}</p>
    <hr />
    <!-- ¥0.26 -->
    <p>{{ a | currency : '¥' }}</p>
    <!-- RMB123.00 -->
    <p>{{ b | currency : 'RMB' }}</p>
    <!-- CA$45.60 -->
    <p>{{ c | currency : 'CAD' }}</p>
    <!-- CAD45.60 -->
    <p>{{ c | currency : 'CAD' : 'code' }}</p>
    <!-- $0,045.60 -->
    <p>{{ c | currency : 'CAD' : 'symbol-narrow' : '4.2-2' }}</p>
  `,
  styles: []
})
export class AppComponent {
  a = 0.258;
  b = 123;
  c = 45.6;
}
[3]. date 管道
具体的可以查看官方文档: https://v10.angular.cn/api/common/DatePipe
import { Component } from '@angular/core';

@Component({
  selector: 'app-root',
  template: `<p>
    {{ currentTime | date : 'yyyy-MM-dd HH:MM:ss' }}
  </p>`,
  styles: []
})
export class AppComponent {
  currentTime = Date.now();
}
[4]. i18nSelect 管道
i18nSelect 管道类似一个通用选择器,显示匹配当前值的字符串。i18nSelect 管道的使用场景:如在数据中存在性别字段,它的值一般为 0和1,但是期望在页面上显示中文的性别,这时可以考虑使用i18nSelect 管道,请参阅下面的示例。
import { Component } from '@angular/core';

@Component({
  selector: 'app-root',
  template: `<p>
    {{ female | i18nSelect : dicMap }}
  </p>`,
  styles: []
})
export class AppComponent {
  female = '0';
  dicMap = { '0': '女', '1': '男' };
}
(二) 自定义管道
- 实现自定义管道的步骤可以分为 3 步。
- (1)自定义一个管道类,该类需要实现 PipeTransform 接口,并实现接口中的 transform0方法。
- (2)用@Pipe() 装饰器声明该类,并且通过装饰器中的元数据 name 属性定义管道的名字管道名一般推荐小写字符串形式。
- (3)注册自定义管道类。将管道类导入NgModule 类中的 declarations 数组中。
- @Pipe() 装饰器中除了 name 属性外,还有 pure 属性,它表示该管道是否是纯管道:pure 属性值等于 true 时,表示为纯管道,意思是当 transform() 方法中的参数发生变化时,管道才执行方法中的逻辑;反之,则为非纯管道。pure 属性为可选项,默认值为 true,Angular 中的内置管道都属于纯管道。
- Angular 提供了Angular CLI命令“ng generate pipe 管道类”生成自定义管道。
-
新建一个项目
ng new demo-pipe -s -t --style=css --routing=false --minimal -
使用命令新建 orderby 管道文件(位置:src/app/orderby.pipe.ts)
#简写 ng g p orderby ng generate pipe orderby -
如果使用命令创建的管道,管道将在
src/app/app.module.ts文件被自动引入import { BrowserModule } from '@angular/platform-browser'; import { NgModule } from '@angular/core'; import { AppComponent } from './app.component'; // 引入管道 import { OrderbyPipe } from './orderby.pipe'; @NgModule({ declarations: [ AppComponent, OrderbyPipe // 声明管道 ], imports: [BrowserModule], providers: [], bootstrap: [AppComponent] }) export class AppModule {} -
修改 orderby 管道文件(位置:src/app/orderby.pipe.ts)
import { Pipe, PipeTransform } from '@angular/core'; @Pipe({ name: 'orderby' }) export class OrderbyPipe implements PipeTransform { transform(value: Array<unknown>, ...args: unknown[]): Array<unknown> { if (args.length === 0 || args[0] === 'asc') { return value.sort(); } else if (args[0] === 'desc') { return value.sort().reverse(); } return value; } } -
修改
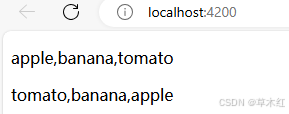
src/app/app.component.ts组件import { Component } from '@angular/core'; @Component({ selector: 'app-root', template: `<p>{{ fruits | orderby }}</p> <p>{{ fruits | orderby : 'desc' }}</p>`, styles: [] }) export class AppComponent { fruits = ['apple', 'tomato', 'banana']; } -
页面显示


 被折叠的 条评论
为什么被折叠?
被折叠的 条评论
为什么被折叠?
 到【灌水乐园】发言


