哈喽大家好,今天跟大家分享linux下安装mysql8.0.11的步骤并启动mysql服务。
在安装过程中,
-bash: bin/mysqld: /lib/ld-linux.so.2: bad ELF interpreter: No such file or directory
解决方法:
环境信息:
[root@my~]# uname -m&&uname -r

x86_64
3.10.0-693.2.2.el7.x86_64

[root@my~]# cat /etc/redhat-release

CentOS Linux release 7.4.1708 (Core) 是因为64位系统中安装了32位程序,哭。。。。。
mysql官网:MySQL :: Download MySQL Community Server

看自己的系统是32位还是64位的,去选择下载的安装包如下:8.0.11版本

也可以使用命令下载
wget?https://dev.mysql.com/get/Downloads/MySQL-8.0/mysql-8.0.11-linux-glibc2.12-x86_64.tar.gz2,上传解压安装包
[root@kongyanan ~]# tar -zxvf mysql-8.0.11-linux-glibc2.12-x86_64.tar.gz
3 将安装包移动到usr/local下并重命名(自己安装的目录)
[root@kongyanan ~]# mv mysql-8.0.11-linux-glibc2.12-x86_64 /usr/local/mysql4.在mysql根目录下创建data目录,存放数据
[root@kongyanan opt]# cd /usr/local/mysql/

[root@kongyanan sql]# mkdir data
5.创建mysql用户组和mysql用户
[root@kongyanan ~]#groupadd mysql

[root@kongyanan ~]#useradd -g mysql mysql
6.改变mysql目录权限
[root@kongyanan ~]#chown -R mysql.mysql /usr/local/mysql/

或者

[root@kongyanan ~]#chown -R mysql .

[root@kongyanan ~]#chgrp -R mysql .
7,初始化数据库
[root@my~]#bin/mysqld --initialize --user=mysql --basedir=/usr/local/mysql --datadir=/usr/local/mysql/data出现报错:
bin/mysqld: error while loading shared libraries: libaio.so.1: cannot open shared object file: No such file or directory
解决方法:yum install -y libaio
再次执行初始化数据库:
8.配置myql
在mysql/support-files创建文件my-default.cnf
[root@kongyanan ~]# cd /usr/local/mysql/support-files/
[root@kongyanan support-files]# touch my-default.cnf
复制配置文件到/etc/my.cnf
[root@my support-files]#cp -a ./my-default.cnf /etc/my.cnf 编辑my.cnf
[root@kongyanan ~] vim /etc/my.cnf

basedir = /usr/local/mysql

datadir = /usr/local/mysql/data

port = 3306

socket = /tmp/mysql.sock

character-set-srever=utf8mb4

esc保存

:wq 退出
9.配置mysql服务
[root@kongyanan mysql]# cp -a ./support-files/mysql.server /etc/init.d/mysqld
[root@kongyanan mysql]# chmod +x /etc/rc.d/init.d/mysqld
[root@kongyanan mysql]# chkconfig --add mysqld
检查是否生效
[root@kongyanan mysql]# chkconfig --list mysqld

Note: This output shows SysV services only and does not include native
      systemd services. SysV configuration data might be overridden by native
      systemd configuration.

      If you want to list systemd services use 'systemctl list-unit-files'.
      To see services enabled on particular target use
      'systemctl list-dependencies [target]'.

mysqld         	0:off	1:off	2:on	3:on	4:on	5:on	6:off
10 配置环境变量
编辑 / etc/profile 文件

[root@kongyanan ~]# vi /etc/profile

在 profile 文件底部添加如下两行配置,保存后退出

PATH=/data/mysql/bin:/data/mysql/lib:$PATH

export PATH

设置环境变量立即生效

[root@kongyanan ~]source /etc/profile
11启动mysql服务 service mysql start
启动失败报错:
Job for mysqld.service failed because the control process exited with error code. See "systemctl status mysqld.service" and "journalctl -xe" for details.
[root@kongyanan ~]chown mysql:mysql -R /usr/local/mysql/
再次启动:service mysql start还出现错误

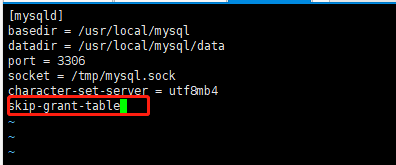
是因为my.cnf文件配置的问题,再次重新配置,第一行缺少了红框框的内容

查看mysql版本
[root@kongyanan ~]#mysql -v

-bash: mysql: command not found
这是由于系统默认会查找/usr/bin下的命令,如果这个命令不在这个目录下,当然会找不到命令,我们需要做的就是映射一个链接到/usr/bin目录下
# ln -s /usr/local/mysql/bin/mysql /usr/bin再次查看,又报错。。。
ERROR 1045 (28000): Access denied for user 'root'@'localhost' (using password: NO)
一般这个错误是由密码错误引起,解决的办法自然就是重置密码
使用systemctl命令启动关闭mysql服务:
启动mysql服务:

#systemctl start mysqld.service

停止mysql服务

#systemctl stop mysqld.service

重启mysql服务

#systemctl restart mysqld.service

查看mysql服务当前状态

#systemctl status mysqld.service

设置mysql服务开机自启动

#systemctl enable mysqld.service

停止mysql服务开机自启动

#systemctl disable mysqld.service
8.0.11重置密码:
在/etc/my.cnf文件下新增一行skip-grant-table,先跳过mysql的验证

重启mysql服务 service mysqld restart/
 [root@kongyanan ~]#systemctl stop mysqld.service
 [root@kongyanan ~]#systemctl start mysqld.service
 [root@kongyanan ~]mysql -u root -p
 Enter password:回车
因为设置了免密登录可以直接登录
修改密码
选择数据库
use mysql
修改数据库密码sql
ALTER USER ‘root’@'%' IDENTIFIED WITH mysql_native_password BY 'newpassword(你的密码)';
然后退出mysql,修改my.cnf文件将免密登录设置去掉,重启mysql服务即可修改成功。
8.0.11如何正确修改密码详情请看
Centos7重置Mysql 8.0.1 root 密码 - 网络蚂蚁 - 博客园这篇文章非常详细,按照步骤来就可以修改成功
然而,修改成功之后使用客户端连接不上去。。。。。。。
发现3306不让访问,查看方法

firewall-cmd --state
查看已开放的列表
firewall-cmd --list-ports
添加要开放的列表
firewall-cmd --zone=public --add-port=3306/tcp --permanent
重启防火墙
firwall-cmd --reload
再次查看----
![]()
然后再使用客户端进行连接,就连上了。。。。。。


 本文详细介绍了在Linux环境下安装MySQL8.0.11的步骤,包括解决32位与64位兼容问题、安装libaio库、初始化数据库、配置my.cnf文件、设置环境变量以及遇到的权限和密码重置问题。通过文中步骤,读者可以了解完整的安装流程和常见问题解决方案。


 1504
1504

 被折叠的 条评论
为什么被折叠?


