


 本文详细介绍了如何通过sIoT和Android App实现MQTT消息通讯,包括sIoT配置、Mind+编程、AppInventor应用创建,以及实验过程与结果分析,强调了参数配置的一致性和细心操作的重要性。
sIoT及安卓app实现mqtt实验
一、实验目的及要求
【实验一】实现sIoT配置并实现sIoT上mqtt消息的通讯。
【实验二】通过AppInventor结合sIoT实现手机app控制掌控板的灯和显示内容。
二、实验原理与内容
sIoT可以在局域网上实现mqtt消息的通讯。借助sIoT可以通过手机app实现局域网内的设备操控。
三、实验软硬件环境
硬件:掌控板
软件:Mind+
四、实验过程(实验步骤、记录、数据、分析)
实验一:实现sIoT配置并实现sIoT上mqtt消息的通讯。
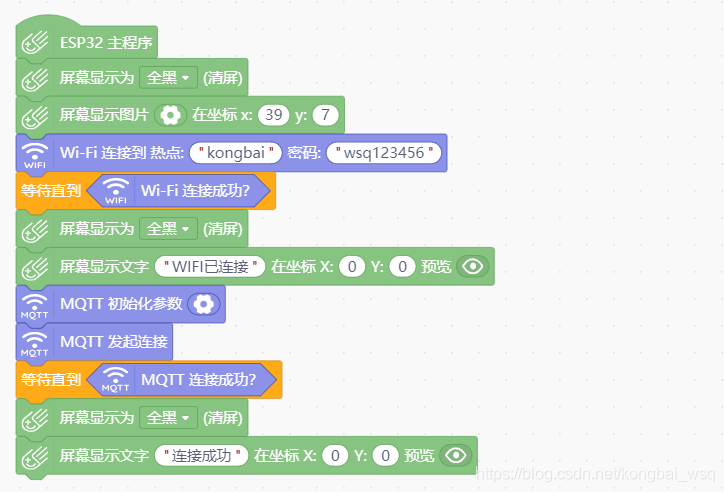
1、下载好Siot的程序包,打开,先在Siot的JSON文件上查看或修改账户名、密码等信息。修改保存好,打开.exe程序。登陆Siot网页端,在浏览器输入其中的网页服务请求地址,也就是本机地址加上端口号,例如我的:192.168.43.191:8089。最后新建一个topic。

2、进入Mind+软件,选择上传模式,在左下角的扩展中选择ESP32掌控板,并在网络服务中选择MQTT、WiFi服务。将电脑与掌控板连接后,根据实验要求选择合适的模块进行操作。
 3、核心代码:
/*!
 * MindPlus
 * mpython
 *
 */
#include <MPython.h>
#include <DFRobot_Iot.h>
// 函数声明
void obloqMqttEventT1(String& message);
// 静态常量
const String topics[5] = {"DFRobot/Seifer","2018324123/伍世权","","",""};
const MsgHandleCb msgHandles[5] = {NULL,obloqMqttEventT1,NULL,NULL,NULL};
// 创建对象
DFRobot_Iot myIot;


// 主程序开始
void setup() {
	mPython.begin();
	myIot.setMqttCallback(msgHandles);
	myIot.wifiConnect("kongbai", "wsq123456");
	while (!myIot.wifiStatus()) {yield();}
	display.setCursorLine(1);
	display.printLine("WiFi连接成功");
	myIot.init("192.168.43.191","siot","","dfrobot", topics, 1883);
	myIot.connect();
	while (!myIot.connected()) {yield();}
	display.setCursorLine(2);
	display.printLine("mqtt连接成功");
}
void loop() {
	if ((buttonA.isPressed())) {
		myIot.publish(topic_1, "2018324123伍世权");
		display.setCursorLine(3);
		display.printLine("发送成功");
	}
}


// 事件回调函数
void obloqMqttEventT1(String& message) {
	display.setCursorLine(4);
	display.printLine(message);
	rgb.write(-1, 0x0000FF);
}
// A code block
var foo = 'bar';
4、注意填好MQTT初始化参数

5、实验效果图
(1)连接成功

(2)按下A键发送信息,发送成功有信息提示

(3)在Siot网页上可以看到发送的信息

实验二:通过AppInventor结合sIoT实现手机app控制掌控板的灯和显示内容
1、在实验一的基础上使用Siot计科,重新编写好实验核心代码。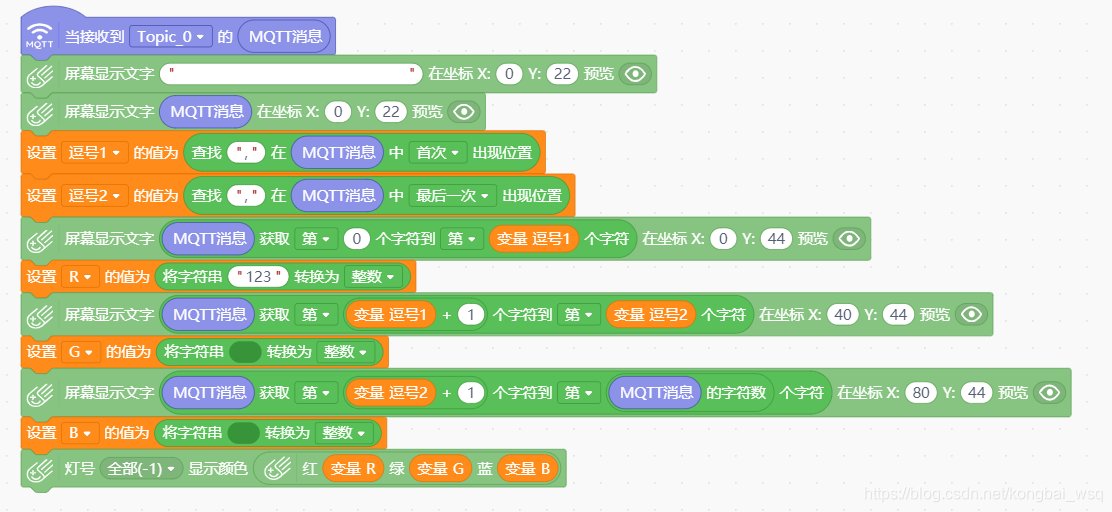
2、登录AppInventor网站(http://app.gzjkw.net/login/),将实验文件.aia修改打包apk,扫描二维码,然后下载对应的程序到手机上。

3、核心代码:
/*!
 * MindPlus
 * mpython
 *
 */
#include <MPython.h>
#include <DFString.h>
#include <DFRobot_Iot.h>

// 动态变量
volatile float mind_n_DouHao1, mind_n_DouHao2, mind_n_R, mind_n_G, mind_n_B;
// 函数声明
void     obloqMqttEventT0(String& message);
uint32_t rgbToColor(uint8_t r, uint8_t g, uint8_t b);
// 静态常量
const uint8_t imageMatrix[][350] = {
	{0x0,0x0,0x0,0x1f,0x80,0x0,0x0,0x0,0x0,0x0,0x30,0xc0,0x0,0x0,0x0,0x0,0x0,0x60,0x60,0x0,0x0,0x0,0x0,0x0,0x40,0x20,0x0,0x0,0x0,0x0,0x0,0x40,0x20,0x0,0x0,0x0,0x0,0x0,0x40,0x20,0x0,0x0,0x0,0x0,0x0,0x60,0x60,0x0,0x0,0x0,0x0,0x0,0x30,0xc0,0x0,0x0,0x0,0x0,0x0,0x33,0x80,0x0,0x0,0x0,0x1e,0x0,0x22,0x0,0x0,0x0,0x0,0x33,0x80,0x62,0x0,0x3c,0x0,0x0,0x60,0xc0,0x46,0x0,0xee,0x0,0x0,0x40,0xc0,0xc6,0x1,0x83,0x0,0x0,0xc0,0x40,0x86,0x1,0x1,0x80,0x0,0x40,0xc1,0x8c,0x1,0x1,0x80,0x0,0x7c,0x9f,0xff,0x1,0x1,0x80,0x0,0x37,0x98,0x3,0x81,0xa3,0x0,0x0,0x24,0x30,0x0,0x83,0x26,0x0,0x0,0x64,0x30,0x0,0xc6,0x7c,0x0,0x0,0xc7,0xff,0xff,0xf8,0x40,0x0,0x7f,0xff,0xff,0xff,0xff,0xfc,0x0,0xfe,0x0,0x0,0x0,0x1,0xff,0xc0,0xc0,0x0,0x0,0x0,0x0,0x1,0xc0,0xc0,0x0,0x0,0x0,0x0,0x0,0xc0,0xc0,0x0,0x0,0x0,0x0,0x0,0xc0,0xc0,0x0,0x0,0x0,0x0,0x0,0xc0,0xc0,0x0,0x0,0x0,0x0,0x0,0xc0,0xc0,0x3f,0xff,0xff,0xe0,0x1,0x80,0xdc,0x0,0x0,0x0,0x3,0xf9,0x80,0xcf,0xff,0xff,0xff,0xfc,0x5,0x80,0xcb,0xff,0xff,0xff,0xff,0xf5,0x80,0xcb,0xf8,0xff,0xff,0x9f,0xf9,0x80,0xcb,0xf8,0x7f,0xff,0xf,0xf9,0x80,0xcb,0xf8,0x7f,0xff,0xf,0xe9,0x80,0xcb,0xf8,0x7f,0xff,0xf,0xe9,0x80,0x4b,0xf8,0x7f,0xff,0xf,0xe9,0x80,0x68,0x7c,0xff,0xff,0x1f,0xf1,0x80,0x63,0x87,0xff,0xff,0xff,0x93,0x0,0x60,0x38,0x7f,0xff,0xf0,0x33,0x0,0x60,0x3,0x8f,0xfe,0xf,0x83,0x0,0x60,0x0,0x38,0x3,0xe0,0x3,0x0,0x60,0x0,0x7,0xf8,0x0,0x3,0x0,0x60,0x0,0x0,0x0,0x0,0x3,0x0,0x60,0x0,0x0,0x0,0x0,0x3,0x0,0x60,0x0,0x0,0x0,0x0,0x3,0x0,0x60,0x0,0x0,0x0,0x0,0x6,0x0,0x60,0x0,0x0,0x0,0x0,0x6,0x0,0x60,0x0,0x0,0x0,0x0,0x6,0x0,0x7f,0xff,0xff,0xff,0xff,0xfe,0x0,0x7f,0xff,0xff,0xff,0xff,0xfe,0x0}
};
const String topics[5] = {"2018324123/伍世权","","","",""};
const MsgHandleCb msgHandles[5] = {obloqMqttEventT0,NULL,NULL,NULL,NULL};
// 创建对象
DFRobot_Iot myIot;


// 主程序开始
void setup() {
	mPython.begin();
	myIot.setMqttCallback(msgHandles);
	display.fillScreen(0);
	display.drawImage(39, 7, 50, 50, imageMatrix[0]);
	myIot.wifiConnect("kongbai", "wsq123456");
	while (!myIot.wifiStatus()) {yield();}
	display.fillScreen(0);
	display.setCursor(0, 0);
	display.print("WIFI已连接");
	myIot.init("192.168.43.191","siot","","dfrobot", topics, 1883);
	myIot.connect();
	while (!myIot.connected()) {yield();}
	display.fillScreen(0);
	display.setCursor(0, 0);
	display.print("连接成功");
}
void loop() {

}

// 事件回调函数
void obloqMqttEventT0(String& message) {
	display.setCursor(0, 22);
	display.print("                                                    ");
	display.setCursor(0, 22);
	display.print(message);
	mind_n_DouHao1 = (dfstring.indexOf(",",message));
	mind_n_DouHao2 = (dfstring.lastIndexOf(",",message));
	display.setCursor(0, 44);
	display.print((dfstring.substring(message,0,0,0,mind_n_DouHao1)));
	mind_n_R = (String("123").toInt());
	display.setCursor(40, 44);
	display.print((dfstring.substring(message,0,(mind_n_DouHao1 + 1),0,mind_n_DouHao2)));
	mind_n_G = (String().toInt());
	display.setCursor(80, 44);
	display.print((dfstring.substring(message,0,(mind_n_DouHao2 + 1),0,(String(message).length()))));
	mind_n_B = (String().toInt());
	rgb.write(-1, rgbToColor(round(mind_n_R), round(mind_n_G), round(mind_n_B)));
}

// 静态函数
uint32_t rgbToColor(uint8_t r, uint8_t g, uint8_t b)
{
  return (uint32_t)((((uint32_t)r<<16) | ((uint32_t)g<<8)) | (uint32_t)b);
}
4、进入到下载好的手机APP里设置参数,并填写要发送的信息,按下发送。

5、实验效果图
收到信息,并打开灯

五、测试/调试及实验结果分析
实验一里MQTT连接时要使用同一用户的两个topic,发送接收信息时,注意topic号(学号/名字),以免发送和接受都在同一设备。Mind+需要在上传模式下进行。当上传代码完成,测试是否自动连接成功WIFI以及MQTT,若WIFI连接成功并显示在屏幕第一行,MQTT连接成功结果显示在第二行。如此便可以更好的调试。
实验二AppInventor要把address,port,id等参数设置好,设置正确。
实验很成功!
六、实验结论与体会
通过这次实验,我更加熟悉掌握对于MIND+软件的使用。并且学会使用利用sIoT可以在局域网上实现mqtt消息的通讯。并且学会借助sIoT可以通过手机app实现局域网内的设备操控。
在配置mqtt初始化参数时,发送方和接收方的所有的参数配置要保持一致,尤其是服务器地址要保持一致,否则发送方和接收方不能进行通信。在配置mqtt初始化参数时,要尽可能的细心,因为输入参数出错会导致实验失败。


 1875
1875

 被折叠的 条评论
为什么被折叠?
被折叠的 条评论
为什么被折叠?
 到【灌水乐园】发言


