前言
- 学习使用Grid布局实现瀑布流。
- 模拟生成随机假数据:高度、颜色
- 无限滚动,模拟异步请求
参考:
「中高级前端」干货!深度解析瀑布流布局2019年终岁尾,最近对布局相关的内容比较有兴趣,在此整理一下和瀑布流相关的使用场-掘金
原理
目标
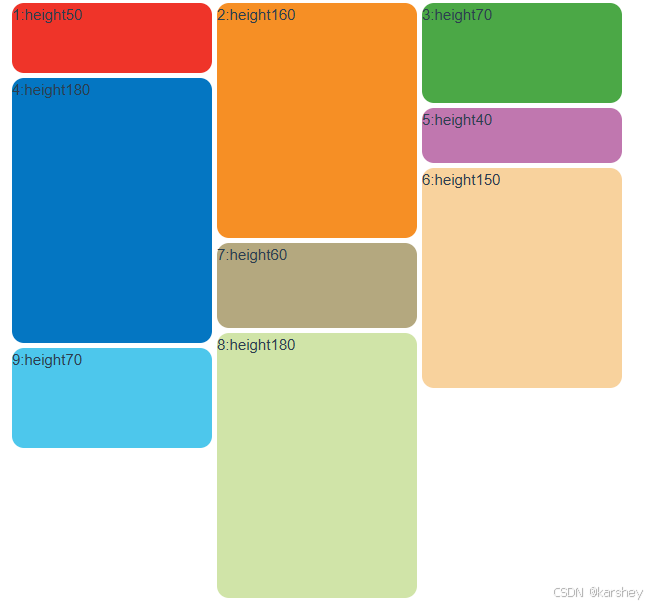
实现瀑布流,参差不齐的排列:

普通版
本文普通版demo效果:

假设想实现上述效果。有若干个item,分别有颜色和高度:
const data = [
  {
    color: '#ef3429',
    height: 50,
    title: '11111',
  },
  {
    color: '#f68f25',
    height: 160,
    title: '2',
  },
  {
    color: '#4ba846',
    height: 70,
    title: 'title title title title title title',
  },
  {
    color: '#0476c2',
    height: 180,
    title: 'title title title title title title',
  },
  {
    color: '#c077af',
    height: 40,
    title: 'title title title title title title title title title title title title',
  },
  {
    color: '#f8d29d',
    height: 150,
    title: '2',
  },
  {
    color: '#b4a87f',
    height: 60,
    title: '2',
  },
  {
    color: '#d0e4a8',
    height: 180,
    title: '2',
  },
  {
    color: '#4dc7ec',
    height: 70,
    title: '2',
  },
]
我们想让它按照瀑布流的方法排列。
进阶版
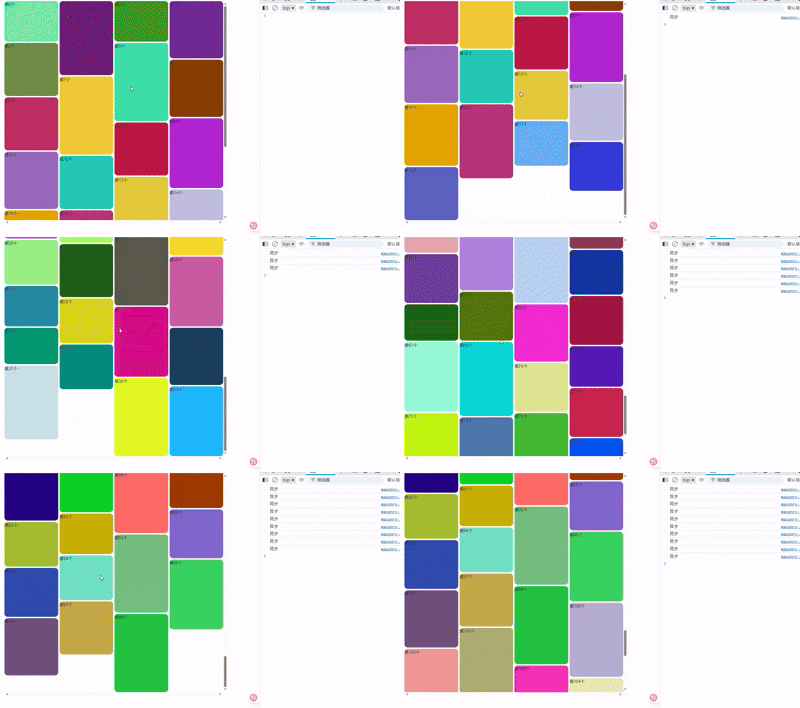
进阶版demo效果:

普通版
代码
设置Grid布局:
grid-template-columns:每列的宽度。下面代码显示为三列相等宽度。column-gap:列之间的gaprow-gap:行之间的gapgrid-auto-rows:每行默认高度为10
.masonry {
  display: grid;
  grid-template-columns: 1fr 1fr 1fr;
  column-gap: 5px;
  row-gap: 5px;
  grid-auto-rows: 10px;
}
这里,grid-auto-rows: 10px;是核心。我们设置网格行的高度默认为10px。一个item可以设置它的开始/结束位置。
grid-row-startgrid-row-end
令每一个item的开始位置为默认:auto。动态地根据item的高度来计算此项的end。 这是瀑布流核心。
  .item {
    grid-row-start: auto;
    height: 100%;
    border-radius: 12px;
  }
// 动态获取网格所占列高度
const getGridColumn = (index: number) => {
  return {
    gridRowEnd: `span ${~~data[index].height / 10}`, // 向下取整
  }
}
完整代码
<template>
  <div>
    <p style="margin-bottom: 10px">
      grid实现:

      <a href="https://juejin.cn/post/6844904004720263176"
        >https://juejin.cn/post/6844904004720263176</a
      >
    </p>
    <div class="masonry">
      <div
        class="item"
        v-for="item in 9"
        :key="item"
        :style="{ ...getGridColumn(item - 1), ...getStyle(item - 1) }"
      >
        {{ item }}:height{{ data[item - 1].height }}
      </div>
    </div>
  </div>
</template>

<script setup lang="ts">
import { onMounted } from 'vue'
const data = [
  {
    color: '#ef3429',
    height: 50,
    title: '11111',
  },
  {
    color: '#f68f25',
    height: 160,
    title: '2',
  },
  {
    color: '#4ba846',
    height: 70,
    title: 'title title title title title title',
  },
  {
    color: '#0476c2',
    height: 180,
    title: 'title title title title title title',
  },
  {
    color: '#c077af',
    height: 40,
    title: 'title title title title title title title title title title title title',
  },
  {
    color: '#f8d29d',
    height: 150,
    title: '2',
  },
  {
    color: '#b4a87f',
    height: 60,
    title: '2',
  },
  {
    color: '#d0e4a8',
    height: 180,
    title: '2',
  },
  {
    color: '#4dc7ec',
    height: 70,
    title: '2',
  },
]

const getStyle = (index: number) => {
  return {
    backgroundColor: `${data[index].color}`,
  }
}

// 动态获取网格所占列高度
const getGridColumn = (index: number) => {
  return {
    gridRowEnd: `span ${~~data[index].height / 10}`, // 向下取整
  }
}

onMounted(() => {})
</script>

<style lang="less">
.item {
  .img {
    border-radius: 12px;
    margin-bottom: 12px;
  }
  width: 200px;
}
.masonry {
  display: grid;
  grid-template-columns: 1fr 1fr 1fr;
  column-gap: 5px;
  row-gap: 5px;
  grid-auto-rows: 10px;
  .item {
    grid-row-start: auto;
    height: 100%;
    border-radius: 12px;
  }
}
</style>
即实现效果:

进阶版
随机生成颜色和高度数组。拉到最底则动态生成新的20个item,模拟异步请求。

随机生成
生成颜色:
export const generateColor = () => {
  // 生成随机颜色(十六进制格式)
  const randomColor =
    '#' +
    Math.floor(Math.random() * 16777215)
      .toString(16)
      .padStart(6, '0')

  return randomColor
}
生成数字:传入一个范围,生成此范围内的数字。
export const generateNum = (min: number, max: number) => {
  const num = max - min + 1
  return Math.floor(min + Math.random() * num)
}
这里我们要模拟高度,因此这样调用generateNum(90, 200)
生成模拟数据
传入的参数表示生成的数据数量。
const getData = (num: number) => {
  if (num <= 0) return
  for (let i = 0; i < num; i++) {
    const item = {
      color: generateColor(),
      height: generateNum(90, 200),
    }

    data.value.push(item)
  }
}
动态计算每项所占网格高度
~~表示向下取整。这是瀑布流的核心。
const getGridColumn = (item: itemType) => {
  return {
    gridRowEnd: `span ${Math.max(~~(item.height / 10), 3)}`, // 为了美观,至少占3格
  }
}
无限滚动、异步请求
如何判断当前数据已经拉到最底?
监听滚动事件太消耗性能了。可以使用IntersectionObserver。
IntersectionObserver - Web API | MDN
这个api用于判断一个div是否与视口发生交集。 我们如何判断当前数据已经拉到最底?这个问题可以转换为:最后一个div是否完全展示在视口中 。
如果完全展示了,就认为数据已经到底,需要请求新数据。
不过,这种判断方法在瀑布流这里并不严谨,因为可能出现最后一个item完全展示了,倒数第二个item未完全展示的情况。如,第19个高度大,第20个高度小。第20个完全展示了,但第19个没有。
如图所示,这里2最高。若只有3个,则3完全展示了,2没有。
4和5,6和7,8和9都是这样。

瀑布流会从左到右从上到下排列。 看行(横排),一行中有空位的,从左到右显示item。
不严谨也没关系。实际效果大差不差。我们并不追求一定完全到底才拉新数据。大概到底也可以拉了。小小误差影响不大。
const observer = new IntersectionObserver((entries) => {
  entries.forEach(
    (entry) => {
    // 最后一个元素完整展示在视口,则说明滚动到底部了,拉数据
      if (entry.isIntersecting) {
        mockMoreData()
      }
    },
    {
      root: 'null', // 视口
      threshold: 1.0,
    },
  )
})

// 每次观测最后一个item。若拉到新数据,则更新被观察者(即当前记录的最后一个item)
const handleObLastItem = () => {
  if (lastItem.value) {
    observer.unobserve(lastItem.value)
  }
  lastItem.value = containerRef.value.lastElementChild
  observer.observe(lastItem.value)
}

// 模拟拉数据,三秒拉到
const mockMoreData = () => {
  setTimeout(() => {
    getData(20)
    console.log('异步')
  }, 3000)

  console.log('同步')
}

onUpdated(() => {
  handleObLastItem()
})
在onUpdated生命周期中更新被观察者。一旦拉到数据,页面重新渲染,就会触发onUpdated,此时需要更新被观察者。
完整代码
<template>
  <div class="container" ref="containerRef">
    <div
      class="item"
      v-for="(item, index) in data"
      :key="index"
      :style="{ ...getGridColumn(item), backgroundColor: item.color }"
    >
      第{{ index }}个
    </div>
  </div>
</template>
<script setup lang="ts">
import { generateColor, generateNum } from '@/utils/fakeNum'
import { ref, onMounted, onUpdated } from 'vue'

const containerRef = ref()
const lastItem = ref()
interface itemType {
  color: string
  height: number
}

const data = ref<itemType[]>([])

const getGridColumn = (item: itemType) => {
  return {
    gridRowEnd: `span ${Math.max(~~(item.height / 10), 3)}`, // 为了美观,至少占3格
  }
}

onMounted(() => {
  getData(20)
})

const getData = (num: number) => {
  if (num <= 0) return
  for (let i = 0; i < num; i++) {
    const item = {
      color: generateColor(),
      height: generateNum(90, 200),
    }

    data.value.push(item)
  }
}

onUpdated(() => {
  handleObLastItem()
})

// 最后一个元素完整展示在视口,则说明滚动到底部了
const observer = new IntersectionObserver((entries) => {
  entries.forEach(
    (entry) => {
      if (entry.isIntersecting) {
        mockMoreData()
      }
    },
    {
      root: 'null', // 视口
      threshold: 1.0,
    },
  )
})

const handleObLastItem = () => {
  if (lastItem.value) {
    observer.unobserve(lastItem.value)
  }
  lastItem.value = containerRef.value.lastElementChild
  observer.observe(lastItem.value)
}

const mockMoreData = () => {
  setTimeout(() => {
    getData(20)
    console.log('异步')
  }, 3000)

  console.log('同步')
}
</script>
<style lang="less">
.container {
  width: 800px;
  height: 800px;
  overflow: scroll;

  display: grid;
  grid-template-columns: 1fr 1fr 1fr 1fr;
  column-gap: 5px;
  row-gap: 5px;
  grid-auto-rows: 10px;

  .item {
    grid-row-start: auto;
    height: 100%;
    border-radius: 12px;
  }
}
</style>


 被折叠的 条评论
为什么被折叠?


