 Fastadmin集成RabbitMQ实现即时与延迟队列


Fastadmin中通过RabbitMq实现即时和延迟队列消息
在原来实现基本队列消息的基础上,可以同时发送和消费即时、延迟两种队列消息。
目录
实现即时和延迟队列
修改配置
在配置文件中分开定义两种队列的参数,便于维护和扩展。
在application/config.php中修改原有的rabbitmq配置,如下:
// +----------------------------------------------------------------------
// | Rabbitmq设置
// +----------------------------------------------------------------------
'rabbitmq'               => [
    // 基础配置
    // RabbitMQ主机
    'host'      => '127.0.0.1',
    // 端口
    'port'      => 5672,
    // 用户名(默认guest,仅本地访问)
    'user'      => 'guest',
    // 密码
    'password'  => 'guest',
    // 虚拟主机
    'vhost'     => '/',
    // 心跳检测时间(秒)
    'heartbeat' => 60,
    // 即时消息配置
    'immediate' => [
        // 即时交换机
        'exchange' => 'fastadmin_immediate_exchange',
        // 即时队列
        'queue' => 'fastadmin_immediate_queue',
        // 即时路由键
        'routing_key' => 'immediate_key'
    ],
    // 延迟队列相关配置
    'delay' => [
        // 临时队列(消息过期)
        'temp_queue' => 'fastadmin_delay_temp_queue',
        // 死信交换机
        'dlx_exchange' => 'fastadmin_delay_dlx_exchange',
        // 死信队列(最终消费)
        'dlx_queue' => 'fastadmin_delay_dlx_queue',
        // 死信路由键
        'dlx_routing_key' => 'delay_key'
    ]
],
工具类实现
RabbitMQ工具类中封装两种消息的声明、发送、消费方法,复用连接和通道资源。
在application/common/library/RabbitMQ.php中修改原有代码,整体如下:
消费消息
需要分别启动两个消费者进程(可通过命令行脚本实现)。
即时消息消费者
在application/common/command/目录下创建ConsumerImmediate.php文件,内容如下:
<?php
namespace app\common\command;
use app\common\library\RabbitMQ;
use think\console\Command;
use think\console\Input;
use think\console\Output;
class ConsumerImmediate extends Command
{
// 配置命令
protected function configure()
{
$this->setName('consumer_immediate') // 命令名:php think consumer_immediate
->setDescription('RabbitMQ消费者,处理队列即时消息');
}
// 执行命令
protected function execute(Input $input, Output $output)
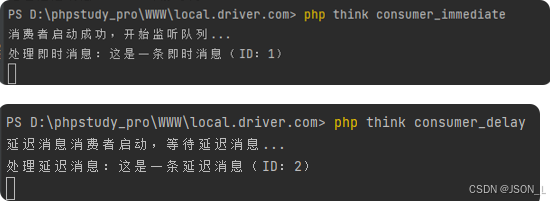
{
$output->writeln('消费者启动成功,开始监听队列...');
try {
$rabbitMQ = new RabbitMQ();
$callback = function ($msg) {
$data = json_decode($msg->body, true);
echo "处理即时消息:" . $data['content'] . "(ID:{$data['id']})\n";
$msg->ack(); // 手动确认
};
$rabbitMQ->consumeImmediate($callback);
} catch (\Exception $e) {
$output->writeln('消费者异常:' . $e->getMessage());
}
}
}
延时消息消费者
在application/common/command/目录下创建ConsumerDelay.php文件,内容如下:
<?php

namespace app\common\command;

use app\common\library\RabbitMQ;
use think\console\Command;
use think\console\Input;
use think\console\Output;

class ConsumerDelay extends Command
{
    // 配置命令
    protected function configure()
    {
        $this->setName('consumer_delay')  // 命令名:php think consumer_delay
        ->setDescription('RabbitMQ消费者,处理队列延时消息');
    }

    // 执行命令
    protected function execute(Input $input, Output $output)
    {
        $output->writeln('延迟消息消费者启动,等待延迟消息...');
        try {
            $rabbitMQ = new RabbitMQ();
            $callback = function ($msg) {
                $data = json_decode($msg->body, true);
                echo "处理延迟消息:" . $data['content'] . "(ID:{$data['id']})\n";
                $msg->ack(); // 手动确认
            };
            $rabbitMQ->consumeDelay($callback);
        } catch (\Exception $e) {
            $output->writeln('消费者异常:' . $e->getMessage());
        }
    }
}
注册任务队列
在application/command.php中把即时消息消费者和延时消息消费者注册,如下:
return [
    'app\admin\command\Crud',
    'app\admin\command\Menu',
    'app\admin\command\Install',
    'app\admin\command\Min',
    'app\admin\command\Addon',
    'app\admin\command\Api',
    'app\common\command\ConsumerImmediate',
    'app\common\command\ConsumerDelay',
];
启动消费者
打开两个终端,分别执行以下命令:
# 启动即时消息消费者
php think consumer_immediate

# 启动延迟消息消费者(另开终端)
php think consumer_delay
发送消息
在demo.php中编写两个发送消息方法,分别是即时消息和延迟消息,如下:
// 示例:发送消息到队列
public function sendMessage()
{
    // 发送即时消息
    $rabbitMQ = new RabbitMQ();
    try {
        $rabbitMQ->sendImmediateMessage([
            'id'        => 1,
            'content'   => '这是一条即时消息',
            'time'      => date('Y-m-d H:i:s')
        ]);
        echo "即时消息发送成功\n";
    } catch (\Exception $e) {
        echo "即时消息发送失败:" . $e->getMessage() . "\n";
    }
}

// 示例:延迟 10 秒处理消息
public function sendDelay()
{
    $rabbitMQ = new RabbitMQ();
    try {
        $rabbitMQ->sendDelayMessage([
            'id'        => 2,
            'content'   => '这是一条延迟消息',
            'time'      => date('Y-m-d H:i:s')
        ], 10);
        echo "延迟消息发送成功\n";
    } catch (\Exception $e) {
        echo "延迟消息发送失败:" . $e->getMessage() . "\n";
    }
}
注意:fastadmin中要设置无需登录和授权。
然后分别发送两种消息,效果如下:
在linux中可以使用Supervisor监控队列执行,避免因意外崩溃导致消息堆积。
总结
Fastadmin中通过RabbitMq实现即时和延迟队列消息的完整版,使用其他框架也可以借此实现。


 4510
4510

 被折叠的 条评论
为什么被折叠?
被折叠的 条评论
为什么被折叠?
 到【灌水乐园】发言


