


<LinearLayout xmlns:android="http://schemas.android.com/apk/res/android"
xmlns:tools="http://schemas.android.com/tools"
android:layout_width="wrap_content"
android:layout_height="match_parent"
android:orientation="vertical"
tools:context="${relativePackage}.${activityClass}" >
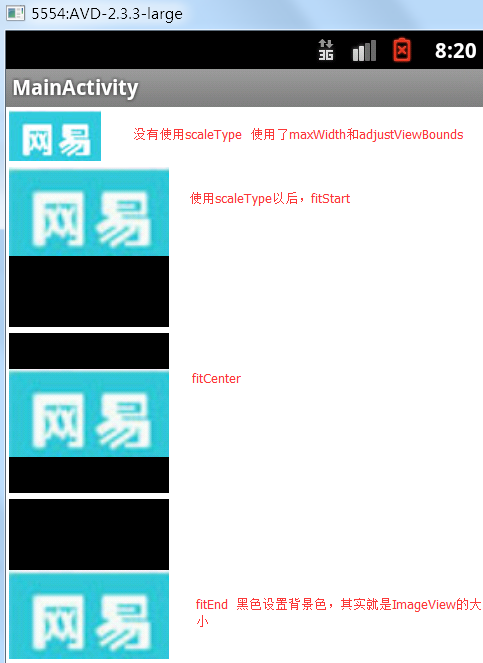
<!-- 调整ImageView的边界,使其完全显示 -->
<ImageView
android:maxWidth="160px"
android:maxHeight="160px"
android:layout_width="wrap_content"
android:layout_height="wrap_content"
android:adjustViewBounds="true"
android:background="#FF000000"
android:src="@drawable/pic"
android:layout_margin="2dp"
/>
<!-- fitstart 保持长宽比,是图片适应ImageView,显示在左上角 -->
<ImageView
android:layout_width="160px"
android:layout_height="160px"
android:scaleType="fitStart"
android:src="@drawable/pic"
android:background="#FF000000"
android:layout_margin="2dp"
/>
<!-- fitCenter 保持长宽比,是图片适应ImageView,显示在中间 -->
<ImageView
android:layout_width="160px"
android:layout_height="160px"
android:scaleType="fitCenter"
android:src="@drawable/pic"
android:background="#FF000000"
android:layout_margin="2dp"
/>
<!-- fitCenter 保持长宽比,是图片适应ImageView,显示在中间 -->
<ImageView
android:layout_width="160px"
android:layout_height="160px"
android:scaleType="fitEnd"
android:src="@drawable/pic"
android:background="#FF000000"
android:layout_margin="2dp"
/>
</LinearLayout>
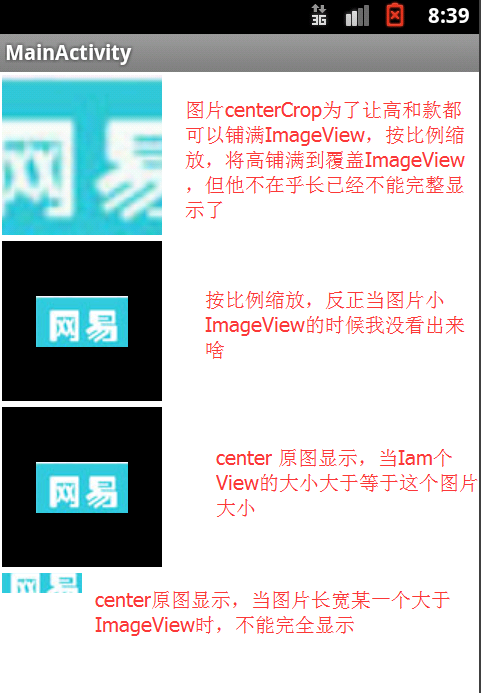
其形式效果如下:
<LinearLayout xmlns:android="http://schemas.android.com/apk/res/android"
    xmlns:tools="http://schemas.android.com/tools"
    android:layout_width="wrap_content"
    android:layout_height="match_parent"
    android:orientation="vertical"
    tools:context="${relativePackage}.${activityClass}" >
       <ImageView
        android:layout_width="160px"
        android:layout_height="160px"
        android:scaleType="centerCrop"
        android:src="@drawable/pic"
        android:background="#FF000000"
        android:layout_margin="2dp"
        />

        <ImageView
        android:layout_width="160px"
        android:layout_height="160px"
        android:scaleType="centerInside"
        android:src="@drawable/pic"
        android:background="#FF000000"
        android:layout_margin="2dp"
        />
        <!-- 按原图大小显示,如果长或宽超出ImageView的范围,则两边的图像不能显示 -->
        <ImageView
        android:layout_width="160px"
        android:layout_height="160px"
        android:scaleType="center"
        android:src="@drawable/pic"
        android:background="#FF000000"
        android:layout_margin="2dp"/>


        <ImageView
         android:layout_width="80px"
        android:layout_height="20px"
        android:scaleType="center"
        android:src="@drawable/pic"
        android:background="#FF000000"
        android:layout_margin="2dp"/>


</LinearLayout>
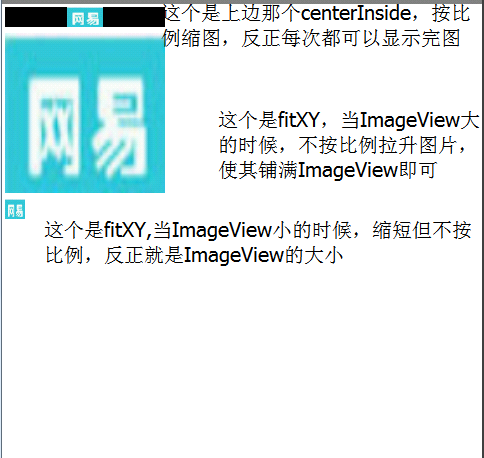
显示效果如下
怎么现在不能去水印了,很烦,但也好,
<LinearLayout xmlns:android="http://schemas.android.com/apk/res/android"
    xmlns:tools="http://schemas.android.com/tools"
    android:layout_width="wrap_content"
    android:layout_height="match_parent"
    android:orientation="vertical"
    tools:context="${relativePackage}.${activityClass}" >


        <ImageView
        android:layout_width="160px"
        android:layout_height="20px"
        android:scaleType="centerInside"
        android:src="@drawable/pic"
        android:background="#FF000000"
        android:layout_margin="2dp"
        />


          <ImageView
        android:layout_width="160px"
        android:layout_height="160px"
        android:scaleType="fitXY"
        android:src="@drawable/pic"
        android:background="#FF000000"
        android:layout_margin="2dp"
        />


          <ImageView
        android:layout_width="20px"
        android:layout_height="20px"
        android:scaleType="fitXY"
        android:src="@drawable/pic"
        android:background="#FF000000"
        android:layout_margin="2dp"
        />


</LinearLayout>
我感觉我怕是在浪费时间。希望。。。
原图


 3248
3248

 被折叠的 条评论
为什么被折叠?
被折叠的 条评论
为什么被折叠?
 到【灌水乐园】发言


