


文章目录
1. lnmp搭建
安装后配置,修改nginx的主配置文件

       [root@server ~]# vim /usr/local/nginx/conf/nginx.conf
        .....
        error_log  logs/error.log;
        #error_log  logs/error.log  notice;		##开启错误日志存放目录
        #error_log  logs/error.log  info;
        .....

//开启以匹配php结尾的网站模板


         # pass the PHP scripts to FastCGI server listening on 127.0.0.1:9000
            #
            location ~ \.php$ {
                root           html;
                fastcgi_pass   127.0.0.1:9000;
                fastcgi_index  index.php;
                fastcgi_param  SCRIPT_FILENAME  $document_root$fastcgi_script_name;		##此处修改/scripts为$document_root
                include        fastcgi_params;
            }

  //修改server段内容为

          #access_log  logs/host.access.log  main;

            location / {
                root   html;
                index index.php index.html index.htm;		##此处添加index.php即可
            }

  //在网页目录站点创建index.php的文件,写入php网页信息
        [root@server ~]# cat > /usr/local/nginx/html/index.php <<EOF
        > <?php
        >     phpinfo();
        > ?>
        > EOF

    //检查配置文件语法是否有误,并重新加载配置文件
        [root@server ~]# nginx -t
        nginx: the configuration file /usr/local/nginx/conf/nginx.conf syntax is ok
        nginx: configuration file /usr/local/nginx/conf/nginx.conf test is successful
        [root@server ~]# nginx -s reload
    //验证
2. zabbix部署
环境说明:
| 环境 | IP | 要安装的应用 |
|---|---|---|
| 服务器 | 192.168.93.129 | lnmp架构 |
| 客户端 | 192.168.93.130 | zabbix agent |
2.1 zabbix服务端安装
# 安装依赖包
[root@server ~]# yum -y install net-snmp-devel libevent-devel
安装过程略....

# 下载zabbix
[root@server ~]# cd /usr/src/
[root@server ~]# wget https://nchc.dl.sourceforge.net/project/zabbix/ZABBIX%20Latest%20Stable/4.0.3/zabbix-4.0.3.tar.gz
下载过程略....

# 解压
[root@server src]# tar xf zabbix-4.0.3.tar.gz

# 创建zabbix用户和组
[root@serversrc]# groupadd -r zabbix
[root@server src]# useradd -r -M -s /sbin/nologin -g zabbix zabbix

# 配置zabbix数据库
[root@server ~]# mysql -uroot -p
Enter password:
Welcome to the MySQL monitor.  Commands end with ; or \g.
Your MySQL connection id is 5
Server version: 5.7.22

Copyright (c) 2000, 2018, Oracle and/or its affiliates. All rights reserved.

Oracle is a registered trademark of Oracle Corporation and/or its
affiliates. Other names may be trademarks of their respective
owners.

Type 'help;' or '\h' for help. Type '\c' to clear the current input statement.

mysql>  alter user 'root'@'localhost' identified by '123456';		#重置密码
Query OK, 0 rows affected (0.00 sec)

mysql> create database zabbix character set utf8 collate utf8_bin;
Query OK, 1 row affected (0.00 sec)

mysql> grant all privileges on zabbix.* to zabbix@localhost identified by 'zabbix123!';
Query OK, 0 rows affected, 2 warnings (0.07 sec)

mysql> flush privileges;
Query OK, 0 rows affected (0.00 sec)

mysql> quit
Bye

[root@server ~]# cd /usr/src/zabbix-4.0.3/database/mysql/
[root@server mysql]# ls
data.sql  images.sql  Makefile.am  Makefile.in  schema.sql
[root@server mysql]# mysql -uzabbix -pzabbix123! zabbix < schema.sql
mysql: [Warning] Using a password on the command line interface can be insecure.

[root@server mysql]# mysql -uzabbix -pzabbix123! zabbix < images.sql
mysql: [Warning] Using a password on the command line interface can be insecure.

[root@server mysql]# mysql -uzabbix -pzabbix123! zabbix < data.sql
mysql: [Warning] Using a password on the command line interface can be insecure.

# 编译安装zabbix
[root@server mysql]# cd /usr/src/zabbix-4.0.3
[root@server zabbix-4.0.3]# ./configure --enable-server \
> --enable-agent \
> --with-mysql \
> --with-net-snmp \
> --with-libcurl \
> --with-libxml2

[root@server zabbix-4.0.3]# make install
2.2 zabbix服务端配置
# 修改服务端配置文件
# 设置数据库信息
[root@server ~]# ls /usr/local/etc/
zabbix_agentd.conf  zabbix_agentd.conf.d  zabbix_server.conf  zabbix_server.conf.d
[root@server ~]# vim /usr/local/etc/zabbix_server.conf
....
DBPassword=zabbix123!       //设置zabbix数据库连接密码

# 启动zabbix_server和zabbix_agentd
[root@server ~]# zabbix_server
[root@server ~]# zabbix_agentd
[root@server ~]# ss -antl
State      Recv-Q Send-Q    Local Address:Port                   Peer Address:Port
LISTEN     0      128                   *:22                                *:*
LISTEN     0      100           127.0.0.1:25                                *:*
LISTEN     0      128                   *:10050                             *:*
LISTEN     0      128                   *:10051                             *:*
LISTEN     0      128           127.0.0.1:9000                              *:*
LISTEN     0      128                  :::80                               :::*
LISTEN     0      128                  :::22                               :::*
LISTEN     0      100                 ::1:25                               :::*
LISTEN     0      80                   :::3306                             :::*
2.3 zabbix web界面安装前配置
# 修改/etc/php.ini的配置并重启php-fpm
[root@server ~]# sed -ri 's/(post_max_size =).*/\1 16M/g' /etc/php.ini
[root@server ~]# sed -ri 's/(max_execution_time =).*/\1 300/g' /etc/php.ini
[root@server ~]# sed -ri 's/(max_input_time =).*/\1 300/g' /etc/php.ini
[root@server ~]# sed -i '/;date.timezone/a date.timezone = Asia/Shanghai' /etc/php.ini
[root@server ~]# service php-fpm restart

[root@srever ~]# cd /usr/src/zabbix-4.0.3
[root@server zabbix-4.0.3]# ls
aclocal.m4  ChangeLog     config.log     configure.ac  frontends   m4           man      README
AUTHORS     compile       config.status  COPYING       include     Makefile     misc     sass
bin         conf          config.sub     database      INSTALL     Makefile.am  missing  src
build       config.guess  configure      depcomp       install-sh  Makefile.in  NEWS

[root@server zabbix-4.0.3]# mkdir /usr/local/nginx/html/zabbix
[root@server zabbix-4.0.3]# cp -a frontends/php/* /usr/local/nginx/html/zabbix/
[root@server zabbix-4.0.3]# chown -R nginx.nginx /usr/local/nginx/html

# 修改nginx配置文件
        #access_log  logs/host.access.log  main;

        location / {
            root   html;
            index zabbix index.php index.html index.htm;		##此处添加zabbix
        }


        location ~ \.php$ {
            root           html;
            fastcgi_pass   127.0.0.1:9000;
            fastcgi_index  zabbix;			##此处为zabbix
            fastcgi_param  SCRIPT_FILENAME  $document_root$fastcgi_script_name;
            include        fastcgi_params;
        }


# 启动nginx status,在nginx.conf配置文件中添加以下内容
[rootserver zabbix-4.0.3]# vim /usr/local/nginx/conf/nginx.conf		#
        location /nginx_status {
            stub_status on;
            access_log off;
            allow 192.168.100.100;	## 定义仅客户端能访问
            deny all;
        }

[root@server zabbix-4.0.3]# nginx -t
nginx: the configuration file /usr/local/nginx/conf/nginx.conf syntax is ok
nginx: configuration file /usr/local/nginx/conf/nginx.conf test is successful
[root@server zabbix-4.0.3]# nginx -s reload

# 客户端使用curl命令获取nginx status,并了解其参数值
[root@client ~]# curl http://192.168.100.100/nginx_status
Active connections: 1
server accepts handled requests
 8 8 4
Reading: 0 Writing: 1 Waiting: 0

## Active connections – 活跃的连接数量
## server accepts handled requests — 总共处理了1个连接 , 成功创建1次握手, 总共处理了1个请求
## Reading — 读取客户端的连接数
## Writing — 响应数据到客户端的数量
## Waiting — 开启 keep-alive 的情况下,这个值等于 active – (reading+writing), 意思就是 Nginx 已经处理完正在等候下一次请求指令的驻留连接.

# 设置zabbix/conf目录的权限,让zabbix有权限生成配置文件zabbix.conf.php
[root@server~]# chmod 777 /usr/local/nginx/html/zabbix/conf
[root@server ~]# ll -d /usr/local/nginx/html/zabbix/conf
drwxrwxrwx 2 nginx nginx 81 12月 20 2018 /usr/local/nginx/html/zabbix/conf

# 重启nginx
[root@server ~]# nginx -s stop
[root@server ~]# nginx
[root@server~]# ss -antl
State      Recv-Q Send-Q    Local Address:Port                   Peer Address:Port
LISTEN     0      128                   *:80                                *:*
LISTEN     0      128                   *:22                                *:*
LISTEN     0      100           127.0.0.1:25                                *:*
LISTEN     0      128                   *:10050                             *:*
LISTEN     0      128                   *:10051                             *:*
LISTEN     0      128           127.0.0.1:9000                              *:*
LISTEN     0      128                  :::22                               :::*
LISTEN     0      100                 ::1:25                               :::*
LISTEN     0      80                   :::3306                             :::*
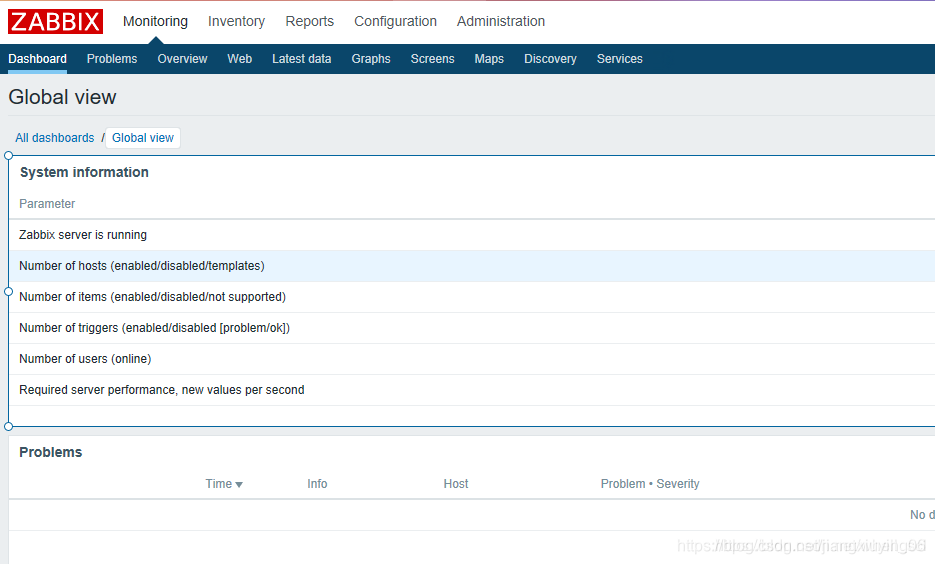
登录进去zabbix网页
 //恢复zabbix/conf目录的权限为755
 [root@server~]# chmod 755 /usr/local/nginx/html/zabbix/conf
 1
2.4 zabbix 客户端配置
[root@client ~]# mkdir /scripts
[root@client ~]# cd /scripts/
[root@client scripts]# vim nginx.sh
[root@client scripts]# cat nginx.sh
#!/bin/bash

case $1 in
    accepts)
        curl -s http://192.168.30.133/nginx_stat | awk 'NR==3 {print $1}'
    ;;
    handled)
        curl -s http://192.168.30.133/nginx_stat |awk 'NR==3 {print $2}'
    ;;
    requests)
        curl -s http://192.168.30.133/nginx_stat |awk 'NR==3 {print $3}'
    ;;
    *)
        echo "Usage: $0 { accepts | handled | requests }"
esac
1
2
3
4
5
6
7
8
9
10
11
12
13
14
15
16
17
18
19
给脚本执行权限

[root@client scripts]# chmod +x nginx.sh
[root@client scripts]# ll
总用量 4
-rwxr-xr-x 1 root root 378 8月  29 19:45 nginx.sh
[root@client scripts]# chmod -R zabbix.zabbix /scripts/
1
2
3
4
5
修改客户端配置文件

[root@client ~]# vim /usr/local/etc/zabbix_agentd.conf
修改:UnsafeUserParameters 等于 1 :UnsafeUserParameters=1
UserParameter=nginx[*],/bin/bash /scripts/nginx.sh $1		##末行加入此行
1
2
3
重启zabbix_agentd

[root@client ~]# pkill zabbix
[root@client ~]# zabbix_agentd
1
2
在服务端测试脚本

[root@client ~]# zabbix_get -s 192.168. 30.129 -k nginx[requests]
358
3. 配置网页界面
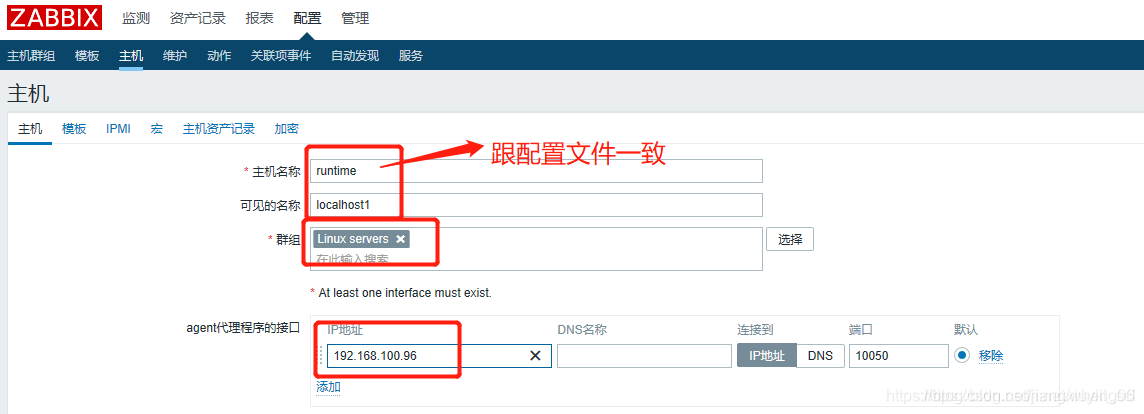
创建新主机:
主机名必须和刚刚自定义的主机名一致: Hostname=runtime
- 配置——主机——创建主机
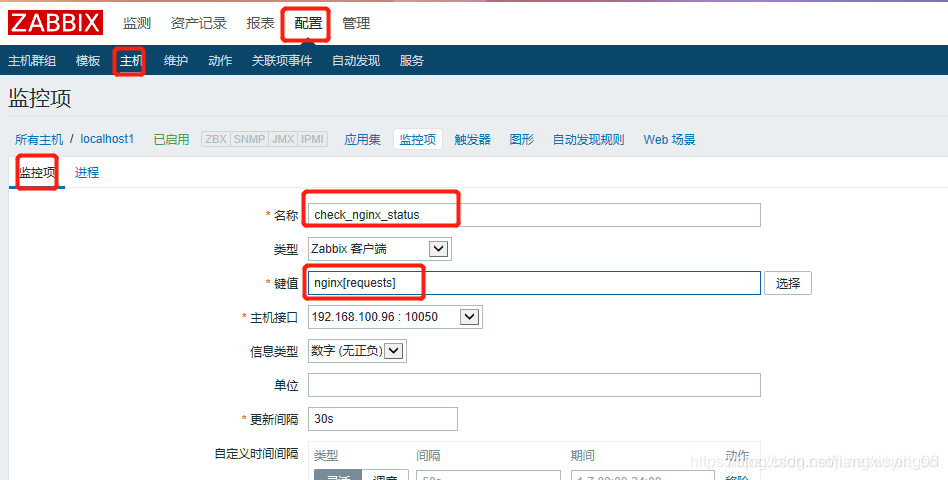
添加监控项 - 配置——主机——监控项
- 配置以下配置其他保持默认
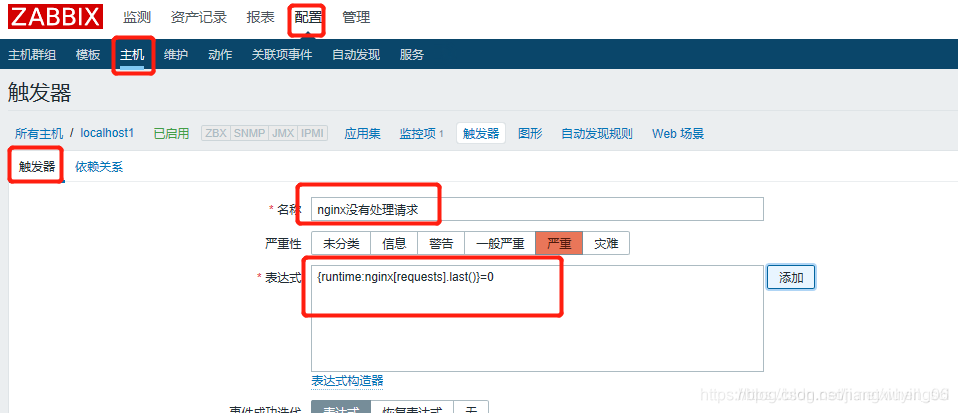
添加触发器 - 配置——主机——触发器
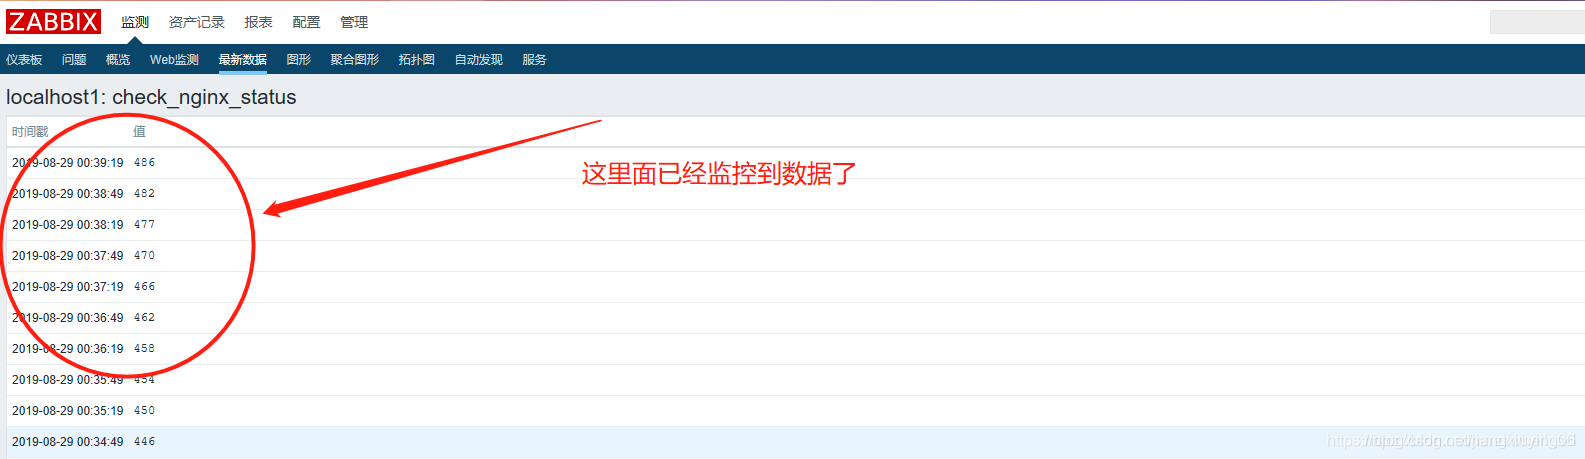
4. 验证


 被折叠的 条评论
为什么被折叠?
被折叠的 条评论
为什么被折叠?
 到【灌水乐园】发言


