


 本文详细介绍了Flutter中的裁剪布局,包括ClipRect、ClipRRect、ClipOval的基础用法,以及如何使用ClipPath和CustomClipper创建自定义裁剪形状。通过实例展示了如何利用这些裁剪工具实现复杂图形的裁剪效果。
Flutter 裁剪布局之 ClipRect、ClipRRect、ClipOval、ClipPath、CustomClipper
文章目录
裁剪布局
Flutter中提供了一些剪裁widget,如下表格。
| widget | 作用 |
|---|---|
| ClipRect | 将 child 剪裁为给定的矩形大小 |
| ClipRRect | 将 child 剪裁为圆角矩形 |
| ClipOval | 如果 child 为正方形时剪裁之后是圆形,如果 child 为矩形时,剪裁之后为椭圆形 |
| ClipPath | 将 child 按照给定的路径进行裁剪 |
| CustomClipper | 并不是一个widget,但是使用CustomClipper可以绘制出任何我们想要的形状 |
ClipRect
将 child 剪裁为给定的矩形大小
查看构造函数支持哪些字段:
const ClipRect({
	Key key,
	this.clipper, // CustomClipper 对象,如果为空,则裁剪区域为 child 指定的大小
	this.clipBehavior = Clip.hardEdge, // 裁剪的方式, 不能为 null 或者 Clip.none
	Widget child // 子布局
 }
)
clipBehavior`可选值有:`none, hardEdge, antiAlias, antiAliasWithSaveLayer
none:不裁剪hardEdge:裁剪但不应用抗锯齿,裁剪速度比none模式慢一点,但比其他方式快。antiAlias:裁剪而且抗锯齿,以实现更平滑的外观。裁剪速度比antiAliasWithSaveLayer快,比hardEdge慢。antiAliasWithSaveLayer:带有抗锯齿的剪辑,并在剪辑之后立即保存saveLayer。
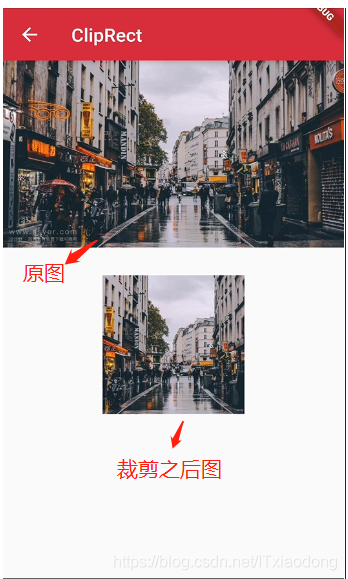
代码实现:
Column(
  children: <Widget>[
    Container(
      child: Image.network(
          'https://ssyerv1.oss-cn-hangzhou.aliyuncs.com/picture/389e31d03d36465d8acd9939784df6f0.jpg!sswm'
      ),
    ),
    SizedBox(
      height: 30,
    ),
    ClipRect(
      child: Container(
        height: 150,
        width: 150,
        child: Image.network(
          'https://ssyerv1.oss-cn-hangzhou.aliyuncs.com/picture/389e31d03d36465d8acd9939784df6f0.jpg!sswm',
          fit: BoxFit.cover,
        ),
      ),
    )
  ],
)
ClipRRect
将
child剪裁为圆角矩形
查看构造函数中的字段:
const ClipRRect({
    Key key,
    this.borderRadius = BorderRadius.zero,// 圆角
    this.clipper, // CustomClipper 对象,如果为空,则裁剪区域为 child 指定的大小
    this.clipBehavior = Clip.antiAlias,// 裁剪的方式, 不能为 null 或者 Clip.none
    Widget child,
  })
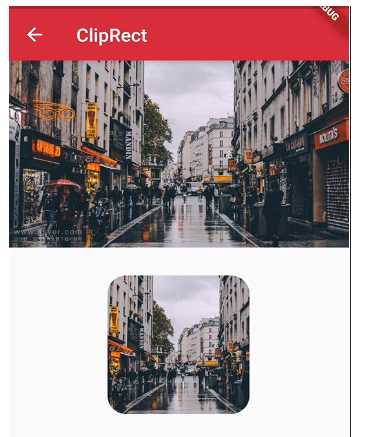
伪代码:
Column(
  children: <Widget>[
    Container(
      child: Image.network(
          'https://ssyerv1.oss-cn-hangzhou.aliyuncs.com/picture/389e31d03d36465d8acd9939784df6f0.jpg!sswm'
      ),
    ),
    SizedBox(
      height: 30,
    ),
    ClipRRect(
      borderRadius: BorderRadius.circular(20),// 圆角半径
      child: Container(
        height: 150,
        width: 150,
        child: Image.network(
          'https://ssyerv1.oss-cn-hangzhou.aliyuncs.com/picture/389e31d03d36465d8acd9939784df6f0.jpg!sswm',
          fit: BoxFit.cover,
        ),
      ),
    ),
  ],
)
ClipOval
如果
child为正方形时剪裁之后是圆形,如果child为矩形时,剪裁之后为椭圆形。
构造函数中的字段同ClipRect。
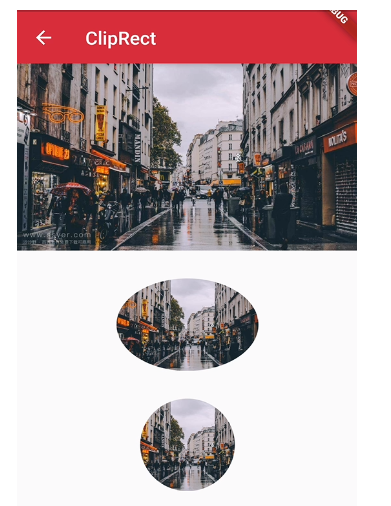
伪代码:
Column(
  children: <Widget>[
    Container(
      child: Image.network(
          'https://ssyerv1.oss-cn-hangzhou.aliyuncs.com/picture/389e31d03d36465d8acd9939784df6f0.jpg!sswm'
      ),
    ),
    SizedBox(
      height: 30,
    ),
    ClipOval(// 宽高不一致为,裁剪后为椭圆形
      child: Container(
        height: 100,
        width: 150,
        child: Image.network(
          'https://ssyerv1.oss-cn-hangzhou.aliyuncs.com/picture/389e31d03d36465d8acd9939784df6f0.jpg!sswm',
          fit: BoxFit.cover,
        ),
      ),
    ),
    SizedBox(
      height: 30,
    ),
    ClipOval(// 宽高一致为,裁剪后为圆形
      child: Container(
        height: 100,
        width: 100,
        child: Image.network(
          'https://ssyerv1.oss-cn-hangzhou.aliyuncs.com/picture/389e31d03d36465d8acd9939784df6f0.jpg!sswm',
          fit: BoxFit.cover,
        ),
      ),
    ),
  ],
)
ClipPath 及 CustomClipper
ClipPath会将child按照给定的路径进行裁剪,CustomClipper可以绘制出任何我们想要的形状
实现的效果:实战项目源码可在 Flutter-WanAndroid 中查看。
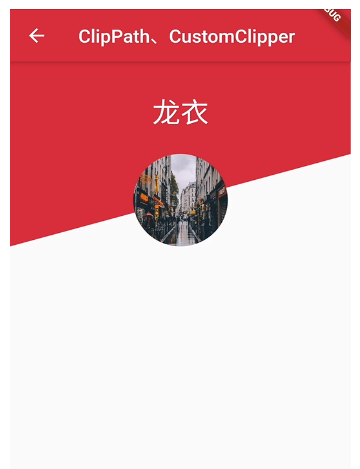
上方的这种效果可以通过ClipPath+CustomClipper实现。
主要思路是通过CustomClipper实现自定义的斜线效果然后将结果传递给ClipPath构造函数中的clipper字段。
我们先来看看CustomClipper这个抽象类。


 被折叠的 条评论
为什么被折叠?
被折叠的 条评论
为什么被折叠?
 到【灌水乐园】发言


