


背景:
单独创建自定义桶用于文件上传,代码已经上传附件。
处理问题:
正常mogo上传只能小于16M,
本文使用的mongo版本
mongodb-driver-core:3.8.2
mongodb-driver:3.8.2
spring-boot-starter-data-mongodb:2.1.10.RELEASE
spring-data-mongodb:2.1.12.RELEASE
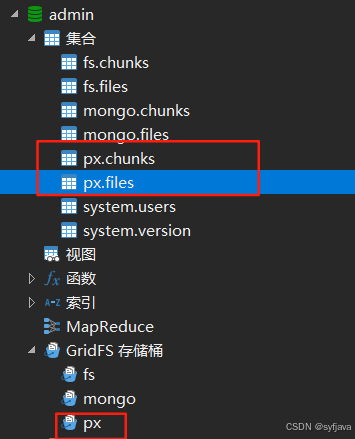
1. MongoDB "px" Bucket 配置方法
yml 配置的mon数据库使用的桶是默认的mongo
insiis.activated.fs=mongo
spring.data.mongodb.bucket-name=mongo
spring.data.mongodb.host=192.168.1.2
spring.data.mongodb.port=27017
spring.data.mongodb.username=syf
spring.data.mongodb.password=123456
spring.data.mongodb.authentication-database=admin
spring.data.mongodb.database=admin
在给定的代码中,使用 Spring Data MongoDB 来配置 "px" bucket 而不使用默认的 "mongo" bucket。以下是详细的配置步骤和代码分析:
配置类 PxMongoGridFsConfig
import org.springframework.context.annotation.Bean;
import org.springframework.context.annotation.Configuration;
import org.springframework.data.mongodb.MongoDbFactory;
import org.springframework.data.mongodb.core.convert.DefaultMongoTypeMapper;
import org.springframework.data.mongodb.core.convert.MappingMongoConverter;
import org.springframework.data.mongodb.core.mapping.MongoMappingContext;
import org.springframework.data.mongodb.gridfs.GridFsTemplate;

@Configuration
public class PxMongoGridFsConfig {

    /**
     * 手动创建 MappingMongoConverter Bean。
     * 在一些项目中,Spring Boot 可能不会自动配置此 Bean,因此需要我们手动创建。
     * @param mongoDbFactory Spring Boot 自动配置的 MongoDbFactory
     * @param context Spring Boot 自动配置的 MongoMappingContext
     * @return 配置好的 MappingMongoConverter
     */
    @Bean
    public MappingMongoConverter mappingMongoConverter(MongoDbFactory mongoDbFactory, MongoMappingContext context) {
        MappingMongoConverter converter = new MappingMongoConverter(new org.springframework.data.mongodb.core.convert.DefaultDbRefResolver(mongoDbFactory), context);
        // 移除 _class 字段
        converter.setTypeMapper(new DefaultMongoTypeMapper(null));
        return converter;
    }

    // 这是为 "px" bucket 创建的 GridFsTemplate
    @Bean(name = "pxGridFsTemplate")
    public GridFsTemplate pxGridFsTemplate(MongoDbFactory mongoDbFactory, MappingMongoConverter mongoConverter) {
        return new GridFsTemplate(mongoDbFactory, mongoConverter, "px");
    }
}
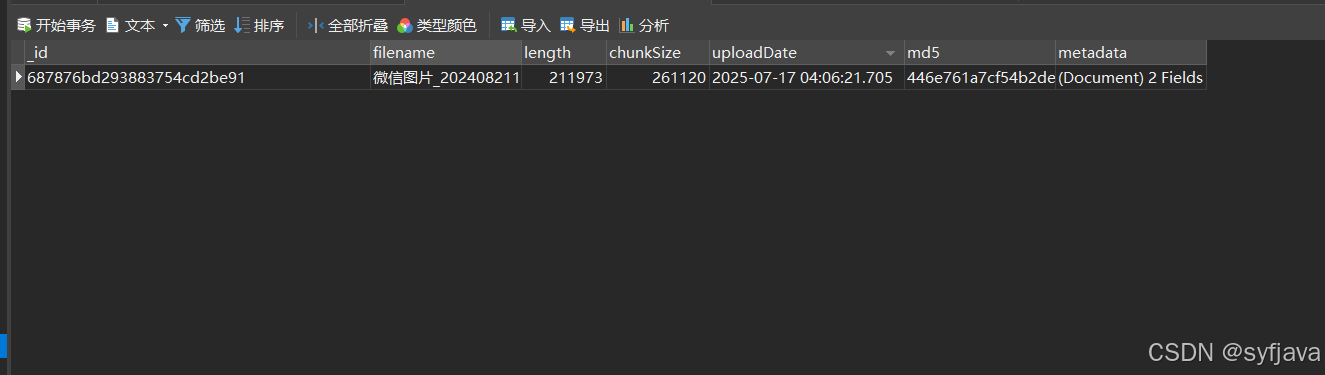
上传文件时候会自动创建桶:
这个是px.files上传的文件
前端页面:
<el-row>
                    <el-col :span="24">
                        <ep-input name="fileId" :property="registrationForm.fileId" p="H"></ep-input>
                        <el-form-item label="工种图片">
                            <el-upload
                                class="avatar-uploader"
                                action="/server/business/pxMongoGridFS/file/upload"
                                :headers="uploadHeaders"
                                :data="uploadData"
                                :show-file-list="false"
                                :on-success="handleUploadSuccess"
                                :before-upload="beforeUpload">
                                <img v-if="registrationForm.fileId && registrationForm.fileId.value"
                                     :src="'/server/business/pxMongoGridFS/file/download/' + registrationForm.fileId.value"
                                     class="avatar">
                                <i v-else class="el-icon-plus avatar-uploader-icon"></i>
                            </el-upload>
                            <div v-if="registrationForm.fileId && registrationForm.fileId.value" class="image-actions">
                                <el-button type="text" size="small" @click="previewImage">预览</el-button>
                                <el-button type="text" size="small" style="color: #F56C6C;" @click="removeImage">删除</el-button>
                            </div>
                        </el-form-item>
                    </el-col>
                </el-row>
            </el-form>
js方法:
  // 上传图片前的验证
        beforeUpload(file) {
            const isImage = file.type.indexOf('image/') === 0;
            const isLt4M = file.size / 1024 / 1024 < 4;

            if (!isImage) {
                this.$message.error('上传文件只能是图片格式!');
                return false;
            }
            if (!isLt4M) {
                this.$message.error('上传图片大小不能超过 2MB!');
                return false;
            }

            // 设置businessId为当前记录ID,如果是新增则为空
            this.uploadData.businessId = this.registrationForm.id.value || '';

            return true;
        },

        // 上传成功的回调
        handleUploadSuccess(response, file) {
            if (response.status == 0) {
                // 保存fileId到表单中,用于保存到主表
                this.registrationForm.fileId.value = response.data;
                this.$message.success('上传成功');
            } else {
                this.$message.error(response.msg || '上传失败');
            }
        },

        // 预览图片
        previewImage() {
            if (this.registrationForm.fileId.value) {
                this.previewImageUrl = '/server/business/pxMongoGridFS/file/download/' + this.registrationForm.fileId.value;
                this.previewVisible = true;
            }
        },

        // 删除图片
        removeImage() {
            if (!this.registrationForm.fileId.value) return;

            this.$confirm('确认删除该图片吗?', '提示', {
                confirmButtonText: '确定',
                cancelButtonText: '取消',
                type: 'warning'
            }).then(() => {
                console.log(this.registrationForm.fileId.value)
                this.$http.post('/business/pxMongoGridFS/file/delete', {
                    fileId: this.registrationForm.fileId.value
                }).then(res => {
                    if (res.data.code === 0) {
                        this.registrationForm.fileId.value = '';
                        this.$message.success('删除成功');
                    } else {
                        this.$message.error(res.data.msg || '删除失败');
                    }
                }).catch(err => {
                    this.$message.error('删除失败:' + err.message);
                });
            }).catch(() => {
                // 取消删除
            });
        }
二、上传、下载、删除接口
根据上面controller找到service代码复制就能用,代码已经上传附件,自行下载。
 /**
     * 上传文件
     */
    @PostMapping("/upload")
    public ResponseMessage upload(@RequestParam("file") MultipartFile file,
                                @OdinRequestParam("businessId") String businessId,
                                @OdinRequestParam("businessType") String businessType,
                                @OdinRequestParam("description") String description) {
        try {
            if (file == null || file.isEmpty()) {
                return this.error("上传文件不能为空");
            }


            // 上传文件
            String fileId = fileService.uploadFile(file, businessId, businessType, description);

            return ResponseMessage.ok("上传成功", fileId);
        } catch (Exception e) {
            log.error("上传文件异常", e);
            return this.error("上传文件异常:" + e.getMessage());
        }
    }

    /**
     * 下载文件
     */
    @GetMapping("/download/{fileId}")
    @Syslog("下载文件")
    public void download(@PathVariable("fileId") String fileId, HttpServletResponse response) {
        try {
            fileService.downloadFile(fileId, response);
        } catch (Exception e) {
            log.error("下载文件异常", e);
            try {
                response.setContentType("text/html;charset=utf-8");
                response.getWriter().write("下载文件异常:" + e.getMessage());
            } catch (Exception ex) {
                log.error("响应异常信息失败", ex);
            }
        }
    }

    /**
     * 删除文件
     */
    @PostMapping("/delete")
    public ResponseMessage delete(@OdinRequestParam("fileId") String fileId) {
        try {
            boolean result = fileService.deleteFile(fileId);
            if (result) {
                return this.ok("删除成功");
            } else {
                return this.error("删除失败");
            }
        } catch (Exception e) {
            log.error("删除文件异常", e);
            return this.error("删除文件异常:" + e.getMessage());
        }
    }


 2696
2696

 被折叠的 条评论
为什么被折叠?
被折叠的 条评论
为什么被折叠?
 到【灌水乐园】发言


