


 该博客围绕Vue待办任务列表DEMO展开,介绍组件设计与编码流程,包括MyHeader、MyFooter等组件功能。还阐述了props通信、v-model使用注意事项。提及localStorage和sessionStorage特性及使用,解决数据刷新丢失问题。最后讲解自定义事件绑定、解绑及适用场景。
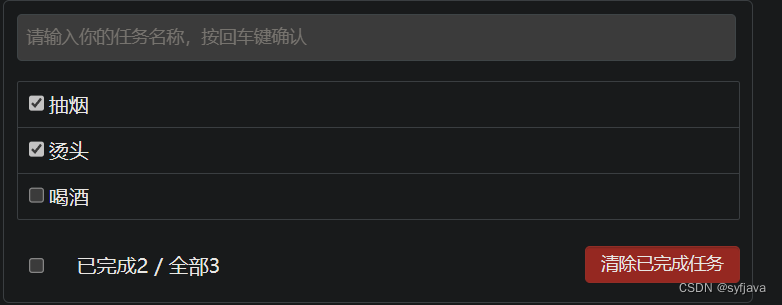
DEMO简介
练习DEMO的需求:
完成下面待办任务列表的简单业务。了解组件设计,以及对前面知识点巩固
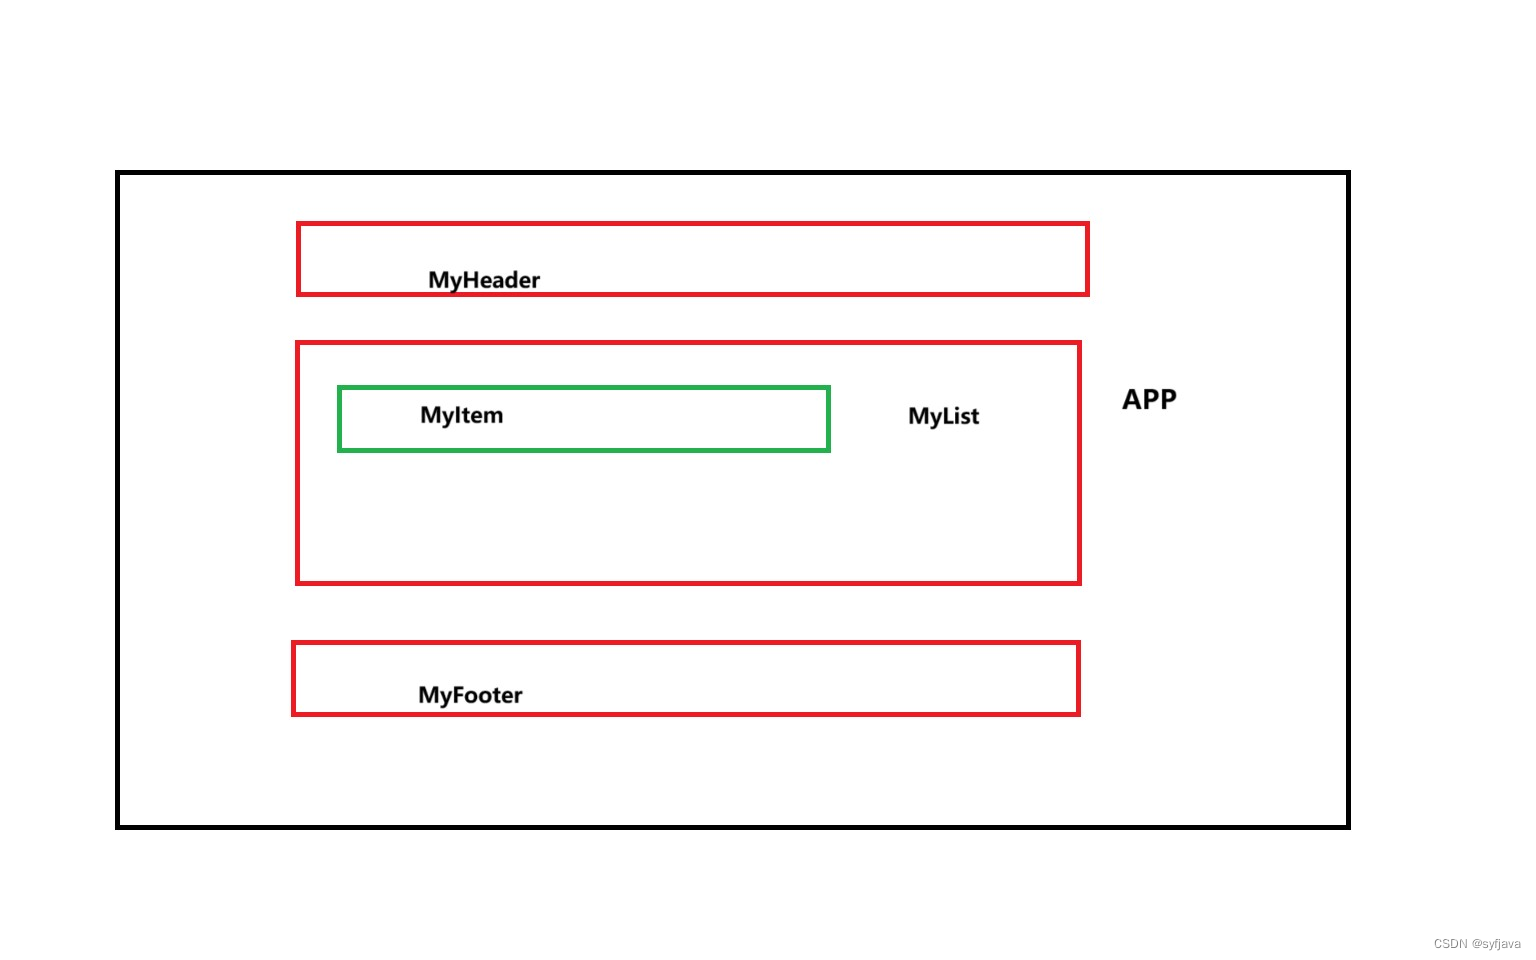
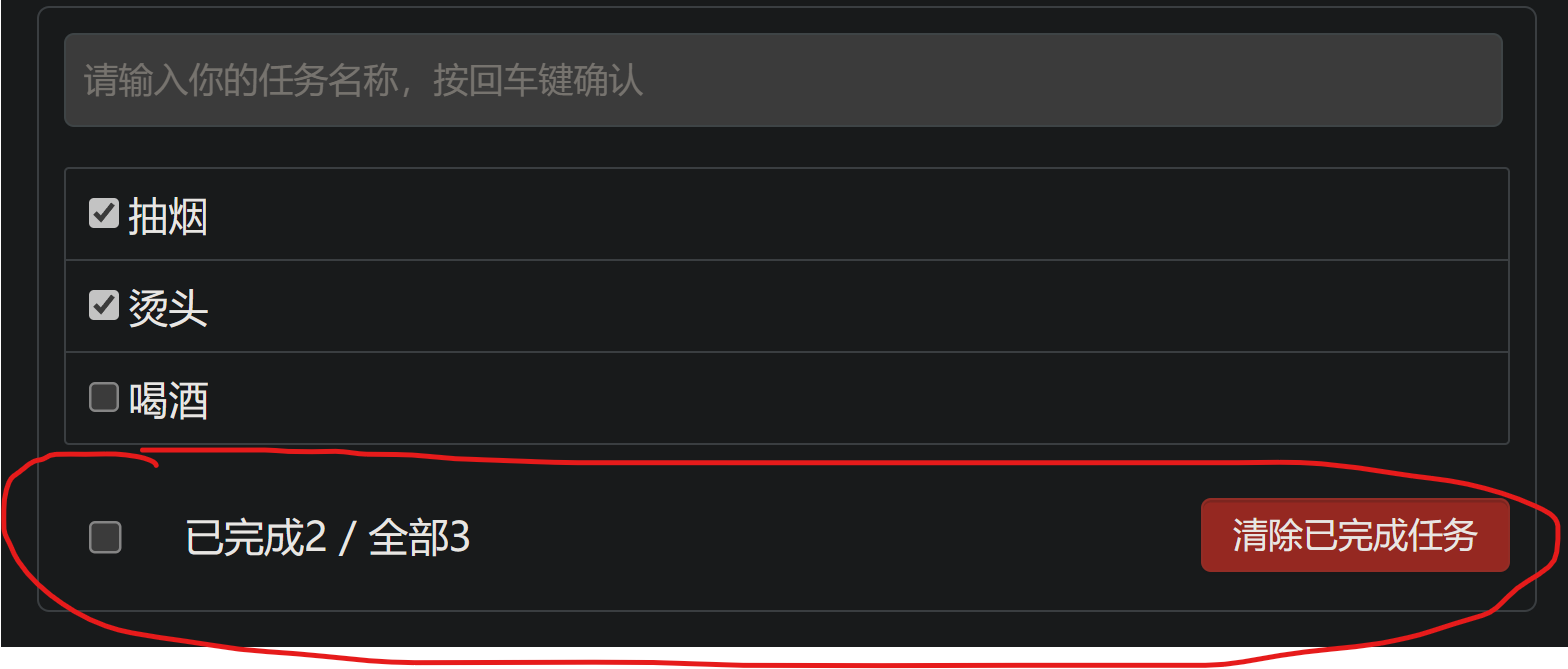
页面的组件设计如下
总结
1-组件编码流程
(1).拆分静态组件: 组件要按照功能点拆分,命名不要与html元素冲突
(2).实现动态组件:考虑好数据的存放位置,数据是一个组件在用,还是一些组件在用
1).一个组件在用: 放在组件自身即可
2).一些组件在用: 放在他们共同的父组件上 (状态提升)2-props 适用于:
(1)父组件==>子组件通信
(2).子组件==>父组件通信(要求父先给子一个函数,父组件先把函数交给子组件 props 接受,子组件调用函数)3-使用v-model时要切记: v-model绑定的值不能是props传过来的值,因为props是不可以修改的!
4-props传过来的若是对象类型的值,修改对象中的属性时Vue不会报错,但不推荐这样做。
1-MyHeater组件
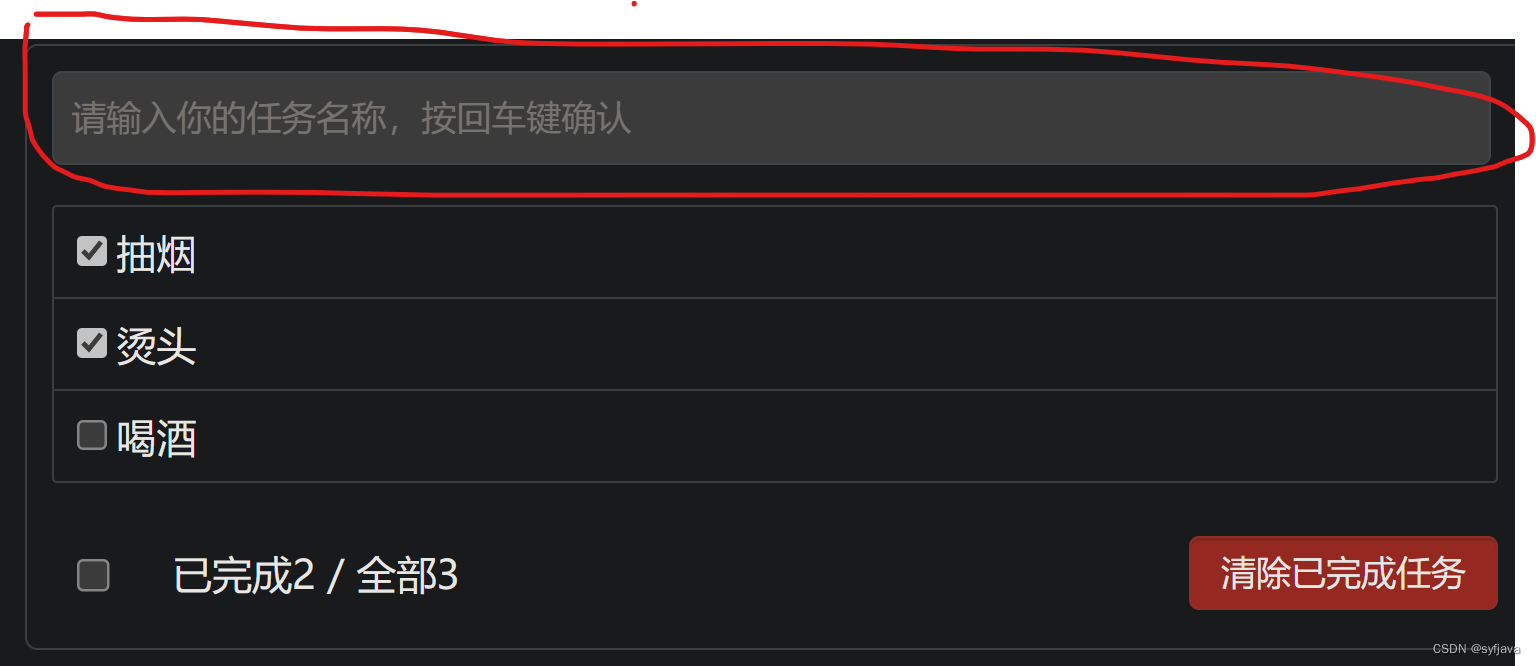
功能: 对应上面的输入框部分,enter触发添加方法。
如下图:addTodo是APP父组件定义的方法,MyHeader组件中props接受,然后自身调用 addTodo新增方法,实现todos数据的改变
<template>
  <div class="todo-header">
    <input
      type="text"
      placeholder="请输入你的任务名称,按回车键确认"
      @keyup.enter="add"
    />
  </div>
</template>

<script>
//nanoid  是一款uuid简易生成器。 npm i nanoid 命令安装
import { nanoid } from "nanoid";
export default {
  name: "MyHeader",
  props: ["addTodo"],
  methods: {
    add(event) {
      //    包装对象
      let val = event.target.value;
      let idNew =  nanoid()

      if (!val) {
        return;
      }

      const toobj = {
        id: idNew,
        title: val,
        done: false,
      };
      this.addTodo(toobj);
      event.target.value = "";
    },
  },
};
</script>

<style scoped>
/*header*/
.todo-header input {
  width: 560px;
  height: 28px;
  font-size: 14px;
  border: 1px solid #ccc;
  border-radius: 4px;
  padding: 4px 7px;
}

.todo-header input:focus {
  outline: none;
  border-color: rgba(82, 168, 236, 0.8);
  box-shadow: inset 0 1px 1px rgba(0, 0, 0, 0.075),
    0 0 8px rgba(82, 168, 236, 0.6);
}
</style>
2-MyFooter组件
功能: 1- 通过计算属性计算数量
2- 全选功能:计算属性的get、set 实现读取以及改变
props都是APP组件中传入的对象、方法
<template>
<div class="todo-footer" v-show="total">
<label>
<!-- 1- 写2个 初始化 以及改变方法 -->
<!-- <input type="checkbox" :checked="isAll" @change="checkAll" /> -->
<!-- 2- 使用 v-moldel -->
<input type="checkbox" v-model="isAll" />
</label>
<span>
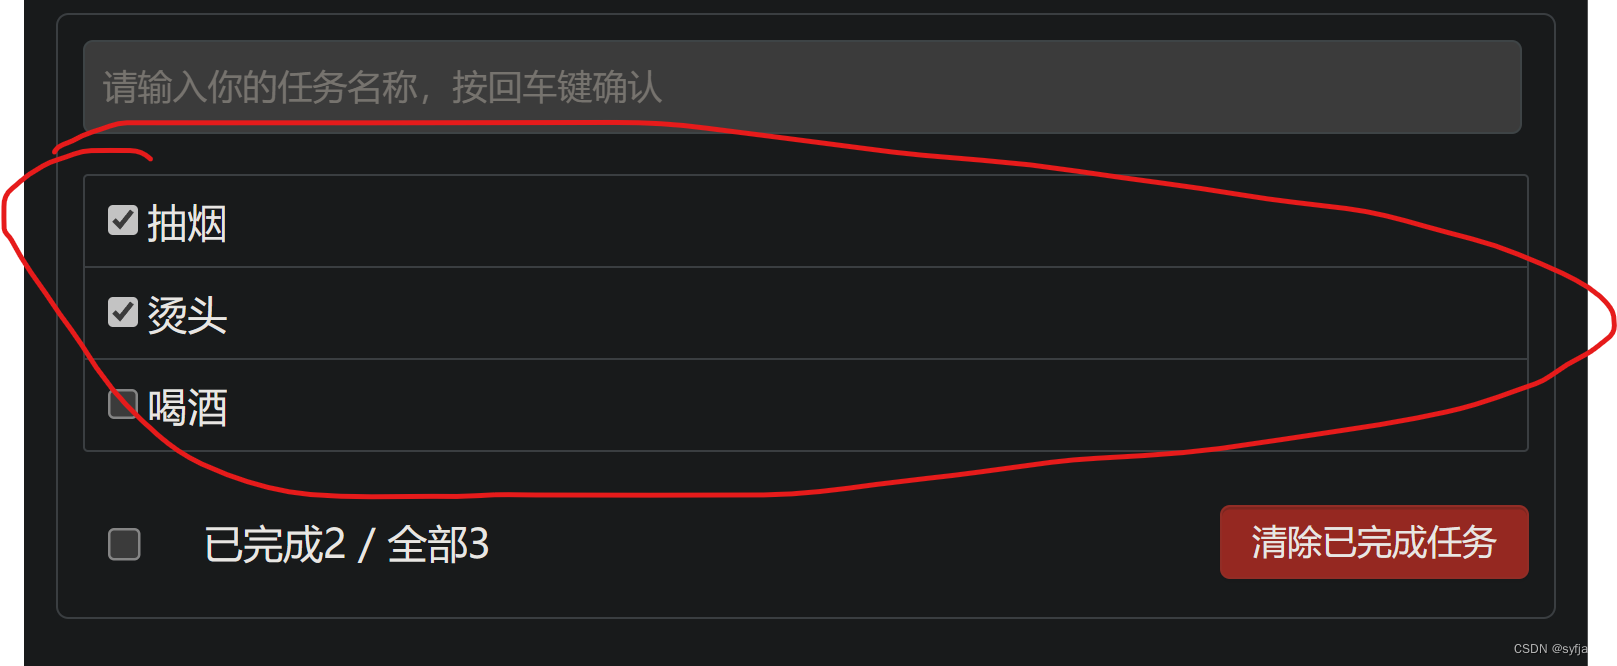
<span>已完成{{ doneTotal }}</span> / 全部{{ total }}
</span>
<button class="btn btn-danger" @click="clearBut">清除已完成任务</button>
</div>
</template>
<script>
export default {
name: "MyFooter",
props: ["todos", "checkAllBut",'clearAll'],
computed: {
// 判断是否全部选中
// 1-
// isAll() {
// return this.total === this.doneTotal && this.total > 0
// },
// 2- v-model
isAll: {
get() {
return this.total === this.doneTotal && this.total > 0;
},
set(val) {
//全选按钮是否选中
this.checkAllBut(val);
},
},
//2-计算总数(用于计数 和 是否展示)
total() {
return this.todos.length;
},
//计算已经完成的数量
doneTotal() {
const num = this.todos.reduce((pre, current) => {
console.log("上一次返回值", pre);
console.log("当前对象", current);
return pre + (current.done ? 1 : 0);
}, 0);
return num;
},
},
methods: {
//3-点击全部选中
checkAll(e) {
console.log(e.target.checked);
//全选按钮是否选中
this.checkAllBut(e.target.checked);
},
//清除已经办理
clearBut(){
this.clearAll();
}
},
};
</script>
<style>
/*footer*/
.todo-footer {
height: 40px;
line-height: 40px;
padding-left: 6px;
margin-top: 5px;
}
.todo-footer label {
display: inline-block;
margin-right: 20px;
cursor: pointer;
}
.todo-footer label input {
position: relative;
top: -1px;
vertical-align: middle;
margin-right: 5px;
}
.todo-footer button {
float: right;
margin-top: 5px;
}
</style>
3-MyList
功能:遍历列表
主要是通过props接受APP中 props:['todos','checkTodo','deleteTodo'],数据、方法传递给子组件。4-
<template>
  <ul class="todo-main">
    <MyItem v-for="item in todos " :key="item.id" :todo="item" :checkTodo="checkTodo" :deleteTodo="deleteTodo"/>
  </ul>
</template>

<script>
import MyItem from "./MyItem.vue";
export default {
  name: "MyList",
  components: {
    MyItem,
  },
  props:['todos','checkTodo','deleteTodo']
};
</script>

<style scoped>
/*main*/
.todo-main {
  margin-left: 0px;
  border: 1px solid #ddd;
  border-radius: 2px;
  padding: 0px;
}

.todo-empty {
  height: 40px;
  line-height: 40px;
  border: 1px solid #ddd;
  border-radius: 2px;
  padding-left: 5px;
  margin-top: 10px;
}
</style>
4-MyItem组件
功能:1-勾选 checkbox ,改变待办状态
2- 删除数据,改变todos 原数据
<template>
  <li>
    <label>
      <!-- <input type="checkbox" :checked="todo.done" @click="changeCheck(todo.id)"/> -->
      <input
        type="checkbox"
        :checked="todo.done"
        @change="changeCheck(todo.id)"
      />
      <!-- v-model 替换上面 change 方法 (不推荐)-->
      <!-- <input type="checkbox" v-model="todo.done" /> -->

      <span>{{ todo.title }}</span>
    </label>
    <button class="btn btn-danger" @click="handleDelte(todo.id)">删除</button>
  </li>
</template>

<script>
export default {
  name: "MyItem",
  //声明接受todo对象
  props: ['todo', 'checkTodo','deleteTodo'],
  mounted() {
    console.log(this.todo);
  },
  methods: {
    //改变选中的状态
    changeCheck(id) {
      this.checkTodo(id);
    },
    //删除记录
    handleDelte(id){
      if(confirm('确认删除吗?')){
        this.deleteTodo(id);
      }
    }
  },
};
</script>

<style scoped>
/*item*/
li {
  list-style: none;
  height: 36px;
  line-height: 36px;
  padding: 0 5px;
  border-bottom: 1px solid #ddd;
}

li label {
  float: left;
  cursor: pointer;
}

li label li input {
  vertical-align: middle;
  margin-right: 6px;
  position: relative;
  top: -1px;
}

li button {
  float: right;
  display: none;
  margin-top: 3px;
}

li:before {
  content: initial;
}

li:last-child {
  border-bottom: none;
}

li:hover {
  background-color: gray;
}

li:hover button {
  display: block;
}
</style>
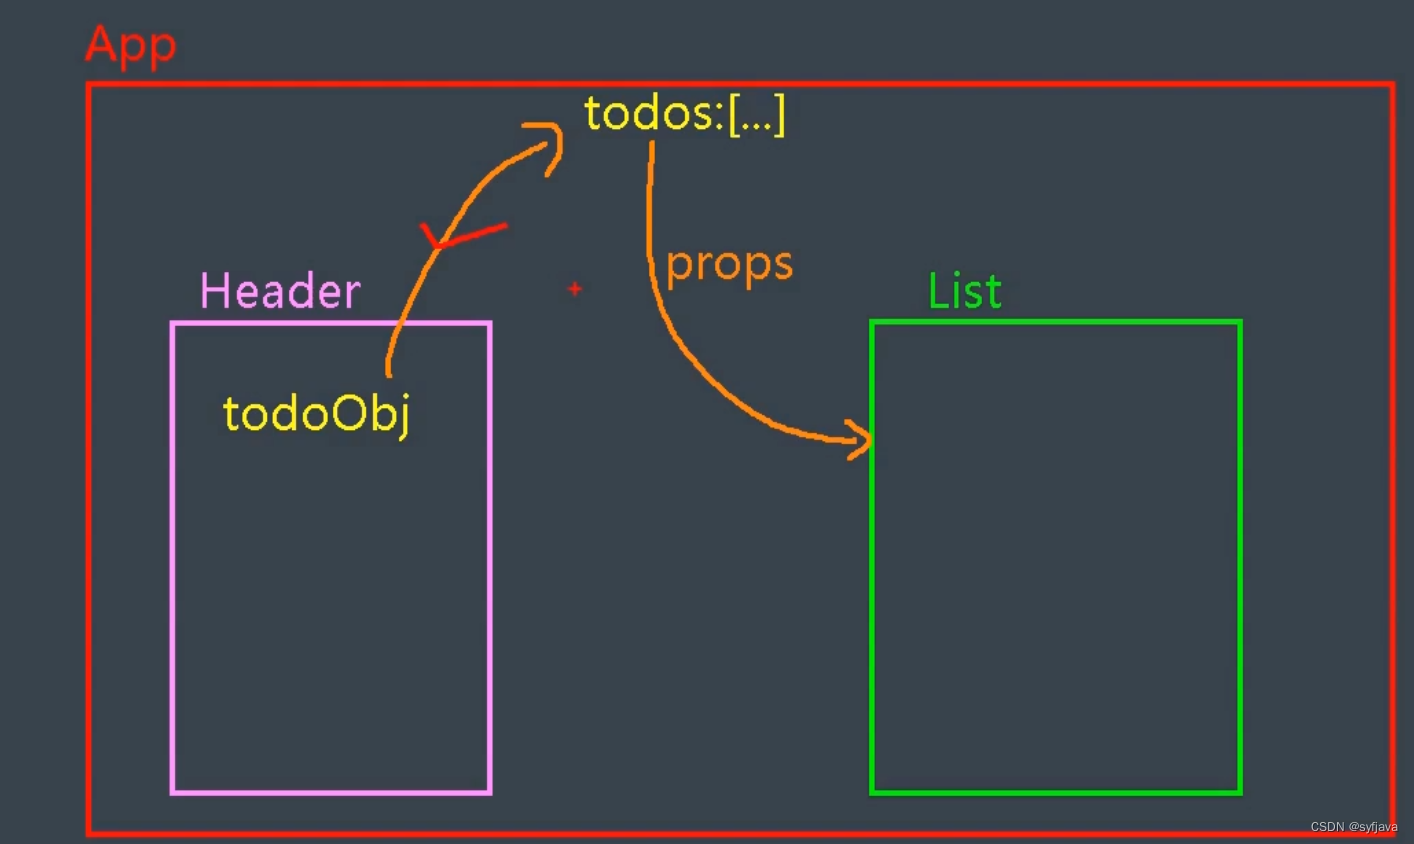
5-APP组件
1-以上功能最外层的父组件,也是定义 todos元数据的地方
2-定义对todos数据的 c r u d方法的地方,通过props 让子组件接受方法
<template>
<div id="root">
<div class="todo-container">
<div class="todo-wrap">
<MyHeader :addTodo="addTodo"></MyHeader>
<MyList
:todos="todos"
:checkTodo="checkTodo"
:deleteTodo="deleteTodo"
></MyList>
<MyFooter :todos="todos" :checkAllBut="checkAllBut" :clearAll="clearAll"></MyFooter>
</div>
</div>
</div>
</template>
<script>
import MyHeader from "./components/MyHeader.vue";
import MyList from "./components/MyList.vue";
import MyFooter from "./components/MyFooter.vue";
export default {
name: "App",
components: {
MyHeader,
MyList,
MyFooter,
},
data() {
return {
todos: [
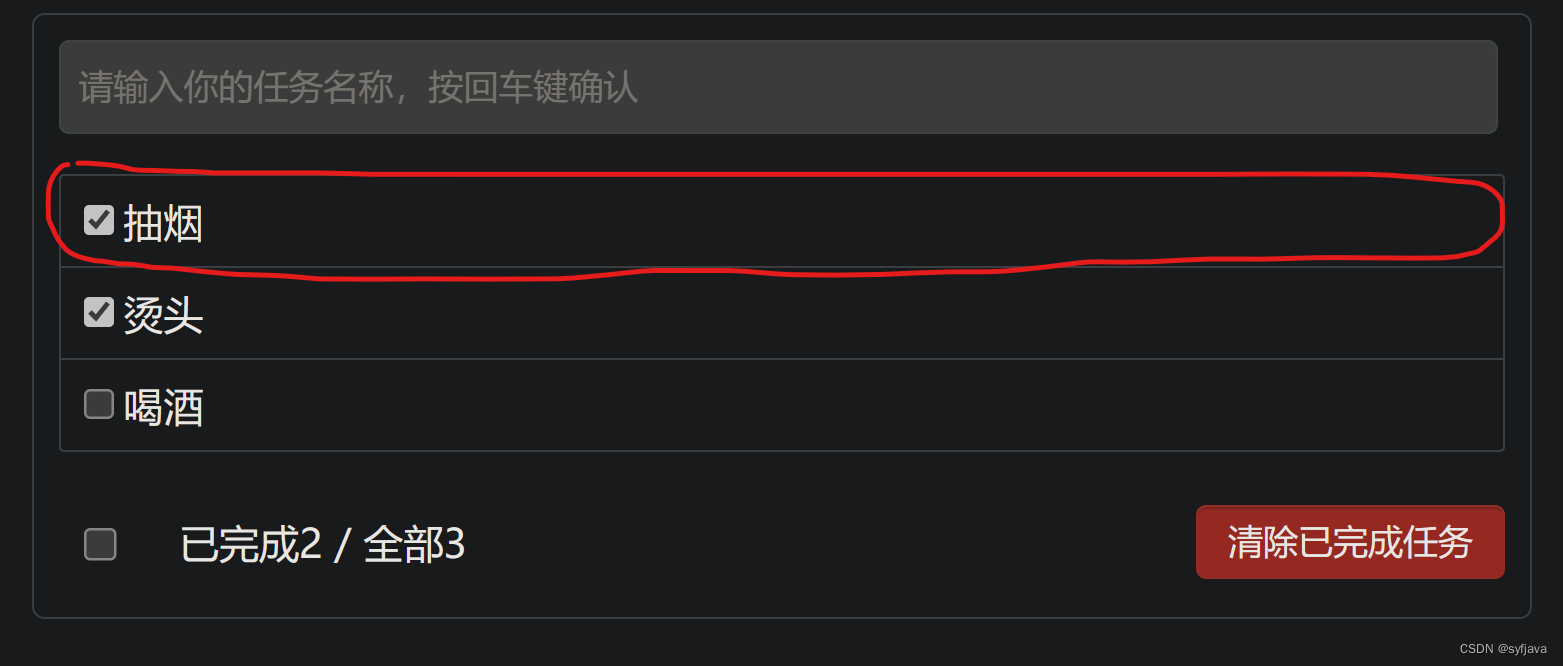
{ id: "001", title: "抽烟", done: true },
{ id: "002", title: "烫头", done: true },
{ id: "003", title: "喝酒", done: false },
],
};
},
methods: {
//添加todo
addTodo(x) {
console.log("收到值:", x);
this.todos.unshift(x);
},
//勾选或者取消
checkTodo(id) {
this.todos.forEach((obj) => {
if (id == obj.id) {
obj.done = !obj.done;
}
});
},
// 删除方法
deleteTodo(id) {
// 过滤新数组返回
this.todos = this.todos.filter((obj) => {
return id !== obj.id;
});
},
//全选或者全不选
checkAllBut(isAll) {
this.todos.forEach((obj) => {
obj.done = isAll ? true : false;
});
},
// 清除所有
clearAll(){
this.todos = this.todos.filter((obj)=>{
return !obj.done
})
}
},
};
</script>
<style>
/* #app {
font-family: Avenir, Helvetica, Arial, sans-serif;
-webkit-font-smoothing: antialiased;
-moz-osx-font-smoothing: grayscale;
text-align: center;
color: #2c3e50;
margin-top: 60px;
} */
/*base*/
body {
background: #fff;
}
.btn {
display: inline-block;
padding: 4px 12px;
margin-bottom: 0;
font-size: 14px;
line-height: 20px;
text-align: center;
vertical-align: middle;
cursor: pointer;
box-shadow: inset 0 1px 0 rgba(255, 255, 255, 0.2),
0 1px 2px rgba(0, 0, 0, 0.05);
border-radius: 4px;
}
.btn-danger {
color: #fff;
background-color: #da4f49;
border: 1px solid #bd362f;
}
.btn-danger:hover {
color: #fff;
background-color: #bd362f;
}
.btn:focus {
outline: none;
}
.todo-container {
width: 600px;
margin: 0 auto;
}
.todo-container .todo-wrap {
padding: 10px;
border: 1px solid #ddd;
border-radius: 5px;
}
</style>
6- localStorage、sessionStorage
localStorage
localStorage 是浏览器的一个特性,这个特性主要是用来作为本地存储来使用的,解决了 cookie 存储空间不足的问题(cookie 的存储空间为 4k),localStorage 中一般浏览器支持的是 5M 大小localStorage 的优势:
localStorage 拓展了 cookie 的 4K 的限制
localStorage 可以将第一次请求的数据存储到本地,这相当于一个 5M 大小的前端页面的数据库,相比于 cookie 可以节约宽带,但是这个只有在高版本浏览器中才支持(IE 浏览器需要在 8 版本以上)localStorage 的局限
目前所有的浏览器都会把 localStorage 的值类型先定位 String 类型,如果需要存储对象,那么需要我们用到 JSON 内置的一些方法做一些转换
localStorage 在浏览器的隐私模式下是不可读取的
localStorage 本质是对字符串的读取,如果存储内容过多就会消耗内存空间,导致页面变卡
localStorage 不能被爬虫抓取到
localSorage 和 sessionStorage 唯一的区别在于 localStorage 属于永久存储,而 sessionStorage 在会话结束的时候键值对会被清空,也即他们的生存期不同
sessionStorage 的内置方法与 localStorage 基本一致,我们通常将 localStorage 和 sessionStorage 统称为 webStorage
sessionStorage 存储的内容会随浏览器窗口的关闭而清除
localStorage 存储的内容需要手动清除才会消失
DEMO展示
1- localStorage:
<!DOCTYPE html>
<html>

<head>
    <meta charset='utf-8'>
    <meta http-equiv='X-UA-Compatible' content='IE=edge'>
    <title>localStorage</title>
    <meta name='viewport' content='width=device-width, initial-scale=1'>
    <link rel='stylesheet' type='text/css' media='screen' href='main.css'>
    <script src='main.js'></script>
</head>

<body>
    <h2>localStorage</h2>
    <button onclick="saveDate()">点我保存数据</button>
    <hr />

    <button onclick="getData()">点我读取数据</button>
    <hr />
    <button onclick="deleteDate()">点我删除数据</button>
    <hr />
    <button onclick="clearDate()">清除所有</button>
    <hr />
</body>
<script type="text/javascript">
    let person = { 'name': 'syf', 'age': 18 }
    function saveDate() {
        localStorage.setItem('msg', 'helloword');
        localStorage.setItem('person', JSON.stringify(person));
    };
    function getData() {
        console.log(localStorage.getItem('msg'));

        console.log(JSON.parse(localStorage.getItem('person')));
    }

    function deleteDate() {
        localStorage.removeItem('msg')
    }
    function clearDate() {
        localStorage.clear()
    }
</script>

</html>
2- sessionStorage
<!DOCTYPE html>
<html>

<head>
    <meta charset='utf-8'>
    <meta http-equiv='X-UA-Compatible' content='IE=edge'>
    <title>sessionStorage</title>
    <meta name='viewport' content='width=device-width, initial-scale=1'>
    <link rel='stylesheet' type='text/css' media='screen' href='main.css'>
    <script src='main.js'></script>
</head>

<body>
    <h2>sessionStorage</h2>
    <button onclick="saveDate()">点我保存数据</button>
    <hr />

    <button onclick="getData()">点我读取数据</button>
    <hr />
    <button onclick="deleteDate()">点我删除数据</button>
    <hr />
    <button onclick="clearDate()">清除所有</button>
    <hr />
</body>
<script type="text/javascript">
    let person = { 'name': 'syf', 'age': 18 }
    function saveDate() {
        sessionStorage.setItem('msg', 'helloword');
        sessionStorage.setItem('person', JSON.stringify(person));
    };
    function getData() {
        console.log(sessionStorage.getItem('msg'));

        console.log(JSON.parse(sessionStorage.getItem('person')));
    }

    function deleteDate() {
        sessionStorage.removeItem('msg')
    }
    function clearDate() {
        sessionStorage.clear()
    }
</script>

</html>
7-修改上面TODOList 的DEMO
使用 localStorage 去保存数据。解决 刷新数据就的丢失的问题。
解决办法 如下 2点:
1- todos数据要在loaclStorage中保存一份(深度监视,数据修改就覆盖 localStorage)
  watch: {
    todos: {
      deep: true, // 开启深度监视,监视里面的每一个对象的 done 值
      handler(value) {
        localStorage.setItem("todos", JSON.stringify(value)); // 将 value 值转化为一个JSON字符串
      },
    },
  },
2-修改数据读,从localStorage中获取
  data() {
    return {
      // todos: [
      //   { id: "001", title: "抽烟", done: true },
      //   { id: "002", title: "烫头", done: true },
      //   { id: "003", title: "喝酒", done: false },
      // ],
      todos:JSON.parse(localStorage.getItem('todos')) || []
    };
  },
7-绑定自定义事件
props 使我们之前使用的绑定事件的方式,实现子组件向父亲组件传递值等。
下面我们使用自定义事件方式:
1-App组件
使用 v-on或@ 以及ref 方式绑定事件
<template>
  <div id="app">
    <h1>{{ msg }}</h1>
    <!--1-  通过父组件给子组件绑定函数方式,用props方式,子传递给父组件 -->
    <school :getSchoolName="getSchoolName"></school>
    <hr />
    <!--2- 通过父组件给子组件绑定一个事件方式 , 子传递给父组件   (@或者 v-on:)-->
    <!-- <student v-on:getStudentNameFun="getStudentName"></student> -->
    <!-- 简写 -->
    <!-- <student @getStudentNameFun="getStudentName"></student> -->

    <!-- 3- 通过父组件给子组件绑定一个事件方式 , 子传递给父组件 (ref)-->
    <student ref="student"></student>
  </div>
</template>

<script>
import Student from "./components/Student.vue";
import School from "./components/School.vue";

export default {
  name: "App",
  data() {
    return {
      msg: "你好啊",
    };
  },
  components: {
    Student,
    School,
  },
  methods: {
    getSchoolName(name) {
      console.log("父组件接受到School组件传递的名称", name);
      alert(name);
    },
    getStudentName(name, ...param) {
      console.log("父组件接受到Studengt组件传递的名称", name, param);
      alert(name);
    },
  },
//我们在钩子函数 mounted 里面绑定自定义事件 myGetStudentName
  mounted() {
        //绑定自定义事件  app 挂载完毕,3s 后执行
    setTimeout(() => {
      this.$refs.student.$on("getStudentNameFun", this.getStudentName);
      //once 触发一次后不能再触发
      // this.$refs.student.$once("getStudentNameFun", this.getStudentName);
    }, 3000);


  },
};
</script>

<style>
#app {
  font-family: Avenir, Helvetica, Arial, sans-serif;
  -webkit-font-smoothing: antialiased;
  -moz-osx-font-smoothing: grayscale;
  text-align: center;
  color: #2c3e50;
  margin-top: 60px;
  background-color: gray;
  padding: 5px;
}
</style>
1-school中 使用 props传递
<template>
  <!--组件主体-->
  <div class="school">
    <h2 >学校:{{ name }}</h2>
    <h2>学校地址:{{ addr }}</h2>
    <button @click="sendSchoolNmae">点我传递名称给父组件</button>
  </div>
</template>

<script>
export default {
  name: "School",
  data() {
    return {
      name: "Vue学院",
      addr: "海棠大道168号",
    };
  },
  props:['getSchoolName'],
  methods:{
    sendSchoolNmae(){
        this.getSchoolName(this.name);
    }
  }
};
</script>
<style scoped>
/* 组件样式 */
.school  {
  background-color: red;
  padding: 5px;
}
</style>
2-student
//触发 Student 身上的 getStudentName 事件
this.$emit('getStudentNameFun', this.name, 'param1','param2')
<template>
  <!--组件主体-->
  <div class="student">
    <h2 >姓名:{{ name}}</h2>
    <h2>性别:{{ sex }}</h2>
    <button @click="sendStudentNmae">点我传递名称给父组件</button>
  </div>
</template>

<script>
export default {
  name: "Student",
  data() {
    return {
      name: "正在学习Vue学生",
      sex: "男",
    };
  },
  methods:{
    sendStudentNmae(){
      //触发 Student 身上的 getStudentName 事件
        this.$emit('getStudentNameFun', this.name, 'param1','param2')
    }
  }
};
</script>
<style  scoped>
/* 组件样式 */
.student {
  background-color: greenyellow;
  padding: 5px;
  margin-top: 40px;
}
</style>
8-解绑事件
this.$destory(),销毁当前组件的实例后(vc),销毁后该组件所有的自定义事件全部都会失效;
this.$destory()销毁总组件或 Vue 实例后(vm),销毁后该总组件 或 Vue 实例的所有子组件和自定义事件都会失效
// 解绑vc身上的自定义事件
vc.$off('event')

// 解绑vm身上的自定义事件
vm.$off('event')


// 解绑vc身上的自定义事件
vc.$off('event')

// 解绑vm身上的自定义事件
vm.$off('event')


// 解绑vc身上所有自定义事件
vc.$off()

// 解绑vm身上素有的自定义事件
vm.$offf()
9-自定义事件总结
适用场景:
子组件给父组件传值()
使用场景:A是父组件,B是子组件,B想给A传数据,那么就要在A父组件中给B绑定自定义事件(事件的回调在A中)
一、 绑定自定义事件
1.第一种方式,在父组件中: <Demo @atguigu="test"/> 或<Demo v-on:atguigu="test"/>
2.第二种方式,在父组件中:
<Demo ref="demo"/>
. . . . . .
mounted(){
this.$refs.xxx.$on( 'atguigu',this.test)}
二、触发自定义事件
触发自定义事件:this.$emit('atguigu’,数据)
1- 通过 this.$refs.xxx.$on('event', callback) 绑定自定义事件时,回调函数如果是普通形式,而不是箭头函数形式,this 指向的是 xxx 绑定的组件,所以我们平时使用的使用的时候
回调要么配置在 methods 中,要么使用箭头函数,否则会出现 this 的指向问题
2-组件上一般只能绑定自定义事件,如果想要绑定原生 DOM 事件,例如:click、keyup等等,需要使用 native 进行修饰
app.vue
<template>
  <div id="app">
    <h1>{{ msg }}</h1>
    <!--1-  通过父组件给子组件绑定函数方式,用props方式,子传递给父组件 -->
    <school :getSchoolName="getSchoolName"></school>
    <hr />
    <!--2- 通过父组件给子组件绑定一个事件方式 , 子传递给父组件   (@或者 v-on:)-->
    <!-- <student v-on:getStudentNameFun="getStudentName"></student> -->
    <!-- 简写 -->
    <!-- <student @getStudentNameFun="getStudentName" @demoFun="demo"></student> -->

    <!-- 3- 通过父组件给子组件绑定一个事件方式 , 子传递给父组件 (ref)-->
    <student ref="student" @click.native="show"></student>

  </div>
</template>

<script>
import Student from "./components/Student.vue";
import School from "./components/School.vue";

export default {
  name: "App",
  data() {
    return {
      msg: "你好啊",
    };
  },
  components: {
    Student,
    School,
  },
  methods: {
    getSchoolName(name) {
      console.log("父组件接受到School组件传递的名称", name);
      alert(name);
    },
    getStudentName(name, ...param) {
      console.log("父组件接受到Studengt组件传递的名称", name, param);
      alert(name);
    },
    demo(){
      console.log('demo被触发');
    },
    show(){
      console.log('123');
    }
  },
  // mounted() {
  //       //绑定自定义事件  app 挂载完毕,3s 后执行
  //   setTimeout(() => {
  //     this.$refs.student.$on("getStudentNameFun", this.getStudentName);
  //   }, 3000);


  // },
};
</script>

<style>
#app {
  font-family: Avenir, Helvetica, Arial, sans-serif;
  -webkit-font-smoothing: antialiased;
  -moz-osx-font-smoothing: grayscale;
  text-align: center;
  color: #2c3e50;
  margin-top: 60px;
  background-color: gray;
  padding: 5px;
}
</style>
student.vue
<template>
  <!--组件主体-->
  <div class="student">
    <h2 >姓名:{{ name}}</h2>
    <h2>性别:{{ sex }}</h2>
    <button @click="sendStudentNmae">点我传递名称给父组件</button>
    <button @click="unbind">解绑按钮</button>
    <button @click="unbind">销毁Student的实例,vc身上自定义事件不奏效</button>
  </div>
</template>

<script>
export default {
  name: "Student",
  data() {
    return {
      name: "正在学习Vue学生",
      sex: "男",
    };
  },
  methods:{
    sendStudentNmae(){
      //1- 触发 Student 身上的 getStudentName 事件
        this.$emit('getStudentNameFun', this.name, 'param1','param2')
        this.$emit('demoFun');
        this.$emit('click');
    },
    unbind(){
      // 2-解绑一个
      this.$off('getStudentNameFun');
      //3- 解绑多个
       this.$off(['getStudentNameFun','demoFun']);
       //4- 解绑所有
       this.$off();
    },
    death(){
      this.$destroy();
    }
  }
};
</script>
<style  scoped>
/* 组件样式 */
.student {
  background-color: greenyellow;
  padding: 5px;
  margin-top: 40px;
}
</style>


 1317
1317

 被折叠的 条评论
为什么被折叠?
被折叠的 条评论
为什么被折叠?
 到【灌水乐园】发言


