


1、首先从简单使用开始, 演示几种bean的创建情况
数据准备:
定义两个bean类:
public class Person {
    private String name;
    private Integer age;
    private String email;

   // ...getXXX() setXXX()(略)
}
public class Student {
private String grade;
private String clazz;
private Person person;
public Student() {
System.out.println("Student()");
}
public Student(String grade) {
System.out.println("Student(String grade)");
this.grade = grade;
}
public Student(String grade, String clazz) {
System.out.println("Student(String grade, String clazz)");
this.grade = grade;
this.clazz = clazz;
}
public Student(String grade, String clazz, Person person) {
System.out.println("Student(String grade, String clazz, Person person)");
this.grade = grade;
this.clazz = clazz;
this.person = person;
}
// ...getXXX() setXXX()(略)
}spring xml配置:
<?xml version="1.0" encoding="UTF-8"?>
<beans xmlns="http://www.springframework.org/schema/beans"
       xmlns:xsi="http://www.w3.org/2001/XMLSchema-instance"
       xsi:schemaLocation="http://www.springframework.org/schema/beans http://www.springframework.org/schema/beans/spring-beans.xsd">

    <bean id="person" class="org.spring.xml.bean.Person">
        <property name="name" value="lisi"></property>
        <property name="age" value="12"></property>
        <property name="email" value="lisi@123.com"></property>
    </bean>


    <bean id="student0" class="org.spring.xml.bean.Student">
        <property name="grade" value="1年级"/>
        <property name="clazz" value="2班"/>
    </bean>

    <bean id="student1" class="org.spring.xml.bean.Student">
        <constructor-arg name="grade" value="1年级"/>
    </bean>

    <bean id="student2" class="org.spring.xml.bean.Student">
        <constructor-arg name="grade" value="1年级"/>
        <constructor-arg name="clazz" value="2班"/>
    </bean>

    <bean id="student3" class="org.spring.xml.bean.Student">
        <constructor-arg name="grade" value="1年级"/>
        <constructor-arg name="clazz" value="2班"/>
        <constructor-arg name="person" ref="person"/>
    </bean>

    <bean id="student4" class="org.spring.xml.bean.Student" autowire="constructor">
        <constructor-arg name="grade" value="1年级"/>
        <constructor-arg name="clazz" value="2班"/>
    </bean>

    <bean id="student5" class="org.spring.xml.bean.Student" scope="prototype">
        <constructor-arg name="grade" value="1年级"/>
        <constructor-arg name="clazz" value="2班"/>
        <constructor-arg name="person" ref="person"/>
    </bean>

</beans>
测试代码:
 public static void main(String[] args) {
        DefaultListableBeanFactory beanFactory = new DefaultListableBeanFactory();
        XmlBeanDefinitionReader reader = new XmlBeanDefinitionReader(beanFactory);
        ClassPathResource resource = new ClassPathResource("spring-config.xml");
        reader.loadBeanDefinitions(resource);

        Student student = beanFactory.getBean("student0", Student.class);
        System.out.println("student0==>" + student);
        System.out.println();

        student = beanFactory.getBean("student1", Student.class);
        System.out.println("student1==>" + student);
        System.out.println();

        student = beanFactory.getBean("student2", Student.class);
        System.out.println("student2==>" + student);
        System.out.println();

        student = beanFactory.getBean("student3", Student.class);
        System.out.println("student3==>" + student);
        System.out.println();

        student = beanFactory.getBean("student4", Student.class);
        System.out.println("student4==>" + student);
        System.out.println();


        student = beanFactory.getBean("student5", Student.class);
        System.out.println("student5==>" + student);
        System.out.println();

        student = beanFactory.getBean("student5", Student.class, new Object[]{"2年级", "4班"});
        System.out.println("student5=传入2个参数=>" + student);
        System.out.println();

        student = beanFactory.getBean("student5", Student.class, new Object[]{"2年级", "4班", beanFactory.getBean(Person.class)});
        System.out.println("student5=传入3个参数=>" + student);
        System.out.println();
    }
执行结果:
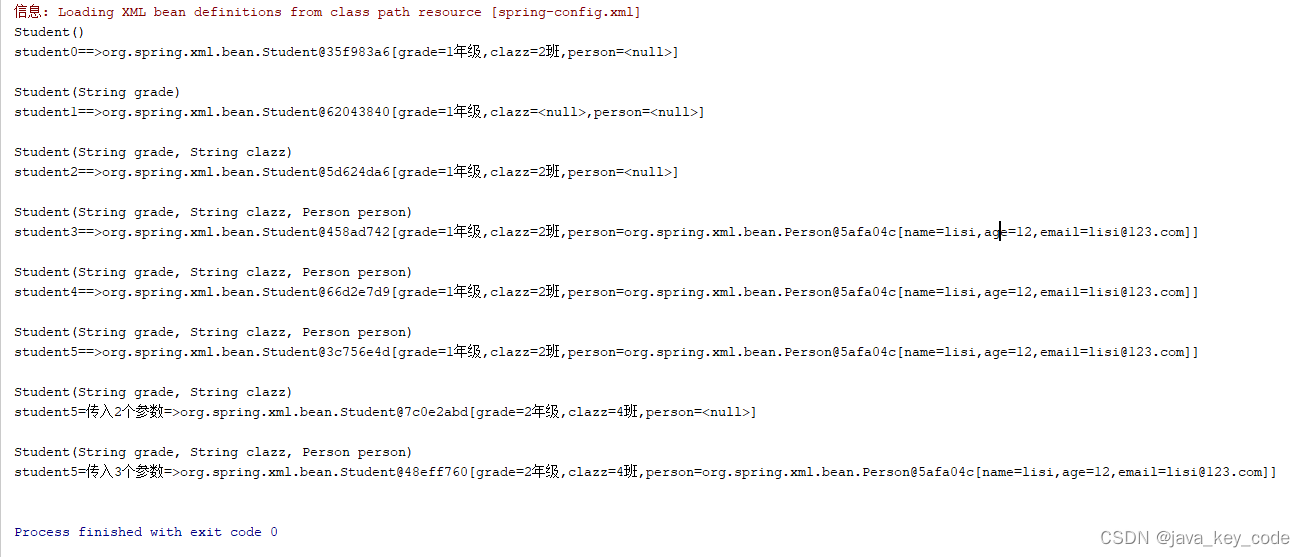
注意观察上面配置的差异和测试代码获取bean实例的差异,读懂源码的前提需要会灵活应用
========================接下来从源码分析调用逻辑========================
创建bean入口:AbstractAutowireCapableBeanFactory#createBean(String beanName, RootBeanDefinition mbd, Object[] args)
package org;

public abstract class AbstractAutowireCapableBeanFactory extends AbstractBeanFactory
        implements AutowireCapableBeanFactory {

    //最终bean的实例化是通过CglibSubclassingInstantiationStrategy来完成的
    private InstantiationStrategy instantiationStrategy = new CglibSubclassingInstantiationStrategy();

    //分析流程 节点1
    //bean工厂创建bean实例时都要进入该方法,Spring IOC的核心方法
    @Override
    protected Object createBean(final String beanName, final RootBeanDefinition mbd, final Object[] args)
            throws BeanCreationException {

        //将AbstractBeanDefinition中的beanClass字段值由String转为Class类型
        //Object beanClass = "XXX.XXX.BeanName" ==> Object beanClass = Class.forName("XXX.XXX.BeanName")
        resolveBeanClass(mbd, beanName);

        try {
            /*
                ==================lookup-method====================
                java代码
                --------------------------------------------------
                public class User {
                    public void say() {
                        System.out.println("I am User!!");
                    }
                }

                public class Student extends User {
                    @Override
                    public void say() {
                        System.out.println("I am student!!");
                    }
                }

                public abstract class LookUpBean {
                    public abstract User getUser();
                }
                ---------------------------------------------------

                xml配置
               <bean id="user" class="org.spring.lookup.User"/>
               <bean id="student" class="org.spring.lookup.Student"/>

               <bean id="lookUpBean" class="org.spring.lookup.LookUpBean">
                  <lookup-method name="getUser" bean="student"></lookup-method>
              </bean>
               ==================lookup-method==================================


              ====================replaced-method==============================
              java代码
              -----------------------------------------------------------------
              public class ReplacedMethod implements MethodReplacer {
                  @Override
                  public Object reimplement(Object obj, Method method, Object[] args) {
                      System.out.println("替换为:I am ReplacedMethod");
                      return null;
                  }
              }

              public class ChangeMethod {
                  public void change() {
                      System.out.println("I am ChangeMethod.change()");
                  }
              }

              xml配置
              <bean id="replacedMethod" class="org.spring.replacedmethod.ReplacedMethod"></bean>

              <bean id="changeMethod" class="org.spring.replacedmethod.ChangeMethod">
                  <replaced-method name="change" replacer="replacedMethod"></replaced-method>
              </bean>
             */
            //1、lookup-method被封装成new LookupOverride(methodName, beanRef)
            //2、replaced-method被封装成new ReplaceOverride(name, callback),  callback对应replacer属性值
            //3、LookupOverride和ReplaceOverride都继承了抽象类MethodOverride
            //4、该处代码的功能是将AbstractBeanDefinition中的集合属性MethodOverrides的MethodOverride的字段overloaded值设置为false
            //   MethodOverride.setOverloaded(false); 该参数只影响<replaced-method>,<lookup-method>只匹配无参的方法
            // 一旦设置为false表示被替换的方法没有重载,<replaced-method>匹配方法时不再做参数类型匹配
            /*
                    public class LookupOverride extends MethodOverride {
                        // ...其它代码代码(略)

                        @Override
                        public boolean matches(Method method) {
                            return (method.getName().equals(getMethodName()) && method.getParameterTypes().length == 0);
                        }
                        // ...其它代码代码(略)
                    }


                    public class ReplaceOverride extends MethodOverride {
                        // ...其它代码代码(略)

                        @Override
                        public boolean matches(Method method) {
                            if (!method.getName().equals(getMethodName())) {
                                return false;
                            }

                            if (!isOverloaded()) { //MethodOverride.setOverloaded(false)作用于此处
                                return true;
                            }

                            // 参数类型匹配
                            if (this.typeIdentifiers.size() != method.getParameterTypes().length) {
                                return false;
                            }
                            for (int i = 0; i < this.typeIdentifiers.size(); i++) {
                                String identifier = this.typeIdentifiers.get(i);
                                if (!method.getParameterTypes()[i].getName().contains(identifier)) {
                                    return false;
                                }
                            }
                            return true;
                        }

                        // ...其它代码代码(略)
                    }

             */
            mbd.prepareMethodOverrides();
        }
        catch (BeanDefinitionValidationException ex) {
            throw new BeanDefinitionStoreException(mbd.getResourceDescription(),
                    beanName, "Validation of method overrides failed", ex);
        }

        try {
            //1、前后置处理器InstantiationAwareBeanPostProcessor.postProcessBeforeInstantiation(beanClass, beanName)
            //2、后后置处理器BeanPostProcessor.postProcessAfterInitialization(existingBean, beanName)
            //3、后置处理器如果有bean实例创建出来,流程终止,不再走下面的创建流程
            Object bean = resolveBeforeInstantiation(beanName, mbd);
            if (bean != null) {
                return bean;
            }
        }
        catch (Throwable ex) {
            throw new BeanCreationException(mbd.getResourceDescription(), beanName,
                    "BeanPostProcessor before instantiation of bean failed", ex);
        }

        //分析流程 节点2
        // 进入核心流程doCreateBean()
        Object beanInstance = doCreateBean(beanName, mbd, args);
        return beanInstance;
    }

    //分析流程 节点2
    //createBean()方法做准备工作
    //doCreateBean()方法才是真正创建bean实例的地方
    protected Object doCreateBean(final String beanName, final RootBeanDefinition mbd, final Object[] args) {
        BeanWrapper instanceWrapper = null;
        if (mbd.isSingleton()) {
            instanceWrapper = this.factoryBeanInstanceCache.remove(beanName);
        }
        if (instanceWrapper == null) {
            //分析流程 节点3
            //创建BeanWrapper对象,同时会在BeanWrapper对象中创建bean实例
            instanceWrapper = createBeanInstance(beanName, mbd, args);
        }

        //刚刚创建出来的bean实例,此时<property>中的属性值还未赋值给bean对象
        final Object bean = (instanceWrapper != null ? instanceWrapper.getWrappedInstance() : null);
        Class<?> beanType = (instanceWrapper != null ? instanceWrapper.getWrappedClass() : null);

        synchronized (mbd.postProcessingLock) {
            if (!mbd.postProcessed) {
                //执行后置处理器MergedBeanDefinitionPostProcessor.
最低0.47元/天 解锁文章


 356
356

 被折叠的 条评论
为什么被折叠?
被折叠的 条评论
为什么被折叠?
 到【灌水乐园】发言


