 Spring注解方式注入对象详解


 本文介绍如何在Spring中使用注解进行对象注入,相较于传统方式,注解注入简化了配置文件。通过修改XML配置,创建Product类,并利用@Autowired和@Resource注解,详细阐述注解注入的过程。同时,文章提及了Autowired与Resource的区别,并提供了测试类的代码示例及运行结果。如需了解更多,可联系作者或访问其个人博客。
上次Spring入门的时候我们使用的是最原始的方法来注入对象,这次我们用个有意思的方式——注解方式来注入对象,使用注解方式可以使得配置文件变得更加简洁,前面的准备工作可以看我的上一篇博客 https://mp.youkuaiyun.com/postedit/90181339
首先我们修改xml配置文件
<?xml version="1.0" encoding="UTF-8"?>
<beans xmlns="http://www.springframework.org/schema/beans"
xmlns:xsi="http://www.w3.org/2001/XMLSchema-instance"
xmlns:aop="http://www.springframework.org/schema/aop"
xmlns:tx="http://www.springframework.org/schema/tx"
xmlns:context="http://www.springframework.org/schema/context"
xsi:schemaLocation="
http://www.springframework.org/schema/beans
http://www.springframework.org/schema/beans/spring-beans-3.0.xsd
http://www.springframework.org/schema/aop
http://www.springframework.org/schema/aop/spring-aop-3.0.xsd
http://www.springframework.org/schema/tx
http://www.springframework.org/schema/tx/spring-tx-3.0.xsd
http://www.springframework.org/schema/context
http://www.springframework.org/schema/context/spring-context-3.0.xsd">
<context:annotation-config/> <!-- 这句话表示使用了注解方式来配置 -->
<bean name="c" class="com.li.pico.Category">
<property name="name" value="category 1"/>
</bean>
<bean name="p" class="com.li.pico.Product">
<property name="name" value="product1"/>
<!-- <property name="category" ref="c"/>这句话我们注释掉了,即没有给其注入值-->
</bean>
</beans>
然后我们在原来的包下面新建一个Product类
package com.li.pico;

import javax.annotation.Resource;

import org.springframework.beans.factory.annotation.Autowired;
import org.springframework.stereotype.Component;
public class Product {//@resource优先找name一样的,没找到则会找和它对应的类,
	//@Autowired 默认先按 byType 进行匹配,如果发现找到多个 bean,则又按照 byName 方式进行匹配,如果还有多个,则报出异常。
    private int id;
    @Resource
    private Category category;//xml文件里面没有对其进行赋值处理,通过@resource注解注入找到对应的bean,得到它的值
    String name;
    public int getId(){
    	return id;
    }
    public void setId(int id){
    	this.id=id;
    }
    public String getName(){
    	return name;
    }
    public void setName(String name){
    	this.name=name;
    }
    public Category getCategory(){
    	return category;
    }
    public void setCategory(Category category){
    	this.category=category;
    }
}
Autowired和Resource的区别可以查看这篇文章 https://www.cnblogs.com/think-in-java/p/5474740.html
测试类中的代码如下:
package com.how2java.test;
import org.springframework.context.ApplicationContext;
import org.springframework.context.support.ClassPathXmlApplicationContext;
import com.how2java.pojo.Category;
public class TestSpring {
public static void main(String[] args) {
ApplicationContext context = new ClassPathXmlApplicationContext(new String[] { "applicationContext.xml" });
Product p=(Product)context.getBean("p");
System.out.println(p.getName());
System.out.println(p.getCategory().getName());
}
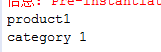
}输出结果如下图:
好了,这次就到这里啦,这是spring的注解方式注入对象。按照步骤一步一步来肯定没问题的
有疑问的话可以联系QQ 2321591758
个人博客地址 www.imlowliness.club


 1239
1239

 被折叠的 条评论
为什么被折叠?
被折叠的 条评论
为什么被折叠?
 到【灌水乐园】发言


