


 本文详细解读了Spring事件体系的观察者模式实现,包括ApplicationEvent、ApplicationEventMulticaster和ApplicationListener的角色,以及源码中事件发布、监听器注册和事件发布的流程。通过实例演示如何自定义事件和监听器,以及如何利用Spring的默认事件发布器。
1、Spring事件原理
原理:观察者模式
spring的事件监听有三部分组成:
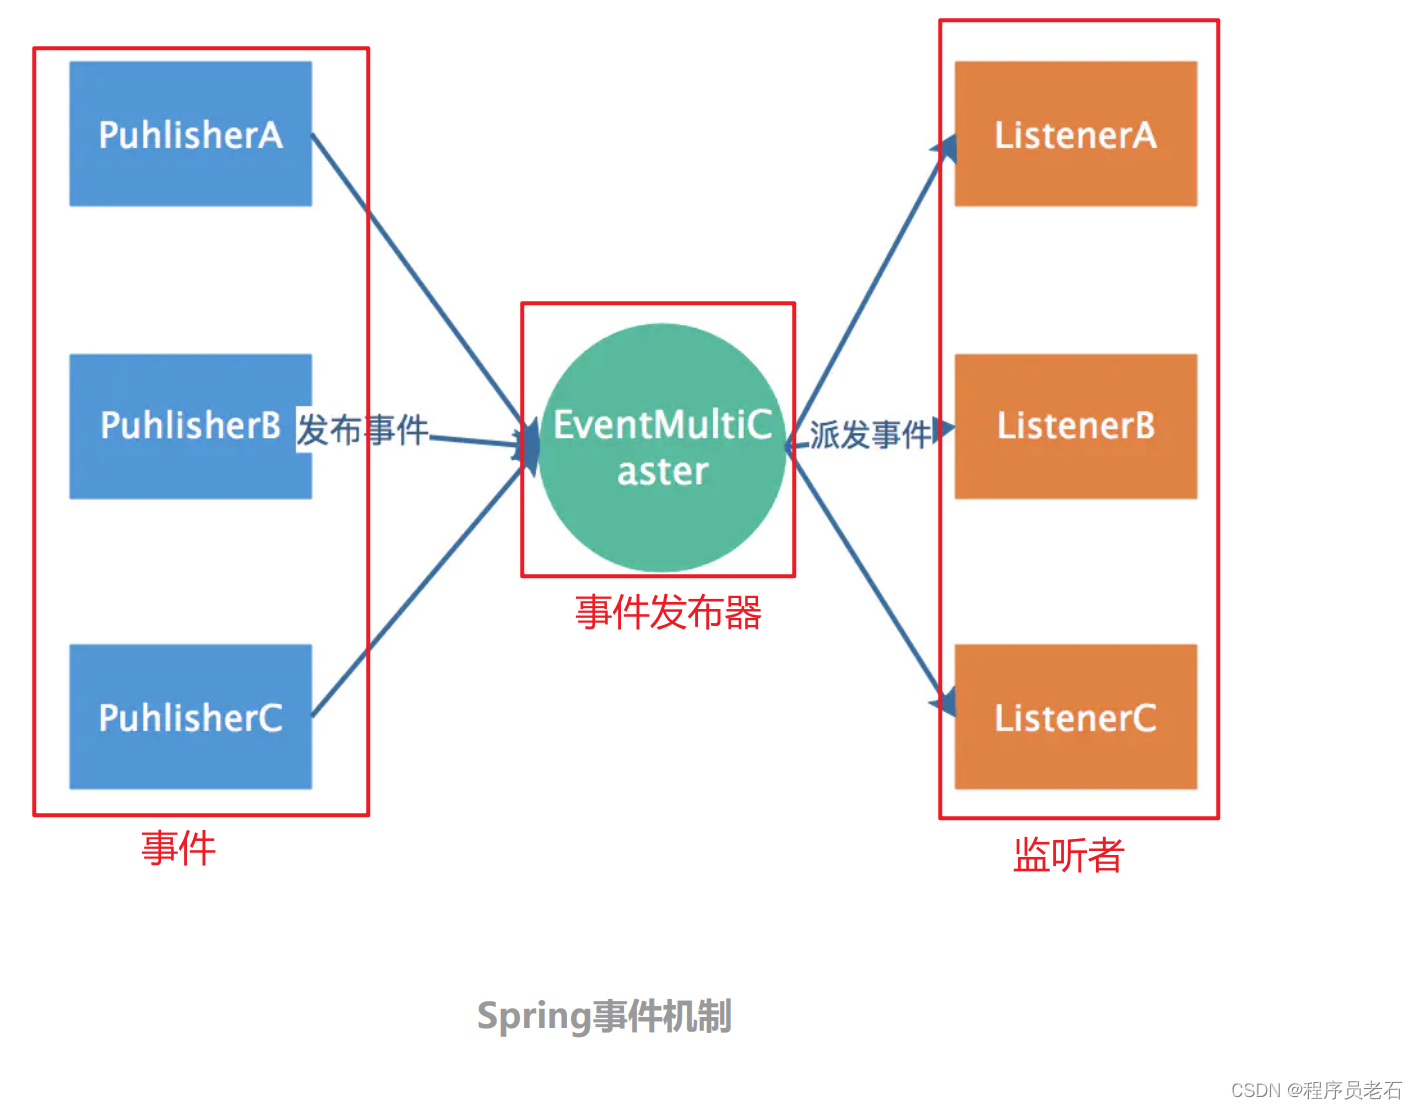
1)事件(ApplicationEvent)负责对应相应监听器 事件源发生某事件是特定事件监听器被触发的原因。
2)事件发布器(ApplicationEventMulticaster)对应于观察者模式中的被观察者/主题, 负责通知观察者(监听器) 对外提供发布事件和增删事件监听器的接口,维护事件和事件监听器之间的映射关系,并在事件发生时负责通知相关监听器。
3)监听器(ApplicationListener)对应于观察者模式中的观察者。监听器监听特定事件,并在内部定义了事件发生后的响应逻辑。
Spring事件机制是观察者模式的一种实现,但是除了发布者和监听者两个角色之外,还有一个EventMultiCaster的角色负责把事件转发给监听者,工作流程如下:
2、源码分析
1、applicationEventMulticaster提供了容器监听器的注册表
Spring在ApplicationContext接口的抽象实现类AbstractApplicationContext中完成了事件体系的搭建。
AbstractApplicationContext拥有一个applicationEventMulticaster成员变量,applicationEventMulticaster提供了容器监听器的注册表。
AbstractApplicationContext在refresh()这个容器启动方法中搭建了事件的基础设施,其中refresh()如下:
public void refresh() throws BeansException, IllegalStateException {
		synchronized (this.startupShutdownMonitor) {
			// 1、准备刷新上下文环境,和主流程关系不大,主要是保存了容器的启动时间,启动标志等
			/** 一个早期事件监听器对象 */
			prepareRefresh();

			// Tell the subclass to refresh the internal bean factory.
			ConfigurableListableBeanFactory beanFactory = obtainFreshBeanFactory();

			// Prepare the bean factory for use in this context.
			/**
			 * 还是一些准备工作,添加了两个后置处理器:ApplicationContextAwareProcessor,ApplicationListenerDetector
			 * 还设置了 忽略自动装配 和 允许自动装配 的接口,如果不存在某个bean的时候,spring就自动注册singleton bean
			 * 还设置了bean表达式解析器等
			 */
			prepareBeanFactory(beanFactory);

			try {
				// Allows post-processing of the bean factory in context subclasses.

				postProcessBeanFactory(beanFactory);

				/**
				 * 重点代码终于来了,可以说 这句代码是目前为止最重要,也是内容最多的代码了,我们有必要好好分析下
				 */
				invokeBeanFactoryPostProcessors(beanFactory);

				// Register bean processors that intercept bean creation.
				// 注册bean的后置处理器
				registerBeanPostProcessors(beanFactory);

				// Initialize message source for this context.
				// 初始化国际化资源处理器
				initMessageSource();

				// Initialize event multicaster for this context.
				/** 创建事件多播器 管理所有的监听器,负责调用事件对应的监听器 */
				initApplicationEventMulticaster();

				// Initialize other special beans in specific context subclasses.
				onRefresh();

				// Check for listener beans and register them.
				/** 把我们的事件监听器注册到多播器上 */
				registerListeners();

				// Instantiate all remaining (non-lazy-init) singletons.
				// 实例化我们剩余的单实例bean
				finishBeanFactoryInitialization(beanFactory);

				// Last step: publish corresponding event.
				/**最后容器刷新,发布刷新事件 (springcloud也是从这里启动的) */
				finishRefresh();
			}

			********
2、事件发布器的初始化
进入到refresh()方法-》initApplicationEventMulticaster()方法中
protected void initApplicationEventMulticaster() {
		ConfigurableListableBeanFactory beanFactory = getBeanFactory();
		if (beanFactory.containsLocalBean(APPLICATION_EVENT_MULTICASTER_BEAN_NAME)) {
			this.applicationEventMulticaster =
					beanFactory.getBean(APPLICATION_EVENT_MULTICASTER_BEAN_NAME, ApplicationEventMulticaster.class);
			if (logger.isTraceEnabled()) {
				logger.trace("Using ApplicationEventMulticaster [" + this.applicationEventMulticaster + "]");
			}
		}
		else {
			/** Spring自动使用SimpleApplicationEventMulticaster作为事件发布器*/
			this.applicationEventMulticaster = new SimpleApplicationEventMulticaster(beanFactory);
			beanFactory.registerSingleton(APPLICATION_EVENT_MULTICASTER_BEAN_NAME, this.applicationEventMulticaster);
			if (logger.isTraceEnabled()) {
				logger.trace("No '" + APPLICATION_EVENT_MULTICASTER_BEAN_NAME + "' bean, using " +
						"[" + this.applicationEventMulticaster.getClass().getSimpleName() + "]");
			}
		}
	}
Spring容器会先判断是否有配置的外部用户自定义的事件发布器(只要实现ApplicationEventMulticaster就可以了,Spring会通过反射的机制将其注册成容器的事件广播器),如果没有找到配置的外部事件广播器,Spring自动使用SimpleApplicationEventMulticaster作为事件广播器。
3、注册事件监听器
protected void registerListeners() {
		// Register statically specified listeners first.
		/** 获取容器中所有的监听器对象
		 * 这个时候正常流程是不会有监听器的,除非手动调用addApplicationListeners()
		 */
		for (ApplicationListener<?> listener : getApplicationListeners()) {
			/** 把监听器挨个注册到我们的事件发布器上去 */
			getApplicationEventMulticaster().addApplicationListener(listener);
		}

		// Do not initialize FactoryBeans here: We need to leave all regular beans
		// uninitialized to let post-processors apply to them!
		/** 获取bean定义中的监听器对象,并且是实现了ApplicationListener接口的类 ,接口方式的监听器就是在这里注册到多播器里面的 */
		String[] listenerBeanNames = getBeanNamesForType(ApplicationListener.class, true, false);
		for (String listenerBeanName : listenerBeanNames) {
			/** 把监听器名称注册到发布器上,这里注册的只是监听器的名称 */
			getApplicationEventMulticaster().addApplicationListenerBean(listenerBeanName);
		}

		// Publish early application events now that we finally have a multicaster...
		/** 在这里获取我们的早期事件 */
		Set<ApplicationEvent> earlyEventsToProcess = this.earlyApplicationEvents;
		/** 在这里赋值null ,也就是至此之后都将没有早期事件了 */
		this.earlyApplicationEvents = null;
		if (!CollectionUtils.isEmpty(earlyEventsToProcess)) {
			/** 通过发布器的multicastEvent()方法进行播发早期事件 */
			for (ApplicationEvent earlyEvent : earlyEventsToProcess) {
				getApplicationEventMulticaster().multicastEvent(earlyEvent);
			}
		}
	}
Spring根据反射机制,使用ListableBeanFactory的getBeansOfType方法,从BeanDefinitionRegistry中找出所有实现 org.springframework.context.ApplicationListener的Bean,将它们注册为容器的事件监听器,实际的操作就是将其添加到事件广播器所提供的监听器注册表中。
4、发布事件
跟着finishRefresh();方法进入publishEvent(new ContextRefreshedEvent(this));方法如下:
protected void publishEvent(Object event, @Nullable ResolvableType eventType) {
		Assert.notNull(event, "Event must not be null");

		// Decorate event as an ApplicationEvent if necessary
		ApplicationEvent applicationEvent;
		if (event instanceof ApplicationEvent) {
			applicationEvent = (ApplicationEvent) event;
		}
		else {
			applicationEvent = new PayloadApplicationEvent<>(this, event);
			if (eventType == null) {
				eventType = ((PayloadApplicationEvent<?>) applicationEvent).getResolvableType();
			}
		}

		// Multicast right now if possible - or lazily once the multicaster is initialized
		if (this.earlyApplicationEvents != null) {
			this.earlyApplicationEvents.add(applicationEvent);
		}
		else {
			getApplicationEventMulticaster().multicastEvent(applicationEvent, eventType);
		}

		// Publish event via parent context as well...
		if (this.parent != null) {
			if (this.parent instanceof AbstractApplicationContext) {
				((AbstractApplicationContext) this.parent).publishEvent(event, eventType);
			}
			else {
				this.parent.publishEvent(event);
			}
		}
	}
在AbstractApplicationContext的publishEvent方法中,Spring委托**ApplicationEventMulticaster(事件发布器)**将事件通知给所有的事件监听器。
5、Spring默认的事件发布器SimpleApplicationEventMulticaster
/**
	 * Invoke the given listener with the given event.
	 * @param listener the ApplicationListener to invoke
	 * @param event the current event to propagate
	 * @since 4.1
	 */
	protected void invokeListener(ApplicationListener<?> listener, ApplicationEvent event) {
		ErrorHandler errorHandler = getErrorHandler();
		if (errorHandler != null) {
			try {
				doInvokeListener(listener, event);
			}
			catch (Throwable err) {
				errorHandler.handleError(err);
			}
		}
		else {
			doInvokeListener(listener, event);
		}
	}

	@SuppressWarnings({"rawtypes", "unchecked"})
	private void doInvokeListener(ApplicationListener listener, ApplicationEvent event) {
		try {
			/** 在这里调用监听器的onApplicationEvent()方法 */
			listener.onApplicationEvent(event);
		}
		catch (ClassCastException ex) {
			String msg = ex.getMessage();
			if (msg == null || matchesClassCastMessage(msg, event.getClass())) {
				// Possibly a lambda-defined listener which we could not resolve the generic event type for
				// -> let's suppress the exception and just log a debug message.
				Log logger = LogFactory.getLog(getClass());
				if (logger.isTraceEnabled()) {
					logger.trace("Non-matching event type for listener: " + listener, ex);
				}
			}
			else {
				throw ex;
			}
		}
	}
默认的事件发布器,会遍历注册的每个监听器,并启动来调用每个监听器的onApplicationEvent方法。
由于SimpleApplicationEventMulticaster的taskExecutor的实现类是SyncTaskExecutor,因此,事件监听器对事件的处理,是同步进行的。
从代码可以看出,applicationContext.publishEvent()方法,需要同步等待各个监听器处理完之后,才返回。
也就是说,Spring提供的事件机制,默认是同步的。如果想用异步的,可以自己实现ApplicationEventMulticaster接口,并在Spring容器中注册id为applicationEventMulticaster的Bean。
Spring发布事件之后,所有注册的事件监听器,都会收到该事件,因此,事件监听器在处理事件时,需要先判断该事件是否是自己关心的。
Sping事件体系所使用的设计模式是:观察者模式。ApplicationListener是观察者接口,接口中定义了。onApplicationEvent方法,该方法的作用是对ApplicationEvent事件进行处理。
3、代码实现
1)Order类
public class Order {
    private Integer id;

    public Integer getId() {
        return id;
    }

    public void setId(Integer id) {
        this.id = id;
    }
}
2)自定义事件
/**
 * 自定义事件,实现ApplicationEvent接口
 */
public class OrderEvent  extends ApplicationEvent implements Serializable {

	private static final long serialVersionUID = 1L;

    private String name;

    public OrderEvent(Object source, String name) {
        super(source);
        this.name = name;
    }

    public String getName() {
        return name;
    }
}
3)事件监听器 - 基于接口实现
该方法的作用是对ApplicationEvent事件进行处理。
@Component
//@Lazy
public class OrderEventListener implements ApplicationListener<OrderEvent> {//}   {

    // 基于注解的
//    @EventListener(OrderEvent.class)
	@Override
    public void onApplicationEvent(OrderEvent event) {
        if(event.getName().equals("orderListener")){
            System.out.println("Order processing.......");
        }
    }

}
4)测试类
public class MainStat1 {

	public static void main(String[] args) throws Exception {
		AnnotationConfigApplicationContext applicationContext = new AnnotationConfigApplicationContext(MainConfig.class);
		Order order = new Order();
		order.setId(1);
		System.out.println("order.....");
		applicationContext.publishEvent(new OrderEvent(order,"orderListener"));
		System.out.println("print log...");
	}

}
测试截图:

打印了事件监听器中的Order processing…,说明OrderEvent事件被监听到了,触发了事件监听器处理下订单逻辑处理。


 1051
1051

 被折叠的 条评论
为什么被折叠?
被折叠的 条评论
为什么被折叠?
 到【灌水乐园】发言


