


 本文详细介绍了SpringMVC在Web开发中的集成步骤,包括添加相关依赖、配置Web.xml、注解与原生参数接收,以及常用注解如@RequestMapping的使用。
SpringMVC的具体使用(上)
1.在Web开发环境中集成
一.导入相关的包
(spring3.X之后的发布版都带有springMVC需要的包)
如果是maven项目则导入相关依赖
    <!--web-->
    <dependency>
      <groupId>org.springframework</groupId>
      <artifactId>spring-web</artifactId>
      <version>5.0.5.RELEASE</version>
    </dependency>
二.配置Web.xml里的组件
  <!-- DispatchServlet -->
  <servlet>
  	<servlet-name>SpringMVC</servlet-name>
  	<servlet-class>org.springframework.web.servlet.DispatcherServlet</servlet-class>
  	<init-param>
         <!--初始化参数,指定mvc配置文件的位置-->
  		<param-name>contextConfigLocation</param-name>
  		<param-value>/WEB-INF/SpringMVC-servlet.xml</param-value>
  	</init-param>
    <!--Tomcat启动时创建-->
  	<load-on-startup>1</load-on-startup>
  </servlet>
  <servlet-mapping>
  	<servlet-name>SpringMVC</servlet-name>
  	<url-pattern>*.do</url-pattern>
    <!--接受所有以.do结尾的请求,也可以是所有请求-->
  </servlet-mapping>
<!--全局初始化参数-->
  <context-param>
    <param-name>contextConfigLocation</param-name>
    <param-value>/WEB-INF/applicationContext.xml</param-value>
  </context-param>

  <!-- 配置监听器,对Appliaction进行监听,在Tomcat启动时监听appliaction的建立
 读取上述全局初始化配置文件,建立bean工厂,然后放入application之中-->
  <listener>
    <listener-class>org.springframework.web.context.ContextLoaderListener</listener-class>
  </listener>
SpringMVC-servlet.xml(名字可以随便取,为了区别了spring的主配文件(applicationContext.xml)且叫它MVC配置文件)
<?xml version="1.0" encoding="UTF-8"?>
<beans xmlns="http://www.springframework.org/schema/beans"
    xmlns:xsi="http://www.w3.org/2001/XMLSchema-instance"
    xmlns:context="http://www.springframework.org/schema/context"
    xmlns:mvc="http://www.springframework.org/schema/mvc"
    xsi:schemaLocation="http://www.springframework.org/schema/beans http://www.springframework.org/schema/beans/spring-beans.xsd
        http://www.springframework.org/schema/context http://www.springframework.org/schema/context/spring-context-4.1.xsd
        http://www.springframework.org/schema/mvc http://www.springframework.org/schema/mvc/spring-mvc-4.1.xsd">
    <!-- 开启注解-->
    <mvc:annotation-driven />
    <!-- 扫描包 -->
    <context:component-scan base-package="com.MyTest.Controller" />

    <!--配置方式使用springMVC的配置,注解方式可以忽略-->
    <bean class="org.springframework.web.servlet.handler.SimpleUrlHandlerMapping">
    	<property name="mappings">
    		<props>
    			<prop key="/hello.do">shit</prop>
    		</props>
    	</property>
    </bean>

    <bean class="org.springframework.web.servlet.mvc.SimpleControllerHandlerAdapter"/>

    <!--实现Controller接口的类配置的bean,注解方式不用配
	因为@Controller继承了@Component注解会在IOC容器注册一个bean-->
    <bean id="shit" class="com.MyTest.Controller.HelloController"></bean>

    <!--配置视图解析器,给返回的字符串加上前后缀,构成路径,以供跳转-->
    <bean class="org.springframework.web.servlet.view.InternalResourceViewResolver"
            id="internalResourceViewResolver">
        <!-- 前缀 -->
        <!-- <property name="prefix" value="/WEB-INF/jsp/" />  -->

        <!-- 后缀 -->
        <property name="suffix" value=".jsp" />
    </bean>

</beans>
spring主配文件
<?xml version="1.0" encoding="UTF-8"?>
<beans xmlns="http://www.springframework.org/schema/beans"
    xmlns:xsi="http://www.w3.org/2001/XMLSchema-instance"
    xmlns:context="http://www.springframework.org/schema/context"
    xmlns:aop="http://www.springframework.org/schema/aop"
    xmlns:tx="http://www.springframework.org/schema/tx"
    xmlns:mvc="http://www.springframework.org/schema/mvc"
    xsi:schemaLocation="http://www.springframework.org/schema/beans
    http://www.springframework.org/schema/beans/spring-beans.xsd
    http://www.springframework.org/schema/context
    http://www.springframework.org/schema/context/spring-context.xsd
    http://www.springframework.org/schema/aop
    http://www.springframework.org/schema/aop/spring-aop.xsd
    http://www.springframework.org/schema/tx
    http://www.springframework.org/schema/tx/spring-tx.xsd
    http://www.springframework.org/schema/mvc
    http://www.springframework.org/schema/mvc/spring-mvc.xsd">
    <!--以上是一些常用的约束-->
    <!--这里通常配置一些和其他东西集成用的组件,如数据源,事务管理器.....-->
</beans>
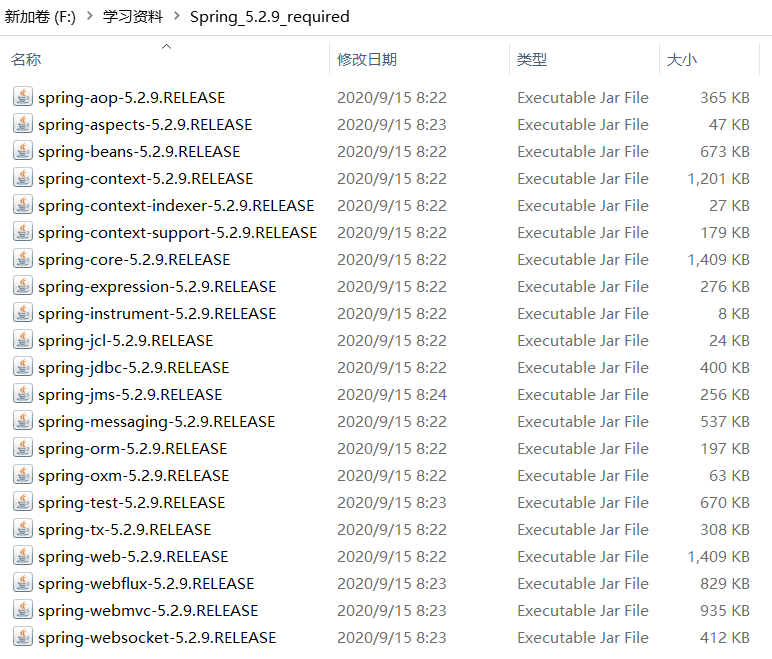
2.配置方式使用
实现Controller接口的控制器
public class HelloController implements Controller { //实现Controller接口

	@Override
	public ModelAndView handleRequest(HttpServletRequest arg0, HttpServletResponse arg1) throws Exception {
		ModelAndView mv = new ModelAndView();
		mv.addObject("wdnmd", "WDNMDSDAW");//将数据放入modelandview(request)
		mv.setViewName("success");
         //返回视图模型或字符串,如果使用redirect:XXX则不会去使用视图解析器,
         //自己要提供准确跳转路径
		return mv;
	}

}
<%@ page language="java" contentType="text/html; charset=ISO-8859-1"
    pageEncoding="ISO-8859-1"%>
<!DOCTYPE html>
<html>
<head>
<meta charset="ISO-8859-1">
<title>shit</title>
</head>
<body>
 <!--发送交给DispatchServlet的请求-->
<a href="${pageContext.request.contextPath}/hello.do">ASSHOLE</a>
</body>
</html>
更具上面的配置进行跳转
<!--配置方式使用springMVC的配置,注解方式可以忽略-->
    <bean class="org.springframework.web.servlet.handler.SimpleUrlHandlerMapping">
    	<property name="mappings">
    		<props>
                 <!--请求路径为key对应处理请求的Controller组件的id-->
    			<prop key="/hello.do">shit</prop>
    		</props>
    	</property>
    </bean>
    <!--这个controller的id对应上面prop里的key,由它来处理上述请求-->
    <bean id="shit" class="com.MyTest.Controller.HelloController"></bean>
跳转页面success.jsp:
<%@ page language="java" contentType="text/html; charset=ISO-8859-1"
    pageEncoding="ISO-8859-1"%>
<!DOCTYPE html>
<html>
<head>
<meta charset="ISO-8859-1">
<title>Insert title here</title>
</head>
<body>
show the result
</br>${wdnmd}
</body>
</html>
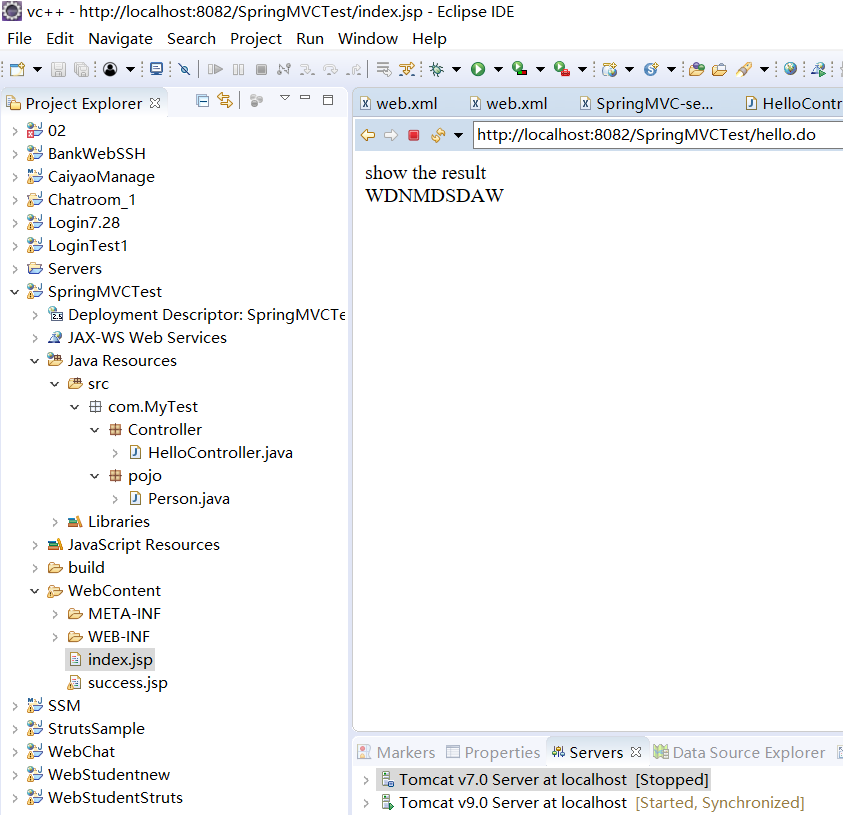
3.注解方式的使用
注解模式的controller
/**
 *
 * @ClassName:  AnnoController
 * @Description:注解方式的Controller
 * @author: 黎翰
 * @date:   2021年9月12日 下午5:36:01
 * @Copyright:
 */
@Controller
public class AnnoController {

    //设置请求路径设置的处理方法
	@RequestMapping("/hello2.do")
	public String HelloController(Model model) {
         //向模型中添加数据
		model.addAttribute("wdnmd", "这是注解方式的controller");
		return "success";  //返回页面
	}

}
4.@RequestMapping请求映射注解的相关
@requestmapping注解的可用属性
| value,value[] | 用于指定请求的URL,可以是字符串数组 |
|---|---|
| method | 请求的方式在requestType枚举里提供了get,post,put… |
| params | 用于指定限制请求参数的条件,支持表达式 |
| produces | 指定返回的数据类型及编码,通常是json或xml,配合@responsebody |
| consume | 指定传入的数据类型及编码,通常是json或xml |
| headers | 指定请求头信息,不符合则不会使用 |
相关注解
@GetMapping即为@RequestMapping(method=requestType.GET)
@PostMapping即为@RequestMapping(method=requestType.POST)
…
5.接收参数
SpringMVC接收参数可以自动转换类型,但有些也需要手动转换,可以自定义转换器。
下面列出接收参数的几种方式
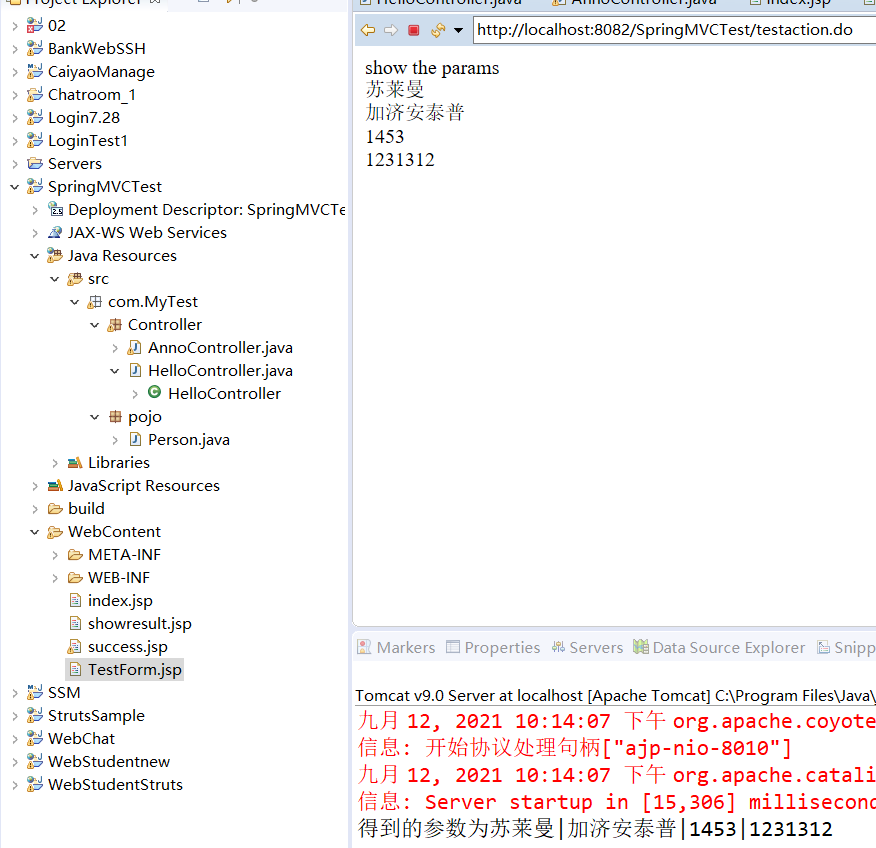
一.原生方式,从request拿(不会自动转型)
测试用表单:
<%@ page language="java" contentType="text/html; charset=UTF-8"
    pageEncoding="UTF-8"%>
<!DOCTYPE html>
<html>
<head>
<meta charset="UTF-8">
<title>shit</title>
</head>
<body>
测试表单
	<form action="${pageContext.request.contextPath}/testaction.do" method="post">
		<span>姓名:</span><input type="text" name="theName" /><br>
		<span>地址:</span><input type="text" name="thAddress" /><br>
		<span>电话:</span><input type="text" name="thePhone" /><br>
		<span>年龄:</span><input type="text" name="theAge" /><br>
		<input type="submit" value="提交表单" />
	</form>
</body>
</html>
处理方法:
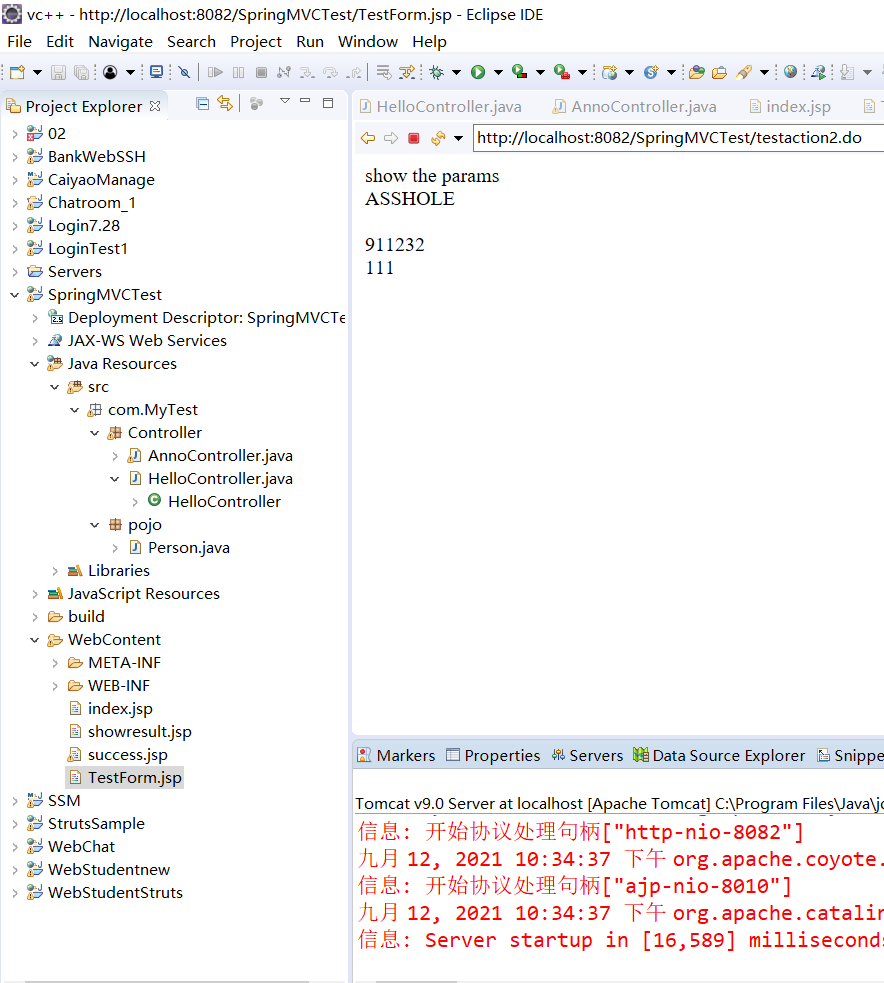
@RequestMapping("/testaction.do")  //对应请求路径
	public void getParamsByRequest(HttpServletRequest request,HttpServletResponse response) throws ServletException, IOException{
         //设置请求编码格式
		request.setCharacterEncoding("utf-8");
		String name = request.getParameter("theName");
		String address = request.getParameter("thAddress");
		String phone = request.getParameter("thePhone");
         //使用原生方式需要手工转型
		int age = Integer.parseInt(request.getParameter("theAge"));
		System.out.println("得到的参数为"+name+"|"+address+"|"+phone+"|"+age);
		request.setAttribute("theName", name);
		request.setAttribute("theAddress", address);
		request.setAttribute("thePhone", phone);
		request.setAttribute("theAge", age);
		request.getRequestDispatcher("showresult.jsp").forward(request, response);
	}
结果页面:
<%@ page language="java" contentType="text/html; charset=UTF-8"
    pageEncoding="UTF-8"%>
<!DOCTYPE html>
<html>
<head>
<meta charset="UTF-8">
<title>Insert title here</title>
</head>
<body>
show the params<br>
<span>${theName}</span><br>
<span>${theAddress}</span><br>
<span>${thePhone}</span><br>
<span>${theAge}</span><br>
</body>
</html>
二.同名参数&@requestParam
可以通过同名参数进行自动传参,不同名则可通过@requestParams进行指定
@RequestMapping("testaction2.do")
	public String getParamsByName(String theName,String theAddress,String thePhone,
								@RequestParam(name="theAge")int Age,Model model) {
		model.addAttribute("theName", theName);
		model.addAttribute("theAddress", theAddress);
		model.addAttribute("thePhone", thePhone);
		model.addAttribute("theAge", Age);

		return "showresult";
	}
三.通过实体类传递
编写一个实体类去接收参数
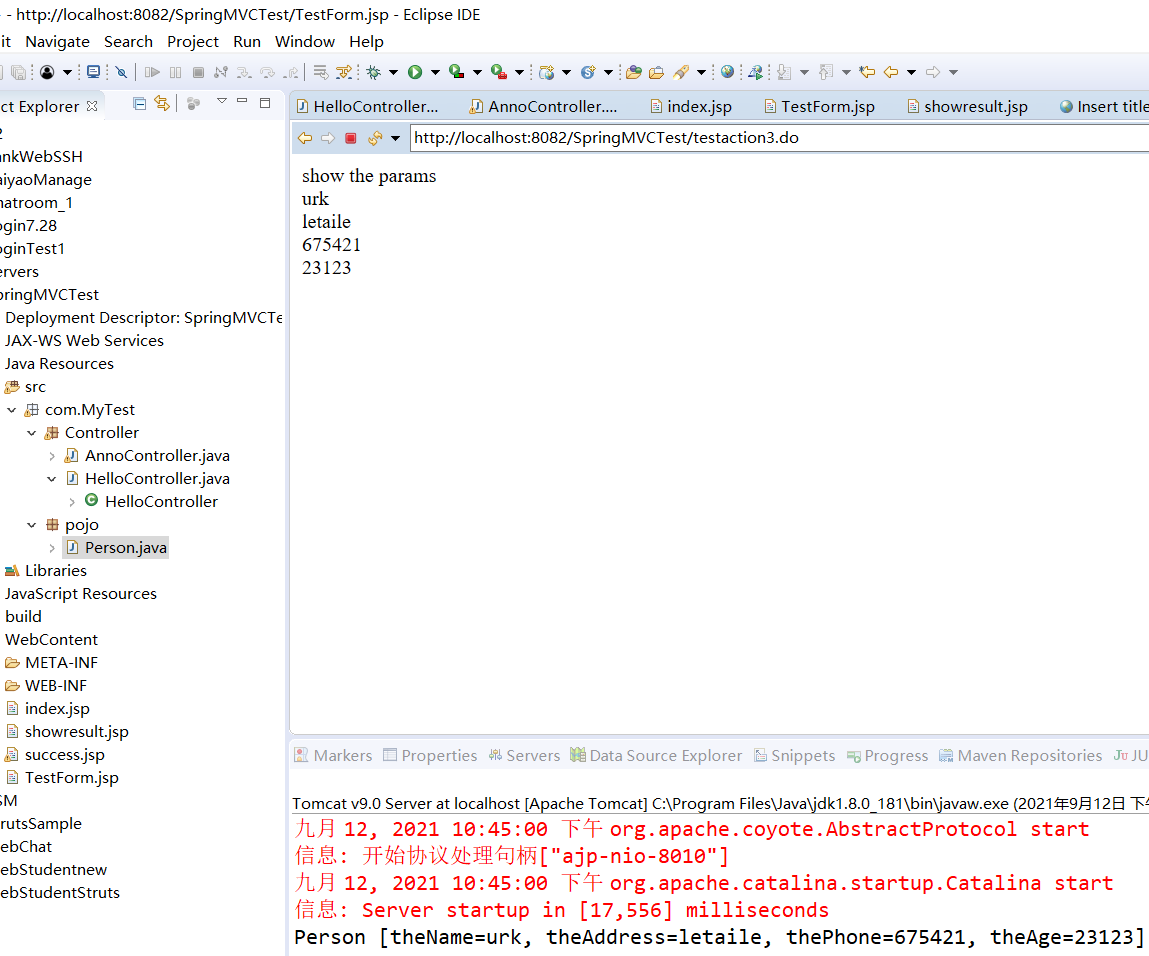
public class Person {

	private String theName;

	private String theAddress;

	private String thePhone;

	private int theAge;

    //-----------------------省去Getter&Setter和toString方法
...
}
处理:
@RequestMapping("/testaction3.do")     //直接通过对象进行参数传递
	public String getParamsByEntity(Person person,Model model) {

		model.addAttribute("theName", person.getTheName());
		model.addAttribute("theAddress", person.getTheAddress());
		model.addAttribute("thePhone", person.getThePhone());
		model.addAttribute("theAge", person.getTheAge());

		System.out.println(person);
		return "showresult";
	}
四.数组与集合对象
数组:
<%@ page language="java" contentType="text/html; charset=UTF-8"
    pageEncoding="UTF-8"%>
<!DOCTYPE html>
<html>
<head>
<meta charset="UTF-8">
<title>shit</title>
</head>
<body>
<a href="${pageContext.request.contextPath}/hello.do">ASSHOLE</a><br>
<a href="${pageContext.request.contextPath}/hello2.do">注解方式的controller</a><br>
<a href="${pageContext.request.contextPath}/hello3.do">@Responsebody测试</a><br>
<a href="${pageContext.request.contextPath}/putArray.do?arrs=item1&arrs=item2&arrs=item3">传入数组为参数</a><br>
</body>
</html>
获取传入的数组:
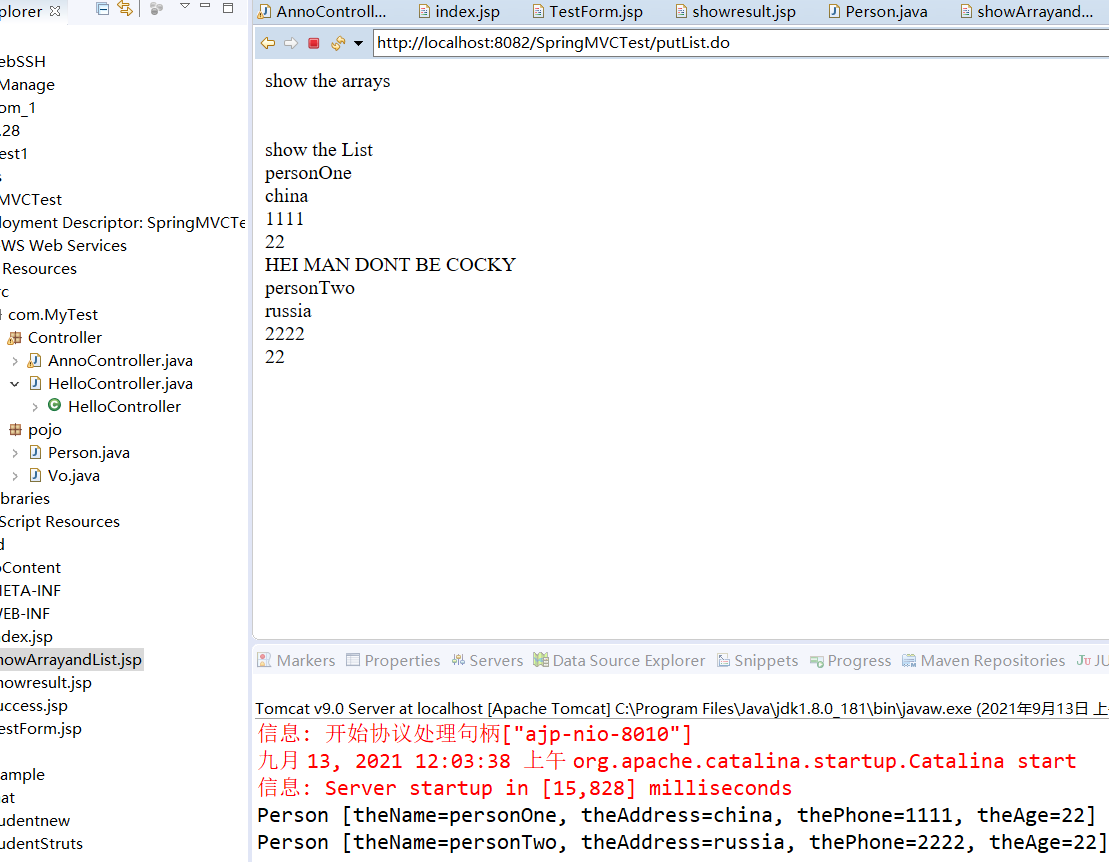
    @RequestMapping("/putArray.do")
	public String getArrayParams(String[] arrs,Model model) {
		System.out.println(arrs[0]);
		System.out.println(arrs[1]);
		model.addAttribute("array", arrs);
		return "showArrayandList";
	}

List集合:
集合对象需要使用封装类对集合进行封装:
集合封装类Vo
public class Vo {

	private List<Person> personList;

	public List<Person> getPersonList() {
		return personList;
	}

	public void setPersonList(List<Person> personList) {
		this.personList = personList;
	}

	@Override
	public String toString() {
		return "Vo [personList=" + personList + "]";
	}

}
请求表单:
<form action="${pageContext.request.contextPath}/putList.do" method="post">
		<span>姓名:</span><input type="text" name="personList[0].theName" /><br>
		<span>地址:</span><input type="text" name="personList[0].theAddress" /><br>
		<span>电话:</span><input type="text" name="personList[0].thePhone" /><br>
		<span>年龄:</span><input type="text" name="personList[0].theAge" /><br>
		------------------------------------------------------------------------<br>
		<span>姓名:</span><input type="text" name="personList[1].theName" /><br>
		<span>地址:</span><input type="text" name="personList[1].theAddress" /><br>
		<span>电话:</span><input type="text" name="personList[1].thePhone" /><br>
		<span>年龄:</span><input type="text" name="personList[1].theAge" /><br>
		<input type="submit" value="提交表单" />
</form>
处理方法:
/**
	 *
	 * @Title: getListParams
	 * @Description: 获取传来的集合参数
	 * @return: String
	 * @throws
	 */
	@RequestMapping("/putList.do")
	public String getListParams(Vo personList,Model model) {
        //利用封装类来保存数据
		personList.getPersonList().forEach(person->System.out.println(person));
		model.addAttribute("personList", personList);
		return "showArrayandList";
	}
显示页面:
<%@ page language="java" contentType="text/html; charset=UTF-8"
    pageEncoding="UTF-8"%>
<!DOCTYPE html>
<html>
<head>
<meta charset="UTF-8">
<title>Insert title here</title>
</head>
<body>
show the arrays<br>
<span>${array[0]}</span><br>
<span>${array[1]}</span><br>
show the List<br>
<span>${personList.personList[0].theName}</span><br>
<span>${personList.personList[0].theAddress}</span><br>
<span>${personList.personList[0].thePhone}</span><br>
<span>${personList.personList[0].theAge}</span><br>
<span>HEI MAN DONT BE COCKY</span><br>
<span>${personList.personList[0].theName}</span><br>
<span>${personList.personList[0].theAddress}</span><br>
<span>${personList.personList[0].thePhone}</span><br>
<span>${personList.personList[0].theAge}</span><br>
</body>
</html>
五.使用@RequestBody接收JSON(多用于AJAX)
使用@RequestBody接收字符串
<button id="requestbodytest"  onclick="sendAJAX()">requestbody测试</button>
<script type="text/javascript">

	var sendAJAX = function(){
		$.ajax({
            type: "POST",
            url: "${pageContext.request.contextPath}/requestbodytest.do",
            contentType:"application/json;charset=UTF-8",
            dataType: "json",
         /*传递一个JSON格式字符串*/ data:JSON.stringify({"theName":"Alan","theAddress":"beijin","thePhone":"123456789","theAge":22}),

            success: function(data){
                        alert(data)
                     }
        });
	}
</script>
@RequestMapping("/requestbodytest.do")
@ResponseBody
public String requestbodyTest(@RequestBody String person) {
    System.out.println("WDNMD");
    System.out.println(person);
    return "AJAXsuccess";
}

使用@RequestBody接收实体类
(——–注意:用@RequestBody接收实体类请先检查有没有导jackson的包(databind,core和annnoation)----)
不然会报Content type ‘application/json;charsetset=UTF-8;charset=UTF-8’ not supported]解析错误(半天时间才找出。。。。。)
@RequestMapping("/requestbodytest.do")
@ResponseBody
public String requestbodyTest(@RequestBody Person person)throws Exception{
    System.out.println("WDNMD");
    Model model ;
    System.out.println(person);
    return "AJAXsuccess";
}

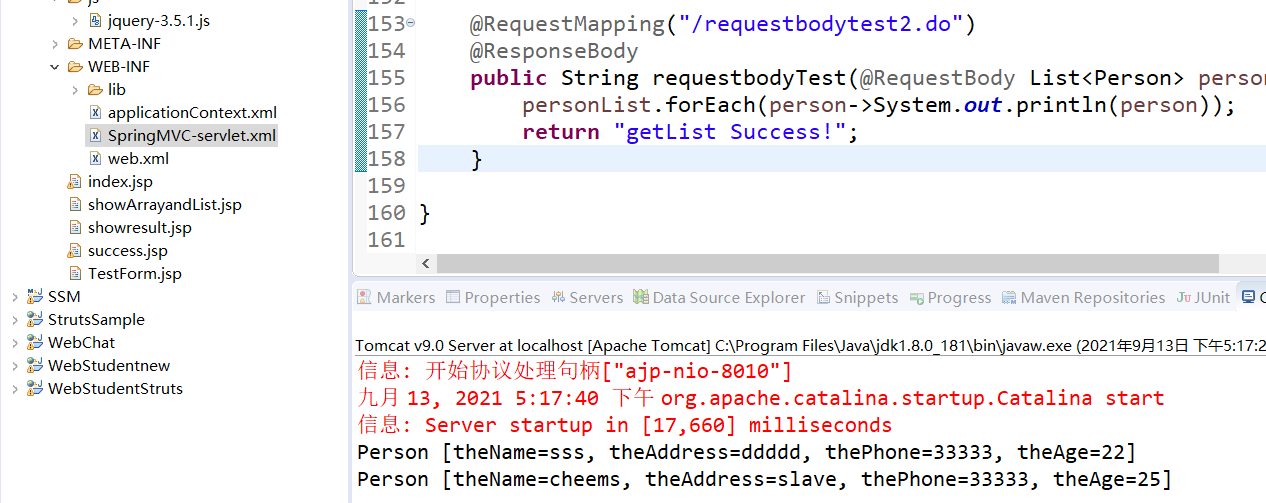
使用@requestBody接收数组和集合
List集合&数组
<button type="button" onclick="AJAXtest2()">@requestbody发送数组&集合JSON</button><br>
<script type="text/javascript">
	var AJAXtest2 = function(){
		var personList = new Array();
		personList.push({theName:"sss",theAddress:"ddddd",thePhone:"33333",theAge:22});
		personList.push({theName:"cheems",theAddress:"slave",thePhone:"33333",theAge:25});
		$.ajax({
			type:"POST",
			contentType:"application/json;charset=UTF-8",
			url:"${pageContext.request.contextPath}/requestbodytest2.do",
			data:JSON.stringify(personList), //将集合传化为JSON字符串进行传输
			success:function(result){
				alert(result)
			}
		});
	}
</script>
	@RequestMapping("/requestbodytest2.do")
	@ResponseBody
	public String requestbodyTest(@RequestBody List<Person> personList) {
        //接收JSON的集合和数组都不用改前端,只需将形参改为对象数组即可
        //既(@RequestBody Person[] personList)
		personList.forEach(person->System.out.println(person));
		return "getList Success!";
	}
接收map(好像不能接收map),貌似js里也没有严格意义上的map数据结构,或是在一些版本里没有?


 被折叠的 条评论
为什么被折叠?
被折叠的 条评论
为什么被折叠?
 到【灌水乐园】发言


