


 本文介绍了如何利用.NETCore6的SignalR集成和Quartz.NET库,构建一个后端定时向前端推送消息的系统。通过创建Hub类和配置Startup.cs,实现了SignalR的WebSocket通信,而Quartz.NET则负责作业调度,定时触发HelloJob类发送消息到所有客户端。前端使用Vue.js接收和显示消息。
最近一直准备着手用.net core编写一个系统用于实现后端向前端定时推送消息,网上看了很多案例,最后选择使用Quartz+signalR来实现这个功能。
signalR
SignalR 是一个 .NET Core/.NET Framework 的开源实时框架,可以使用 Web Socket、Server Sent Events 和 Long Polling 等多种底层传输方式实现通信。SignalR 提供了一个简单的 API,用于创建服务器到客户端远程过程调用, (RPC) 调用客户端浏览器 (和其他客户端平台中的 JavaScript 函数,) 从服务器端 .NET 代码。
注:.net core 6中已经集成了signalR,使用时直接编写实现类时继承Hub类即可,不需要下载Microsoft.AspNetCore.SignalR的包
QuartZ
Quartz.NET是一个Github开源项目,用于创建一个免费商业用途的作业调度框架。需要引入Quartz包
注:支持 .NET Core/.NET Standard 2.0 和 .NET 框架 4.6.1 及更晚版本。
后端实现
MyHub.cs
编写signalR的实现类,这里会给所有连接上的客户端发送信息
public class MyHub : Hub
    {
        public async Task SendMessage(string username, string msg)
        {
            await Clients.All.SendAsync("ReceiveMessage",username, msg);
        }
    }
配置startup.cs
//在ConfigureServices方法中添加signal的服务
services.AddSignalR();

//在Configure方法中添加拦截,指定访问路径
app.UseEndpoints(endpoints =>
            {
                endpoints.MapControllers().RequireCors("any");
               //将特定的路径访问转给特定的程序
                endpoints.MapHub<MyHub>("/Hubs/ChatRoom");
            });
同时记得配置跨域,配置好以上文件后就可以实现前后端websocket通信了
HelloController.cs
    //注释将控制器开放给所有请求访问
    [EnableCors("any")]
    [ApiController]
    [Route("[controller]/[action]")]
    //[Authorize] 指定控制器为授权后可以访问
    public class HelloController : ControllerBase
    {

        //如果需要控制器直接使用Hub发送信息,可以使用该方法进行注入
        private readonly IHubContext<MyHub> _hubContext;
        public IJobScheduler _jobscheduler;
        public IScheduler _scheduler;

        public HelloController(IServiceScopeFactory scopeFactory,  IHubContext<MyHub> hubContext)
        {
            this._hubContext = hubContext;
            //this._scheduler = scheduler;IJobScheduler scheduler,
            //如果在程序开始时没有初始化IOCJobFactory,可以使用以下方法在这里进行初始化
            this._jobscheduler = new JobScheduler(scopeFactory.CreateScope().ServiceProvider);
        }
        /*
         * 可以使用以下这种方法来屏蔽一些耗时很长的注入方法
         * 使用时进行加载,可以提高初始化的速度
         * public string get([FromServices] HelloService h)
         */

        [HttpGet]
        public async Task<string> StartChatAsync(string msg)
        {
            if ("start".Equals(msg))
            {
                _jobscheduler.Start();
                await _jobscheduler.RunJob<HelloJob>("SendEmail", Convert.ToDateTime("2023-04-13 17:28:30"));
            }
            if ("end".Equals(msg))
            {
                _jobscheduler.Stop();
            }
            return msg+"ed";
        }
    }
HelloJob.cs
class HelloJob : IJob
    {
        //使用该类需要现实现并注入IJobFactory
        private readonly IHubContext<MyHub> _hubContext;
        public HelloJob(IHubContext<MyHub> hubContext)
        {
            _hubContext = hubContext;
        }
        public void sendMsg()
        {
            Console.WriteLine("作业执行中");
             _hubContext.Clients.All.SendAsync("ReceiveMessage", "系统通知", $"每隔十秒进行报时{DateTime.Now}").Wait();
        }
        public Task Execute(IJobExecutionContext context)
        {
            Console.WriteLine("作业执行!");
            sendMsg();
            return Task.CompletedTask;
            throw new NotImplementedException();

        }
    }
JobScheduler.cs
编写一个接口,再进行实现,最后将其配置到startup.cs中实现程序启动时就初始化类
public interface IJobScheduler
    {
        IScheduler _scheduler { get; set; }
        void Start();
        Task RunJob<T>(string jobName, DateTime dateTime, IDictionary<string, object> map = null) where T : IJob;
        void Stop();
    }

    public class JobScheduler : IJobScheduler
    {
        public IScheduler _scheduler { get; set; }
        public JobScheduler(IServiceProvider IocContainer)
        {
            var schedulerFactory = new StdSchedulerFactory();
            _scheduler = schedulerFactory.GetScheduler().Result;
            _scheduler.JobFactory = new IOCJobFactory(IocContainer, _scheduler); ;
        }

        public void Start()
        {
            _scheduler.Start();
        }

        public void Stop()
        {
            if (_scheduler == null)
            {
                return;
            }
            try
            {
                if (_scheduler.Shutdown(waitForJobsToComplete: true).Wait(10000))
                {
                    _scheduler = null;
                }
            }
            catch (Exception ex)
            {
                throw (ex);
            }
        }

        public async Task RunJob<T>(string jobName, DateTime dateTime,IDictionary<string, object> map = null) where T : IJob
        {
            try
            {
                string jobKey_Name = "JN_" + jobName;
                string jobKey_Group = "JG_";
                try
                {
                    JobKey jobKey = new JobKey(jobKey_Name, jobKey_Group);
                    IJobDetail job = await _scheduler.GetJobDetail(jobKey);

                    if (job == null)
                    {
                        //if job not exist ,then create it
                        job = JobBuilder.Create<T>()
                                                //setJobData 用于注入数据到quartz中
                                                 .SetJobData(new JobDataMap(map ?? new Dictionary<string, object>()))
                                                 .StoreDurably(true)// store the job detail without any triggers
                                                 .RequestRecovery(true)//
                                                 .WithIdentity(jobKey_Name, jobKey_Group)
                                                 .Build();
                    }
                    // create a trigger
                    ITrigger trigger = CreateSimpleTrigger(jobKey_Name, jobKey_Group, dateTime);
                    // make a schedule with job and tigger, if exist ,then replace it.
                    await _scheduler.ScheduleJob(job, new List<ITrigger>() { trigger }, true);
                }
                catch (Exception ex)
                {
                    throw(ex);
                }
            }
            catch (ObjectDisposedException ex)
            {
                throw(ex);
            }
        }

        private ITrigger CreateSimpleTrigger(string name, string group, DateTime dateTime)
        {
            return TriggerBuilder.Create()
              .WithIdentity("T_" + name, "T__")
              //.StartAt(dateTime.ToUniversalTime()) //触发器的开始运行时间
              .WithSimpleSchedule(x =>
              {
                  x.WithIntervalInSeconds(10)//时间间隔
                  //.WithRepeatCount(10)//重复次数
                  .RepeatForever()//永久重复
                  .WithMisfireHandlingInstructionFireNow();
              })
              .ForJob(name, group)
              .Build();
        }
    }

    /// <summary>
    /// IOCJobFactory : 这个类用于将C#中的依赖注入到Quartz容器中,quartz有一个自己的容器
    ///                 与C#的容器不互通,在ijob类中使用C#中的依赖时会出现无法初始化容器的情况
    ///                 必须使用IJobFactory进行引入
    /// </summary>
    public class IOCJobFactory : IJobFactory
    {
        protected readonly IServiceProvider _container;
        protected readonly IScheduler _scheduler;
        public IOCJobFactory(IServiceProvider container, IScheduler scheduler)
        {
            _container = container;
            _scheduler = scheduler;
        }
        //Called by the scheduler at the time of the trigger firing, in order to produce
        //     a Quartz.IJob instance on which to call Execute.
        public IJob NewJob(TriggerFiredBundle bundle, IScheduler scheduler)
        {
            //Job类型
            Type jobType = bundle.JobDetail.JobType;
            //返回jobType对应类型的实例
            return _container.GetService(jobType) as IJob;
        }
        // Allows the job factory to destroy/cleanup the job if needed.
        public void ReturnJob(IJob job)
        {
        }
    }
Quartz有一个自己的IOC容器,所以当我们在job中使用.net core中的类时(如上面的HelloJob中使用MyHub类),无法进行依赖注入,必须实现IJobFactory接口,将.net core中的依赖注入到Quartz的容器中,才能让我们可以在job中可以使用.net core的类。
//在startup.cs中配置以下服务,使程序启动时初始化JobScheduler类
            services.AddSingleton<IJobScheduler, JobScheduler>();
            services.AddTransient<HelloJob>();
前端实现
前端使用的是vue2
<template>
    <div class="body">
        <div>
        <p>trigger:{{ oup }}</p>
        <br/>
        <!-- 断开链接 -->
        <button  v-on:click="breakConnectToHub()">Break</button>
        <br/>
        <!-- 开启和关闭定时器 -->
        <button  v-on:click="getChat('start')">start</button>
        <button  v-on:click="getChat('end')">end</button>
        <br/>
        <!-- 用户广播通信 -->
        <input type="text" v-model="state.UserName" placeholder="please input your username"/>
        <input type="text" v-model="state.userMessage" placeholder="please input your message"  v-on:keypress="txtMsgOnkeypress"/>
        <div>
            <!-- 消息列表 -->
            <ui>
                <li v-for="(msg,index) in state.messages" :key="index">
                    {{ msg }}
                </li>
            </ui>
        </div>
        </div>
    </div>
</template>
<script>
import { reactive,onMounted } from 'vue';
//需要引入signal包 npm install @microsoft/signalr
import * as signalR from '@microsoft/signalr'
let connection
export default {
    data() {
        return {
            inp: '',
            oup: '',
            txt:''
        }
    },
    methods: {
        async breakConnectToHub(){
            await connection.stop();
        },
        async pushMsg(e){
            await connection.invoke("SendMessage",state.UserName,state.userMessage)
            state.userMessage=""
        },
        getChat:function(msg){
            console.log(msg)
            this.axios.get('http://localhost:7788/hello/StartChat?msg='+msg)
            .then(response => {
                this.oup = response.data;
            })
        }
    },
    //setup 方法的生命周期在create之前,所以不能使用data ,methods
    setup() {
        const state=reactive({UserName:"",userMessage:"",messages:[]});
        const txtMsgOnkeypress=async function(e){
            if(e.keyCode!=13) return;
            //使用哪一个方法
            await connection.invoke("SendMessage",state.UserName,state.userMessage)
            state.userMessage=""
        }
        onMounted(async function(){
            connection=new signalR.HubConnectionBuilder()
            .withUrl('http://localhost:7788/Hubs/ChatRoom',{
            skipNegotiation: true,//跳过协商
            transport: signalR.HttpTransportType.WebSockets,
          })
            .configureLogging(signalR.LogLevel.Information)
            .withAutomaticReconnect().build();
            await connection.start();
            connection.on('ReceiveMessage',function(user,msg){
            state.messages.push({user,msg})
        })
        })
        return {state,txtMsgOnkeypress}
    },
    create: {

    }
}
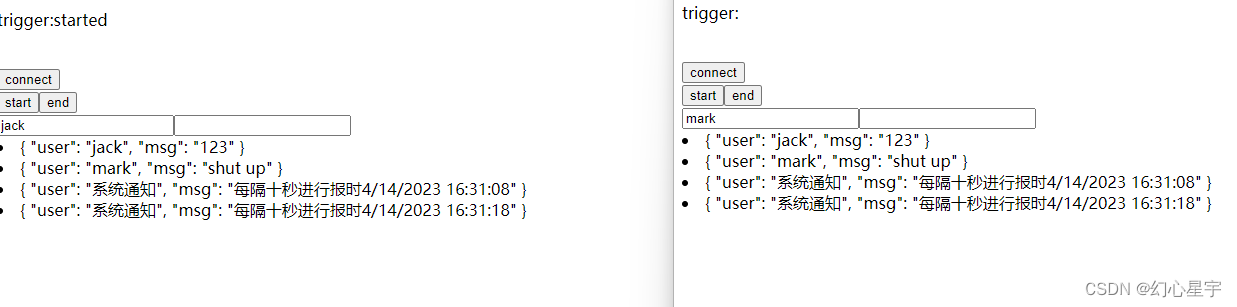
实现效果
前端页面加载成功后就可以进行全双工通信了,在message框中输入文字后回车就可以发送信息广播到所有用。点击start,开启后台触发器,后台向前台发送信息,点击stop,销毁后台触发器,后台停止发送信息。点击Break后,将断开和后端的通信。

希望本文能帮助到正在遇到问题的你!


 238
238

 被折叠的 条评论
为什么被折叠?
被折叠的 条评论
为什么被折叠?
 到【灌水乐园】发言


