


 本文介绍了如何在项目中使用Spring Security构建用户认证服务,通过集成Mybatis,详细阐述了从引入依赖、创建数据库表,到配置YAML文件、定义UserService、UserMapper,以及实现UserDetailsService和Security配置的全过程。
在搭建用户认证服务框架时,我使用了Spring Security 为本服务框架的安全框架,实现了用户登录及授权,结合了mysql数据库
1.引入Spring Security 等相关依赖
<project xmlns="http://maven.apache.org/POM/4.0.0"
	xmlns:xsi="http://www.w3.org/2001/XMLSchema-instance"
	xsi:schemaLocation="http://maven.apache.org/POM/4.0.0 http://maven.apache.org/xsd/maven-4.0.0.xsd">
	<modelVersion>4.0.0</modelVersion>
	<parent>
		<groupId>org.springframework.boot</groupId>
		<artifactId>spring-boot-starter-parent</artifactId>
		<version>2.0.5.RELEASE</version>
	</parent>

	<groupId>com.pec</groupId>
	<artifactId>spring-security-mybatis</artifactId>
	<version>0.0.1-SNAPSHOT</version>

	<dependencies>
		<!-- web启动器 -->
		<dependency>
			<groupId>org.springframework.boot</groupId>
			<artifactId>spring-boot-starter-web</artifactId>
		</dependency>
		<!-- mybatis启动器 -->
		<dependency>
			<groupId>org.mybatis.spring.boot</groupId>
			<artifactId>mybatis-spring-boot-starter</artifactId>
			<version>1.3.0</version>
		</dependency>
		<!-- 数据连接池 druid -->
		<dependency>
			<groupId>com.alibaba</groupId>
			<artifactId>druid</artifactId>
			<version>1.1.0</version>
		</dependency>
		<!-- mysql数据库驱动 -->
		<dependency>
			<groupId>mysql</groupId>
			<artifactId>mysql-connector-java</artifactId>
		</dependency>

		<!-- spring security 相关依赖 -->
		<dependency>
			<groupId>org.springframework.boot</groupId>
			<artifactId>spring-boot-starter-security</artifactId>
		</dependency>
	</dependencies>
	<!-- 将程序打包成一个可执行jar -->
	<build>
		<plugins>
			<plugin>
				<groupId>org.springframework.boot</groupId>
				<artifactId>spring-boot-maven-plugin</artifactId>
			</plugin>
		</plugins>
	</build>
</project>
2.创建相关表
/*
Navicat MySQL Data Transfer

Source Server         : mydb
Source Server Version : 50722
Source Host           : localhost:3306
Source Database       : studydb

Target Server Type    : MYSQL
Target Server Version : 50722
File Encoding         : 65001

Date: 2019-09-01 17:36:03
*/

SET FOREIGN_KEY_CHECKS=0;

-- ----------------------------
-- Table structure for role
-- ----------------------------
DROP TABLE IF EXISTS `role`;
CREATE TABLE `role` (
  `roleid` int(50) NOT NULL,
  `role` varchar(255) DEFAULT NULL,
  PRIMARY KEY (`roleid`)
) ENGINE=InnoDB DEFAULT CHARSET=utf8;


/*
Navicat MySQL Data Transfer

Source Server         : mydb
Source Server Version : 50722
Source Host           : localhost:3306
Source Database       : studydb

Target Server Type    : MYSQL
Target Server Version : 50722
File Encoding         : 65001

Date: 2019-09-01 17:36:37
*/

SET FOREIGN_KEY_CHECKS=0;

-- ----------------------------
-- Table structure for user
-- ----------------------------
DROP TABLE IF EXISTS `user`;
CREATE TABLE `user` (
  `userid` varchar(50) NOT NULL,
  `username` varchar(255) DEFAULT NULL,
  `password` varchar(255) DEFAULT NULL,
  PRIMARY KEY (`userid`)
) ENGINE=InnoDB DEFAULT CHARSET=utf8;

/*
Navicat MySQL Data Transfer

Source Server         : mydb
Source Server Version : 50722
Source Host           : localhost:3306
Source Database       : studydb

Target Server Type    : MYSQL
Target Server Version : 50722
File Encoding         : 65001

Date: 2019-09-01 17:36:45
*/

SET FOREIGN_KEY_CHECKS=0;

-- ----------------------------
-- Table structure for user_role
-- ----------------------------
DROP TABLE IF EXISTS `user_role`;
CREATE TABLE `user_role` (
  `roleid` int(11) DEFAULT NULL,
  `userid` int(11) DEFAULT NULL
) ENGINE=InnoDB DEFAULT CHARSET=utf8;
3.application.yml 配置文件
spring:
  datasource:
    driver-class-name: com.mysql.jdbc.Driver
    url: jdbc:mysql://localhost:3306/studydb
    username: root
    password:
    type: com.alibaba.druid.pool.DruidDataSource

mybatis:
  type-aliases-package: com.pec.pojo
4.创建UserService、UserMapper文件
package com.pec.service;

import com.pec.pojo.UserRole;

public interface UserService {
	UserRole findUserById(String userid);
}

#################################################################

package com.pec.service.impl;

import org.springframework.beans.factory.annotation.Autowired;
import org.springframework.stereotype.Service;
import org.springframework.transaction.annotation.Transactional;

import com.pec.mapper.UserMapper;
import com.pec.pojo.User;
import com.pec.pojo.UserRole;
import com.pec.service.UserService;

@Service
@Transactional
public class UserServiceImpl implements UserService {

	@Autowired
	private UserMapper userMapper;

	@Override
	public UserRole findUserById(String userid) {
		return userMapper.findUserById(userid);
	}

}

#################################################################
package com.pec.mapper;

import com.pec.pojo.UserRole;

public interface UserMapper {
	UserRole findUserById(String userid);
}
5.UserMapper.xml
<?xml version="1.0" encoding="UTF-8" ?>
<!DOCTYPE mapper
PUBLIC "-//mybatis.org//DTD Mapper 3.0//EN"
"http://mybatis.org/dtd/mybatis-3-mapper.dtd">
<mapper namespace="com.pec.mapper.UserMapper">

	<select id="findUserById" parameterType="String"
		resultType="com.pec.pojo.UserRole">
		SELECT
		a.*,
		b.role
		FROM
		USER a,
		role b,
		user_role c
		WHERE
		a.userid = #{value}
		AND a.userid = c.userid
	</select>

</mapper>
6.创建User实体类、UserRole实体类
package com.pec.pojo;

public class User {
	private String userid;

	private String username;

	private String password;


	public String getUserid() {
		return userid;
	}

	public void setUserid(String userid) {
		this.userid = userid;
	}

	public String getUsername() {
		return username;
	}

	public void setUsername(String username) {
		this.username = username;
	}

	public String getPassword() {
		return password;
	}

	public void setPassword(String password) {
		this.password = password;
	}


}

####################################################################

package com.pec.pojo;

public class UserRole extends User{

	private String role;

	public String getRole() {
		return role;
	}

	public void setRole(String role) {
		this.role = role;
	}

	@Override
	public String toString() {
		// TODO Auto-generated method stub
		return super.toString();
	}


}
7.创建一个CustomUserDetailsService类继承UserDetailsService,重写loadUserByUsername方法实现用户登录
package com.pec.config;

import org.springframework.beans.factory.annotation.Autowired;
import org.springframework.context.annotation.Bean;
import org.springframework.security.core.authority.AuthorityUtils;
import org.springframework.security.core.userdetails.User;
import org.springframework.security.core.userdetails.UserDetails;
import org.springframework.security.core.userdetails.UserDetailsService;
import org.springframework.security.core.userdetails.UsernameNotFoundException;
import org.springframework.security.crypto.bcrypt.BCryptPasswordEncoder;
import org.springframework.stereotype.Component;

import com.pec.pojo.UserRole;
import com.pec.service.UserService;

/**
 *  User 自定义UserDetailsServices
 * @author simple-wang
 * Component 不添加则不起作用
 */
@Component
public class CustomUserDetailsService implements UserDetailsService {

	/**
	 * 注入用户服务【登录】
	 * @return
	 */
	@Autowired
	private UserService userService;

	@Bean
	private BCryptPasswordEncoder passwordEncoder() {
		return new BCryptPasswordEncoder();
	}
	@Override
	public UserDetails loadUserByUsername(String username) throws UsernameNotFoundException {
		/**
		 * 执行用户登录
		 */
		System.out.println("用户登录名为:" + username);
		UserRole userRole = userService.findUserById(username);
		System.out.println(userRole);
		System.out.println(userRole.getUserid());
		System.out.println(userRole.getPassword());
		System.out.println(userRole.getRole());
		//
		return new User(username, userRole.getPassword(), AuthorityUtils.commaSeparatedStringToAuthorityList(userRole.getRole()));
	}

}
8.创建一个Security的配置类CustomSecurityConfig 继承 WebSecurityConfigurerAdapter
package com.pec.config;

import org.springframework.context.annotation.Configuration;
import org.springframework.security.config.annotation.web.builders.HttpSecurity;
import org.springframework.security.config.annotation.web.configuration.WebSecurityConfigurerAdapter;

/**
 *
 * @author simple-wang
 */
@Configuration
//@EnableWebSecurity
public class CustomSecurityConfig extends WebSecurityConfigurerAdapter {


	@Override
	protected void configure(HttpSecurity http) throws Exception {
		http.formLogin() // 开启表单登录
				.and().authorizeRequests() // 开启请求认证
				//.antMatchers("/backend/*").permitAll()
				.anyRequest().authenticated()
				.and().logout(); // 任何请求都开启认证

	}
}
9.编写主启动类
package com.pec;

import org.mybatis.spring.annotation.MapperScan;
import org.springframework.boot.SpringApplication;
import org.springframework.boot.autoconfigure.SpringBootApplication;

@SpringBootApplication
@MapperScan("com.pec.mapper")
public class App {
	public static void main(String[] args) {
		SpringApplication.run(App.class, args);
	}
}
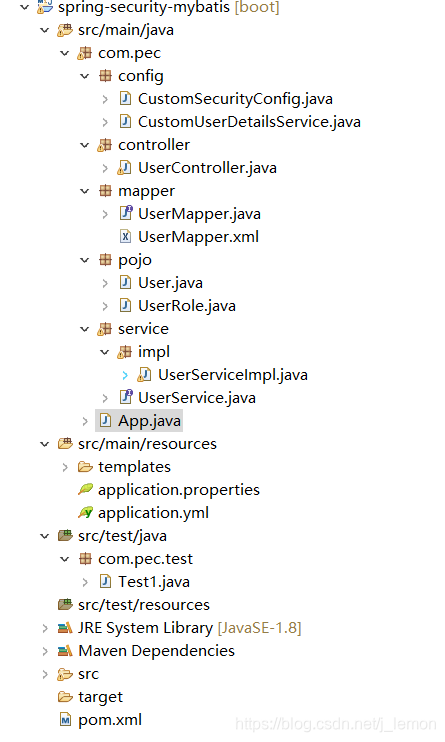
最终生成的代码格式为


 2218
2218


 到【灌水乐园】发言


