


 本文详细介绍了Android开发中的编码规范,包括类名、变量定义、图片ID、String类的命名规则等,并深入探讨了五大常用布局:线性布局、帧布局、表格布局、相对布局、绝对布局的应用与实例。
1、android编码规范
Android官方并没有给出相应的编码规范,一下是我个人从这段时间的学习中总结的一些编码规范。
首先说类名与变量的定义,定义与用户交互的类**Activity.java。自定义变量一律以小写字母m开头,例如:Button mshowText = (Button)findViewById(R.id.showText)。
控件ID的定义,ID一律用小写表示,例如一个图片ImageView 可定义为:@+id/iv,也可以以“名词_控件名称”这种形式定义。
其次是图片的定义格式,图片的定义以解释清楚为准,参照这种定义格式“btn_background_ok.png”。
String类的name定义,可以按照驼峰命名法,首字母小写,例如:String name=usename。
最后,也是最容易出错的,布局文件名称的定义必须为小写字母,否者无法生成R类,尽量不要用缩写,也是以表达清楚为准,通常情况下用下划线连接各语义单词,例如show_button_icons.xml 或者list_menu_item_choose.xml。
1、常用布局
Android中有五大布局,分别是线性布局、帧布局、表格布局、相对布局、绝对布局,其中,线性布局和表格布局以及相对布局是用的最多的三个布局方式。
(1)LinearLayout :线性布局
LinearLayout 是最常用的一种布局方式,它包含的子控件将以横向或竖向的方式排列,按照相对位置来排列所有的widgets或者其他的containers,超过边界时,某些控件将缺失或消失。因此一个垂直列表的每一行只会有一个widget或者是container,而不管他们有多宽,而一个水平列表将会只有一个行高(高度为最高子控件的高度加上边框高度)。LinearLayout保持其所包含的widget或者是container之间的间隔以及互相对齐(相对一个控件的右对齐、中间对齐或者左对齐)
android:orientation="vertical" 表示竖直方式对齐
android:orientation="horizontal"表示水平方式对齐
android:layout_width="fill_parent"定义当前视图在屏幕上 可以消费的宽度,fill_parent即填充整个屏幕。
android:layout_height="wrap_content":随着文字栏位的不同 而改变这个视图的宽度或者高度。
以下是线性布局的一个简单的例子。
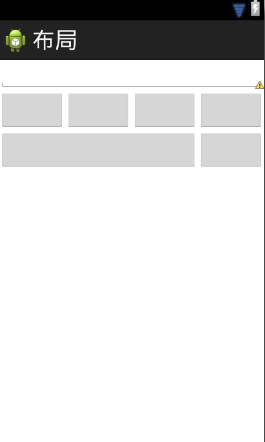
<LinearLayout xmlns:android="http://schemas.android.com/apk/res/android"
    xmlns:tools="http://schemas.android.com/tools"
    android:layout_width="match_parent"
    android:layout_height="match_parent"
    android:orientation="vertical" >
<!--  et.setText(float a+"");-->
    <EditText
        android:layout_width="fill_parent"
        android:layout_height="wrap_content" />
    <!-- linerLayout  控件 -->

    <LinearLayout
        android:layout_width="fill_parent"
        android:layout_height="wrap_content" >

        <Button
            android:layout_width="fill_parent"
            android:layout_height="wrap_content"
            android:layout_weight="1" />

        <Button
            android:layout_width="fill_parent"
            android:layout_height="wrap_content"
            android:layout_weight="1" />

        <Button
            android:layout_width="fill_parent"
            android:layout_height="wrap_content"
            android:layout_weight="1" />

        <Button
            android:layout_width="fill_parent"
            android:layout_height="wrap_content"
            android:layout_weight="1" />
    </LinearLayout>


     <LinearLayout
        android:layout_width="fill_parent"
        android:layout_height="wrap_content" >

        <Button
            android:layout_width="fill_parent"
            android:layout_height="wrap_content"
            android:layout_weight="1" />

        <Button
            android:layout_width="fill_parent"
            android:layout_height="wrap_content"
            android:layout_weight="3" />
    </LinearLayout>
</LinearLayout>
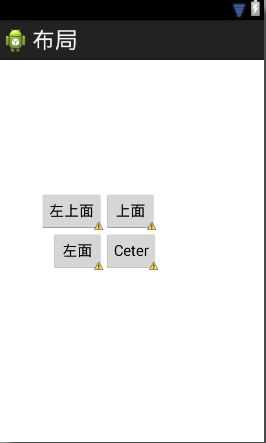
(2)RleativeLayout :相对布局
一个简单的相对布局相对布局最好使用例子来解释。假设我们要设计一个屏幕,包含一个EditText控件和一个Button控件。我们希望Button显示在 EditText控件的右边。因此,我们可以定义一个包含两个子控件的相对布局:子控件分别是EditText和Button。EditText控件可能有一个规则说:将这个控件放置在父控件(布局)的左手边并且在第二个控件(Button)的左边。同时,Button控件可能有一个规则:将这个控件放置在父控件(布局)的右手边。
<RelativeLayout xmlns:android="http://schemas.android.com/apk/res/android"
    xmlns:tools="http://schemas.android.com/tools"
    android:layout_width="match_parent"
    android:layout_height="match_parent"
     >
     <Button
          android:layout_width="wrap_content"
          android:layout_height="wrap_content"
          android:layout_centerInParent="true"
          android:id="@+id/bt"
          android:text="Ceter"
         />
      <Button
          android:layout_width="wrap_content"
          android:layout_height="wrap_content"
          android:id="@+id/bt2"
          android:text="上面"
          android:layout_above="@id/bt"
          android:layout_alignLeft="@id/bt"
         />
       <Button
          android:layout_width="wrap_content"
          android:layout_height="wrap_content"
          android:id="@+id/bt3"
          android:text="左面"
          android:layout_toLeftOf="@id/bt"
          android:layout_alignBaseline="@id/bt"
         />
       <Button
          android:layout_width="wrap_content"
          android:layout_height="wrap_content"
          android:id="@+id/bt3"
          android:text="左上面"
          android:layout_toLeftOf="@id/bt"
          android:layout_above="@id/bt"
         />
</RelativeLayout>
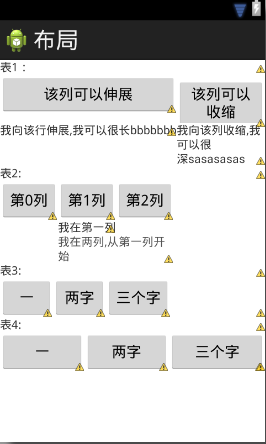
(3)TableLayout:表格布局
TableLayout,表格布局采用行列形式管理UI组件,TableLayout不需要明确地声明有多少行和列,而是通过添加TableRow、其它组件来控制表格的行数、列数。每次向TableLayout添加一个TableRow,就是在向表格添加一行,TableRow也是容器,可以向TableRow中添加组件,每添加一个组件,即是添加一列。如果直接向TableLayout添加组件,则认为这个
组件占用行。表格布局中列的宽度即是每一列中最宽的组件的宽度。如下是一个包含4TableLayout布局的实例及效果图。
<LinearLayout xmlns:android="http://schemas.android.com/apk/res/android"
    xmlns:tools="http://schemas.android.com/tools"
    android:layout_width="match_parent"
    android:layout_height="match_parent"
    android:orientation="vertical" >
    <TextView
          android:layout_width="fill_parent"
          android:layout_height="wrap_content"
          android:text="表1:"
        />
    <TableLayout
          android:layout_width="fill_parent"
          android:layout_height="wrap_content"
          android:stretchColumns="0"
          android:shrinkColumns="1"
         >
        <TableRow >
              <Button  android:text="该列可以伸展"/>
              <Button  android:text="该列可以收缩"/>
        </TableRow>
        <TableRow >
             <TextView android:text="我向该行伸展,我可以很长bbbbbbb"/>
             <TextView android:text="我向该列收缩,我可以很深sasasasas"/>
        </TableRow>
    </TableLayout>

    <TextView
         android:layout_width="fill_parent"
         android:layout_height="wrap_content"
         android:text="表2:"
        />
    <TableLayout
         android:layout_width="fill_parent"
         android:layout_height="wrap_content"
        >
        <TableRow >
            <Button android:text="第0列"/>
            <Button android:text="第1列"/>
            <Button android:text="第2列"/>
        </TableRow>
        <TableRow >
            <TextView android:text="我在第一列"  android:layout_column="1" />
        </TableRow>
          <TableRow >
            <TextView android:text="我在两列,从第一列开始"  android:layout_column="1" android:layout_span="2" />
        </TableRow>
    </TableLayout>
     <TextView
         android:layout_width="fill_parent"
         android:layout_height="wrap_content"
         android:text="表3:"
        />
     <TableLayout
         android:layout_width="fill_parent"
         android:layout_height="wrap_content"
        >
          <TableRow >
              <Button android:text="一"/>
              <Button android:text="两字"/>
              <Button android:text="三个字"/>
          </TableRow>
          </TableLayout>

     <TextView
         android:layout_width="fill_parent"
         android:layout_height="wrap_content"
         android:text="表4:"
        />
     <TableLayout
         android:layout_width="fill_parent"
         android:layout_height="wrap_content"
        >
          <TableRow >
              <Button android:text="一" android:layout_weight="1"/>
              <Button android:text="两字" android:layout_weight="1"/>
              <Button android:text="三个字" android:layout_weight="1"/>
          </TableRow>
          </TableLayout>
</LinearLayout>
<!--EndFragment-->


 785
785

 被折叠的 条评论
为什么被折叠?
被折叠的 条评论
为什么被折叠?
 到【灌水乐园】发言


