


 本文介绍如何配置并使用Swagger生成RESTful API文档。包括Swagger依赖添加、配置类编写及控制器中注解的应用,展示了如何组织API文档、分组及参数描述。
集成
//版本号
<properties>
    <springfox.swagger.version>2.9.2</springfox.swagger.version>
</properties>

//添加依赖
<dependency>
    <groupId>io.springfox</groupId>
    <artifactId>springfox-swagger2</artifactId>
    <version>${springfox.swagger.version}</version>
</dependency>
<dependency>
    <groupId>io.springfox</groupId>
    <artifactId>springfox-swagger-ui</artifactId>
    <version>${springfox.swagger.version}</version>
</dependency>
swagger配置项
import org.springframework.context.annotation.Bean;
import org.springframework.context.annotation.Configuration;
import springfox.documentation.builders.ApiInfoBuilder;
import springfox.documentation.builders.PathSelectors;
import springfox.documentation.builders.RequestHandlerSelectors;
import springfox.documentation.service.ApiInfo;
import springfox.documentation.spi.DocumentationType;
import springfox.documentation.spring.web.plugins.Docket;
import springfox.documentation.swagger2.annotations.EnableSwagger2;

/**
 * swagger配置
 *
 * 与Application.java同级或通过@Import导入配置
 *
 * 访问地址=>http://host:port/swagger-ui.html
 */
@Configuration
@EnableSwagger2
public class SwaggerConfig {

    @Bean(value = "swagger模块的接口")
    public Docket apiSwagger() {
        return new Docket(DocumentationType.SWAGGER_2)
                .apiInfo(apiInfo())//添加接口文档页面信息
                .groupName("swagger接口")//分组名
                .select()
                .apis(RequestHandlerSelectors.basePackage("sb.simple.swagger"))//分组api所属位置
                .paths(PathSelectors.any())
                .build();
    }

    @Bean(value = "wrapper模块的接口")
    public Docket apiWrapper() {
        return new Docket(DocumentationType.SWAGGER_2)
                .apiInfo(apiInfo())
                .groupName("wrapper接口")
                .select()
                .apis(RequestHandlerSelectors.basePackage("sb.simple.wrapper"))
                .paths(PathSelectors.any())
                .build();
    }


    private ApiInfo apiInfo() {
        return new ApiInfoBuilder()
                .title("卫宁物联网数据平台服务接口文档")
                .description("接口由swagger注解生成")
                //.termsOfServiceUrl("")
                .contact("winning health")
                .version("1.0")
                .build();
    }
}
类(Controller)中使用swagger相关注解
import io.swagger.annotations.*;
import org.springframework.web.bind.annotation.GetMapping;
import org.springframework.web.bind.annotation.PostMapping;
import org.springframework.web.bind.annotation.RequestMapping;
import org.springframework.web.bind.annotation.RestController;

@RestController
@RequestMapping("swaggerA")
@Api(value = "分组A=若未定义tags则value值用作于分组,一般设为api path=>/swaggerA", tags = "分组A", description = "详细描述但已废弃")
public class SwaggerAController {

    @GetMapping("hello")
    //httpMethod可选值=>"GET", "HEAD", "POST", "PUT", "DELETE", "OPTIONS", "PATCH"
    //code=>默认200
    @ApiOperation(value = "简要说明", notes = "详细说明", httpMethod = "GET", code = 200)
    @ApiImplicitParams({//对单一参数进行注解
            //@ApiImplicitParam(name = "参数名称", value = "参数说明", required = true, dataType = "参数类型=>String, int, boolean, 类名等", paramType = "参数的请求类型=>path, query, body, header, form"),
            @ApiImplicitParam(name = "name", value = "名字", required = true, dataType = "String", paramType = "query")
    })
    @ApiResponses({//描述可能返回的结果
            @ApiResponse(code = 200, message = "易于理解的描述", response = String.class, responseContainer = "返回的容器类型=>List, Set, Map其他值会被忽略"),
    })
    public String hello(String name) {
        return "hello:" + name;
    }

    @PostMapping("hi")
    //@ApiParam对参数进行简短的说明
    public String hi(@ApiParam(value = "姓名", required = true) String username) {
        return "hi:" + username;
    }
}
mode&Controller使用swagger注解
//model
import io.swagger.annotations.ApiModel;
import io.swagger.annotations.ApiModelProperty;
import lombok.Data;

@Data
@ApiModel(value = "Swagger对象", description = "model的详细描述")
public class Swagger {

    //example=>示例值
    @ApiModelProperty(value = "用户id", example = "9527", required = true)
    private int id;
    @ApiModelProperty(value = "用户名", example = "akali", required = true)
    private String name;
    @ApiModelProperty(value = "用户年龄", example = "20", required = true)
    private int age;
}
//controller
import io.swagger.annotations.Api;
import io.swagger.annotations.ApiOperation;
import org.springframework.web.bind.annotation.GetMapping;
import org.springframework.web.bind.annotation.PostMapping;
import org.springframework.web.bind.annotation.RequestMapping;
import org.springframework.web.bind.annotation.RestController;

@RestController
@RequestMapping("swaggerB")
@Api(value = "/swaggerB", tags = "分组B")
public class SwaggerBController {

    @GetMapping("hi")
    @ApiOperation(value = "打招呼", notes = "对传入的对象进行打印", httpMethod = "GET", code = 200)
    public String hi(Swagger swagger) {
        return "hello, id:" + swagger.getId() + ", name:" + swagger.getName() + ", age:" + swagger.getAge();
    }

    @PostMapping("hello")
    @ApiOperation(value = "打招呼", notes = "对传入的对象进行打印", httpMethod = "POST", code = 200)
    public String hello(Swagger swagger) {
        return "hello, id:" + swagger.getId() + ", name:" + swagger.getName() + ", age:" + swagger.getAge();
    }
}
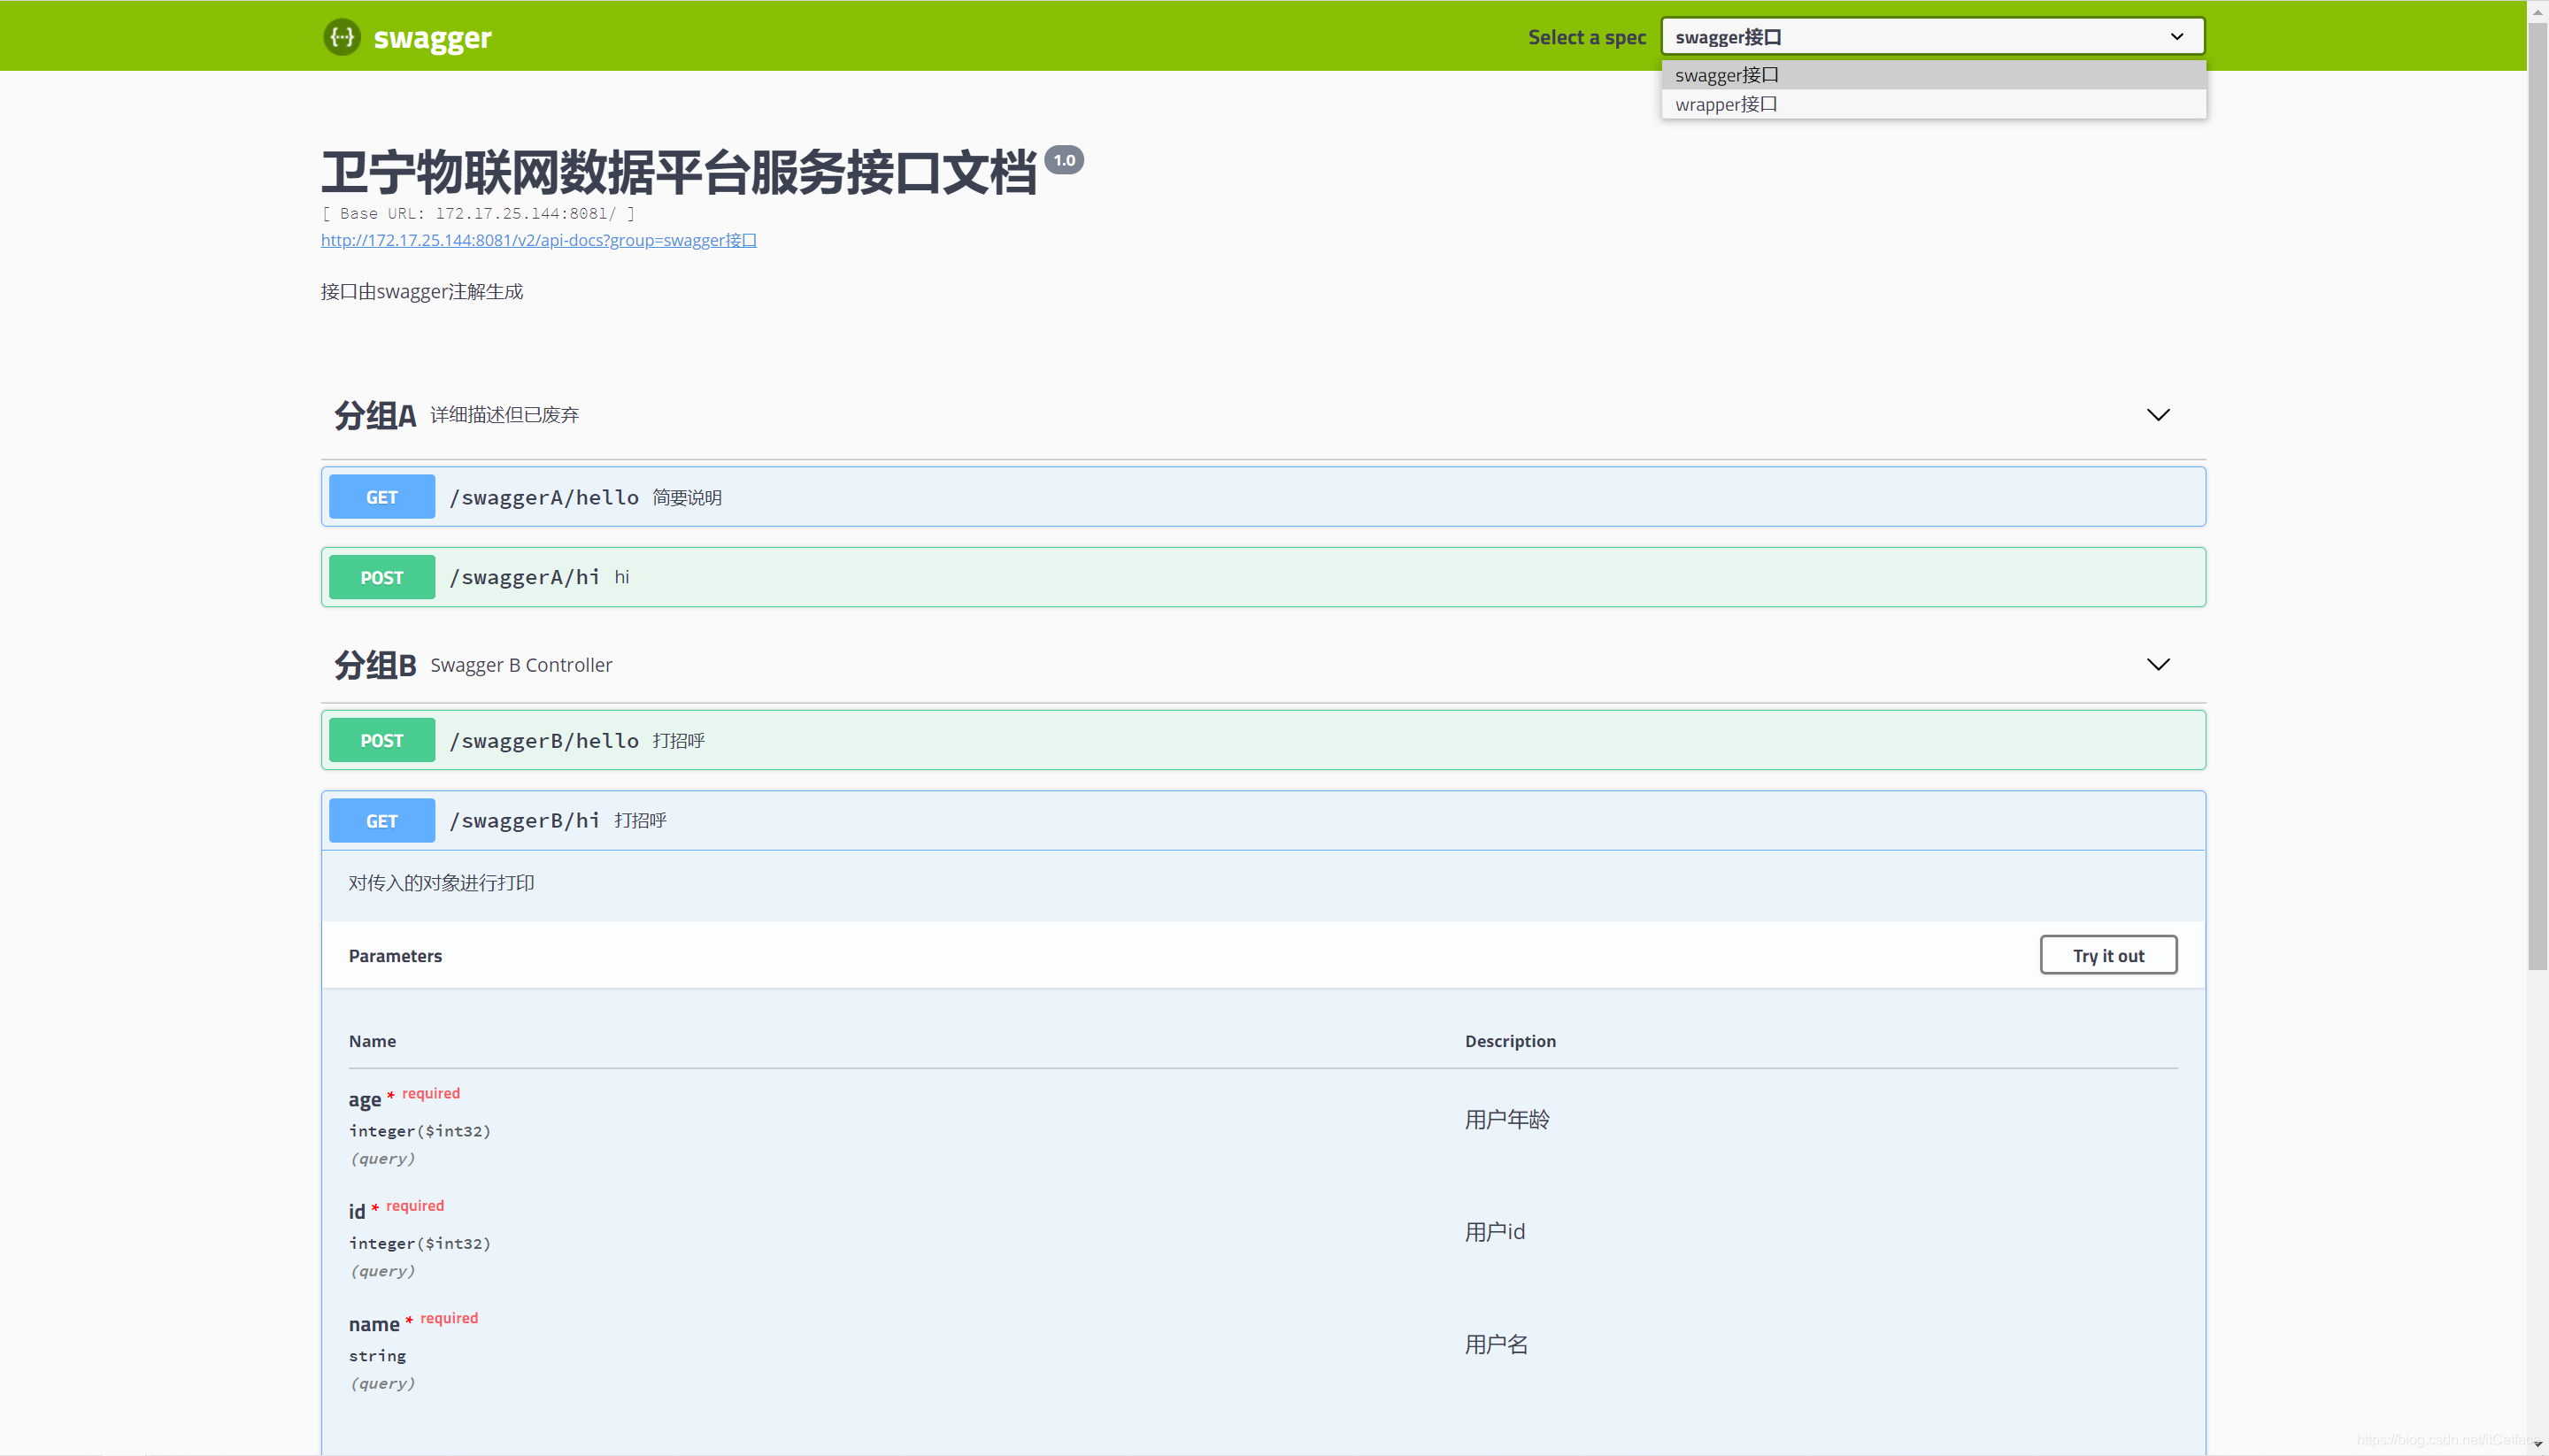
效果展示
使用笔记
Long型参数接收不到
使用swagger页面测试时,Long型入参接收不到,但使用其他如postman可以接收
添加paramType="query"或"path",添加dataType="Long"


 1446
1446

 被折叠的 条评论
为什么被折叠?
被折叠的 条评论
为什么被折叠?
 到【灌水乐园】发言


