


一、直方图及直方图均衡化
直方图是从图像灰度图中提取的亮度信息,包含灰度级和像素数,对于uint8图像其灰度级为0~255(2^8=256),用imhist()函数显示。imhist()/numel可获得归一化直方图。书中显示直方图的函数还有bar()、stem()、plot(),这里不赘述。
直方图均衡化能够提高图像整体亮度,增强对比度,对原图灰度级做积分处理,使输出灰度级的概率密度函数为均匀:,该过程可以用histeq()函数实现,以下是我自己写的直方图均衡化过程的代码。
global s;
axes(handles.axes2);
T=imread(s);
if ndims(T)==3
    T=rgb2gray(T);
end
[m,n]=size(T);
GP=zeros(1,256);   %构造一个统计灰度出现频次的矩阵
for k=0:255
     GP(k+1)=length(find(T==k))/(m*n);  %计算每级灰度出现的概率,将其存入GP
end
%直方图均衡化
S1=zeros(1,256);
for i=1:256
    for j=1:i
          S1(i)=GP(j)+S1(i);
    end
end
S2=round((S1*256)+0.5); %将Sk归到相近级的灰度
for i=1:256
    GPeq(i)=sum(GP(find(S2==i)));%计算现有每个灰度级出现的概率
end
I=T;
for i=0:255
    I(find(T==i)) = S2(i+1);
end
imshow(I);
guidata(hObject,handles);
setappdata(handles.axes2,'img2',I);
global cell;
global pos;
imgpro=getappdata(handles.axes2,'img2');
pos=pos+1;
cell{pos}=imgpro;
二、图像加运算、减运算,与、或逻辑运算
进行这些运算要求两幅图像大小相同,若不同可以用imresize函数进行统一,例如frames=imresize(frames,[512,512]) 统一为512*512大小的图像。
%与、或逻辑运算
global s;
axes(handles.axes2);
[Filename,Pathname]=uigetfile({'*.bmp;*.jpg;*.png;*.jpeg;*.tif'},'pick an image','C:\');
if isequal(Filename,0)||isequal(Pathname,0)
    warndlg('please select a picture first!','warning');
    return;
else
    STR=[Pathname Filename];
    t=imread(STR);
end
c=imread(s);
t1=im2bw(t);
c1=im2bw(c);
k1=c1&t1;%%%%或,该句改为:k1=c1|t1;
imshow(t);
figure();
imshow(k1);title('and');
setappdata(handles.axes2,'img2',k1);
global cell;
global pos;
imgpro=getappdata(handles.axes2,'img2');
pos=pos+1;
cell{pos}=imgpro;

%减运算
global s;
axes(handles.axes2);
[Filename,Pathname]=uigetfile({'*.bmp;*.jpg;*.png;*.jpeg;*.tif'},'pick an image','C:\');
if isequal(Filename,0)||isequal(Pathname,0)
    warndlg('please select a picture first!','warning');
    return;
else
    STR=[Pathname Filename];
    t=imread(STR);
end
k=imread(s);
j=imsubtract(k,t);
imshow(t);
figure();imshow(j);title('cut');
setappdata(handles.axes2,'img2',j);
global cell;
global pos;
imgpro=getappdata(handles.axes2,'img2');
pos=pos+1;
cell{pos}=imgpro;

%加运算
global s;
axes(handles.axes2);
[Filename,Pathname]=uigetfile({'*.bmp;*.jpg;*.png;*.jpeg;*.tif'},'pick an image','C:\');
if isequal(Filename,0)||isequal(Pathname,0)
    warndlg('please select a picture first!','warning');
    return;
else
    STR=[Pathname Filename];
    t=imread(STR);
end
k=imread(s);
imshow((k+t)/2,[0 255]); %在空域内直接融合
figure();imshow(j);title('add');
setappdata(handles.axes2,'img2',j);
global cell;
global pos;
imgpro=getappdata(handles.axes2,'img2');
pos=pos+1;
cell{pos}=imgpro;
三、图像增强:对数变换、幂次变换
对数变换:,其中s为新图像素值,r为原图像素值,c为增强大小,我取为10.
global s;
axes(handles.axes2)
a=imread(s);
if ndims(a)==3
    a=rgb2gray(a);
end
v=10;
r=mat2gray(double(a));
b=log(1+v*r)/(log(v+1));
imshow(b);
setappdata(handles.axes2,'img2',b);
global cell;
global pos;
imgpro=getappdata(handles.axes2,'img2');
pos=pos+1;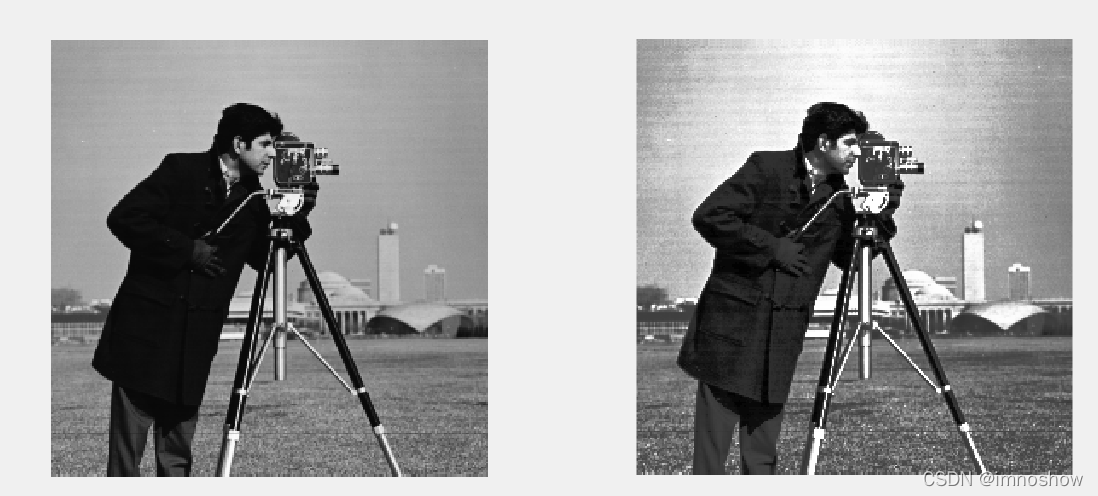
cell{pos}=imgpro;幂次变换:,图中可以看到高灰度段值有明显提升。
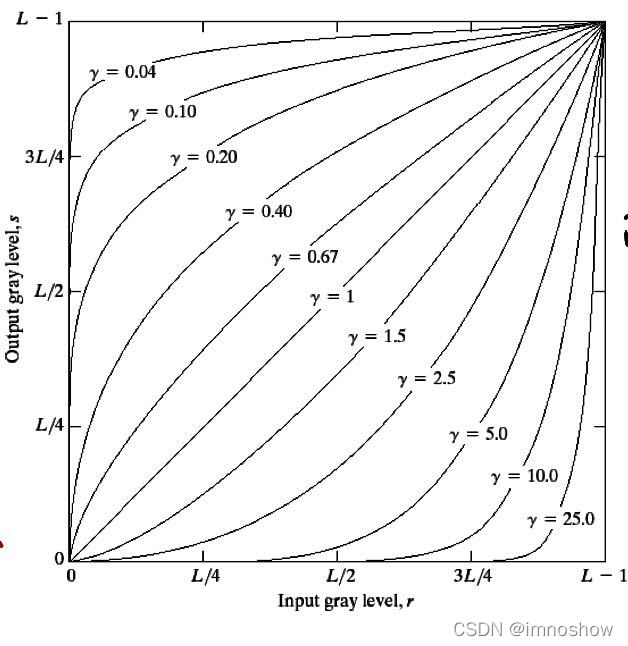
对此代码我做了一个交互,即用户可以输入γ的值来决定变换程度。
global s;
axes(handles.axes2);
imggray=imread(s);
if ndims(imggray)==3
    imggray=rgb2gray(imggray);
end
gamma=inputdlg('please input gamma:');
if isempty(gamma)
    warndlg('please input gamma!','warning');
    return;
else
    x=str2num(gamma{:});
end
I=imadjust(imggray,[0 1],[0 1],x);
imshow(I);
setappdata(handles.axes2,'img2',I);
global cell;
global pos;
imgpro=getappdata(handles.axes2,'img2');
pos=pos+1;
cell{pos}=imgpro;


 1万+
1万+

 被折叠的 条评论
为什么被折叠?
被折叠的 条评论
为什么被折叠?
 到【灌水乐园】发言


