


 本文从Android开机启动的第一个程序init出发,深入解析其挂载文件系统、初始化属性服务、加载init.rc配置文件的过程,直到启动Zygote。详细探讨了property_init、StartPropertyService和LoadBootScripts等关键步骤,带领读者走进Android Framework的世界。
前言
失业了,时间就多了起来,把之前整理的知识都记录成文档,分享出来。可以整理下自己的经历,留下来,希望可以帮助到大家,也是对自己知识的一个汇总。
前提
首先明确下前提条件:
 1.有C/C++基础,不要求非常精通,但是能够阅读代码
 2.有Linux系统的基础知识
 3.有Android的基础知识,有相关经验更好
大家都是Android开发,对于阅读源代码都是必须要经历的。业务开发经常所面对常用Api的调用,UI搭建,架构。随着深入,仅仅只会Api的调用是无法满足需求的,如果想成为高级/资深工程师,那么阅读系统源码是必修。例如我们在开发的过程中遇到的问题,有很多是需要通过分析源码解决。 还有性能优化,卡顿优化,ANR等 都需要我们对源码非常熟悉才能进行。我们也可以从源码中学到很多很多的知识,能够做一些看似无法实现的功能,例如插件化、保活等等。总之源码是我们提高都必修课也是最好的学习材料。
开始
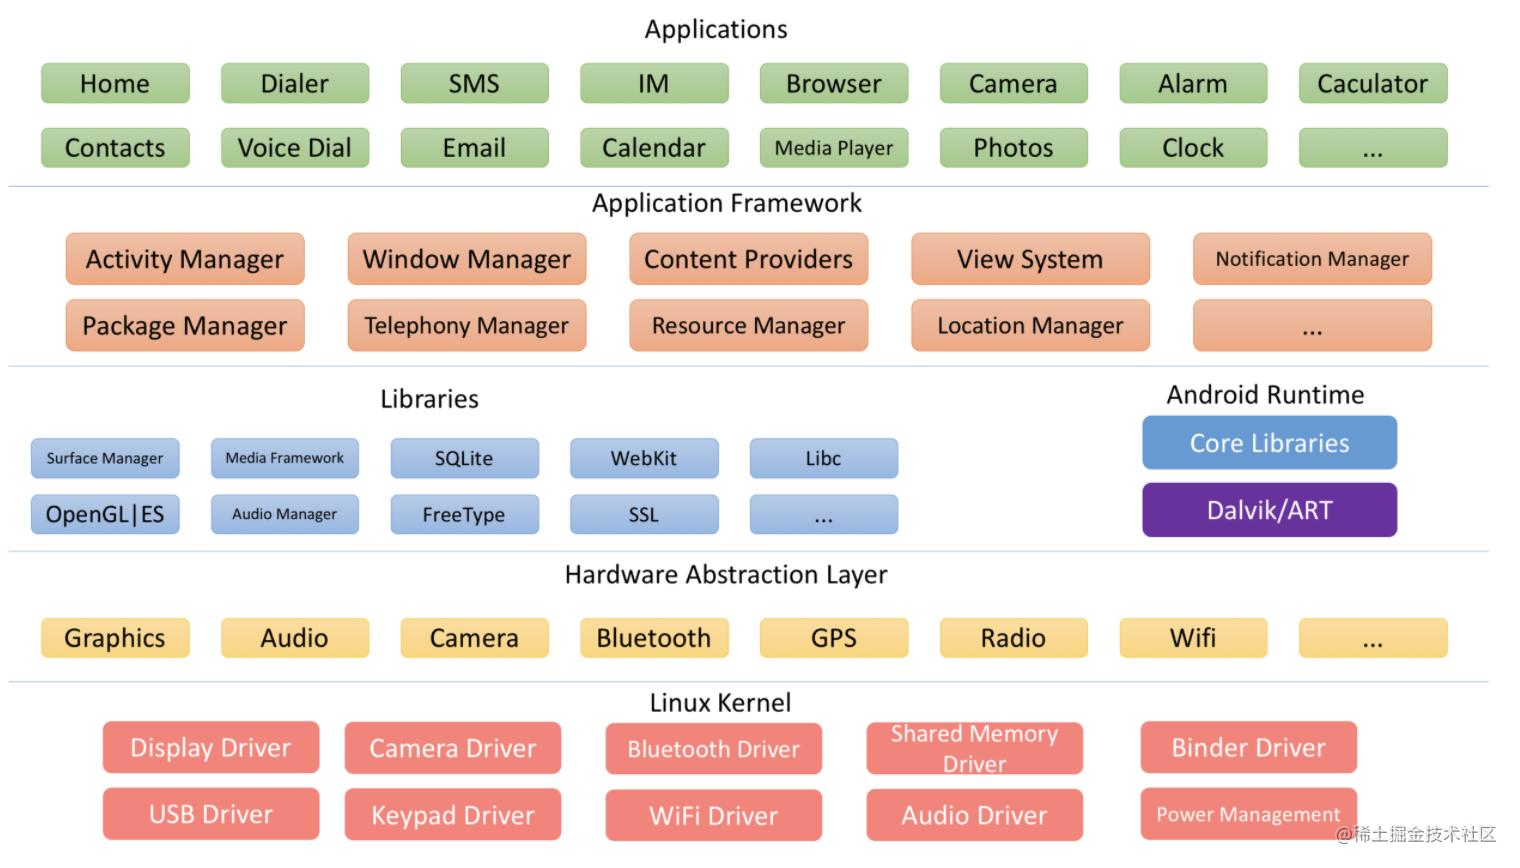
接下来正文开始,这是一张详细的架构图,层次分别是Application层、FrameWork层、Runtime Libraries层以及Hal层和Kernel层。架构还是很清晰的。对Application层熟悉能满足我们的日常开发需求。从Application层开始我们需要一层层往下走。那么我们就从Android开机启动的第一个程序init做为入口,打开FrameWork的神秘大门吧。
注:本次分享针对Android10。
正文开始
不管Java还是C++运行一个程序都是以main方法作为入口。所以我们先看看init.cpp的main函数.
目录:/system/core/init/main.cpp
在线地址:https://android.googlesource.com/platform/system/core/+/refs/heads/android10-release/init/main.cpp
具体代码:
int main(int argc, char** argv) {
#if __has_feature(address_sanitizer)
    __asan_set_error_report_callback(AsanReportCallback);
#endif
    if (!strcmp(basename(argv[0]), "ueventd")) {
        return ueventd_main(argc, argv);
    }
    if (argc > 1) {
        if (!strcmp(argv[1], "subcontext")) {
            android::base::InitLogging(argv, &android::base::KernelLogger);
            const BuiltinFunctionMap function_map;
            return SubcontextMain(argc, argv, &function_map);
        }
        if (!strcmp(argv[1], "selinux_setup")) {
            return SetupSelinux(argv);
        }
        if (!strcmp(argv[1], "second_stage")) {
            return SecondStageMain(argc, argv);//
        }
    }
    return FirstStageMain(argc, argv);//在这里创建和挂载了启动所需要的目录信息包含tmpfs、devpts、proc、sysfs、selinuxfs文件系统。。
}
在Main函数,分了几个阶段,首先第一步是FirstStageMain,我们看看他做了什么?
目录:/system/core/init/first_stage_init.cpp
在线地址:https://android.googlesource.com/platform/system/core/+/refs/heads/android10-release/init/first_stage_init.cpp
具体代码:
int FirstStageMain(int argc, char** argv) {
    if (REBOOT_BOOTLOADER_ON_PANIC) {
        InstallRebootSignalHandlers();
    }

    boot_clock::time_point start_time = boot_clock::now();

    std::vector<std::pair<std::string, int>> errors;
#define CHECKCALL(x) \
    if ((x) != 0) errors.emplace_back(#x " failed", errno);

    // Clear the umask.
    umask(0);

    CHECKCALL(clearenv());
    CHECKCALL(setenv("PATH", _PATH_DEFPATH, 1));
    // Get the basic filesystem setup we need put together in the initramdisk
    // on / and then we'll let the rc file figure out the rest.
    CHECKCALL(mount("tmpfs", "/dev", "tmpfs", MS_NOSUID, "mode=0755"));//挂载了tmpfs
    CHECKCALL(mkdir("/dev/pts", 0755));//创建pts目录并且赋予0755的权限
    CHECKCALL(mkdir("/dev/socket", 0755));//创建socket目录并且赋予0755的权限
    CHECKCALL(mkdir("/dev/dm-user", 0755));//创建dm-user目录并且赋予0755的权限
    CHECKCALL(mount("devpts", "/dev/pts", "devpts", 0, NULL));//挂载devpts
#define MAKE_STR(x) __STRING(x)
    CHECKCALL(mount("proc", "/proc", "proc", 0, "hidepid=2,gid=" MAKE_STR(AID_READPROC)));//挂载proc文件系统
#undef MAKE_STR
    // Don't expose the raw commandline to unprivileged processes.
    CHECKCALL(chmod("/proc/cmdline", 0440));
    std::string cmdline;
    android::base::ReadFileToString("/proc/cmdline", &cmdline);
    // Don't expose the raw bootconfig to unprivileged processes.
    chmod("/proc/bootconfig", 0440);
    std::string bootconfig;
    android::base::ReadFileToString("/proc/bootconfig", &bootconfig);
    gid_t groups[] = {AID_READPROC};
    CHECKCALL(setgroups(arraysize(groups), groups));
    CHECKCALL(mount("sysfs", "/sys", "sysfs", 0, NULL));//挂载sysfs
    CHECKCALL(mount("selinuxfs", "/sys/fs/selinux", "selinuxfs", 0, NULL));//挂载selinxfs

    CHECKCALL(mknod("/dev/kmsg", S_IFCHR | 0600, makedev(1, 11)));

    if constexpr (WORLD_WRITABLE_KMSG) {
        CHECKCALL(mknod("/dev/kmsg_debug", S_IFCHR | 0622, makedev(1, 11)));
    }

    CHECKCALL(mknod("/dev/random", S_IFCHR | 0666, makedev(1, 8)));
    CHECKCALL(mknod("/dev/urandom", S_IFCHR | 0666, makedev(1, 9)));

    CHECKCALL(mknod("/dev/ptmx", S_IFCHR | 0666, makedev(5, 2)));
    CHECKCALL(mknod("/dev/null", S_IFCHR | 0666, makedev(1, 3)));

    CHECKCALL(mount("tmpfs", "/mnt", "tmpfs", MS_NOEXEC | MS_NOSUID | MS_NODEV,
                    "mode=0755,uid=0,gid=1000"));
    CHECKCALL(mkdir("/mnt/vendor", 0755));
    CHECKCALL(mkdir("/mnt/product", 0755));
    CHECKCALL(mount("tmpfs", "/debug_ramdisk", "tmpfs", MS_NOEXEC | MS_NOSUID | MS_NODEV,
                    "mode=0755,uid=0,gid=0"));
    CHECKCALL(mount("tmpfs", kSecondStageRes, "tmpfs", MS_NOEXEC | MS_NOSUID | MS_NODEV,
                    "mode=0755,uid=0,gid=0"))
#undef CHECKCALL

    SetStdioToDevNull(argv);
    InitKernelLogging(argv);


    const char* path = "/system/bin/init";
    const char* args[] = {path, "selinux_setup", nullptr};
    auto fd = open("/dev/kmsg", O_WRONLY | O_CLOEXEC);
    dup2(fd, STDOUT_FILENO);
    dup2(fd, STDERR_FILENO);
    close(fd);
    execv(path, const_cast<char**>(args));

    // execv() only returns if an error happened, in which case we
    // panic and never fall through this conditional.
    PLOG(FATAL) << "execv(\"" << path << "\") failed";

    return 1;
}
原来init进程的第一个阶段主要是挂载了tmpfs、devpts、proc、sysfs和selinux 文件系统,也就是说android系统启动就挂载了,关闭就消失了。
其中文件系统:
1.tmpfs:虚拟文件系统,他把所有的文件都存在虚拟内存中。tmpfs速度很快,毕竟他是驻留在RAM中。但是由于驻留在RAM中,所以断电之后文件内容不会被保存。
2.devpts:管理远程虚拟终端文件设备,挂接点是/dev/pts。pty的主复合设备/dev/ptmx被打开,就会在/dev/pts下创建pty设备文件。
3.proc:非常重要的虚拟文件系统,,通过它我们可以获得系统信息,同时也能够在运行时修改特定的内核参数。
4.sysfs:和proc类似,把连接在系统上的设备和总线组织成一个分级的文件,使得它们可以在用户空间存取。
5.selinux:对系统中每一个对象都生成一个安全上下文,每个对象访问系统资源都需要进行上下文审查。
再挂在完成之后,又返回了init 启动了selinux_setup。
int SetupSelinux(char** argv) {
    SetStdioToDevNull(argv);
    InitKernelLogging(argv);

    if (REBOOT_BOOTLOADER_ON_PANIC) {
        InstallRebootSignalHandlers();
    }

    boot_clock::time_point start_time = boot_clock::now();

    MountMissingSystemPartitions();

    SelinuxSetupKernelLogging();

    LOG(INFO) << "Opening SELinux policy";

    PrepareApexSepolicy();

    // Read the policy before potentially killing snapuserd.
    std::string policy;
    ReadPolicy(&policy);
    CleanupApexSepolicy();

    auto snapuserd_helper = SnapuserdSelinuxHelper::CreateIfNeeded();
    if (snapuserd_helper) {
        snapuserd_helper->StartTransition();
    }

    LoadSelinuxPolicy(policy);

    if (snapuserd_helper) {
        // Before enforcing, finish the pending snapuserd transition.
        snapuserd_helper->FinishTransition();
        snapuserd_helper = nullptr;
    }

    if (selinux_android_restorecon("/dev/selinux/", SELINUX_ANDROID_RESTORECON_RECURSE) == -1) {
        PLOG(FATAL) << "restorecon failed of /dev/selinux failed";
    }

    SelinuxSetEnforcement();


    if (selinux_android_restorecon("/system/bin/init", 0) == -1) {
        PLOG(FATAL) << "restorecon failed of /system/bin/init failed";
    }

    setenv(kEnvSelinuxStartedAt, std::to_string(start_time.time_since_epoch().count()).c_str(), 1);

    const char* path = "/system/bin/init";
    const char* args[] = {path, "second_stage", nullptr};
    execv(path, const_cast<char**>(args));//执行second_stage

    PLOG(FATAL) << "execv(\"" << path << "\") failed";

    return 1;
}
selinux是安全权限相关,感兴趣的大家可以自行学习研究。 在执行完成之后回到init 执行了second_stage。
文件目录:system/core/init/init.cpp
在线地址:
int SecondStageMain(int argc, char** argv) {
    if (REBOOT_BOOTLOADER_ON_PANIC) {
        InstallRebootSignalHandlers();
    }
    SetStdioToDevNull(argv);
    InitKernelLogging(argv);
    LOG(INFO) << "init second stage started!";
    if (auto result = WriteFile("/proc/1/oom_score_adj", "-1000"); !result) {
        LOG(ERROR) << "Unable to write -1000 to /proc/1/oom_score_adj: " << result.error();
    }
    GlobalSeccomp();
    keyctl_get_keyring_ID(KEY_SPEC_SESSION_KEYRING, 1);
    close(open("/dev/.booting", O_WRONLY | O_CREAT | O_CLOEXEC, 0000));
    property_init();//初始化属性服务
    process_kernel_dt();
    process_kernel_cmdline();
    export_kernel_boot_props();
    property_set("ro.boottime.init", getenv("INIT_STARTED_AT"));
    prop
最低0.47元/天 解锁文章


 1288
1288

 被折叠的 条评论
为什么被折叠?
被折叠的 条评论
为什么被折叠?
 到【灌水乐园】发言


