


继续上一篇文章的案例,第一次使用SecurityUtils.getSubject()来获取Subject时
使用ThreadLocal模式来获取,若没有则创建一个并绑定到当前线程。此时创建使用的是Subject内部类Builder来创建的,Builder会创建一个SubjectContext接口的实例DefaultSubjectContext,最终会委托securityManager来根据SubjectContext信息来创建一个Subject,下面详细说下该过程,在DefaultSecurityManager的createSubject方法中:
首先就是复制SubjectContext,SubjectContext 接口继承了Map<String, Object>,然后加入了几个重要的SecurityManager、SessionId、Subject、PrincipalCollection、Session、boolean authenticated、boolean sessionCreationEnabled、Host、AuthenticationToken、AuthenticationInfo等众多信息。
然后来讨论下接口设计:
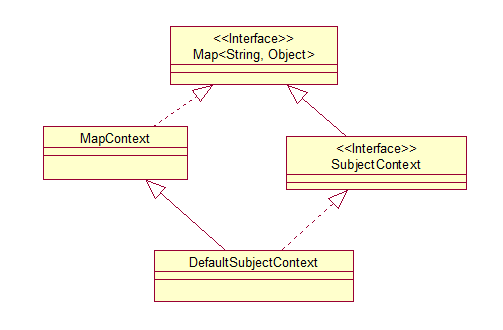
讨论1:首先是SubjectContext为什么要去实现Map<String, Object>?
SubjectContext提供了常用的get、set方法,还提供了一个resolve方法,以SecurityManager为例:
这些get、set方法则用于常用的设置和获取,而resolve则表示先调用getSecurityManager,如果获取不到,则使用其他途径来获取,如DefaultSubjectContext的实现:
如果getSecurityManager获取不到,则使用SecurityUtils工具来获取。
再如resolvePrincipals
普通的getPrincipals()获取不到,尝试使用其他属性来获取。
讨论2:此时就有一个问题,有必要再对外公开getPrincipals方法吗?什么情况下外界会去调用getPrincipals方法而不会去调用resolvePrincipals方法?
然后我们继续回到上面的类图设计上:
DefaultSubjectContext继承了MapContext,MapContext又实现了Map<String, Object>,看下此时的MapContext有什么东西:
MapContext内部拥有一个类型为HashMap的backingMap属性,大部分方法都由HashMap来实现,然后仅仅更改某些行为,MapContext没有选择去继承HashMap,而是使用了组合的方式,更加容易去扩展,如backingMap的类型不一定非要选择HashMap,可以换成其他的Map实现,一旦MapContext选择继承HashMap,如果想对其他的Map类型进行同样的功能增强的话,就需要另写一个类来继承它然后改变一些方法实现,这样的话就会有很多重复代码。这也是设计模式所强调的少用继承多用组合。但是MapContext的写法使得子类没法去替换HashMap,哎,心塞 。
MapContext又提供了如下几个返回值不可修改的方法:
有点扯远了。继续回到DefaultSecurityManager创建Subject的地方:
对于context,把能获取到的参数都凑齐,SecurityManager、Session。resolveSession尝试获取context的map中获取Session,若没有则尝试获取context的map中的Subject,如果存在的话,根据此Subject来获取Session,若没有再尝试获取sessionId,若果有了sessionId则构建成一个DefaultSessionKey来获取对应的Session。
整个过程如下;
先看下context.resolveSession():
existingSubject.getSession(false):通过Subject获取Session如下
getSession()的参数表示是否创建session,如果Session为空,并且传递的参数为true,则会创建一个Session。然而这里传递的是false,也就是说不会在创建Subject的时候来创建Session,所以把创建Session过程说完后,再回到此处是要记着不会去创建一个Session。但是我们可以来看下是如何创建Session的,整体三大步骤,先创建一个SessionContext ,然后根据SessionContext 来创建Session,最后是装饰Session,由于创建Session过程内容比较多,先说说装饰Session。
装饰Session就是讲Session和DelegatingSubject封装起来。
然后来说Session的创建过程,这和Subject的创建方式差不多。
同样是SessionContext的接口设计:
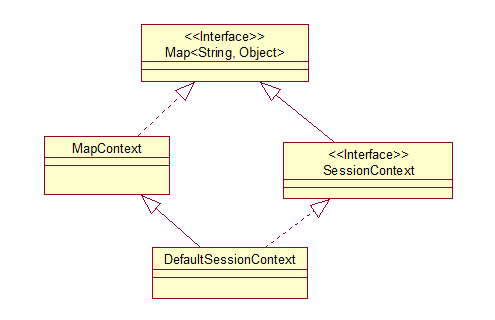
和SubjectContext相当雷同。
看下SessionContext的主要内容:
主要两个内容,host和sessionId。
接下来看下如何由SessionContext来创建Session:
和Subject一样也是由一个SessionFactory根据SessionContext来创建出一个Session,看下默认的SessionFactory SimpleSessionFactory的创建过程:
如果SessionContext有host信息,就传递给Session,然后就是直接new一个Session接口的实现SimpleSession,先看下Session接口有哪些内容:
id:Session的唯一标识,创建时间、超时时间等内容。
再看SimpleSession的创建过程:
设置下超时时间为DefaultSessionManager.DEFAULT_GLOBAL_SESSION_TIMEOUT 30分钟,startTimestamp 和lastAccessTime设置为现在开始。就这样构建出了一个Session的实例,然后就是需要将该实例保存起来:
即该进行create(s)操作了,又和Subject极度的相像,使用sessionDAO来保存刚才创建的Session。再来看下SessionDAO接口:
也就是对所有的Session进行增删该查,SessionDAO 接口继承关系如下:
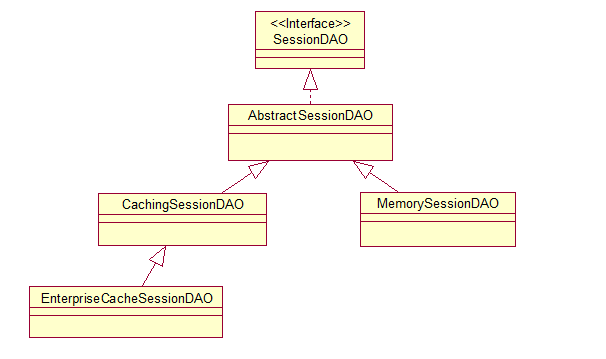
AbstractSessionDAO:有一个重要的属性SessionIdGenerator,它负责给Session创建sessionId,SessionIdGenerator接口如下:
很简单,参数为Session,返回sessionId。SessionIdGenerator 的实现有两个JavaUuidSessionIdGenerator、RandomSessionIdGenerator。而AbstractSessionDAO默认采用的是JavaUuidSessionIdGenerator,如下:
MemorySessionDAO继承了AbstractSessionDAO,它把Session存储在一个ConcurrentMap<Serializable, Session> sessions集合中,key为sessionId,value为Session。
CachingSessionDAO:主要配合在别的地方存储session。先不介绍,之后的文章再详细说。
对于本案例来说SessionDAO为MemorySessionDAO。至此整个Session的创建过程就走通了。
刚才虽然说了整个Session的创建过程,回到上文所说的,不会去创建Session的地方。在创建Subject搜集session信息时,使用的此时的Subject的Session、sessionId都为空,所以获取不到Session。然后就是doCreateSubject:
就是通过SubjectFactory工厂接口来创建Subject的,而DefaultSecurityManager默认使用的
SubjectFactory是DefaultSubjectFactory:
继续看DefaultSubjectFactory是怎么创建Subject的:
仍然就是将这些属性传递给DelegatingSubject,也没什么好说的。创建完成之后,就需要将刚创建的Subject保存起来,仍回到:
来看下save方法:
可以看到又是使用另一个模块来完成的即SubjectDAO,SubjectDAO接口如下:
很简单,就是保存和删除一个Subject。我们看下具体的实现类DefaultSubjectDAO是如何来保存的:
首先就是判断isSessionStorageEnabled,是否要存储该Subject的session来
DefaultSubjectDAO:有一个重要属性SessionStorageEvaluator,它是用来决定一个Subject的Session来记录Subject的状态,接口如下
其实现为DefaultSessionStorageEvaluator:
决定策略就是通过DefaultSessionStorageEvaluator 的sessionStorageEnabled的true或false 和subject是否有Session对象来决定的。如果允许存储Subject的Session的话,下面就说具体的存储过程:
上面有我们关心的重点,当subject.getSession(false)获取的Session为空时(它不会去创建Session),此时就需要去创建Session,subject.getSession()则默认调用的是subject.getSession(true),则会进行Session的创建,创建过程上文已详细说明了。
在第一次创建Subject的时候
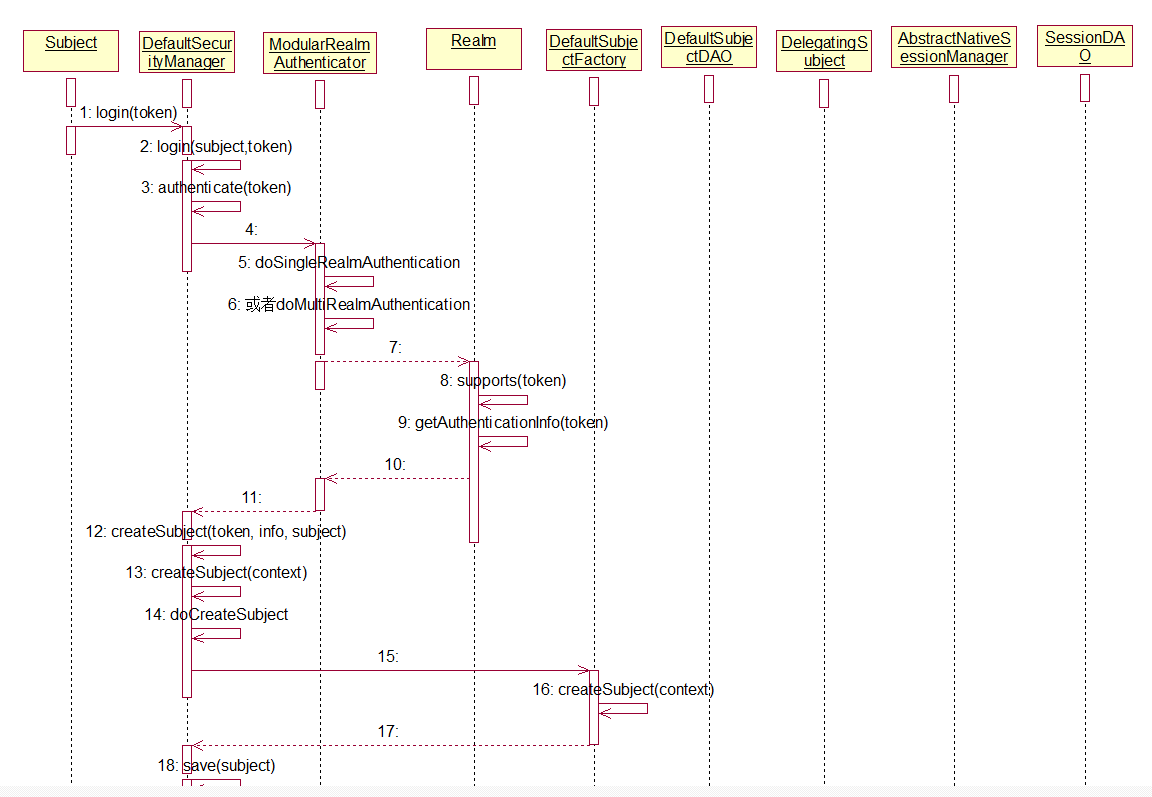
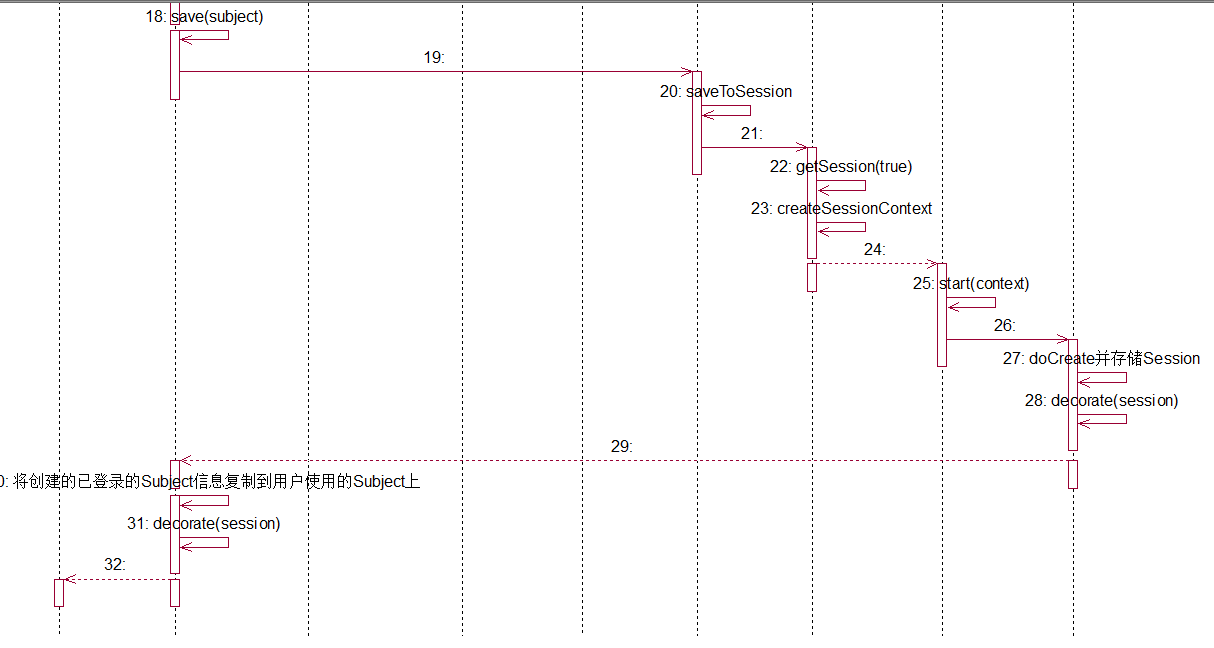
虽然Session为空,但此时还没有用户身份信息,也不会去创建Session。案例中的subject.login(token),该过程则会去创建Session,具体看下过程:
对于验证过程上篇文章已经简单说明了,这里不再说明,重点还是在验证通过后,会设置Subject的身份,即用户名:
有了认证成功的AuthenticationInfo信息,SubjectContext在resolvePrincipals便可以获取用户信息,即通过AuthenticationInfo的getPrincipals()来获得。
PrincipalCollection不为空了,在save(subject)的时候会得到session为空,同时PrincipalCollection不为空,则会执行Session的创建。也就是说在认证通过后,会执行Session的创建,Session创建完成之后会进行一次装饰,即用StoppingAwareProxiedSession将创建出来的session和subject关联起来,然后又进行如下操作:
subject 创建出来之后,暂且叫内部subject,就是把认证通过的内部subject的信息和session复制给我们外界使用的subject.login(token)的subject中,这个subject暂且叫外部subject,看下session的赋值,又进行了一次装饰,这次装饰则把session(类型为StoppingAwareProxiedSession,即是内部subject和session的合体)和外部subject绑定到一起。
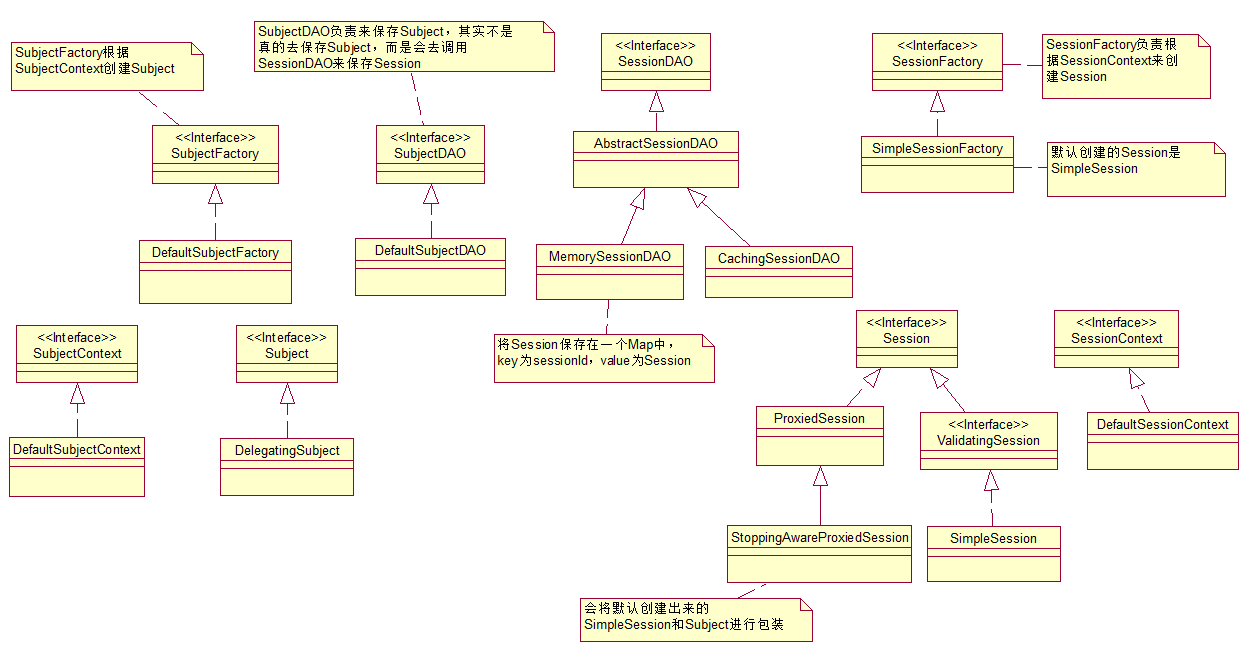
最后来总结下,首先是Subject和Session的接口类图:
然后就是Subject subject = SecurityUtils.getSubject()的一个简易的流程图:

最后是subject.login(token)的简易流程图:
Java代码 
- public static Subject getSubject() {
- Subject subject = ThreadContext.getSubject();
- if (subject == null) {
- subject = (new Subject.Builder()).buildSubject();
- ThreadContext.bind(subject);
- }
- return subject;
- }
使用ThreadLocal模式来获取,若没有则创建一个并绑定到当前线程。此时创建使用的是Subject内部类Builder来创建的,Builder会创建一个SubjectContext接口的实例DefaultSubjectContext,最终会委托securityManager来根据SubjectContext信息来创建一个Subject,下面详细说下该过程,在DefaultSecurityManager的createSubject方法中:
Java代码
- public Subject createSubject(SubjectContext subjectContext) {
- SubjectContext context = copy(subjectContext);
- context = ensureSecurityManager(context);
- context = resolveSession(context);
- context = resolvePrincipals(context);
- Subject subject = doCreateSubject(context);
- save(subject);
- return subject;
- }
首先就是复制SubjectContext,SubjectContext 接口继承了Map<String, Object>,然后加入了几个重要的SecurityManager、SessionId、Subject、PrincipalCollection、Session、boolean authenticated、boolean sessionCreationEnabled、Host、AuthenticationToken、AuthenticationInfo等众多信息。
然后来讨论下接口设计:
讨论1:首先是SubjectContext为什么要去实现Map<String, Object>?
SubjectContext提供了常用的get、set方法,还提供了一个resolve方法,以SecurityManager为例:
Java代码
- SecurityManager getSecurityManager();
- void setSecurityManager(SecurityManager securityManager);
- SecurityManager resolveSecurityManager();
这些get、set方法则用于常用的设置和获取,而resolve则表示先调用getSecurityManager,如果获取不到,则使用其他途径来获取,如DefaultSubjectContext的实现:
Java代码
- public SecurityManager resolveSecurityManager() {
- SecurityManager securityManager = getSecurityManager();
- if (securityManager == null) {
- if (log.isDebugEnabled()) {
- log.debug("No SecurityManager available in subject context map. " +
- "Falling back to SecurityUtils.getSecurityManager() lookup.");
- }
- try {
- securityManager = SecurityUtils.getSecurityManager();
- } catch (UnavailableSecurityManagerException e) {
- if (log.isDebugEnabled()) {
- log.debug("No SecurityManager available via SecurityUtils. Heuristics exhausted.", e);
- }
- }
- }
- return securityManager;
- }
如果getSecurityManager获取不到,则使用SecurityUtils工具来获取。
再如resolvePrincipals
Java代码
- public PrincipalCollection resolvePrincipals() {
- PrincipalCollection principals = getPrincipals();
- if (CollectionUtils.isEmpty(principals)) {
- //check to see if they were just authenticated:
- AuthenticationInfo info = getAuthenticationInfo();
- if (info != null) {
- principals = info.getPrincipals();
- }
- }
- if (CollectionUtils.isEmpty(principals)) {
- Subject subject = getSubject();
- if (subject != null) {
- principals = subject.getPrincipals();
- }
- }
- if (CollectionUtils.isEmpty(principals)) {
- //try the session:
- Session session = resolveSession();
- if (session != null) {
- principals = (PrincipalCollection) session.getAttribute(PRINCIPALS_SESSION_KEY);
- }
- }
- return principals;
- }
普通的getPrincipals()获取不到,尝试使用其他属性来获取。
讨论2:此时就有一个问题,有必要再对外公开getPrincipals方法吗?什么情况下外界会去调用getPrincipals方法而不会去调用resolvePrincipals方法?
然后我们继续回到上面的类图设计上:
DefaultSubjectContext继承了MapContext,MapContext又实现了Map<String, Object>,看下此时的MapContext有什么东西:
Java代码
- public class MapContext implements Map<String, Object>, Serializable {
- private static final long serialVersionUID = 5373399119017820322L;
- private final Map<String, Object> backingMap;
- public MapContext() {
- this.backingMap = new HashMap<String, Object>();
- }
- public MapContext(Map<String, Object> map) {
- this();
- if (!CollectionUtils.isEmpty(map)) {
- this.backingMap.putAll(map);
- }
- }
- //略
- }
MapContext内部拥有一个类型为HashMap的backingMap属性,大部分方法都由HashMap来实现,然后仅仅更改某些行为,MapContext没有选择去继承HashMap,而是使用了组合的方式,更加容易去扩展,如backingMap的类型不一定非要选择HashMap,可以换成其他的Map实现,一旦MapContext选择继承HashMap,如果想对其他的Map类型进行同样的功能增强的话,就需要另写一个类来继承它然后改变一些方法实现,这样的话就会有很多重复代码。这也是设计模式所强调的少用继承多用组合。但是MapContext的写法使得子类没法去替换HashMap,哎,心塞
。 MapContext又提供了如下几个返回值不可修改的方法:
Java代码
- public Set<String> keySet() {
- return Collections.unmodifiableSet(backingMap.keySet());
- }
- public Collection<Object> values() {
- return Collections.unmodifiableCollection(backingMap.values());
- }
- public Set<Entry<String, Object>> entrySet() {
- return Collections.unmodifiableSet(backingMap.entrySet());
- }
有点扯远了。继续回到DefaultSecurityManager创建Subject的地方:
Java代码
- public Subject createSubject(SubjectContext subjectContext) {
- //create a copy so we don't modify the argument's backing map:
- SubjectContext context = copy(subjectContext);
- //ensure that the context has a SecurityManager instance, and if not, add one:
- context = ensureSecurityManager(context);
- //Resolve an associated Session (usually based on a referenced session ID), and place it in the context before
- //sending to the SubjectFactory. The SubjectFactory should not need to know how to acquire sessions as the
- //process is often environment specific - better to shield the SF from these details:
- context = resolveSession(context);
- //Similarly, the SubjectFactory should not require any concept of RememberMe - translate that here first
- //if possible before handing off to the SubjectFactory:
- context = resolvePrincipals(context);
- Subject subject = doCreateSubject(context);
- //save this subject for future reference if necessary:
- //(this is needed here in case rememberMe principals were resolved and they need to be stored in the
- //session, so we don't constantly rehydrate the rememberMe PrincipalCollection on every operation).
- //Added in 1.2:
- save(subject);
- return subject;
- }
对于context,把能获取到的参数都凑齐,SecurityManager、Session。resolveSession尝试获取context的map中获取Session,若没有则尝试获取context的map中的Subject,如果存在的话,根据此Subject来获取Session,若没有再尝试获取sessionId,若果有了sessionId则构建成一个DefaultSessionKey来获取对应的Session。
整个过程如下;
Java代码
- protected SubjectContext resolveSession(SubjectContext context) {
- if (context.resolveSession() != null) {
- log.debug("Context already contains a session. Returning.");
- return context;
- }
- try {
- //Context couldn't resolve it directly, let's see if we can since we have direct access to
- //the session manager:
- Session session = resolveContextSession(context);
- if (session != null) {
- context.setSession(session);
- }
- } catch (InvalidSessionException e) {
- log.debug("Resolved SubjectContext context session is invalid. Ignoring and creating an anonymous " +
- "(session-less) Subject instance.", e);
- }
- return context;
- }
先看下context.resolveSession():
Java代码
- public Session resolveSession() {
- //这里则是直接从map中取出Session
- Session session = getSession();
- if (session == null) {
- //try the Subject if it exists:
- //若果没有,尝试从map中取出Subject
- Subject existingSubject = getSubject();
- if (existingSubject != null) {
- //这里就是Subject获取session的方法,需要详细看下
- session = existingSubject.getSession(false);
- }
- }
- return session;
- }
existingSubject.getSession(false):通过Subject获取Session如下
Java代码
- public Session getSession(boolean create) {
- if (log.isTraceEnabled()) {
- log.trace("attempting to get session; create = " + create +
- "; session is null = " + (this.session == null) +
- "; session has id = " + (this.session != null && session.getId() != null));
- }
- if (this.session == null && create) {
- //added in 1.2:
- if (!isSessionCreationEnabled()) {
- String msg = "Session creation has been disabled for the current subject. This exception indicates " +
- "that there is either a programming error (using a session when it should never be " +
- "used) or that Shiro's configuration needs to be adjusted to allow Sessions to be created " +
- "for the current Subject. See the " + DisabledSessionException.class.getName() + " JavaDoc " +
- "for more.";
- throw new DisabledSessionException(msg);
- }
- log.trace("Starting session for host {}", getHost());
- SessionContext sessionContext = createSessionContext();
- Session session = this.securityManager.start(sessionContext);
- this.session = decorate(session);
- }
- return this.session;
- }
getSession()的参数表示是否创建session,如果Session为空,并且传递的参数为true,则会创建一个Session。然而这里传递的是false,也就是说不会在创建Subject的时候来创建Session,所以把创建Session过程说完后,再回到此处是要记着不会去创建一个Session。但是我们可以来看下是如何创建Session的,整体三大步骤,先创建一个SessionContext ,然后根据SessionContext 来创建Session,最后是装饰Session,由于创建Session过程内容比较多,先说说装饰Session。
Java代码
- protected Session decorate(Session session) {
- if (session == null) {
- throw new IllegalArgumentException("session cannot be null");
- }
- return new StoppingAwareProxiedSession(session, this);
- }
装饰Session就是讲Session和DelegatingSubject封装起来。
然后来说Session的创建过程,这和Subject的创建方式差不多。
同样是SessionContext的接口设计:
和SubjectContext相当雷同。
看下SessionContext的主要内容:
Java代码
- void setHost(String host);
- String getHost();
- Serializable getSessionId();
- void setSessionId(Serializable sessionId);
主要两个内容,host和sessionId。
接下来看下如何由SessionContext来创建Session:
Java代码
- protected Session doCreateSession(SessionContext context) {
- Session s = newSessionInstance(context);
- if (log.isTraceEnabled()) {
- log.trace("Creating session for host {}", s.getHost());
- }
- create(s);
- return s;
- }
- protected Session newSessionInstance(SessionContext context) {
- return getSessionFactory().createSession(context);
- }
和Subject一样也是由一个SessionFactory根据SessionContext来创建出一个Session,看下默认的SessionFactory SimpleSessionFactory的创建过程:
Java代码
- public Session createSession(SessionContext initData) {
- if (initData != null) {
- String host = initData.getHost();
- if (host != null) {
- return new SimpleSession(host);
- }
- }
- return new SimpleSession();
- }
如果SessionContext有host信息,就传递给Session,然后就是直接new一个Session接口的实现SimpleSession,先看下Session接口有哪些内容:
Java代码
- public interface Session {
- Serializable getId();
- Date getStartTimestamp();
- Date getLastAccessTime();
- long getTimeout() throws InvalidSessionException;
- void setTimeout(long maxIdleTimeInMillis) throws InvalidSessionException;
- String getHost();
- void touch() throws InvalidSessionException;
- void stop() throws InvalidSessionException;
- Collection<Object> getAttributeKeys() throws InvalidSessionException;
- Object getAttribute(Object key) throws InvalidSessionException;
- void setAttribute(Object key, Object value) throws InvalidSessionException;
- Object removeAttribute(Object key) throws InvalidSessionException;
- }
id:Session的唯一标识,创建时间、超时时间等内容。
再看SimpleSession的创建过程:
Java代码
- public SimpleSession() {
- this.timeout = DefaultSessionManager.DEFAULT_GLOBAL_SESSION_TIMEOUT;
- this.startTimestamp = new Date();
- this.lastAccessTime = this.startTimestamp;
- }
- public SimpleSession(String host) {
- this();
- this.host = host;
- }
设置下超时时间为DefaultSessionManager.DEFAULT_GLOBAL_SESSION_TIMEOUT 30分钟,startTimestamp 和lastAccessTime设置为现在开始。就这样构建出了一个Session的实例,然后就是需要将该实例保存起来:
Java代码
- protected Session doCreateSession(SessionContext context) {
- Session s = newSessionInstance(context);
- if (log.isTraceEnabled()) {
- log.trace("Creating session for host {}", s.getHost());
- }
- create(s);
- return s;
- }
- protected void create(Session session) {
- if (log.isDebugEnabled()) {
- log.debug("Creating new EIS record for new session instance [" + session + "]");
- }
- sessionDAO.create(session);
- }
即该进行create(s)操作了,又和Subject极度的相像,使用sessionDAO来保存刚才创建的Session。再来看下SessionDAO接口:
Java代码
- public interface SessionDAO {
- Serializable create(Session session);
- Session readSession(Serializable sessionId) throws UnknownSessionException;
- void update(Session session) throws UnknownSessionException;
- void delete(Session session);
- Collection<Session> getActiveSessions();
- }
也就是对所有的Session进行增删该查,SessionDAO 接口继承关系如下:
AbstractSessionDAO:有一个重要的属性SessionIdGenerator,它负责给Session创建sessionId,SessionIdGenerator接口如下:
Java代码
- public interface SessionIdGenerator {
- Serializable generateId(Session session);
- }
很简单,参数为Session,返回sessionId。SessionIdGenerator 的实现有两个JavaUuidSessionIdGenerator、RandomSessionIdGenerator。而AbstractSessionDAO默认采用的是JavaUuidSessionIdGenerator,如下:
Java代码
- public AbstractSessionDAO() {
- this.sessionIdGenerator = new JavaUuidSessionIdGenerator();
- }
MemorySessionDAO继承了AbstractSessionDAO,它把Session存储在一个ConcurrentMap<Serializable, Session> sessions集合中,key为sessionId,value为Session。
CachingSessionDAO:主要配合在别的地方存储session。先不介绍,之后的文章再详细说。
对于本案例来说SessionDAO为MemorySessionDAO。至此整个Session的创建过程就走通了。
刚才虽然说了整个Session的创建过程,回到上文所说的,不会去创建Session的地方。在创建Subject搜集session信息时,使用的此时的Subject的Session、sessionId都为空,所以获取不到Session。然后就是doCreateSubject:
Java代码
- protected Subject doCreateSubject(SubjectContext context) {
- return getSubjectFactory().createSubject(context);
- }
就是通过SubjectFactory工厂接口来创建Subject的,而DefaultSecurityManager默认使用的
SubjectFactory是DefaultSubjectFactory:
Java代码
- public DefaultSecurityManager() {
- super();
- this.subjectFactory = new DefaultSubjectFactory();
- this.subjectDAO = new DefaultSubjectDAO();
- }
继续看DefaultSubjectFactory是怎么创建Subject的:
Java代码
- public Subject createSubject(SubjectContext context) {
- SecurityManager securityManager = context.resolveSecurityManager();
- Session session = context.resolveSession();
- boolean sessionCreationEnabled = context.isSessionCreationEnabled();
- PrincipalCollection principals = context.resolvePrincipals();
- boolean authenticated = context.resolveAuthenticated();
- String host = context.resolveHost();
- return new DelegatingSubject(principals, authenticated, host, session, sessionCreationEnabled, securityManager);
- }
仍然就是将这些属性传递给DelegatingSubject,也没什么好说的。创建完成之后,就需要将刚创建的Subject保存起来,仍回到:
Java代码
- public Subject createSubject(SubjectContext subjectContext) {
- //create a copy so we don't modify the argument's backing map:
- SubjectContext context = copy(subjectContext);
- //ensure that the context has a SecurityManager instance, and if not, add one:
- context = ensureSecurityManager(context);
- //Resolve an associated Session (usually based on a referenced session ID), and place it in the context before
- //sending to the SubjectFactory. The SubjectFactory should not need to know how to acquire sessions as the
- //process is often environment specific - better to shield the SF from these details:
- context = resolveSession(context);
- //Similarly, the SubjectFactory should not require any concept of RememberMe - translate that here first
- //if possible before handing off to the SubjectFactory:
- context = resolvePrincipals(context);
- Subject subject = doCreateSubject(context);
- //save this subject for future reference if necessary:
- //(this is needed here in case rememberMe principals were resolved and they need to be stored in the
- //session, so we don't constantly rehydrate the rememberMe PrincipalCollection on every operation).
- //Added in 1.2:
- save(subject);
- return subject;
- }
来看下save方法:
Java代码
- protected void save(Subject subject) {
- this.subjectDAO.save(subject);
- }
可以看到又是使用另一个模块来完成的即SubjectDAO,SubjectDAO接口如下:
Java代码
- public interface SubjectDAO {
- Subject save(Subject subject);
- void delete(Subject subject);
- }
很简单,就是保存和删除一个Subject。我们看下具体的实现类DefaultSubjectDAO是如何来保存的:
Java代码
- public Subject save(Subject subject) {
- if (isSessionStorageEnabled(subject)) {
- saveToSession(subject);
- } else {
- log.trace("Session storage of subject state for Subject [{}] has been disabled: identity and " +
- "authentication state are expected to be initialized on every request or invocation.", subject);
- }
- return subject;
- }
首先就是判断isSessionStorageEnabled,是否要存储该Subject的session来
DefaultSubjectDAO:有一个重要属性SessionStorageEvaluator,它是用来决定一个Subject的Session来记录Subject的状态,接口如下
Java代码
- public interface SessionStorageEvaluator {
- boolean isSessionStorageEnabled(Subject subject);
- }
其实现为DefaultSessionStorageEvaluator:
Java代码
- public class DefaultSessionStorageEvaluator implements SessionStorageEvaluator {
- private boolean sessionStorageEnabled = true;
- public boolean isSessionStorageEnabled(Subject subject) {
- return (subject != null && subject.getSession(false) != null) || isSessionStorageEnabled();
- }
决定策略就是通过DefaultSessionStorageEvaluator 的sessionStorageEnabled的true或false 和subject是否有Session对象来决定的。如果允许存储Subject的Session的话,下面就说具体的存储过程:
Java代码
- protected void saveToSession(Subject subject) {
- //performs merge logic, only updating the Subject's session if it does not match the current state:
- mergePrincipals(subject);
- mergeAuthenticationState(subject);
- }
- protected void mergePrincipals(Subject subject) {
- //merge PrincipalCollection state:
- PrincipalCollection currentPrincipals = null;
- //SHIRO-380: added if/else block - need to retain original (source) principals
- //This technique (reflection) is only temporary - a proper long term solution needs to be found,
- //but this technique allowed an immediate fix that is API point-version forwards and backwards compatible
- //
- //A more comprehensive review / cleaning of runAs should be performed for Shiro 1.3 / 2.0 +
- if (subject.isRunAs() && subject instanceof DelegatingSubject) {
- try {
- Field field = DelegatingSubject.class.getDeclaredField("principals");
- field.setAccessible(true);
- currentPrincipals = (PrincipalCollection)field.get(subject);
- } catch (Exception e) {
- throw new IllegalStateException("Unable to access DelegatingSubject principals property.", e);
- }
- }
- if (currentPrincipals == null || currentPrincipals.isEmpty()) {
- currentPrincipals = subject.getPrincipals();
- }
- Session session = subject.getSession(false);
- if (session == null) {
- //只有当Session为空,并且currentPrincipals不为空的时候才会去创建Session
- //Subject subject = SecurityUtils.getSubject()此时两者都是为空的,
- //不会去创建Session
- if (!CollectionUtils.isEmpty(currentPrincipals)) {
- session = subject.getSession();
- session.setAttribute(DefaultSubjectContext.PRINCIPALS_SESSION_KEY, currentPrincipals);
- }
- //otherwise no session and no principals - nothing to save
- } else {
- PrincipalCollection existingPrincipals =
- (PrincipalCollection) session.getAttribute(DefaultSubjectContext.PRINCIPALS_SESSION_KEY);
- if (CollectionUtils.isEmpty(currentPrincipals)) {
- if (!CollectionUtils.isEmpty(existingPrincipals)) {
- session.removeAttribute(DefaultSubjectContext.PRINCIPALS_SESSION_KEY);
- }
- //otherwise both are null or empty - no need to update the session
- } else {
- if (!currentPrincipals.equals(existingPrincipals)) {
- session.setAttribute(DefaultSubjectContext.PRINCIPALS_SESSION_KEY, currentPrincipals);
- }
- //otherwise they're the same - no need to update the session
- }
- }
- }
上面有我们关心的重点,当subject.getSession(false)获取的Session为空时(它不会去创建Session),此时就需要去创建Session,subject.getSession()则默认调用的是subject.getSession(true),则会进行Session的创建,创建过程上文已详细说明了。
在第一次创建Subject的时候
Java代码
- Subject subject = SecurityUtils.getSubject();
虽然Session为空,但此时还没有用户身份信息,也不会去创建Session。案例中的subject.login(token),该过程则会去创建Session,具体看下过程:
Java代码
- public Subject login(Subject subject, AuthenticationToken token) throws AuthenticationException {
- AuthenticationInfo info;
- try {
- info = authenticate(token);
- } catch (AuthenticationException ae) {
- try {
- onFailedLogin(token, ae, subject);
- } catch (Exception e) {
- if (log.isInfoEnabled()) {
- log.info("onFailedLogin method threw an " +
- "exception. Logging and propagating original AuthenticationException.", e);
- }
- }
- throw ae; //propagate
- }
- //在该过程会进行Session的创建
- Subject loggedIn = createSubject(token, info, subject);
- onSuccessfulLogin(token, info, loggedIn);
- return loggedIn;
- }
对于验证过程上篇文章已经简单说明了,这里不再说明,重点还是在验证通过后,会设置Subject的身份,即用户名:
Java代码
- protected Subject createSubject(AuthenticationToken token, AuthenticationInfo info, Subject existing) {
- SubjectContext context = createSubjectContext();
- context.setAuthenticated(true);
- context.setAuthenticationToken(token);
- context.setAuthenticationInfo(info);
- if (existing != null) {
- context.setSubject(existing);
- }
- return createSubject(context);
- }
有了认证成功的AuthenticationInfo信息,SubjectContext在resolvePrincipals便可以获取用户信息,即通过AuthenticationInfo的getPrincipals()来获得。
Java代码
- public PrincipalCollection resolvePrincipals() {
- PrincipalCollection principals = getPrincipals();
- if (CollectionUtils.isEmpty(principals)) {
- //check to see if they were just authenticated:
- AuthenticationInfo info = getAuthenticationInfo();
- if (info != null) {
- principals = info.getPrincipals();
- }
- }
- if (CollectionUtils.isEmpty(principals)) {
- Subject subject = getSubject();
- if (subject != null) {
- principals = subject.getPrincipals();
- }
- }
- if (CollectionUtils.isEmpty(principals)) {
- //try the session:
- Session session = resolveSession();
- if (session != null) {
- principals = (PrincipalCollection) session.getAttribute(PRINCIPALS_SESSION_KEY);
- }
- }
- return principals;
- }
PrincipalCollection不为空了,在save(subject)的时候会得到session为空,同时PrincipalCollection不为空,则会执行Session的创建。也就是说在认证通过后,会执行Session的创建,Session创建完成之后会进行一次装饰,即用StoppingAwareProxiedSession将创建出来的session和subject关联起来,然后又进行如下操作:
Java代码
- public void login(AuthenticationToken token) throws AuthenticationException {
- clearRunAsIdentitiesInternal();
- //这里的Subject则是经过认证后创建的并且也含有刚才创建的session,类型为
- //StoppingAwareProxiedSession,即是该subject本身和session的合体。
- Subject subject = securityManager.login(this, token);
- PrincipalCollection principals;
- String host = null;
- if (subject instanceof DelegatingSubject) {
- DelegatingSubject delegating = (DelegatingSubject) subject;
- //we have to do this in case there are assumed identities - we don't want to lose the 'real' principals:
- principals = delegating.principals;
- host = delegating.host;
- } else {
- principals = subject.getPrincipals();
- }
- if (principals == null || principals.isEmpty()) {
- String msg = "Principals returned from securityManager.login( token ) returned a null or " +
- "empty value. This value must be non null and populated with one or more elements.";
- throw new IllegalStateException(msg);
- }
- this.principals = principals;
- this.authenticated = true;
- if (token instanceof HostAuthenticationToken) {
- host = ((HostAuthenticationToken) token).getHost();
- }
- if (host != null) {
- this.host = host;
- }
- Session session = subject.getSession(false);
- if (session != null) {
- //在这里可以看到又进行了一次装饰
- this.session = decorate(session);
- } else {
- this.session = null;
- }
- }
subject 创建出来之后,暂且叫内部subject,就是把认证通过的内部subject的信息和session复制给我们外界使用的subject.login(token)的subject中,这个subject暂且叫外部subject,看下session的赋值,又进行了一次装饰,这次装饰则把session(类型为StoppingAwareProxiedSession,即是内部subject和session的合体)和外部subject绑定到一起。
最后来总结下,首先是Subject和Session的接口类图:
然后就是Subject subject = SecurityUtils.getSubject()的一个简易的流程图:
最后是subject.login(token)的简易流程图:

 1万+


 扫一扫


 被折叠的 条评论
为什么被折叠?
 到【灌水乐园】发言


