


mysql读写分离
mysql实现读写分离的方式
mysql 实现读写分离的方式有以下几种:
- 程序修改mysql操作,直接和数据库通信,简单快捷的读写分离和随机的方式实现的负载均衡,权限独立分配,需要开发人员协助。
- amoeba,直接实现读写分离和负载均衡,不用修改代码,有很灵活的数据解决方案,自己分配账户,和后端数据库权限管理独立,权限处理不够灵活。
- mysql-proxy,直接实现读写分离和负载均衡,不用修改代码,master和slave用一样的帐号,效率低
- mycat中间件
- proxysql中间件(推荐使用)
proxysql介绍:
ProxySQL 是基于 MySQL 的一款开源的中间件的产品,是一个灵活的 MySQL 代理层,可以实现读写分离,支持 Query 路由功能,支持动态指定某个 SQL 进行缓存,支持动态加载(无需重启 ProxySQL 服务),故障切换和一些 SQL 的过滤功能。
ProxySQL安装
//配置yum源
[root@localhost ~]# cat <<EOF | tee /etc/yum.repos.d/proxysql.repo
[proxysql_repo]
name= ProxySQL
baseurl=http://repo.proxysql.com/ProxySQL/proxysql-2.0.x/centos/8/
gpgcheck=1
gpgkey=http://repo.proxysql.com/ProxySQL/repo_pub_key
EOF

[root@localhost ~]# yum -y install  proxysql

//开机自启
[root@localhost ~]#  systemctl enable --now proxysql


[root@localhost ~]# ss -antl
State  Recv-Q  Send-Q   Local Address:Port           Peer Address:Port
LISTEN 0       128            0.0.0.0:22                  0.0.0.0:*
LISTEN 0       128            0.0.0.0:6032                0.0.0.0:*
LISTEN 0       128            0.0.0.0:6033                0.0.0.0:*
LISTEN 0       128            0.0.0.0:6033                0.0.0.0:*
LISTEN 0       128            0.0.0.0:6033                0.0.0.0:*
LISTEN 0       128            0.0.0.0:6033                0.0.0.0:*
LISTEN 0       128               [::]:22                     [::]:*
ProxySQL的Admin管理接口
当 ProxySQL 启动后,将监听两个端口:
- admin管理接口,默认端口为6032。该端口用于查看、配置ProxySQL
- 接收SQL语句的接口,默认端口为6033,这个接口类似于MySQL的3306端口
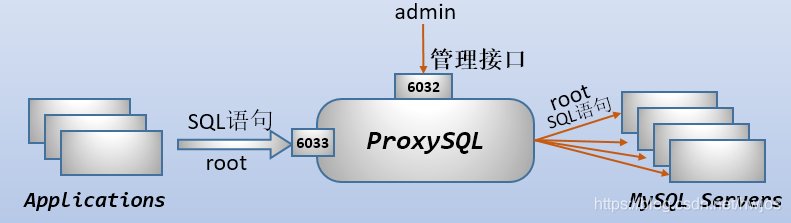
ProxySQL 的 admin 管理接口是一个使用 MySQL 协议的接口,所以,可以直接使用 mysql 客户端、navicat 等工具去连接这个管理接口,其默认的用户名和密码均为 admin
[root@localhost ~]# yum -y install  mariadb


[root@localhost ~]# mysql -uadmin -padmin -h127.0.0.1 -P6032
Welcome to the MariaDB monitor.  Commands end with ; or \g.
Your MySQL connection id is 4
Server version: 5.5.30 (ProxySQL Admin Module)

Copyright (c) 2000, 2018, Oracle, MariaDB Corporation Ab and others.

Type 'help;' or '\h' for help. Type '\c' to clear the current input statement.

MySQL [(none)]> show databases;
+-----+---------------+-------------------------------------+
| seq | name          | file                                |
+-----+---------------+-------------------------------------+
| 0   | main          |                                     |
| 2   | disk          | /var/lib/proxysql/proxysql.db       |
| 3   | stats         |                                     |
| 4   | monitor       |                                     |
| 5   | stats_history | /var/lib/proxysql/proxysql_stats.db |
+-----+---------------+-------------------------------------+
5 rows in set (0.000 sec)
由于 ProxySQL 的配置全部保存在几个自带的库中,所以通过管理接口,可以非常方便地通过发送一些SQL命令去修改 ProxySQL 的配置。 ProxySQL 会解析通过该接口发送的某些对ProxySQL 有效的特定命令,并将其合理转换后发送给内嵌的 SQLite3 数据库引擎去运行
ProxySQL 的配置几乎都是通过管理接口来操作的,通过 Admin 管理接口,可以在线修改几乎所有的配置并使其生效。只有两个变量的配置是必须重启 ProxySQL 才能生效的,它们是:
mysql-threads 和 mysql-stacksize
与admin管理接口相关的变量
admin-admin_credentials变量控制的是admin管理接口的管理员账户。默认的管理员账户和密码为admin:admin,但是这个默认的用户只能在本地使用。如果想要远程连接到ProxySQL,例如用windows上的navicat连接Linux上的ProxySQL管理接口,必须自定义一个管理员账户。
MySQL [(none)]> select @@admin-admin_credentials;    //查看当前用户名和密码
+---------------------------+
| @@admin-admin_credentials |
+---------------------------+
| admin:admin               |
+---------------------------+
1 row in set (0.001 sec)

MySQL [(none)]>  set admin-admin_credentials='admin:admin;myadmin:123123';   //设置管理员帐号myadmin,密码123123
Query OK, 1 row affected (0.001 sec)

MySQL [(none)]> select @@admin-admin_credentials;
+----------------------------+
| @@admin-admin_credentials  |
+----------------------------+
| admin:admin;myadmin:123123 |
+----------------------------+
1 row in set (0.001 sec)


MySQL [(none)]> load admin variables to runtime;        //使修改立即生效
Query OK, 0 rows affected (0.001 sec)

MySQL [(none)]> save admin variables to disk;    //使修改永久保存到磁盘
Query OK, 33 rows affected (0.002 sec)
修改后,就可以使用该用户名和密码连接管理接口
[root@master ~]# mysql -umyadmin -p123123 -P6032 -h192.168.236.135
Welcome to the MariaDB monitor.  Commands end with ; or \g.
Your MySQL connection id is 10
Server version: 5.5.30 (ProxySQL Admin Module)

Copyright (c) 2000, 2018, Oracle, MariaDB Corporation Ab and others.

Type 'help;' or '\h' for help. Type '\c' to clear the current input statement.


l_variables where variable_name='admin-admin_credentials';
+-------------------------+----------------------------+
| variable_name           | variable_value             |
+-------------------------+----------------------------+
| admin-admin_credentials | admin:admin;myadmin:123123 |
+-------------------------+----------------------------+
1 row in set (0.002 sec)
admin-stats_credentials
admin-stats_credentials 变量控制admin管理接口的普通用户,这个变量中的用户没有超级管理员权限,只能查看monitor库和main库中关于统计的数据,其它库都是不可见的,且没有任何写权限
默认的普通用户名和密码均为 stats ,与admin一样,它默认也只能用于本地登录,若想让人远程查看则要添加查看的专有用户
[root@localhost ~]# mysql -ustats -pstats -h127.0.0.1 -P6032
Welcome to the MariaDB monitor.  Commands end with ; or \g.
Your MySQL connection id is 13
Server version: 5.5.30 (ProxySQL Admin Module)

Copyright (c) 2000, 2018, Oracle, MariaDB Corporation Ab and others.

Type 'help;' or '\h' for help. Type '\c' to clear the current input statement.

MySQL [(none)]> show databases;
+-----+---------------+-------------------------------------+
| seq | name          | file                                |
+-----+---------------+-------------------------------------+
| 0   | main          |                                     |
| 2   | monitor       |                                     |
| 3   | stats_history | /var/lib/proxysql/proxysql_stats.db |
+-----+---------------+-------------------------------------+
3 rows in set (0.000 sec)
所有的配置操作都是在修改main库中对应的表
MySQL [(none)]> show tables from main;
+--------------------------------------+
| tables                               |
+--------------------------------------+
| global_variables                     |
| stats_memory_metrics                 |
| stats_mysql_commands_counters        |
| stats_mysql_connection_pool          |
| stats_mysql_connection_pool_reset    |
| stats_mysql_errors                   |
| stats_mysql_errors_reset             |
| stats_mysql_free_connections         |
| stats_mysql_global                   |
| stats_mysql_gtid_executed            |
| stats_mysql_prepared_statements_info |
| stats_mysql_processlist              |
| stats_mysql_query_digest             |
| stats_mysql_query_digest_reset       |
| stats_mysql_query_rules              |
| stats_mysql_users                    |
| stats_proxysql_servers_checksums     |
| stats_proxysql_servers_metrics       |
| stats_proxysql_servers_status        |
+--------------------------------------+
19 rows in set (0.000 sec)

MySQL [(none)]> select * from global_variables;
+--------------------------+----------------+
| variable_name            | variable_value |
+--------------------------+----------------+
| mysql-max_allowed_packet | 4194304        |
+--------------------------+----------------+
1 row in set (0.000 sec)
admin-mysql_ifaces
admin-mysql_ifaces 变量指定admin接口的监听地址,格式为冒号分隔的hostname:port列表。默认监听在 0.0.0.0:6032
注意:允许使用UNIX的domain socket进行监听,这样本主机内的应用程序就可以直接被处理。
[root@localhost ~]# mysql -uadmin -padmin -h127.0.0.1 -P6032
Welcome to the MariaDB monitor.  Commands end with ; or \g.
Your MySQL connection id is 2
Server version: 5.5.30 (ProxySQL Admin Module)

Copyright (c) 2000, 2018, Oracle, MariaDB Corporation Ab and others.

Type 'help;' or '\h' for help. Type '\c' to clear the current input statement.

MySQL [(none)]>  SET admin-mysql_ifaces='0.0.0.0:6032;/tmp/proxysql_admin.sock';
Query OK, 1 row affected (0.000 sec)

MySQL [(none)]> load admin variables to runtime;
Query OK, 0 rows affected (0.000 sec)

MySQL [(none)]> save admin variables to disk;
Query OK, 33 rows affected (0.002 sec)
多层配置系统
proxysql中的库
使用ProxySQL的Admin管理接口连上ProxySQL,可查看ProxySQL拥有的库
[root@localhost ~]# mysql -uadmin -padmin -h127.0.0.1 -P6032
Welcome to the MariaDB monitor.  Commands end with ; or \g.
Your MySQL connection id is 1
Server version: 5.5.30 (ProxySQL Admin Module)

Copyright (c) 2000, 2018, Oracle, MariaDB Corporation Ab and others.

Type 'help;' or '\h' for help. Type '\c' to clear the current input statement.

MySQL [(none)]> show databases;
+-----+---------------+-------------------------------------+
| seq | name          | file                                |
+-----+---------------+-------------------------------------+
| 0   | main          |                                     |
| 2   | disk          | /var/lib/proxysql/proxysql.db       |
| 3   | stats         |                                     |
| 4   | monitor       |                                     |
| 5   | stats_history | /var/lib/proxysql/proxysql_stats.db |
+-----+---------------+-------------------------------------+
5 rows in set (0.000 sec)
其中:
- main库是ProxySQL最主要的库,是需要修改配置时使用的库,它其实是一个内存数据库系统。所以,修改main库中的配置后,必须将其持久化到disk上才能永久保存
- disk库是磁盘数据库,该数据库结构和内存数据库完全一致。当持久化内存数据库中的配置时,其实就是写入到disk库中。磁盘数据库的默认路径为 $DATADIR/proxysql.db
stats库是统计信息库。这个库中的数据一般是在检索其内数据时临时填充的,它保存在内存中。因为没有相关的配置项,所以无需持久化 - monitor库是监控后端MySQL节点相关的库,该库中只有几个log类的表,监控模块收集到的监控信息全都存放到对应的log表中
- stats_history库是1.4.4版新增的库,用于存放历史统计数据。默认路径为 $DATADIR/proxysql_stats.db
ProxySQL 内部使用的是 SQLite3 数据库,无论是内存数据库还是磁盘数据库,都是通过SQLite3引 擎进行解析、操作的。它和 MySQL 的语法可能稍有不同,但ProxySQL会对不兼容的语法自动进行调整,最大程度上保证MySQL语句的有效率。
上面描述main库的时候,只是说了内存数据库需要持久化到disk库才能永久保存配置。但实际上,修改了main库中的配置后,并不会立即生效,它还需要load到runtime的数据结构中才生效,只有在runtime数据结构中的配置才是对ProxySQL当前有效的配置
ProxySQL多层配置系统
ProxySQL 的配置系统非常强大,它能在线修改几乎所有配置(仅有的两个需要重启才能生效的变量为 mysql-threads 和 mysql-stacksize ),并在线生效、持久化保存。这得益于它采用的多层配置系统。
多层配置系统结构如下:
       +-------------------------+
       |         RUNTIME         |
       +-------------------------+
              /|\          |
               |           |
           [1] |       [2] |
               |          \|/
       +-------------------------+
       |         MEMORY          |
       +-------------------------+ _
              /|\          |      |\
               |           |        \
           [3] |       [4] |         \ [5]
               |          \|/         \
       +-------------------------+  +---------------+
       |          DISK           |  |  CONFIG FILE  |
       +-------------------------+  +---------------+
最底层的是 disk 库和 config file 。这里需要注意,这里的 config file 就是传统的配置文件,默认为 /etc/proxysql.cnf , ProxySQL 启动时,主要是从 disk 库中读取配置加载到内存并最终加载到 runtime 生效,只有极少的几个特定配置内容是从 config file 中加载的,除非是第一次初始化 ProxySQL 运行环境(或者disk库为空)
中间层的是 memory ,表示的是内存数据库,其实就是 main 库。通过管理接口修改的所有配置,都保存在内存数据库(main)中。当 ProxySQL 重启或者崩溃时,这个内存数据库中的数据会丢失,所以需要 save 到 disk 库中。
最上层的是 runtime ,它是 ProxySQL 有关线程运行时读取的数据结构。换句话说,该数据结构中的配置都是已生效的配置。所以,修改了 main 库中的配置后,必须 load 到 runtime 数据结构中才能使其生效。
在上面的多层配置系统图中,标注了[1]、[2]、[3]、[4]、[5]的序号。每个序号都有两个操作方向from/to,其实只是所站角度不同而已。以下是各序号对应的操作
[root@localhost ~]# mv /var/lib/proxysql/proxysql.db /opt/
[root@localhost ~]# ls /var/lib/proxysql/
proxysql-ca.pem
proxysql-cert.pem
proxysql-key.pem
proxysql_stats.db


[root@localhost ~]# vim /etc/proxysql.cnf
admin_variables=
{
        admin_credentials="admin:admin"
#       mysql_ifaces="127.0.0.1:6032;/tmp/proxysql_admin.sock"
        mysql_ifaces="0.0.0.0:3306"


[root@localhost ~]# rpm -qa|grep m
ysql
[root@localhost ~]# rpm -qa|grep m
ariadb
mariadb-connector-c-config-3.0.7-1.el8.noarch
mariadb-common-10.3.17-1.module_el8.1.0+257+48736ea6.x86_64
mariadb-connector-c-3.0.7-1.el8.x86_64
mariadb-10.3.17-1.module_el8.1.0+257+48736ea6.x86_64

[root@localhost ~]# systemctl restart proxysql


[root@localhost ~]# ss -antl
State       Recv-Q      Send-Q           Local Address:Port            Peer Address:Port
LISTEN      0           128                    0.0.0.0:3306                 0.0.0.0:*
LISTEN      0           128                    0.0.0.0:6033                 0.0.0.0:*
LISTEN      0           128                    0.0.0.0:6033                 0.0.0.0:*
LISTEN      0           128                    0.0.0.0:6033                 0.0.0.0:*
LISTEN      0           128                    0.0.0.0:6033                 0.0.0.0:*
LISTEN      0           128                    0.0.0.0:22                   0.0.0.0:*
LISTEN      0           128                       [::]:22                      [::]:*
1] :将内存数据库中的配置加载到RUNTIME数据结构中
        LOAD XXX FROM MEMORY
        LOAD XXX TO RUNTIME

[2] :将RUNTIME数据结构中的配置持久化到内存数据库中
        SAVE XXX FROM RUNTIME
        SAVE XXX TO MEMORY

[3] :将磁盘数据库中的配置加载到内存数据库中
        LOAD XXX FROM DISK
        LOAD XXX TO MEMORY

[4] :将内存数据库中的配置持久化到磁盘数据库中
        SAVE XXX FROM MEMORY
        SAVE XXX TO DISK

[5] :从传统配置文件中读取配置加载到内存数据库中
        LOAD XXX FROM CONFIG
DISK/MEMORY/RUNTIME/CONFIG 可以缩写,只要能识别即可。例如MEMORY可以缩写为MEM,runtime可以缩写为run
另外,上面的XXX是什么?这表示要加载/保存的是哪类配置。目前的ProxySQL支持以下几种:
- mysql users
- mysql servers
- mysql variables
- mysql query rules
- admin variables
- scheduler
proxysql_servers:目前ProxySQL集群功能还处于实验阶段,所以该类配置不应该去使用
这些从main库或disk
库中就可以查看到
MySQL [(none)]> show tables from disk;
+------------------------------------+
| tables                             |
+------------------------------------+
| global_variables                   |
| mysql_aws_aurora_hostgroups        |
| mysql_collations                   |
| mysql_galera_hostgroups            |
| mysql_group_replication_hostgroups |
| mysql_query_rules                  |
| mysql_query_rules_fast_routing     |
| mysql_replication_hostgroups       |
| mysql_servers                      |
| mysql_users                        |
| proxysql_servers                   |
| scheduler                          |
+------------------------------------+
12 rows in set (0.001 sec)
上面的结果中我给这些表都标注了一些序号,其所对应的表的内容有以下讲究:
- (1)中包含两类变量,以amdin-开头的表示admin variables,以mysql-开头的表示mysql variables。修改哪类变量,前文的XXX就代表哪类
- (2,5,6)对应的都是mysql servers
- (3,4)对应的是mysql query rules
- (7)对应的mysql users
- (9)对应的scheduler
- (N)只是一张表,保存的是ProxySQL支持的字符集和排序规则,它是不用修改的
- (8)是ProxySQL的集群配置表,该功能目前还处于实验阶段。如果想要配置该功能,则load/save proxysql_servers to/from …
ProxySQL实现读写分离示例
| IP | 角色 | 应用 | 系统平台 |
|---|---|---|---|
| 192.168.236.135 | 读写分离解析主机 | proxysql | redhat8 |
| 192.168.236.131 | master | myasql | redhat8 |
| 192.168.236.129 | slave | mysql | redhat8 |
准备工作:
关闭防火墙
关闭SELINUX
安装mysql并配置主从
//关闭防火墙和seliunx
[root@master ~]# systemctl disable firewalld
Removed /etc/systemd/system/multi-user.target.wants/firewalld.service.
Removed /etc/systemd/system/dbus-org.fedoraproject.FirewallD1.service.
[root@master ~]# systemctl stop firewalld
[root@master ~]# setenforce 0
[root@master ~]# vi /etc/selinux/config

//安装mariadb
[root@master ~]# yum -y install mariadb*
[root@slave ~]# yum -y install mariadb*
[root@slave ~]# systemctl  enable --now mariadb  //设置开机自启
[root@master ~]# systemctl  enable --now mariadb //设置开机自启


[root@master ~]# mysql
Welcome to the MariaDB monitor.  Commands end with ; or \g.
Your MariaDB connection id is 11
Server version: 10.3.17-MariaDB MariaDB Server

Copyright (c) 2000, 2018, Oracle, MariaDB Corporation Ab and others.

Type 'help;' or '\h' for help. Type '\c' to clear the current input statement.
MariaDB [(none)]> grant  replication slave on *.* to 'repl'@'192.168.236.129' identified by 'repl123!';
Query OK, 0 rows affected (0.000 sec)

MariaDB [(none)]> flush privileges;
Query OK, 0 rows affected (0.000 sec)


//测试
[root@slave ~]# mysql -urepl -prepl123! -h192.168.236.131
Welcome to the MariaDB monitor.  Commands end with ; or \g.
Your MariaDB connection id is 11
Server version: 10.3.17-MariaDB MariaDB Server

Copyright (c) 2000, 2018, Oracle, MariaDB Corporation Ab and others.

Type 'help;' or '\h' for help. Type '\c' to clear the current input statement.

//改配置文件
[root@master ~]# vi /etc/my.cnf
[mysqld]
log-bin = mysql_bin
server_id = 10

[root@master ~]# systemctl restart mariadb //服务重启

[root@master ~]# mysql
MariaDB [(none)]> show master status;
+------------------+----------+--------------+------------------+
| File             | Position | Binlog_Do_DB | Binlog_Ignore_DB |
+------------------+----------+--------------+------------------+
| mysql_bin.000001 |      328 |              |                  |
+------------------+----------+--------------+------------------+
1 row in set (0.000 sec)

[root@slave ~]# mysql
MariaDB [(none)]> change master to master_host='192.168.236.131',master_user='repl',master_password='repl123!',master_log_file='mysql_bin.000001',master_log_pos=328;
Query OK, 0 rows affected (0.136 sec)

MariaDB [(none)]> start slave;
Query OK, 0 rows affected, 1 warning (0.000 sec)

MariaDB [(none)]> show slave status\G
*************************** 1. row ***************************
                Slave_IO_State: Waiting for master to send event
                   Master_Host: 192.168.236.131
                   Master_User: repl
                   Master_Port: 3306
                 Connect_Retry: 60
               Master_Log_File: mysql_bin.000001
           Read_Master_Log_Pos: 328
                Relay_Log_File: mariadb-relay-bin.000002
                 Relay_Log_Pos: 555
         Relay_Master_Log_File: mysql_bin.000001
              Slave_IO_Running: Yes
             Slave_SQL_Running: Yes
               Replicate_Do_DB:
           Replicate_Ignore_DB:
            Replicate_Do_Table:
        Replicate_Ignore_Table:
       Replicate_Wild_Do_Table:
   Replicate_Wild_Ignore_Table:
                    Last_Errno: 0
                    Last_Error:
                  Skip_Counter: 0
           Exec_Master_Log_Pos: 328
               Relay_Log_Space: 866
               Until_Condition: None
                Until_Log_File:
                 Until_Log_Pos: 0
            Master_SSL_Allowed: No
            Master_SSL_CA_File:
            Master_SSL_CA_Path:
               Master_SSL_Cert:
             Master_SSL_Cipher:
                Master_SSL_Key:
         Seconds_Behind_Master: 0
 Master_SSL_Verify_Server_Cert: No
                 Last_IO_Errno: 0
                 Last_IO_Error:
                Last_SQL_Errno: 0
                Last_SQL_Error:
   Replicate_Ignore_Server_Ids:
              Master_Server_Id: 10
                Master_SSL_Crl:
            Master_SSL_Crlpath:
                    Using_Gtid: No
                   Gtid_IO_Pos:
       Replicate_Do_Domain_Ids:
   Replicate_Ignore_Domain_Ids:
                 Parallel_Mode: conservative
                     SQL_Delay: 0
           SQL_Remaining_Delay: NULL
       Slave_SQL_Running_State: Slave has read all relay log; waiting for the slave I/O thread to update it
              Slave_DDL_Groups: 0
Slave_Non_Transactional_Groups: 0
    Slave_Transactional_Groups: 0
1 row in set (0.000 sec)
MariaDB [(none)]> create database school;
Query OK, 1 row affected (0.001 sec)
MariaDB [(none)]> show databases;
+--------------------+
| Database           |
+--------------------+
| information_schema |
| mysql              |
| performance_schema |
| school             |
+--------------------+
4 rows in set (0.001 sec)
配置ProxySQL
mysql主库添加proxysql可以增删改查的账号
MariaDB [(none)]> grant all on *.* to 'proadmin'@'192.168.236.135' identified by 'proadmin';
Query OK, 0 rows affected (0.001 sec)

MariaDB [(none)]> flush privileges;
Query OK, 0 rows affected (0.001 sec)
[root@localhost ~]# mysql -uadmin -padmin -h127.0.0.1 -P6032
Welcome to the MariaDB monitor.  Commands end with ; or \g.
Your MySQL connection id is 4
Server version: 5.5.30 (ProxySQL Admin Module)

Copyright (c) 2000, 2018, Oracle, MariaDB Corporation Ab and others.

Type 'help;' or '\h' for help. Type '\c' to clear the current input statement.
登录proxysql管理端
使用 insert 语句添加 mysql 主机到 mysql_servers 表中,其中:hostgroup_id 1 表示写组,2表示读组
(admin@127.0.0.1:6032) [(none)]> insert into mysql_servers(hostgroup_id,hostname,port,weight,comment) values(10,'192.168.226.129',3306,1,'Write Group');
Query OK, 1 row affected (0.000 sec)

(admin@127.0.0.1:6032) [(none)]> insert into mysql_servers(hostgroup_id,hostname,port,weight,cne)]> insert into mysql_servers(hostgroup_id,hostname,port,weight,comment) values(20,'192.168.226.131',3306,1,'Read Group');
Query OK, 1 row affected (0.000 sec)

(admin@127.0.0.1:6032) [(none)]> select hostgroup_id,hostname,port,weight,comment from mysql_servers;
+--------------+-----------------+------+--------+-------------+
| hostgroup_id | hostname        | port | weight | comment     |
+--------------+-----------------+------+--------+-------------+
| 10           | 192.168.226.129 | 3306 | 1      | Write Group |
| 20           | 192.168.226.131 | 3306 | 1      | Read Group  |
+--------------+-----------------+------+--------+-------------+
2 rows in set (0.000 sec)
修改后,需要加载到RUNTIME,并保存到disk
(admin@127.0.0.1:6032) [(none)]> load mysql servers to runtime;
Query OK, 0 rows affected (0.003 sec)

(admin@127.0.0.1:6032) [(none)]> save mysql servers to disk;
Query OK, 0 rows affected (0.061 sec)
在 proxysql 主机的 mysql_users 表中添加刚才在 master 上创建的账号 proxysql,proxysql 客户端需要使用这个账号来访问数据库
default_hostgroup 默认组设置为写组,也就是1;
当读写分离的路由规则不符合时,会访问默认组的数据库;
(admin@127.0.0.1:6032) [(none)]> insert into mysql_users(username,password,default_hostgroup,transaction_persistent)values('proadmin','proadmin',10,1);
Query OK, 1 row affected (0.000 sec)

(admin@127.0.0.1:6032) [(none)]> select username,password,default_hostgroup,transaction_persistent from mysql_users;
+----------+----------+-------------------+------------------------+
| username | password | default_hostgroup | transaction_persistent |
+----------+----------+-------------------+------------------------+
| proadmin | proadmin | 10                | 1                      |
+----------+----------+-------------------+------------------------+
1 row in set (0.000 sec)
(admin@127.0.0.1:6032) [(none)]> load mysql users to runtime;
Query OK, 0 rows affected (0.002 sec)

(admin@127.0.0.1:6032) [(none)]>  save mysql users to disk;
Query OK, 0 rows affected (0.002 sec)
添加健康检测的帐号
在mysql的 master 端添加属于proxysql的只读账号
MariaDB [(none)]> GRANT SELECT ON *.* TO 'monitor'@'192.168.236.135' IDENTIFIED BY 'monitor';
Query OK, 0 rows affected (0.046 sec)

MariaDB [(none)]> flush privileges;
Query OK, 0 rows affected (0.001 sec)
在proxysql主机端修改变量设置健康检测的账号
(admin@127.0.0.1:6032) [(none)]> set mysql-monitor_username='monitor';
Query OK, 1 row affected (0.000 sec)

(admin@127.0.0.1:6032) [(none)]> set mysql-monitor_password='monitor';
Query OK, 1 row affected (0.000 sec)

(admin@127.0.0.1:6032) [(none)]> load mysql users to runtime;
Query OK, 0 rows affected (0.000 sec)

(admin@127.0.0.1:6032) [(none)]>  save mysql users to disk;
Query OK, 0 rows affected (0.007 sec)
添加读写分离的路由规则
需求:
将 select 查询语句全部路由至 hostgroup_id=2 的组(也就是读组)
但是 select * from tb for update 这样的语句是会修改数据的,所以需要单独定义,将它路由至 hostgroup_id=1 的组(也就是写组)
其他没有被规则匹配到的组将会被路由至用户默认的组(mysql_users 表中的 default_hostgroup)
(admin@127.0.0.1:6032) [(none)]> insert into mysql_query_rules(rule_id,active,match_digest,destination_hostgroup,apply) values(10,1,'^SELECT.*FOR UPDATE$',10,1);
Query OK, 1 row affected (0.000 sec)

(admin@127.0.0.1:6032) [(none)]> insert into mysql_query_rules(rule_id,active,match_digest,destination_hostgroup,apply)values(20,1,'^SELECT',20,1);
Query OK, 1 row affected (0.000 sec)

(admin@127.0.0.1:6032) [(none)]> select rule_id,active,match_digest,destination_hostgroup,apply from mysql_query_rules;
+---------+--------+----------------------+-----------------------+-------+
| rule_id | active | match_digest         | destination_hostgroup | apply |
+---------+--------+----------------------+-----------------------+-------+
| 10      | 1      | ^SELECT.*FOR UPDATE$ | 10                    | 1     |
| 20      | 1      | ^SELECT              | 20                    | 1     |
+---------+--------+----------------------+-----------------------+-------+
2 rows in set (0.000 sec)

(admin@127.0.0.1:6032) [(none)]> load mysql query rules to run;
Query OK, 0 rows affected (0.001 sec)

(admin@127.0.0.1:6032) [(none)]>  save mysql query rules to disk;
Query OK, 0 rows affected (0.006 sec)
验证读写分离
登录 proxysql 客户端
登录用户是刚才我们在 mysql_user 表中创建的用户,端口为6033
[root@localhost ~]# mysql -uproadmin -pproadmin -h127.0.0.1 -P6033
Welcome to the MariaDB monitor.  Commands end with ; or \g.
Your MySQL connection id is 6
Server version: 5.5.30 (ProxySQL)

Copyright (c) 2000, 2018, Oracle, MariaDB Corporation Ab and others.

Type 'help;' or '\h' for help. Type '\c' to clear the current input statement.
// 验证读写分离是否成功,ProxySQL有个类似审计的功能,可以查看各类SQL的执行情况,其需要在proxysql管理端执行

admin@127.0.0.1:6032) [(none)]> select * from stats_mysql_query_digest\G
*************************** 1. row ***************************
        hostgroup: 20
       schemaname: information_schema
         username: proadmin
   client_address:
           digest: 0x3EA85877510AC608
      digest_text: select * from stats_mysql_query_digest
       count_star: 1
       first_seen: 1609678282
        last_seen: 1609678282
         sum_time: 10003171
         min_time: 10003171
         max_time: 10003171
sum_rows_affected: 0
    sum_rows_sent: 0
*************************** 2. row ***************************
        hostgroup: 20
       schemaname: information_schema
         username: proadmin
   client_address:
           digest: 0x6639C21030DE24C2
      digest_text: select rule_id,active,match_digest,destination_hostgroup,apply from mysql_query_rules
       count_star: 1
       first_seen: 1609678048
        last_seen: 1609678048
         sum_time: 10000201
         min_time: 10000201
         max_time: 10000201
sum_rows_affected: 0
    sum_rows_sent: 0
*************************** 3. row ***************************
        hostgroup: 10
       schemaname: information_schema
         username: proadmin
   client_address:
           digest: 0x02033E45904D3DF0
      digest_text: show databases
       count_star: 5
       first_seen: 1609677960
        last_seen: 1609678592
         sum_time: 50004533
         min_time: 10000281
         max_time: 10001771
sum_rows_affected: 0
    sum_rows_sent: 0
*************************** 4. row ***************************
        hostgroup: 10
       schemaname: information_schema
         username: proadmin
   client_address:
           digest: 0x594F2C744B698066
      digest_text: select USER()
       count_star: 5
       first_seen: 1609677347
        last_seen: 1609678566
         sum_time: 0
         min_time: 0
         max_time: 0
sum_rows_affected: 0
    sum_rows_sent: 0
*************************** 5. row ***************************
        hostgroup: 10
       schemaname: information_schema
         username: proadmin
   client_address:
           digest: 0xCE6BB7764BA98E04
      digest_text: create database jinxinruntian
       count_star: 2
       first_seen: 1609677715
        last_seen: 1609677796
         sum_time: 20000570
         min_time: 10000000
         max_time: 10000570
sum_rows_affected: 0
    sum_rows_sent: 0
*************************** 6. row ***************************
        hostgroup: 10
       schemaname: information_schema
         username: proadmin
   client_address:
           digest: 0x226CD90D52A2BA0B
      digest_text: select @@version_comment limit ?
       count_star: 5
       first_seen: 1609677347
        last_seen: 1609678566
         sum_time: 0
         min_time: 0
         max_time: 0
sum_rows_affected: 0
    sum_rows_sent: 0
*************************** 7. row ***************************
        hostgroup: 10
       schemaname: information_schema
         username: proadmin
   client_address:
           digest: 0x60CA5FCF2DCFE887
      digest_text: create database yt
       count_star: 1
       first_seen: 1609677649
        last_seen: 1609677649
         sum_time: 10000979
         min_time: 10000979
         max_time: 10000979
sum_rows_affected: 0
    sum_rows_sent: 0
*************************** 8. row ***************************
        hostgroup: 10
       schemaname: information_schema
         username: proadmin
   client_address:
           digest: 0x58E6923ACC20FEBB
      digest_text: creata database school
       count_star: 1
       first_seen: 1609677823
        last_seen: 1609677823
         sum_time: 10000445
         min_time: 10000445
         max_time: 10000445
sum_rows_affected: 0
    sum_rows_sent: 0
*************************** 9. row ***************************
        hostgroup: 10
       schemaname: information_schema
         username: proadmin
   client_address:
           digest: 0x0B1D447AD1A1D7CC
      digest_text: creata database school1
       count_star: 1
       first_seen: 1609677838
        last_seen: 1609677838
         sum_time: 10000332
         min_time: 10000332
         max_time: 10000332
sum_rows_affected: 0
    sum_rows_sent: 0
9 rows in set (0.003 sec)


 164
164

 被折叠的 条评论
为什么被折叠?
被折叠的 条评论
为什么被折叠?
 到【灌水乐园】发言


