


 本文是Spring Boot的入门教程,涵盖了约定大于配置的概念、项目搭建、应用入口、配置文件、热部署、Jersey RESTful API的实现以及多环境切换等核心内容。Spring Boot简化了Web服务的开发,提供内置的Tomcat服务器,支持通过devtools实现热部署,并能方便地与AngularJS进行前端集成。
Spring boot
过完年的时候,跟Thoughtworks的coach一起给项目的所有Web Service加继承测试。一直缺少一个Provider,一开始都是用Moco。不过Moco都是利用配置提供契约接口,毕竟是假的数据。而Spring boot利用很少的代码,就可以根据需要提供一个非常好的Provider。简单来说,Spring boot用于快速开发一个web服务。
约定大于配置
Spring boot采用的思想跟Maven一样都是约定大于配置。比如Maven有以下约定:
maven的目录文件结构
src-main-java:项目源代码
src-main-test:测试代码
src/main/resources:项目资源文件
target:存放生成class文件和所需的jar包
pom.xml:项目的maven配置
类似的,Spring boot有以下约定:
1.Spring boot默认的配置文件是且必须是application.yml文件或者application.properties文件,且唯一。
2.spring boot默认只会去src/main/resources文件夹下去找application配置文件
项目搭建
利用Intellij,新建一个Spring Initializr 项目,以web为模板。菜单:File-->New-->Project...-->Spring Initializr,
然后选择:Default:http://start.spring.io
如果没有 Spring in选项,先安装spring boot插件(有些 Intellij 是spring assistant)。
结果如上图,打开pom.xml文件,发现依赖如下:
<?xml version="1.0" encoding="UTF-8"?>
<project xmlns="http://maven.apache.org/POM/4.0.0" xmlns:xsi="http://www.w3.org/2001/XMLSchema-instance"
	xsi:schemaLocation="http://maven.apache.org/POM/4.0.0 http://maven.apache.org/xsd/maven-4.0.0.xsd">
	<modelVersion>4.0.0</modelVersion>

	<groupId>com.example</groupId>
	<artifactId>kaka</artifactId>
	<version>0.0.1-SNAPSHOT</version>
	<packaging>jar</packaging>

	<name>kaka</name>
	<description>Demo project for Spring Boot</description>

	<parent>
		<groupId>org.springframework.boot</groupId>
		<artifactId>spring-boot-starter-parent</artifactId>
		<version>2.0.3.RELEASE</version>
		<relativePath/> <!-- lookup parent from repository -->
	</parent>

	<properties>
		<project.build.sourceEncoding>UTF-8</project.build.sourceEncoding>
		<project.reporting.outputEncoding>UTF-8</project.reporting.outputEncoding>
		<java.version>1.8</java.version>
	</properties>

	<dependencies>
		<dependency>
			<groupId>org.springframework.boot</groupId>
			<artifactId>spring-boot-starter-web</artifactId>
		</dependency>
		<dependency>
			<groupId>org.springframework.boot</groupId>
			<artifactId>spring-boot-starter-test</artifactId>
			<scope>test</scope>
		</dependency>
	</dependencies>

	<build>
		<plugins>
			<plugin>
				<groupId>org.springframework.boot</groupId>
				<artifactId>spring-boot-maven-plugin</artifactId>
			</plugin>
		</plugins>
	</build>

</project>
查看项目的依赖树:mvn dependency:tree
[INFO] +- org.springframework.boot:spring-boot-starter-web:jar:2.0.3.RELEASE:compile
[INFO] |  +- org.hibernate.validator:hibernate-validator:jar:6.0.10.Final:compile
[INFO] |  |  +- org.jboss.logging:jboss-logging:jar:3.3.2.Final:compile
[INFO] |  |  \- com.fasterxml:classmate:jar:1.3.4:compile
[INFO] |  \- org.springframework:spring-webmvc:jar:5.0.7.RELEASE:compile
[INFO] |     +- org.springframework:spring-context:jar:5.0.7.RELEASE:compile
[INFO] |     \- org.springframework:spring-expression:jar:5.0.7.RELEASE:compile
也就是说,spring-boot-starter-web已经为我们引入了spring webmvc等。至此项目已经搭建完成。
应用入口
Spring Boot项目默认有有一个名为*Application的入口类,同时加上@SpringBootApplication注解。该类里有一个main方法,其实就是Java的main方法。
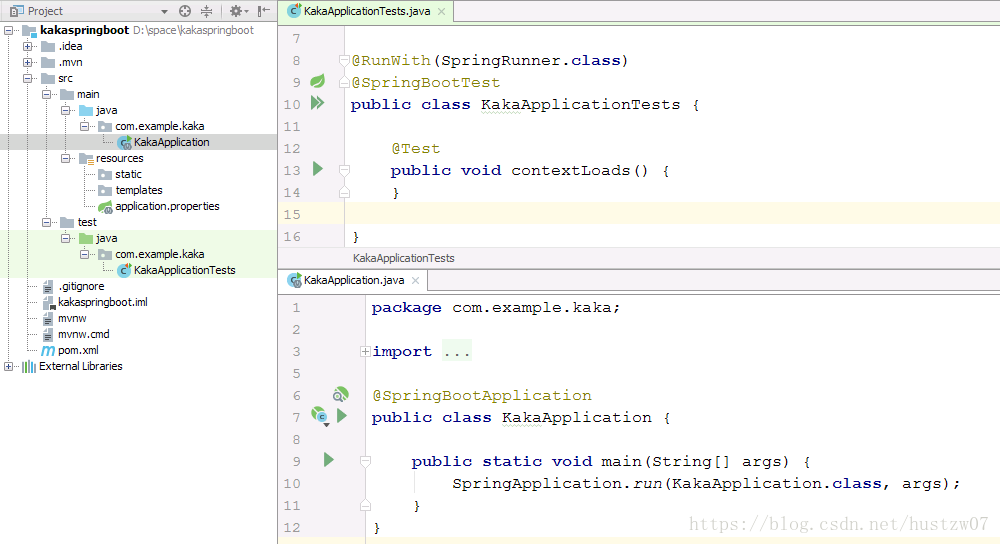
注意:Spring boot会自动扫描 @SpringBootApplication 所在类的同级包以及下一级包里的 Bean类。因此,该入口类就位于grounpID/arctifactID路径下。如上图的com.example.kaka.KakaApplication.java。点开@SpringBootApplication源码:
@Target({ElementType.TYPE})
@Retention(RetentionPolicy.RUNTIME)
@Documented
@Inherited
@SpringBootConfiguration
@EnableAutoConfiguration
@ComponentScan(
    excludeFilters = {@Filter(
    type = FilterType.CUSTOM,
    classes = {TypeExcludeFilter.class}
), @Filter(
    type = FilterType.CUSTOM,
    classes = {AutoConfigurationExcludeFilter.class}
)}
)
public @interface SpringBootApplication {
    @AliasFor(
        annotation = EnableAutoConfiguration.class
    )
    Class<?>[] exclude() default {};

    @AliasFor(
        annotation = EnableAutoConfiguration.class
    )
    String[] excludeName() default {};

    @AliasFor(
        annotation = ComponentScan.class,
        attribute = "basePackages"
    )
    String[] scanBasePackages() default {};

    @AliasFor(
        annotation = ComponentScan.class,
        attribute = "basePackageClasses"
    )
    Class<?>[] scanBasePackageClasses() default {};
}
发现它是多个注解的组合,可以理解为:@SpringBootApplication = @Configuration + @EnableAutoConfiguration + @ComponentScan
在同级目录下新建一个Controller。
package com.example.kaka;

import org.springframework.web.bind.annotation.RequestMapping;
import org.springframework.web.bind.annotation.RestController;

@RestController
public class KakaController {

    @RequestMapping("/kaka")
    public String hello() {
        return "Hello Kaka!";
    }
}这里,注解@RestController:该注解相当于@Controller 和 @ResponseBody 注解
在KakaApplication.java运行程序即可启动。启动后,可以从控制台看到一些输出,其中有一句:
[ restartedMain] o.s.b.w.embedded.tomcat.TomcatWebServer : Tomcat started on port(s): 8080 (http) with context path ''
也就是说,Spring boot已经内置了 Tomcat,启动的时候默认 8080端口。因此,打开http://localhost:8080/kaka即可看到响应。
配置文件
Spring Boot使用一个全局的配置文件 application.properties 或 application.yml。注意这里不是 xml,貌似是因为要支持 yaml语言。
上边的项目中,用的是application.properties。
热部署
平常项目在开发时,为了热部署,都是采用Ant、JRebel等。Spring boot提供了devtools,直接通过JVM类加载,实现热部署。
<dependency>
    <groupId>org.springframework.boot</groupId>
    <artifactId>spring-boot-devtools</artifactId>
    <optional>true</optional> <!-- 这个需要为 true 热部署才有效 -->
</dependency>
在实际使用中,热部署可能不生效。可以按以下步骤解决。
首先,设置勾选“Build project automatically”

然后 Shift+Ctrl+Alt+/,选择Registry
最后,勾选以下选项即可。
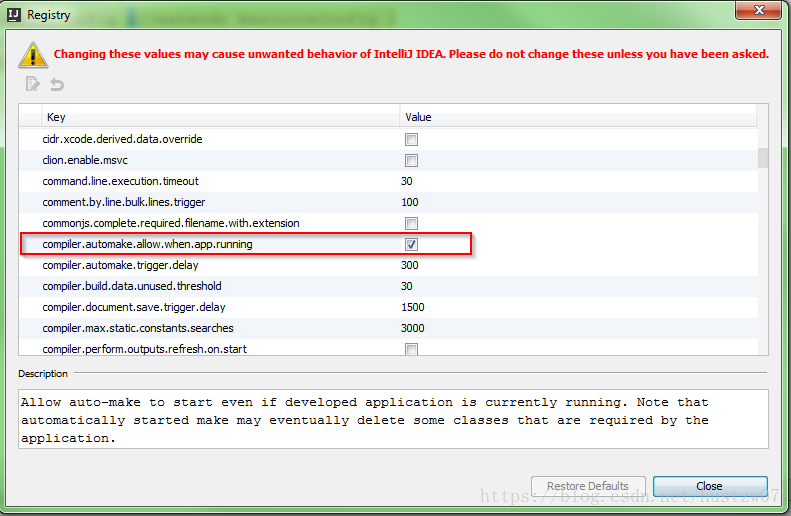
此时修改项目代码,IntelliJ会自动打包部署了。
Jersey
Web项目开发时,多数要提供Restful。Spring boot提供了Jersey的集成。只需添加以下依赖即可,同样不用指定version,它传递依赖Jersey。
		<dependency>
			<groupId>org.springframework.boot</groupId>
			<artifactId>spring-boot-starter-jersey</artifactId>
		</dependency>
引入Jersey后,我们新建一个提供Restful的类
package com.example.kaka.jersey;

import org.springframework.stereotype.Component;

import javax.inject.Singleton;
import javax.ws.rs.GET;
import javax.ws.rs.Path;
import javax.ws.rs.PathParam;

@Component
@Singleton
@Path("/resource")
public class MyResource {

    @Path("kaka/{name}")
    @GET
    public String hello(@PathParam("name") String name) {
        return "Hello" + name;
    }
}
此时,在浏览器里面输入链接 http://localhost:8080/resource/kaka/zw,是访问不到Restful的。因为我们还没有对该Resource进行注册。
注册方式一
新建一个类,这里要保证该类能被Application类扫描到。
package com.example.kaka.jersey;

import org.glassfish.jersey.server.ResourceConfig;
import org.springframework.stereotype.Component;

import javax.ws.rs.ApplicationPath;

@Component
@ApplicationPath("rest")
public class JerseyConfig extends ResourceConfig {
    public JerseyConfig() {
        register(MyResource.class);
    }
}此时,输入新的链接即可访问,http://localhost:8080/rest/resource/kaka/zw
注意,这里使用@ApplicationPath("rest") 设置了应用的访问根路径。
注册方式二
另外,Spring boot的autoconfigure包下面还提供了一个Jersey注册的接口ResourceConfigCustomizer。
删掉上边的类,然后实现该接口:
package com.example.kaka.jersey;

import org.glassfish.jersey.server.ResourceConfig;
import org.springframework.boot.autoconfigure.jersey.ResourceConfigCustomizer;
import org.springframework.stereotype.Component;

@Component
public class MyResourceConfigCustomizer implements ResourceConfigCustomizer {
    @Override
    public void customize(ResourceConfig config) {
        config.register(MyResource.class);
    }
}
实现了该接口的方法时,发现它依赖注入了ResourceConfig的实例,因此,需要给程序创建一个Bean
@SpringBootApplication
public class KakaApplication {

	public static void main(String[] args) {
		SpringApplication.run(KakaApplication.class, args);
	}

    @Bean
    public ResourceConfig resourceConfig() {
        return new ResourceConfig();
    }
}
此时为了做到跟上边一样的效果,即根路径是/rest,需要在 application.properties 文件中,添加下面一句话。
spring.jersey.application-path=rest注册方式三
改方式跟方式二类似,只不过是自己new ResourceConfig()。
在KakaApplication.java 中代码如下:
@SpringBootApplication
public class KakaApplication {

	public static void main(String[] args) {
		SpringApplication.run(KakaApplication.class, args);
	}

    @Bean
    public ResourceConfig resourceConfig() {
        ResourceConfig config = new ResourceConfig();// 新建一个ResourceConfig 而不是实现 ResourceConfigCustomizer 接口
        config.register(MyResource.class);
        return config;
    }
}
该方式同样要保留 application.properties 里面的配置。其实该配置之所以生效,因为spring-jersey的以下代码:
@ConfigurationProperties(
    prefix = "spring.jersey"
)
public class JerseyProperties {
    private JerseyProperties.Type type;
    private Map<String, String> init;
    private final JerseyProperties.Filter filter;
    private final JerseyProperties.Servlet servlet;
    private String applicationPath;

    public JerseyProperties() {
        this.type = JerseyProperties.Type.SERVLET;
        this.init = new HashMap();
        this.filter = new JerseyProperties.Filter();
        this.servlet = new JerseyProperties.Servlet();
    }
    // 省略其他代码
}
即,使用spring.jersey 开头的配置。
多环境切换
springboot 提供多环境配置的机制,让开发者根据需要切换到不同的配置环境。在目录src\main\resources 下创建三个文件:
application-dev.properties
application-pp.properties
application-prd.properties
然后在 application.properties 中 如下设置即可:
spring.profiles.active=devspring-boot 根据该值,自动加载不同环境的配置
logback
spring boot官方推荐使用logback 配置日志,默认会加载 classpath:logback-spring.xml 或者 classpath:logback-spring.groovy。
在src/main/resource 文件夹下新建logback-spring.xml:
<configuration>
    <!-- 文件输出格式 -->
    <property name="PATTERN" value="%-12(%d{yyyy-MM-dd HH:mm:ss.SSS}) |-%-5level [%thread] %c [%L] -| %msg%n"/>
    <!-- pp 文件路径 -->
    <property name="PP_FILE_PATH" value="d:/pp.log"/>
    <!-- prd 文件路径 -->
    <property name="PRD_FILE_PATH" value="/opt/logs"/>

    <!-- local -->
    <springProfile name="dev">
        <appender name="CONSOLE" class="ch.qos.logback.core.ConsoleAppender">
            <encoder>
                <pattern>${PATTERN}</pattern>
            </encoder>
        </appender>
        <logger name="com.light.springboot" level="debug"/>
        <root level="info">
            <appender-ref ref="CONSOLE"/>
        </root>
    </springProfile>

    <!-- pp -->
    <springProfile name="pp">
        <!-- 每天产生一个文件 -->
        <appender name="PP-FILE" class="ch.qos.logback.core.rolling.RollingFileAppender">
            <!-- 文件路径 -->
            <file>${PP_FILE_PATH}</file>
            <rollingPolicy class="ch.qos.logback.core.rolling.TimeBasedRollingPolicy">
                <!-- 文件名称 -->
                <fileNamePattern>${PP_FILE_PATH}/info.%d{yyyy-MM-dd}.log</fileNamePattern>
                <!-- 文件最大保存历史数量 -->
                <MaxHistory>100</MaxHistory>
            </rollingPolicy>
            <layout class="ch.qos.logback.classic.PatternLayout">
                <pattern>${PATTERN}</pattern>
            </layout>
        </appender>
        <root level="info">
            <appender-ref ref="PP-FILE"/>
        </root>
    </springProfile>

    <!-- prd -->
    <springProfile name="prd">
        <appender name="PRD_FILE" class="ch.qos.logback.core.rolling.RollingFileAppender">
            <file>${PRD_FILE_PATH}</file>
            <rollingPolicy class="ch.qos.logback.core.rolling.TimeBasedRollingPolicy">
                <fileNamePattern>${PRD_FILE_PATH}/warn.%d{yyyy-MM-dd}.log</fileNamePattern>
                <MaxHistory>100</MaxHistory>
            </rollingPolicy>
            <layout class="ch.qos.logback.classic.PatternLayout">
                <pattern>${PATTERN}</pattern>
            </layout>
        </appender>
        <root level="warn">
            <appender-ref ref="PRD_FILE"/>
        </root>
    </springProfile>
</configuration>注意:<springProfile>的name 属性是application.properties 中的 spring.profiles.active 的值。
JPA
Spring boot 可以很容易添加JPA资源,支持POJO(Plain Ordinary Java Object)。项目中添加以下依赖(这里我用的是MySQL)
        <dependency>
            <groupId>org.springframework.boot</groupId>
            <artifactId>spring-boot-starter-data-jpa</artifactId>
        </dependency>
        <dependency>
            <groupId>mysql</groupId>
            <artifactId>mysql-connector-java</artifactId>
            <scope>runtime</scope>
        </dependency>
上边的库自带很多POJO用到的类。
新建三个实体:
部门:Deparment
import javax.persistence.*;

@Entity
@Table(name = "deparment")
public class Deparment {
    @Id
    @GeneratedValue(strategy = GenerationType.IDENTITY)
    private Long id;

    private String name;

    public Deparment() {
    }
    // 省略 setter/getter
}
角色:Role
import javax.persistence.*;
import java.io.Serializable;

@Entity
@Table(name = "role")
public class Role implements Serializable {
    @Id
    @GeneratedValue(strategy = GenerationType.IDENTITY)
    private Long id;

    private String name;

    public Role() {
    }
    // 省略 setter/getter
}
用户:User
import com.fasterxml.jackson.annotation.JsonBackReference;
import org.springframework.format.annotation.DateTimeFormat;

import javax.persistence.*;
import java.io.Serializable;
import java.util.Date;
import java.util.List;

@Entity
@Table(name = "user")
public class User implements Serializable {
    @Id
    @GeneratedValue(strategy = GenerationType.IDENTITY)
    private Long id;

    private String name;

    @DateTimeFormat(pattern = "yyyy-MM-dd HH:mm:ss")
    private Date createDate;

    @ManyToOne
    @JoinColumn(name = "did")
    @JsonBackReference
    private Deparment deparment;

    @ManyToMany(cascade = {}, fetch = FetchType.EAGER)
    @JoinTable(name = "user_role", joinColumns = {@JoinColumn(name = "user_id")}, inverseJoinColumns = {@JoinColumn(name = "roles_id")})
    private List<Role> roles;

    public User() {
    }
    // 省略 setter/getter
}
然后为每个entity创建一个repository接口,其中一个如下:
@Repository
public interface DeparmentRepository extends JpaRepository<Deparment, Long> {
}
另外两个类似
在 resources/appplication.yml 中配置我们的数据库连接:
spring:
  application:
    name: my-service
  datasource:
    url: jdbc:mysql://127.0.0.1:3306/world?characterEncoding=utf8
    username: root
    password: Password1
  jpa:
    database: MYSQL
    show-sql: true
  #Hibernate ddl auto (validate|create|create-drop|update)
    hibernate:
      ddl-auto: update
      naming-strategy: org.hibernate.cfg.ImprovedNamingStrategy
    properties:
      hibernate:
        dialect: org.hibernate.dialect.MySQL5Dialect
此时,添加测试即可。
import com.example.cloudclient.entity.Deparment;
import com.example.cloudclient.entity.Role;
import com.example.cloudclient.entity.User;
import com.example.cloudclient.repository.DeparmentRepository;
import com.example.cloudclient.repository.RoleRepository;
import com.example.cloudclient.repository.UserRepository;
import org.junit.Before;
import org.junit.Test;
import org.junit.runner.RunWith;
import org.slf4j.Logger;
import org.slf4j.LoggerFactory;
import org.springframework.beans.factory.annotation.Autowired;
import org.springframework.boot.autoconfigure.EnableAutoConfiguration;
import org.springframework.boot.autoconfigure.jdbc.DataSourceAutoConfiguration;
import org.springframework.boot.test.context.SpringBootTest;
import org.springframework.context.annotation.ComponentScan;
import org.springframework.data.domain.Page;
import org.springframework.data.domain.PageRequest;
import org.springframework.data.domain.Pageable;
import org.springframework.data.domain.Sort;
import org.springframework.test.context.junit4.SpringRunner;

import java.util.Date;
import java.util.List;

import static org.hamcrest.Matchers.is;
import static org.hamcrest.Matchers.notNullValue;
import static org.junit.Assert.assertThat;

@RunWith(SpringRunner.class)
@SpringBootTest
@ComponentScan
@EnableAutoConfiguration(exclude={DataSourceAutoConfiguration.class})
public class CloudclientApplicationTests {
	@Test
	public void contextLoads() {
	}
    private static Logger logger = LoggerFactory.getLogger(CloudclientApplicationTests.class);
    @Autowired
    UserRepository userRepository;
    @Autowired
    DeparmentRepository deparmentRepository;
    @Autowired
    RoleRepository roleRepository;

    @Before
    public void initData() {
        userRepository.deleteAll();
        roleRepository.deleteAll();
        deparmentRepository.deleteAll();

        Deparment deparment = new Deparment();
        deparment.setName("development");
        deparmentRepository.save(deparment);
        assertThat(deparment.getId(), is(notNullValue()));

        User user = new User();
        user.setName("user");
        user.setCreateDate(new Date());
        user.setDeparment(deparment);
        Role role = new Role();
        role.setName("kaka");
        roleRepository.save(role);

        List<Role> roles = roleRepository.findAll();
        assertThat(roles, is(notNullValue()));
        user.setRoles(roles);
        userRepository.save(user);
        assertThat(user.getId(), is(notNullValue()));
    }

    @Test
    public void findPage() {
        Pageable pageable = new PageRequest(0, 10, new Sort(Sort.Direction.ASC, "id"));
        Page<User> page = userRepository.findAll(pageable);
        assertThat(page, is(notNullValue()));
        for (User user : page.getContent()) {
            logger.info("=========user======== user name:{}, deparment name:{}, role name:{}", user.getName(), user.getDeparment().getName(), user.getRoles().get(0).getName());
        }
    }
}
AngularJS
一个Web项目也需要前台的集成,这里我使用AngularJS。


 1792
1792

 被折叠的 条评论
为什么被折叠?
被折叠的 条评论
为什么被折叠?
 到【灌水乐园】发言


