


 本文详细记录了使用Docker部署Nginx时遇到的问题及解决过程,包括拉取镜像、创建挂载目录、启动容器并挂载配置文件,以及在挂载文件时遇到的错误和修正方法。通过修改配置文件将监听端口改为8088,确保了Nginx服务的正常运行。
默认已创建数据文件夹 /data/nginx
1、拉取镜像
docker pull nginx
2、创建挂载目录
mkdir -p /data/nginx/config/conf.d
mkdir -p /data/nginx/logs
mkdir -p /data/nginx/html
3、启动容器
docker run --name nginx --privileged -it -p 8088:8088 -v /data/nginx/config/nginx.conf:/etc/nginx/nginx.conf -v /data/nginx/config/conf.d:/etc/nginx/conf.d -v /data/nginx/logs:/var/log/nginx -v /data/nginx/html:/usr/share/nginx/html -d nginx
结果。。。报错了。。。
![]() docker: Error response from daemon: failed to create shim: OCI runtime create failed: container_linux.go:380: starting container process caused: process_linux.go:545: container init caused: rootfs_linux.go:75: mounting "/data/nginx/nginx.conf" to rootfs at "/etc/nginx/nginx.conf" caused: mount through procfd: not a directory: unknown: Are you trying to mount a directory onto a file (or vice-versa)? Check if the specified host path exists and is the expected type.
docker: Error response from daemon: failed to create shim: OCI runtime create failed: container_linux.go:380: starting container process caused: process_linux.go:545: container init caused: rootfs_linux.go:75: mounting "/data/nginx/nginx.conf" to rootfs at "/etc/nginx/nginx.conf" caused: mount through procfd: not a directory: unknown: Are you trying to mount a directory onto a file (or vice-versa)? Check if the specified host path exists and is the expected type.
是因为只能挂载文件夹,不能挂载文件。如果要挂载文件,需要在宿主机有同名的文件。
3、删除原有容器,启动一个新的容器
docker rm -f nginx
docker run --name test -d nginx
4、拷贝文件至宿主机。注意:conf.d也要拷贝......
docker cp test:/etc/nginx/nginx.conf /data/nginx/config
docker cp test:/etc/nginx/conf.d /data/nginx/config
5、再执行3的代码
6、删除临时容器
docker rm -f test
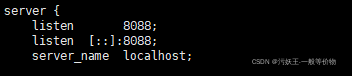
7、修改配置文件
vim /data/nginx/config/conf.d/default.conf
由于启动时使用的监听端口是8088,这里在配置文件中也改成8088


 3796
3796

 被折叠的 条评论
为什么被折叠?
被折叠的 条评论
为什么被折叠?
 到【灌水乐园】发言


