1.Thymeleaf简介
官方网站:https://www.thymeleaf.org/index.html
特点
1.1 动静结合:Thymeleaf 在有网络和无网络的环境下皆可运行,即它可以让美工在浏览器查看页面的静态效果,也可以让程序员在服务器查看带数据的动态页面效果。这是由于它支持 html 原型,然后在 html 标签里增加额外的属性来达到模板+数据的展示方式。。
1.2 与SpringBoot完美整合,SpringBoot提供了Thymeleaf的默认配置,并且为Thymeleaf设置了视图解析器,我们可以像以前操作jsp一样来操作Thymeleaf。代码几乎没有任何区别,就是在模板语法上有区别。
1.3 与前端技术的比较
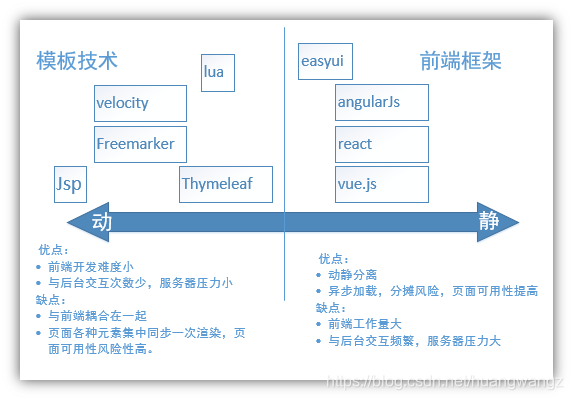
因为Thymeleaf没有使用自定义的标签或语法,所有的模板语言都是扩展了标准H5标签的属性
<div th:text="${item.skuName} "></div>
1.4 pom.xml
<dependency>
   <groupId>org.springframework.boot</groupId>
    <artifactId>spring-boot-starter-thymeleaf</artifactId>
</dependency>
2.Thymeleaf的基本用法
2.1 头文件就像Jsp的<%@Page %>一样 ,Thymeleaf的也要引入标签规范。
<html xmlns="http://www.w3.org/1999/xhtml" xmlns:th="http://www.thymeleaf.org">
2.2 取出请求域中的值,如果不写打底值,没拿到hello这个属性值则会报错
<p th:text="${hello}">打底值</p>
3.3 循环
<table border="1">
    <tr th:each="skuImage:${skuInfo.skuImageList}">
        <td th:text="${skuImage.id}">
        </td>
        <td th:text="${skuImage.imgName}">
        </td>
      </tr>
</table>
3.4 表达式和判断
<td th:text="(${skuImage.id}=='10')?'是10':'不是10'">
</td>
<td th:if="${skuImage.id}=='10'" >123456</td>
3.工程搭建
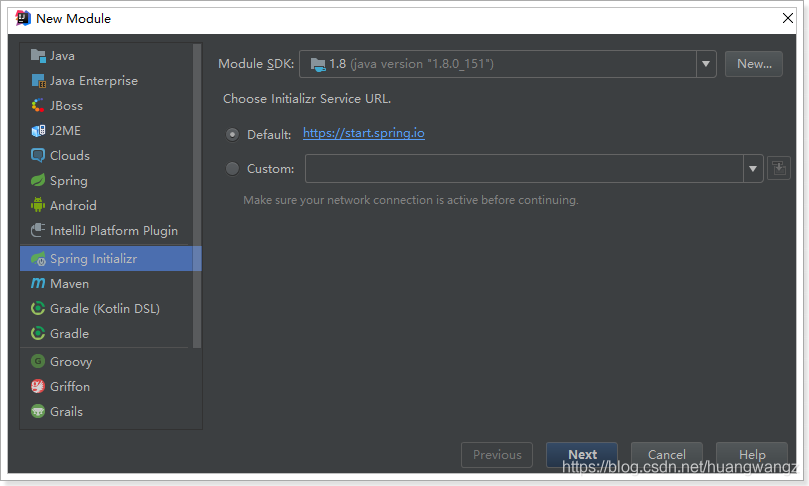
使用spring 脚手架创建:
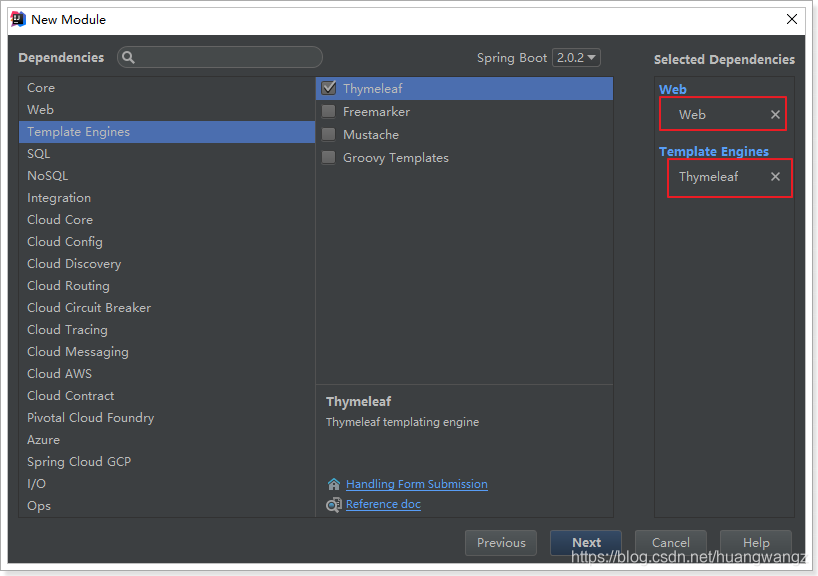
勾选web和Thymeleaf的依赖
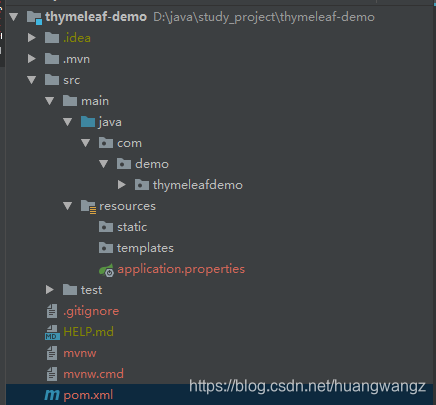
项目结构
不需要做任何配置,启动器已经帮我们把Thymeleaf的视图器配置完成,与jsp类似的前缀+ 视图名 + 后缀风格:
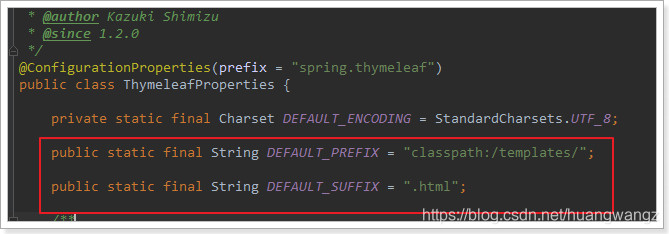
Thymeleaf默认会开启页面缓存,提高页面并发能力。但会导致我们修改页面不会立即被展现,因此我们关闭缓存,在application.properties配置:
# 关闭Thymeleaf的缓存(热部署)
spring.thymeleaf.cache=false
另外,修改完毕页面,需要使用快捷键:Ctrl + Shift + F9来刷新工程。
4.快速开始
我们准备一个controller,控制视图跳转:
@Controller
public class HelloController {

    @GetMapping("show1")
    public String show1(Model model){
        model.addAttribute("msg", "Hello, Thymeleaf!");
        return "hello";
    }
}
新建一个html模板:
<!DOCTYPE html>
<html lang="en" xmlns:th="http://www.thymeleaf.org">
<head>
    <meta charset="UTF-8">
    <title>hello</title>
</head>
<body>
    <h1 th:text="${msg}">大家好</h1>
</body>
</html>
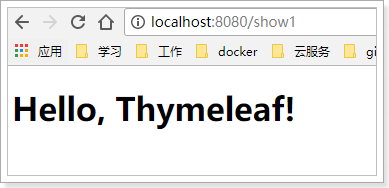
启动项目,访问页面:
5.页面静态化
静态化是指把动态生成的HTML页面变为静态内容保存,以后用户的请求到来,直接访问静态页面,不再经过服务的渲染。
而静态的HTML页面可以部署在nginx中,从而大大提高并发能力,减小tomcat压力。
TemplateEngine:模板引擎:用来解析模板的引擎,需要使用到上下文、模板解析器。分别从两者中获取模板中需要的数据,模板文件。
context: 上下文,用来保存模型数据
writer: 输出目的地的流。
templateEngine.process("模板名", context, writer);
具体实现:
@Service
public class GoodsHtmlService {

    @Autowired
    private GoodsService goodsService;

    @Autowired
    private TemplateEngine templateEngine;

    private static final Logger LOGGER = LoggerFactory.getLogger(GoodsHtmlService.class);

    /**
     * 创建html页面
     *
     * @param spuId
     * @throws Exception
     */
    public void createHtml(Long spuId) {

        PrintWriter writer = null;
        try {
            // 获取页面数据
            Map<String, Object> spuMap = this.goodsService.loadModel(spuId);

            // 创建thymeleaf上下文对象
            Context context = new Context();
            // 把数据放入上下文对象
            context.setVariables(spuMap);

            // 创建输出流
            File file = new File("C:\\project\\nginx-1.14.0\\html\\item\\" + spuId + ".html");
            writer = new PrintWriter(file);

            // 执行页面静态化方法
            templateEngine.process("item", context, writer);
        } catch (Exception e) {
            LOGGER.error("页面静态化出错:{},"+ e, spuId);
        } finally {
            if (writer != null) {
                writer.close();
            }
        }
    }
}
当页面第一次访问,则正常访问controller方法,顺便调用生成静态页面的方法:
@GetMapping("{id}.html")
public String toItemPage(@PathVariable("id")Long id, Model model){

    // 加载所需的数据
    Map<String, Object> map = this.goodsService.loadModel(id);
    // 把数据放入数据模型
    model.addAllAttributes(map);

    // 页面静态化
    this.goodsHtmlService.asyncExcute(id);

    return "item";
}
配置nginx拦截已有的页面:
server {
    listen       80;
    server_name  www.leyou.com;

    proxy_set_header X-Forwarded-Host $host;
    proxy_set_header X-Forwarded-Server $host;
    proxy_set_header X-Forwarded-For $proxy_add_x_forwarded_for;

    location /item {
        # 先找本地
        root html;
        if (!-f $request_filename) { #请求的文件不存在,就反向代理
            proxy_pass http://127.0.0.1:8084;
            break;
        }
    }

    location / {
        proxy_pass http://127.0.0.1:9002;
        proxy_connect_timeout 600;
        proxy_read_timeout 600;
    }
}
重启nginx:nginx -s reload
测试,发现生成后的静态页面访问速度得到了极大提升


 本文介绍Thymeleaf模板引擎的特点与SpringBoot的整合,包括基本语法、页面静态化及与Nginx的配合使用,提升页面并发处理能力。


 646
646

 被折叠的 条评论
为什么被折叠?


