


一、ubuntu安装cups打印
在Ubuntu上安装CUPS(打印系统)的步骤如下:
1、打开终端。
2、更新软件包列表:
sudo apt update
3、安装CUPS:
sudo apt install cups
4、安装foomatic-filters与ghostscript:
sudo apt-get install foomatic-filters
sudo apt-get install ghostscript

sudo apt-get install cups --reinstall

sudo /etc/init.d/cups restart
5、安装完成后,配置并启动CUPS服务:
-
sudo service cups start -
你可以通过以下命令检查CUPS服务的状态:通过浏览器访问CUPS的网页界面,在地址栏输入:
http://localhost:631
6、以上步骤会在Ubuntu系统上安装CUPS,并启动打印服务。如果你的系统中还没有安装Web浏览器,你可以在安装CUPS之后,通过命令行使用lpinfo和lpadmin工具来配置打印机。
7、安装遇到的问题
7、安装遇到的问题Failed to connect to bus: No such file or directory
sudo /etc/init.d/dbus startFailed to start cups.service: Launch helper exited with unknown return code 1
sudo /etc/init.d/cups restart8、打印应用与测试:
添加打印机:
lpadmin -p epson-xxx -E -v "ipp://11.22.33.44/ipp/print" -m everywhere
lpadmin -p EPSON-L3251 -E -v ipp://11.22.33.44/ipp/print -m everywhere
lpadmin -p HP_xxx -E -v ipp://11.22.33.44/ipp/print -m everywhere9、设置默认打印队列:
如果你有一个或多个打印队列可用,但是没有设置默认,你可以使用 lpoptions 命令来设置默认打印队列。假设你有一个名为 printer1 的打印队列,你可以这样设置它为默认:
lpoptions -d epson-xxx
lpoptions -d HP_xxx
10、查看Epson打印机3250系列ppd驱动文件状态及位置
 lpinfo -m | grep 3250
foomatic-db-compressed-ppds:0/ppd/foomatic-ppd/Epson-ActionPrinter_3250-ap3250.ppd Epson ActionPrinter 3250 Foomatic/ap3250 (recommended)

~$ find / -name "Epson*" 2>/dev/null
/etc/cups/ppd/Epson_L3251_Printer.ppd
/etc/cups/ppd/Epson_L3251_Printer.ppd.O
11、开始打印:
lp xxx.pdf
lp -o media=A4 -o resolution=600dpi xxx.pdf
12、删除打印机:
lpadmin -x myprinter13、打印机队列状态
~$ lpstat -p二、Andoird系统各种打印机PDF打印(插件调用方式)
建议使用各打印机厂商提供的打印机插件apk程序安装,然后使用插件调用方式调用打印。
如1、Hp的com.hp.android.printservice_xxx.apk;
2、Epson的EpsoniPrint.apk;
3、Canon的Canon_PR_Biz.apk;
4、Sansung的com.sec.print.mobileprint_v4.xxx.apk等。
插件调用代码:
/**
 * pdf打印
 */
private fun sharePdf(pdfPath: String){
    val pdfFile = File(pdfPath)
    if (pdfFile.exists()) {
        val shareIntent = Intent(Intent.ACTION_SEND)
        shareIntent.setType("application/pdf")
        val pdfUri: Uri = Uri.fromFile(pdfFile)
        shareIntent.putExtra(Intent.EXTRA_STREAM, pdfUri)
        startActivity(Intent.createChooser(shareIntent, "Pdf Report"))
    }
    else {
        Toast.makeText(this, "PDF file not found", Toast.LENGTH_SHORT).show()
    }
}
三、Android ndk交叉编译CUPS
过程较为复杂,依赖较多,集成较为麻烦,暂不推荐。
1、下载NDK(NDK 下载 | Android NDK | Android Developers)
2、解压、安装NDK、配置交叉编译环境
android-ndk-r21e$ ./build/tools/make_standalone_toolchain.py --arch arm --api 24 --install-dir /home/toolchain

# vim ~/.bash_profile
export NDK=/home/xxx/tools/android-ndk-r21e
export PATH=${NDK}:${NDK}/../toolchain/bin:${PATH}
export NDK_PROJECT_PATH=${NDK}
export CXX=armv7a-linux-androideabi24-clang++
export CC=armv7a-linux-androideabi24-clang
3、下载cups、cups-filter及其依赖包
GitHub - jianglei12138/cups: cups for android (UNIX通用打印系统)
4、解压、交叉编译cups2.1.3
4.1 替换local头文件及拷贝so库(GitHub - jianglei12138/liblocale: locale for android)
下载 lcoale 支持库和库 ,然后将标头 locale.h 放在 toolchain-folder/sysroot/usr/include(override) 下,并将共享库 liblocale.so 放在 toolchain-folder/sysroot/usr/lib 下
4.2 配置cups
./configure --host=arm-linux-androideabi --disable-dbus --prefix=/system/usr/root --with-cups-user=system --with-cups-group=system --with-system-groups=root
5、编译
#需要重新编译avahi-master,并拷贝头文件和库,以及local头文件和库,否则会出现缺头文件和库符号错误

make

make install
6、编译2.4.10
./configure --host=arm-linux-androideabi --disable-dbus --without-tls --disable-pam --prefix=/system/usr/root --with-cups-user=system --with-cups-group=system --with-system-groups=root

#打入补丁
patch -p1 < ../cups-2.4.10-android-port.patch

编译
make

make install DESTDIR=/home/xxxx/xxx


补丁:commit cf2c2e6e2140e04cbd99f33406bc5774fafa169d
Author: jianglei <jianglei@bigo.sg>
Date:   Wed Jun 19 16:32:19 2024 +0800

    port to android system

diff --git a/cups/language.c b/cups/language.c
index 6d9474e..bac54e3 100644
--- a/cups/language.c
+++ b/cups/language.c
@@ -439,6 +439,237 @@ cupsLangFree(cups_lang_t *lang)		/* I - Language to free */
 }


+/* Specification.  */
+#include <langinfo.h>
+#if REPLACE_NL_LANGINFO
+/* Override nl_langinfo with support for added nl_item values.  */
+# include <locale.h>
+# include <string.h>
+# undef nl_langinfo
+char *
+rpl_nl_langinfo (nl_item item)
+{
+  switch (item)
+    {
+# if GNULIB_defined_CODESET
+    case CODESET:
+      {
+        const char *locale;
+        static char buf[2 + 10 + 1];
+        locale = setlocale (LC_CTYPE, NULL);
+        if (locale != NULL && locale[0] != '\0')
+          {
+            /* If the locale name contains an encoding after the dot, return
+               it.  */
+            const char *dot = strchr (locale, '.');
+            if (dot != NULL)
+              {
+                const char *modifier;
+                dot++;
+                /* Look for the possible @... trailer and remove it, if any.  */
+                modifier = strchr (dot, '@');
+                if (modifier == NULL)
+                  return dot;
+                if (modifier - dot < sizeof (buf))
+                  {
+                    memcpy (buf, dot, modifier - dot);
+                    buf [modifier - dot] = '\0';
+                    return buf;
+                  }
+              }
+          }
+        return "";
+      }
+# endif
+# if GNULIB_defined_T_FMT_AMPM
+    case T_FMT_AMPM:
+      return "%I:%M:%S %p";
+# endif
+# if GNULIB_defined_ERA
+    case ERA:
+      /* The format is not standardized.  In glibc it is a sequence of strings
+         of the form "direction:offset:start_date:end_date:era_name:era_format"
+         with an empty string at the end.  */
+      return "";
+    case ERA_D_FMT:
+      /* The %Ex conversion in strftime behaves like %x if the locale does not
+         have an alternative time format.  */
+      item = D_FMT;
+      break;
+    case ERA_D_T_FMT:
+      /* The %Ec conversion in strftime behaves like %c if the locale does not
+         have an alternative time format.  */
+      item = D_T_FMT;
+      break;
+    case ERA_T_FMT:
+      /* The %EX conversion in strftime behaves like %X if the locale does not
+         have an alternative time format.  */
+      item = T_FMT;
+      break;
+    case ALT_DIGITS:
+      /* The format is not standardized.  In glibc it is a sequence of 10
+         strings, appended in memory.  */
+      return "\0\0\0\0\0\0\0\0\0\0";
+# endif
+# if GNULIB_defined_YESEXPR || !FUNC_NL_LANGINFO_YESEXPR_WORKS
+    case YESEXPR:
+      return "^[yY]";
+    case NOEXPR:
+      return "^[nN]";
+# endif
+    default:
+      break;
+    }
+  return nl_langinfo (item);
+}
+#else
+/* Provide nl_langinfo from scratch.  */
+# if (defined _WIN32 || defined __WIN32__) && ! defined __CYGWIN__
+/* Native Windows platforms.  */
+#  define WIN32_LEAN_AND_MEAN  /* avoid including junk */
+#  include <windows.h>
+#  include <stdio.h>
+# else
+/* An old Unix platform without locales, such as Linux libc5 or BeOS.  */
+# endif
+# include <locale.h>
+char *
+nl_langinfo (nl_item item)
+{
+  switch (item)
+    {
+    /* nl_langinfo items of the LC_CTYPE category */
+    case CODESET:
+# if (defined _WIN32 || defined __WIN32__) && ! defined __CYGWIN__
+      {
+        static char buf[2 + 10 + 1];
+        /* The Windows API has a function returning the locale's codepage as
+           a number.  */
+        sprintf (buf, "CP%u", GetACP ());
+        return buf;
+      }
+# elif defined __BEOS__
+      return "UTF-8";
+# else
+      return "ISO-8859-1";
+# endif
+    /* nl_langinfo items of the LC_NUMERIC category */
+    case RADIXCHAR:
+      return localeconv () ->decimal_point;
+    case THOUSEP:
+      return localeconv () ->thousands_sep;
+    /* nl_langinfo items of the LC_TIME category.
+       TODO: Really use the locale.  */
+    case D_T_FMT:
+    case ERA_D_T_FMT:
+      return "%a %b %e %H:%M:%S %Y";
+    case D_FMT:
+    case ERA_D_FMT:
+      return "%m/%d/%y";
+    case T_FMT:
+    case ERA_T_FMT:
+      return "%H:%M:%S";
+    case T_FMT_AMPM:
+      return "%I:%M:%S %p";
+    case AM_STR:
+      return "AM";
+    case PM_STR:
+      return "PM";
+    case DAY_1:
+      return "Sunday";
+    case DAY_2:
+      return "Monday";
+    case DAY_3:
+      return "Tuesday";
+    case DAY_4:
+      return "Wednesday";
+    case DAY_5:
+      return "Thursday";
+    case DAY_6:
+      return "Friday";
+    case DAY_7:
+      return "Saturday";
+    case ABDAY_1:
+      return "Sun";
+    case ABDAY_2:
+      return "Mon";
+    case ABDAY_3:
+      return "Tue";
+    case ABDAY_4:
+      return "Wed";
+    case ABDAY_5:
+      return "Thu";
+    case ABDAY_6:
+      return "Fri";
+    case ABDAY_7:
+      return "Sat";
+    case MON_1:
+      return "January";
+    case MON_2:
+      return "February";
+    case MON_3:
+      return "March";
+    case MON_4:
+      return "April";
+    case MON_5:
+      return "May";
+    case MON_6:
+      return "June";
+    case MON_7:
+      return "July";
+    case MON_8:
+      return "August";
+    case MON_9:
+      return "September";
+    case MON_10:
+      return "October";
+    case MON_11:
+      return "November";
+    case MON_12:
+      return "December";
+    case ABMON_1:
+      return "Jan";
+    case ABMON_2:
+      return "Feb";
+    case ABMON_3:
+      return "Mar";
+    case ABMON_4:
+      return "Apr";
+    case ABMON_5:
+      return "May";
+    case ABMON_6:
+      return "Jun";
+    case ABMON_7:
+      return "Jul";
+    case ABMON_8:
+      return "Aug";
+    case ABMON_9:
+      return "Sep";
+    case ABMON_10:
+      return "Oct";
+    case ABMON_11:
+      return "Nov";
+    case ABMON_12:
+      return "Dec";
+    case ERA:
+      return "";
+    case ALT_DIGITS:
+      return "\0\0\0\0\0\0\0\0\0\0";
+    /* nl_langinfo items of the LC_MONETARY category
+       TODO: Really use the locale. */
+    case CRNCYSTR:
+      return "-";
+    /* nl_langinfo items of the LC_MESSAGES category
+       TODO: Really use the locale. */
+    case YESEXPR:
+      return "^[yY]";
+    case NOEXPR:
+      return "^[nN]";
+    default:
+      return "";
+    }
+}
+#endif
 /*
  * 'cupsLangGet()' - Get a language.
  */
diff --git a/cups/thread.c b/cups/thread.c
index 066f8e2..af6be86 100644
--- a/cups/thread.c
+++ b/cups/thread.c
@@ -151,11 +151,11 @@ _cupsRWUnlock(_cups_rwlock_t *rwlock)	/* I - Reader/writer lock */
  * '_cupsThreadCancel()' - Cancel (kill) a thread.
  */

-void
-_cupsThreadCancel(_cups_thread_t thread)/* I - Thread ID */
-{
-  pthread_cancel(thread);
-}
+// void
+// _cupsThreadCancel(_cups_thread_t thread)/* I - Thread ID */
+// {
+//   pthread_cancel(thread);
+// }


 /*
diff --git a/scheduler/auth.c b/scheduler/auth.c
index d0430b4..c80fc78 100644
--- a/scheduler/auth.c
+++ b/scheduler/auth.c
@@ -60,6 +60,50 @@ typedef struct sockpeercred cupsd_ucred_t;
 #  include <snapd-glib/snapd-glib.h>
 #endif /* HAVE_LIBSNAPDGLIB */

+static void android_setup_pwd(struct passwd* pw) {
+       char const* result = "@TERMUX_PREFIX@/bin/login";
+       if (result == NULL || access(result, /*X_OK*/1) == -1) {
+               pw->pw_shell = "@TERMUX_PREFIX@/bin/bash";
+       } else {
+               pw->pw_shell = (char*) result;
+       }
+       pw->pw_dir = "/tmp/";
+       pw->pw_passwd = "*";
+#ifdef __LP64__
+       pw->pw_gecos = ""; /* Avoid NULL field. */
+#endif
+}
+
+static struct passwd* android_polyfill_getpwuid(uid_t t) {
+       struct passwd* pw = getpwuid(t);
+       if (pw == NULL) return NULL;
+       android_setup_pwd(pw);
+       return pw;
+}
+
+static struct passwd* android_polyfill_getpwnam(const char* name) {
+       struct passwd* pw = getpwnam(name);
+       if (pw == NULL) return NULL;
+       android_setup_pwd(pw);
+       return pw;
+}
+
+static int android_polyfill_getpwuid_r(uid_t uid,
+                                       struct passwd *pwd,
+                                       char *buffer,
+                                       size_t bufsize,
+                                       struct passwd **result) {
+       int ret = getpwuid_r(uid, pwd, buffer, bufsize, result);
+       if (ret != 0) return ret;
+       android_setup_pwd(pwd);
+       return 0;
+}
+
+#define getpwnam android_polyfill_getpwnam
+#define getpwuid android_polyfill_getpwuid
+#define getpwuid_r android_polyfill_getpwuid_r
+static void endpwent(void) { /* Do nothing. */ }
+

 /*
  * Local functions...
@@ -686,7 +730,7 @@ cupsdAuthorize(cupsd_client_t *con)	/* I - Client connection */
       * client...
       */

-      pass = crypt(password, pw->pw_passwd);
+      pass = "*"; // crypt(password, pw->pw_passwd);

       if (!pass || strcmp(pw->pw_passwd, pass))
       {
@@ -1133,136 +1177,7 @@ cupsdCheckGroup(
     struct passwd *user,		/* I - System user info */
     const char    *groupname)		/* I - Group name */
 {
-  int		i;			/* Looping var */
-  struct group	*group;			/* Group info */
-  gid_t		groupid;		/* ID of named group */
-#ifdef HAVE_MBR_UID_TO_UUID
-  uuid_t	useruuid,		/* UUID for username */
-		groupuuid;		/* UUID for groupname */
-  int		is_member;		/* True if user is a member of group */
-#endif /* HAVE_MBR_UID_TO_UUID */
-
-
-  cupsdLogMessage(CUPSD_LOG_DEBUG2, "cupsdCheckGroup(username=\"%s\", user=%p, groupname=\"%s\")", username, (void *)user, groupname);
-
- /*
-  * Validate input...
-  */
-
-  if (!username || !groupname)
-    return (0);
-
- /*
-  * Check to see if the user is a member of the named group...
-  */
-
-  group = getgrnam(groupname);
-  endgrent();
-
-  if (group != NULL)
-  {
-   /*
-    * Group exists, check it...
-    */
-
-    groupid = group->gr_gid;
-
-    for (i = 0; group->gr_mem[i]; i ++)
-    {
-     /*
-      * User appears in the group membership...
-      */
-
-      if (!_cups_strcasecmp(username, group->gr_mem[i]))
-	return (1);
-    }
-
-#ifdef HAVE_GETGROUPLIST
-   /*
-    * If the user isn't in the group membership list, try the results from
-    * getgrouplist() which is supposed to return the full list of groups a user
-    * belongs to...
-    */
-
-    if (user)
-    {
-      int	ngroups;		/* Number of groups */
-#  ifdef __APPLE__
-      int	groups[2048];		/* Groups that user belongs to */
-#  else
-      gid_t	groups[2048];		/* Groups that user belongs to */
-#  endif /* __APPLE__ */
-
-      ngroups = (int)(sizeof(groups) / sizeof(groups[0]));
-#  ifdef __APPLE__
-      getgrouplist(username, (int)user->pw_gid, groups, &ngroups);
-#  else
-      getgrouplist(username, user->pw_gid, groups, &ngroups);
-#endif /* __APPLE__ */
-
-      for (i = 0; i < ngroups; i ++)
-        if ((int)groupid == (int)groups[i])
-	  return (1);
-    }
-#endif /* HAVE_GETGROUPLIST */
-  }
-  else
-    groupid = (gid_t)-1;
-
- /*
-  * Group doesn't exist or user not in group list, check the group ID
-  * against the user's group ID...
-  */
-
-  if (user && groupid == user->pw_gid)
     return (1);
-
-#ifdef HAVE_MBR_UID_TO_UUID
- /*
-  * Check group membership through macOS membership API...
-  */
-
-  if (user && !mbr_uid_to_uuid(user->pw_uid, useruuid))
-  {
-    if (groupid != (gid_t)-1)
-    {
-     /*
-      * Map group name to UUID and check membership...
-      */
-
-      if (!mbr_gid_to_uuid(groupid, groupuuid))
-        if (!mbr_check_membership(useruuid, groupuuid, &is_member))
-	  if (is_member)
-	    return (1);
-    }
-    else if (groupname[0] == '#')
-    {
-     /*
-      * Use UUID directly and check for equality (user UUID) and
-      * membership (group UUID)...
-      */
-
-      if (!uuid_parse((char *)groupname + 1, groupuuid))
-      {
-        if (!uuid_compare(useruuid, groupuuid))
-	  return (1);
-	else if (!mbr_check_membership(useruuid, groupuuid, &is_member))
-	  if (is_member)
-	    return (1);
-      }
-
-      return (0);
-    }
-  }
-  else if (groupname[0] == '#')
-    return (0);
-#endif /* HAVE_MBR_UID_TO_UUID */
-
- /*
-  * If we get this far, then the user isn't part of the named group...
-  */
-
-  return (0);
 }


diff --git a/scheduler/conf.c b/scheduler/conf.c
index 0d4bb6a..c791fd9 100644
--- a/scheduler/conf.c
+++ b/scheduler/conf.c
@@ -516,6 +516,8 @@ cupsdFreeAliases(cups_array_t *aliases)	/* I - Array of aliases */
   cupsArrayDelete(aliases);
 }

+static void endpwent(void) { /* Do nothing. */ }
+static void endgrent(void) { /* Do nothing. */ }

 /*
  * 'cupsdReadConfiguration()' - Read the cupsd.conf file.
diff --git a/scheduler/ipp.c b/scheduler/ipp.c
index 37623c5..762636f 100644
--- a/scheduler/ipp.c
+++ b/scheduler/ipp.c
@@ -29,6 +29,9 @@ extern int mbr_check_membership_by_id(uuid_t user, gid_t group, int* ismember);
 #endif /* __APPLE__ */


+static void endpwent(void) { /* Do nothing. */ }
+static void endgrent(void) { /* Do nothing. */ }
+
 /*
  * Local functions...
  */
diff --git a/scheduler/policy.c b/scheduler/policy.c
index 884e499..ab8b958 100644
--- a/scheduler/policy.c
+++ b/scheduler/policy.c
@@ -20,6 +20,8 @@
  * Local functions...
  */

+static void endpwent(void) { /* Do nothing. */ }
+static void endgrent(void) { /* Do nothing. */ }
 static int	compare_ops(cupsd_location_t *a, cupsd_location_t *b);
 static int	compare_policies(cupsd_policy_t *a, cupsd_policy_t *b);
 static void	free_policy(cupsd_policy_t *p);
7、编译过程错误:
Making all in cups...
Making all in filter...
Linking commandtops...
../cups/libcups.so: error: undefined reference to 'nl_langinfo'
clang90: error: linker command failed with exit code 1 (use -v to see invocation)
make[1]: *** [Makefile:254: commandtops] Error 1
make: *** [Makefile:40: all] Error 1
https://android.googlesource.com/toolchain/sed/+/refs/heads/ndk-r14-release/lib/nl_langinfo.c
将上述缺少的实现拷贝到language.c重新编译即可。
Compiling sysman.c...
Linking cupsd...
auth.c:655: error: undefined reference to 'endpwent'
auth.c:1723: error: undefined reference to 'endpwent'
ipp.c:10875: error: undefined reference to 'endpwent'
ipp.c:3744: error: undefined reference to 'endpwent'
clang90: error: linker command failed with exit code 1 (use -v to see invocation)
make[1]: *** [Makefile:382: cupsd] Error 1
make: *** [Makefile:40: all] Error 1
增加头文件包含。
8、部署
- 拷贝etc目录下内容到系统/system/etc/目录,拷贝system/usr/root目录下内容到系统/system/usr/root/目录,拷贝usr/share/目录下内容到系统/usr/share/目录,拷贝liblocal.so目录下内容到系统/system/lib/目录。
9、运行
#cupsd -f运行错误
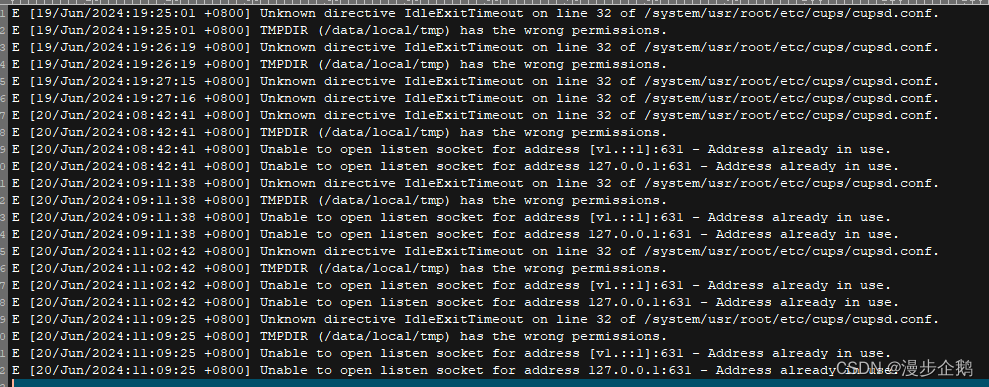 解决
解决
chmod 777 /data/local/tmp

netstat -tulnp | grep 631
10、查看服务状态
安装一个UC浏览器,输入http://localhost:631回车。
11、修改部署配置
busybox vi /system/usr/root/etc/cups/cupsd.conf

# Restrict access to the server...
<Location />
  Order allow,deny
  Allow all
</Location>

# Restrict access to the admin pages...
<Location /admin>
  AuthType Default
  Require user @SYSTEM
  Order allow,deny
  Allow all
</Location>

# Restrict access to configuration files...
<Location /admin/conf>
  AuthType Default
  Require user @SYSTEM
  Order allow,deny
  Allow all
</Location>

# Restrict access to log files...
<Location /admin/log>
  AuthType Default
  Require user @SYSTEM
  Order allow,deny
  Allow all
</Location>

拷贝依赖库文件:

chmod 777 /system/usr/root/var/ -R

1      cp lib/libqpdf.so      /system/lib/
2      cp lib/libcupsfilters.so      /system/lib/
3      cp lib/liblcms2.so      /system/lib/
4      cp lib/libpng16.so   /system/lib/
5      cp lib/libpoppler-cpp.so   /system/lib/
6      cp lib/libxml2.so    /system/lib/
7      cp lib/libpoppler.so     /system/lib/
8      cp lib/libiconv.so      /system/lib/
9      cp lib/libopenjp2.so      /system/lib/

启动服务:

kill cups-id

cupsd -f &
四、部署过程及打印
1、打印测试
-- 添加打印机

lpadmin -p HP_M104W -E -v ipp://11.22.33.44/ipp/print -m everywhere
lpadmin -p EPSON_L3251 -E -v ipp://11.22.33.44/ipp/print -m everywhere

-- 查看打印机状态

lpstat -p

-- 设置默认打印机

lpoptions -d EPSON_L3251

-- 执行打印

:/system/usr/root/bin # ./lp /sdcard/public/xxx.pdf
request id is EPSON_L3251-3 (1 file(s))


-- 设置默认打印机

lpoptions -d HP_M104W

-- 执行打印

lp /sdcard/public/xxx.pdf

-- 日志位置

/system/usr/root/var/log/cups/error_log

* 问题:./lp: Unsupported document-format "application/pdf".
* 问题: File \"/system/usr/root/lib/cups/backend/ipp\" has insecure permissions (0100771/uid=0/gid=0).

-- 权限设置

chmod 755 /system/usr/root/* -R


* 问题:Job 7] Backend ipp returned status -6 (crashed)

-5087-5087  libc                    pid-5087                             A  CANNOT LINK EXECUTABLE "ipp://11.22.33.44/ipp/print": library "libcups.so.2" not found
5087-5087  libc                    pid-5087                             A  Fatal signal 6 (SIGABRT), code -6 in tid 5087 (ipp)

-- 设置SO库、工具运行时环境变量

export LD_LIBRARY_PATH=/system/usr/root/lib
export PATH=/system/usr/root/bin:/system/usr/root/sbin:$PATH

* 问题:PPD creation failed: No IPP attributes.

-- 判断是否支持ipp

ipptool -tv ipp://11.22.33.44:631/ipp/print get-printer-attributes.test | grep -E "ipp-versions-supported|document-format-supported|get-printer-attributes"

--网页服务端Administration

用户名:root
密码:*

-- 嗅探所有打印机

/system/usr/root//lib/cups/backend/snmp
2、开机启动:
# init and start cupsd services
chmod 777 /data/local/tmp -R
chmod 777 /system/usr/root -R

export PATH=/system/usr/root/sbin:/system/usr/root/bin:$PATH

cupsd -f &
五、打印情况说明
1、此时只是安装了CUPS打印服务,对于PDF、png、jpeg等格式的文档和图片还是不能打印的。
2、需要交叉编译部署cups-filter解析转换文档或者图片格式后才能打印,参见另外的文章:
六、参考资料
GitHub - apple/cups: Apple CUPS Sources
使用 CUPS 命令行实用程序设置和管理打印机 - Oracle Solaris 管理:常见任务
Debian -- Details of package cups-filters in trixie
Debian -- Details of source package cups-filters in trixie
GitHub - jianglei12138/cups: cups for android (UNIX通用打印系统)
https://android.googlesource.com/toolchain/sed/+/refs/heads/ndk-r14-release/lib/nl_langinfo.c
特别感谢上述开源网站和作者的帮助,致敬他们热情、友好、无私的精神和品质,相信这些都是社会能够快速进步的源泉和力量。


 8287
8287

 被折叠的 条评论
为什么被折叠?
被折叠的 条评论
为什么被折叠?
 到【灌水乐园】发言


