举一个例子,体验一下分散文件是如何起作用的。
一、设计文件如下:
设置1个main.c文件,3个测试文件test_file_A.c, test_file_B.c, test_file_C.c,在三个文件中分别定义了一个全局变量和函数。test_variant_A,test_func_A(u8 input),test_variant_B,test_func_B(u8 input),test_variant_C,test_func_C(u8 input),
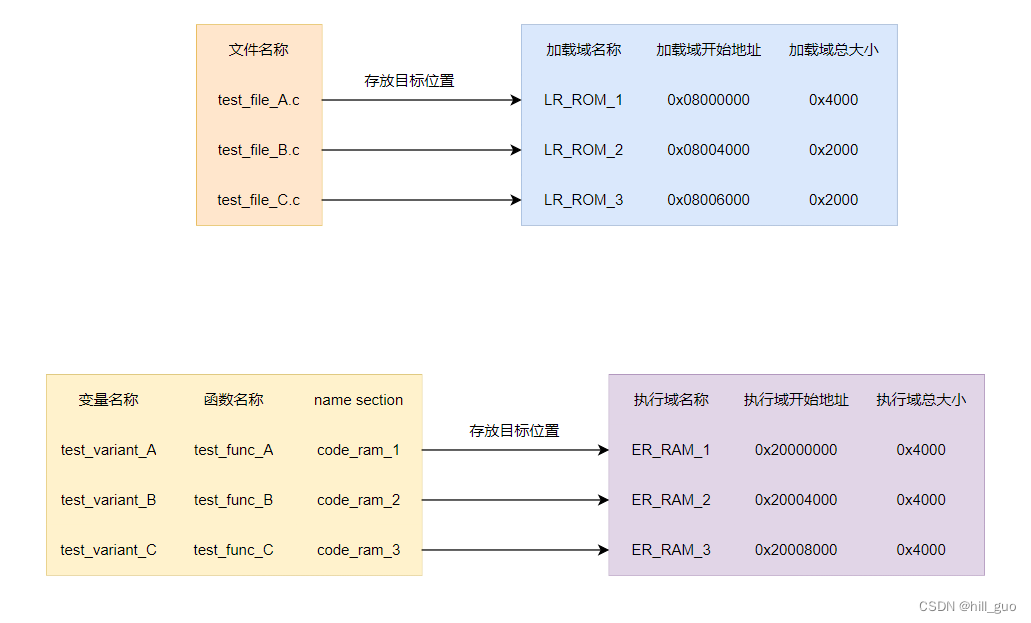
二、设计存储区分区如下:
把flash分成3个区:LR_ROM_1,LR_ROM_2,LR_ROM_3. 把RAM分成3个区:ER_RAM_1,ER_RAM_2,ER_RAM_3.
三、设计存放关系如下:
test_file_A.c存放到LR_ROM_1,test_file_B.c存放到LR_ROM_2,test_file_C.c存放到LR_ROM_3;
test_variant_A,test_func_A(u8 input),存放到ER_RAM_1;
test_variant_B,test_func_A(u8 input),存放到ER_RAM_2;
test_variant_C,test_func_A(u8 input),存放到ER_RAM_3;
如图:
四、代码内容:
main.c文件内容
#include "sys.h"
#include "delay.h"
#include "usart.h"
#include "led.h"
extern void test_func_A(u8 input);
extern void test_func_B(u8 input);
extern void test_func_C(u8 input);
extern void another_test_func_A(void);
extern void another_test_func_B(void);
extern void another_test_func_C(void);
int main(void)
{
delay_init(); //ÑÓʱº¯Êý³õʼ»¯
LED_Init(); //³õʼ»¯ÓëLEDÁ¬½ÓµÄÓ²¼þ½Ó¿Ú
while(1)
{
LED0=0;
LED1=1;
delay_ms(300); //ÑÓʱ300ms
LED0=1;
LED1=0;
delay_ms(300); //ÑÓʱ300ms
test_func_A(5);
test_func_B(6);
test_func_C(7);
another_test_func_A();
another_test_func_B();
another_test_func_C();
}
}
test_file_A.c内容
#include "usart.h"
u8 test_variant_A __attribute__((section("code_ram_1"))) = 10;
void test_func_A(u8 input) __attribute__((section("code_ram_1")));
void test_func_A(u8 input){
u8 value = input + test_variant_A;
printf("fila A test_func_A value = %d.\r\n", value);
}
void another_test_func_A(void)
{
printf("another test func A.\r\n");
}
test_file_B.c内容
#include "usart.h"
u8 test_variant_B __attribute__((section("code_ram_2"))) = 10;
void test_func_B(u8 input) __attribute__((section("code_ram_2")));
void test_func_B(u8 input){
u8 value = input + test_variant_B;
printf("fila B test_func_B value = %d.\r\n", value);
}
void another_test_func_B(void)
{
printf("another test func B.\r\n");
}
test_file_C.c内容
#include "usart.h"
u8 test_variant_C __attribute__((section("code_ram_3"))) = 10;
void test_func_C(u8 input) __attribute__((section("code_ram_3")));
void test_func_C(u8 input){
u8 value = input + test_variant_C;
printf("fila C test_func_C value = %d.\r\n", value);
}
void another_test_func_C(void)
{
printf("another test func C.\r\n");
}
五、分散加载文件内容
; *************************************************************
; *** Scatter-Loading Description File generated by uVision ***
; *************************************************************
LR_ROM_1 0x08000000 0x00004000 { ; load region size_region
ER_IROM1 0x08000000 0x00004000 { ; load address = execution address
*.o (RESET, +First)
*(InRoot$$Sections)
.ANY (+RO)
.ANY (+XO)
test_file_a.o(+RO)
}
ER_RAM_1 0x20000000 0x00004000 { ; RW data
.ANY (+RW +ZI)
test_file_A.o(code_ram_1)
}
ER_RAM_2 0x20004000 0x00004000 { ; RW data
.ANY (+RW +ZI)
test_file_B.o(code_ram_2)
}
ER_RAM_3 0x20008000 0x00004000 { ; RW data
.ANY (+RW +ZI)
test_file_C.o(code_ram_3)
}
}
LR_ROM_2 0x08004000 0x00002000 { ; load region size_region
ER_IROM2 0x08004000 0x00002000 { ; load address = execution address
test_file_B.o(+RO)
}
}
LR_ROM_3 0x08006000 0x00002000 { ; load region size_region
ER_IROM3 0x08006000 0x00002000 { ; load address = execution address
test_file_C.o(+RO)
}
}
六、查看map文件
七、思考
1)需要在RAM区运行的代码,代码运行起来后拷贝到RAM区,此时的地址就是分散加载文件中的执行域指定的地址,那么这部分代码在加载域的时候,地址是如何分配的呢?
答:在本例子中,设置了3个RAM区,期望把3个函数和3个全局变量分别放在这3个RAM区。生成镜像文件(可以理解为bin/hex等文件)的时候,代码是按加载域地址排列存放的,烧录到flash中,也是按加载域的地址存放在flash中。此时的地址是按RAM执行域所在的加载域地址范围分配的。如图:
根据分散加载文件知道:code_ram_1放在执行域ER_RAM_1中,地址信息是:基地址 = 0x0x20000000, 最大长度 = 0x00004000;执行域ER_RAM_1又放在了加载域LR_ROM_1中,地址信息是:基地址 = 0x08000000,最大长度 = 0x00004000。所以,code_ram_1的加载域地址必然是在LR_ROM_1范围中,图中分配的地址 = 0x08000a74 (Code),0x08000ab4 (Data). 当程序跑起来,code_ram_1必然在ER_RAM_1的范围中,图中分配的地址 = 0x2000004c. 基于这个原理推理,加载域中包含的执行域的地址范围全部加起来,不得超过加载域的最大范围。
2)如何正确计算加载域和执行域的地址范围?答:①原则一:一个加载域的地址范围 >= 加载域内部的多个执行域地址之和;②原则二:同一个加载域内部的执行域之间地址范围不要重叠;③原则三:不同加载域之间的地址范围不要重叠;④原则四:如果变量或者函数分配了name section,则优先按name section分配地址范围。比如,如图:
3)分散加载文件有什么好处?答:我所了解的一种好处:在蓝牙SOC芯片中,经常使用加载文件,可以把蓝牙协议栈和一些库文件单独放在一个存储器区域,用户应用程序放在另外一个flash区域,这样在ota的时候,只需要更新用户应用程序的内容,减少OTA的文件大小,从而节省ota的文件传输时间。