


1.导入所需的库:
Tkinter用于GUI,face_recognition用于人脸识别,PIL用于图像处理,subprocess用于运行其他Python脚本。
import tkinter as tk
from tkinter import filedialog
import face_recognition
from PIL import Image, ImageTk
import subprocess
2.设置窗口
创建一个Tkinter窗口,设置标题和大小。
win = tk.Tk()
win.title('Welcome')
win.geometry('750x600')
3.设置背景
设置窗口背景为一张GIF图片,并调整图片大小以适应窗口。
image = Image.open("9.gif")
image = image.resize((750, 600))  # 调整背景图片大小
photo1 = ImageTk.PhotoImage(image)
canvas = tk.Label(win, image=photo1)
canvas.pack()- 定义全局变量
定义全局变量file_path和face_image_label,用于存储文件路径和人脸图像标签。
file_path = None
face_image_label = None- 定义函数xz
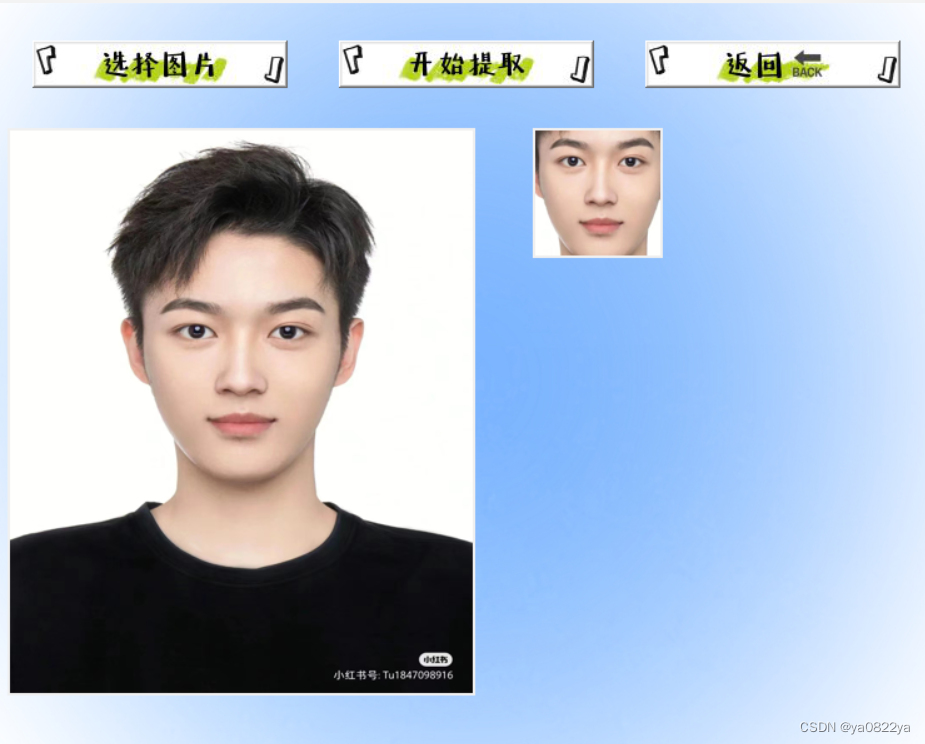
用于打开文件对话框,让用户选择一张图片,并将其显示在窗口中。
def xz():
    global file_path
    file_path = filedialog.askopenfilename(title="选择图片",
                                           filetypes=(("图片文件", "*.png *.jpg *.jpeg *.bmp"),
                                                      ("所有文件", "*.*")))
    if file_path:
        image = Image.open(file_path)
        image = image.resize((370, 450))
        photo = ImageTk.PhotoImage(image)
        image_label = tk.Label(win, image=photo)
        image_label.image = photo
        image_label.place(x=10, y=100)
6.定义函数tq
用于识别人脸,并将识别出的人脸显示在窗口中。
def tq():
    global file_path, face_image_label
    if file_path:
        img = face_recognition.load_image_file(file_path)
        face_locations = face_recognition.face_locations(img, model='hog')

        for i, face_location in enumerate(face_locations):
            top, right, bottom, left = face_location
            face_img = img[top:bottom, left:right]

            face_name = f"face_{i}.jpg"
            face_image = Image.fromarray(face_img)
            face_image = face_image.resize((100, 100))
            face_photo = ImageTk.PhotoImage(face_image)

            if face_image_label:
                face_image_label.destroy()

            face_image_label = tk.Label(win, image=face_photo)
            face_image_label.image = face_photo
face_image_label.place(x=430, y=100)7.定义函数close
用于关闭当前窗口并打开另一个Python脚本提取.py。
def close():
    win.destroy()  # 先关闭当前窗口
    subprocess.Popen(["python", "提取.py"])  # 再打开新的脚本
8.设置按钮
image = Image.open("A.gif")  # 加载一张图片
photo2 = ImageTk.PhotoImage(image)
bt1 = tk.Button(win, image=photo2, width=198, height=32,command=xz)
bt1.place(x=30, y=30)

image = Image.open("F3.gif")  # 加载一张图片
photo3 = ImageTk.PhotoImage(image)
bt2 = tk.Button(win, image=photo3, width=198, height=32,command=tq)
bt2.place(x=275, y=30)

image = Image.open("B.gif")  # 加载一张图片
photo4 = ImageTk.PhotoImage(image)
bt3 = tk.Button(win, image=photo4, width=198, height=32,command=close)
bt3.place(x=520, y=30)
- 退出窗口
win.mainloop()


 306
306

 被折叠的 条评论
为什么被折叠?
被折叠的 条评论
为什么被折叠?
 到【灌水乐园】发言


