


 文章介绍了SpringBoot中@Scheduled注解的单线程特性,导致定时任务执行顺序依赖。给出了三种解决方案:扩大线程池、使用多线程Scheduled或异步执行方法,以确保任务并行执行和避免阻塞。
前言
springboot框架中提供了@Scheduled注解,让我们快速实现一个定时任务。但其实这个注解是单线程的,多个定时任务之间是需要一个一个来执行的。如果有多个任务,其中一个任务执行时间过长,则有可能会导致其他后续任务被阻塞直到该任务执行完成。
测试
@Component
public class ScheduledTimerComp {

    private Logger logger = LoggerFactory.getLogger(ScheduledTimerComp.class);

    @Scheduled(cron = "0/2 * * * * ?")
    public void test1() {
        String id = UUID.randomUUID().toString().replace("-", "");
        logger.info(String.format("[%s]test1...开启", id));
        try {
            Thread.sleep(10 * 1000);
        } catch (InterruptedException e) {
            throw new RuntimeException(e);
        }
        logger.info(String.format("[%s]tes1....结束", id));
    }

    @Scheduled(cron = "0/2 * * * * ?")
    public void test2() {
        String id = UUID.randomUUID().toString().replace("-", "");
        logger.info(String.format("[%s]test2...开启", id));
        try {
            Thread.sleep(2 * 1000);
        } catch (InterruptedException e) {
            throw new RuntimeException(e);
        }
        logger.info(String.format("[%s]test2...结束", id));
    }

}
执行完后:
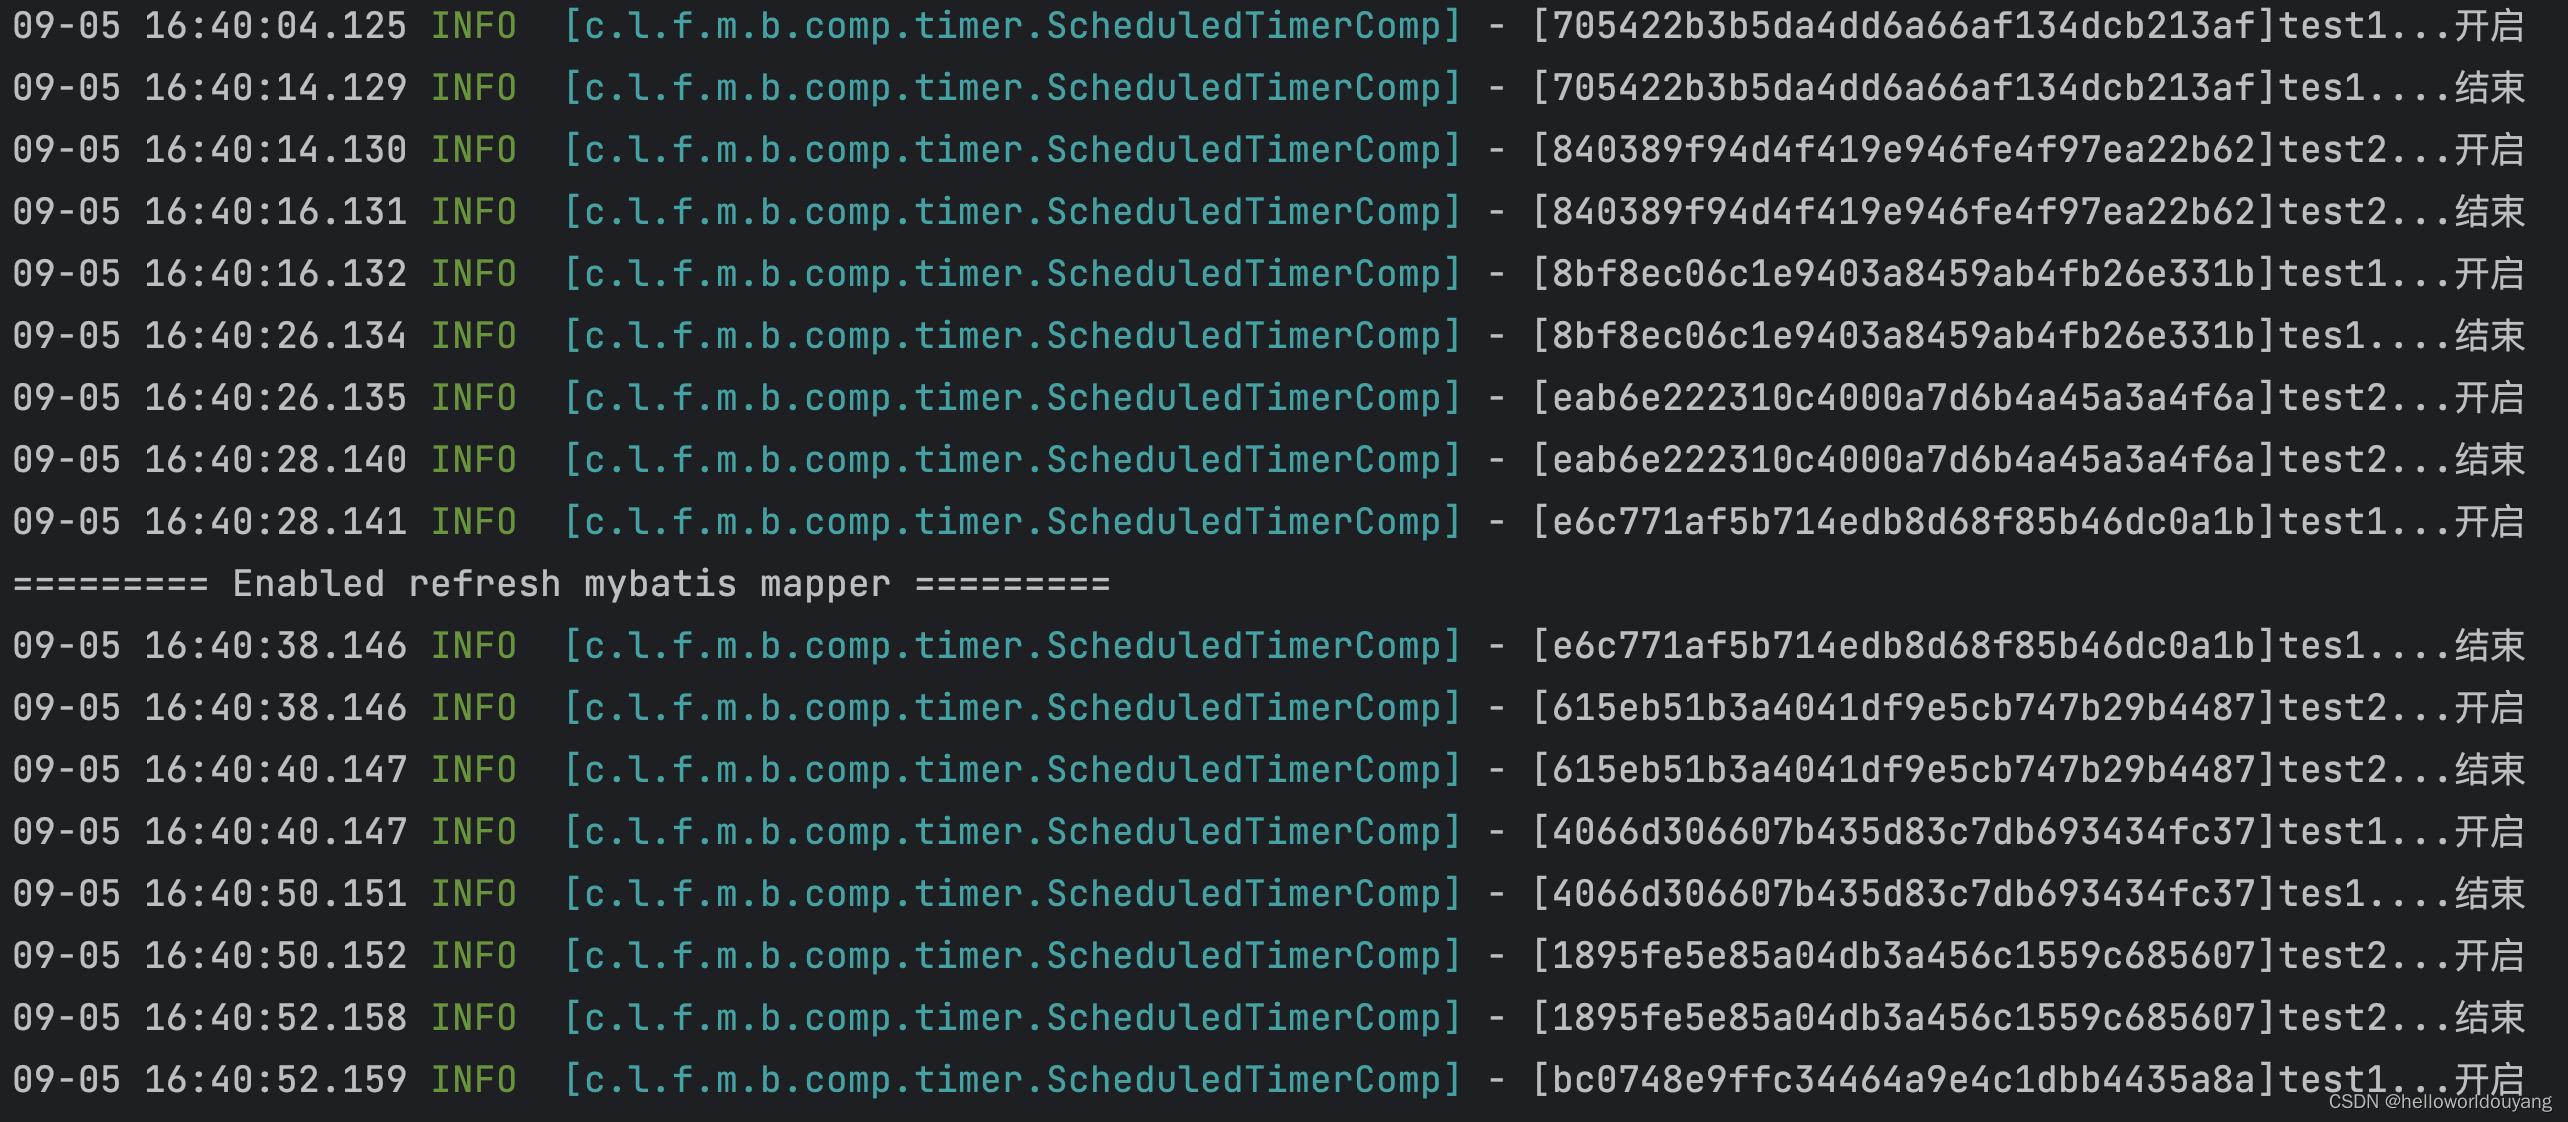
发现test2被阻塞了,只有test1执行完后,test2才会执行。
原因
定时任务的配置中默认设定了一个SingleThreadScheduledExecutor。源码中,从ScheduledAnnotationBeanPostProcessor类往下找,在定时任务注册类(ScheduledTaskRegistrar)中的ScheduleTasks中看到这样的一段判断:
if (this.taskScheduler == null) {
    this.localExecutor = Executors.newSingleThreadScheduledExecutor();
    this.taskScheduler = new ConcurrentTaskScheduler(this.localExecutor);
}
也就是说如果taskScheduler为空,那么就给定时任务做了一个单线程的线程池。
解决
同时在这个定时任务注册类(ScheduledTaskRegistrar)中,看到了还有一个设置taskScheduler的方法,那么也就是说,我们是可以去set它的
public void setScheduler(Object scheduler) {
    Assert.notNull(scheduler, "Scheduler object must not be null");
    if (scheduler instanceof TaskScheduler) {
        this.taskScheduler = (TaskScheduler) scheduler;
    }
    else if (scheduler instanceof ScheduledExecutorService) {
        this.taskScheduler = new ConcurrentTaskScheduler(((ScheduledExecutorService) scheduler));
    }
    else {
        throw new IllegalArgumentException("Unsupported scheduler type: " + scheduler.getClass());
    }
}
方案一、
扩大原定时任务线程池中的核心线程数(推荐)
新建一个类,实现SchedulingConfigurer接口
@Configuration
public class ScheduleConfig implements SchedulingConfigurer {
    @Override
    public void configureTasks(ScheduledTaskRegistrar scheduledTaskRegistrar) {
        scheduledTaskRegistrar.setScheduler(Executors.newScheduledThreadPool(50));
    }
}
这个方案,在工程启动后,会默认启动50个线程,放在线程池中。每个定时任务会占用1个线程。注:相同的定时任务,执行的时候,还是在同一个线程中。
例如,程序启动,每个定时任务占用一个线程。test1开始执行,test2也开始执行,彼此之间异步不相关。如果test1卡死了,那么下个周期,test1还是处理卡死状态,test2可以正常执行。也就是说,test1某一次卡死了,不会影响其他线程,但是他自己本身这个定时任务会一直等待上一次任务执行完成!
方案二、
Scheduled配置成成多线程执行
新建一个类,工程启动时加载
@Configuration
@EnableAsync
public class ScheduleConfig {

    @Bean
    public TaskScheduler taskScheduler() {
        ThreadPoolTaskScheduler taskScheduler = new ThreadPoolTaskScheduler();
        taskScheduler.setPoolSize(50);
        return taskScheduler;
    }
}
    @Async
    @Scheduled(cron = "0/2 * * * * ?")
    public void test1() {
        String id = UUID.randomUUID().toString().replace("-", "");
        logger.info(String.format("[%s]test1...开启", id));
        try {
            Thread.sleep(10 * 1000);
        } catch (InterruptedException e) {
            throw new RuntimeException(e);
        }
        logger.info(String.format("[%s]tes1....结束", id));
    }

    @Async
    @Scheduled(cron = "0/2 * * * * ?")
    public void test2() {
        String id = UUID.randomUUID().toString().replace("-", "");
        logger.info(String.format("[%s]test2...开启", id));
        try {
            Thread.sleep(2 * 1000);
        } catch (InterruptedException e) {
            throw new RuntimeException(e);
        }
        logger.info(String.format("[%s]test2...结束", id));
    }
这个方案,每次定时任务启动的时候,都会创建一个单独的线程来处理。也就是说同一个定时任务也会启动多个线程处理。
例如:test1和test2一起处理,但是test1卡死了,test2是可以正常执行的。且下个周期,test1还是会正常执行,不会因为上一次卡死了,影响test1。
但是test1中的卡死线程越来越多,会导致50个线程池占满,还是会影响到定时任务。
这时候,可能需要对工程进行重启了
方案三、
将所有@Scheduled注释的方法内部改成线程异步执行
private ExecutorService service = Executors.newFixedThreadPool(5);

    @Scheduled(cron = "0/2 * * * * ?")
    public void test1() {
        service.execute(()->{
            String id = UUID.randomUUID().toString().replace("-", "");
            logger.info(String.format("[%s]test1...开启", id));
            try {
                Thread.sleep(10 * 1000);
            } catch (InterruptedException e) {
                throw new RuntimeException(e);
            }
            logger.info(String.format("[%s]tes1....结束", id));
        });

    }

    @Scheduled(cron = "0/2 * * * * ?")
    public void test2() {
        service.execute(()->{
            String id = UUID.randomUUID().toString().replace("-", "");
            logger.info(String.format("[%s]test2...开启", id));
            try {
                Thread.sleep(2 * 1000);
            } catch (InterruptedException e) {
                throw new RuntimeException(e);
            }
            logger.info(String.format("[%s]test2...结束", id));
        });
    }


 678
678

 被折叠的 条评论
为什么被折叠?
被折叠的 条评论
为什么被折叠?
 到【灌水乐园】发言


