29-轮廓发现

opencv——提取轮廓 #include #include "cv.h" #include "cxcore.h" #include "highgui.h" using namespace std; #define OPENCV_FLANN_LOGGER_H int main(int argc,char* argv[]) { int i; //创建并设置一个动态内存存储器, CvMemStorage 阅读详情

轮廓发现(find contour in your image)

1、轮廓发现(find contour);
2、代码演示;

轮廓发现(find contour)

1、轮廓发现是基于图像边缘提取的基础寻找对象轮廓的方法,一般用来寻找二值图像的轮廓,所以边缘提取的阈值选定会影响最终轮廓发现结果;

相关API

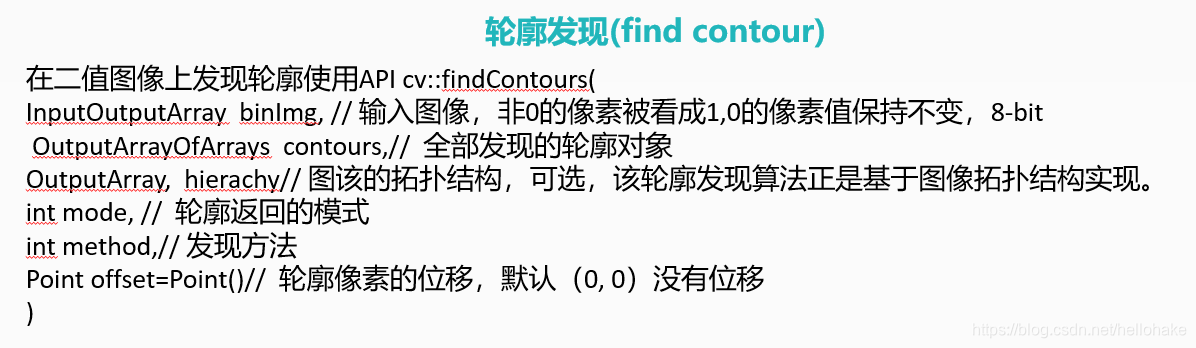
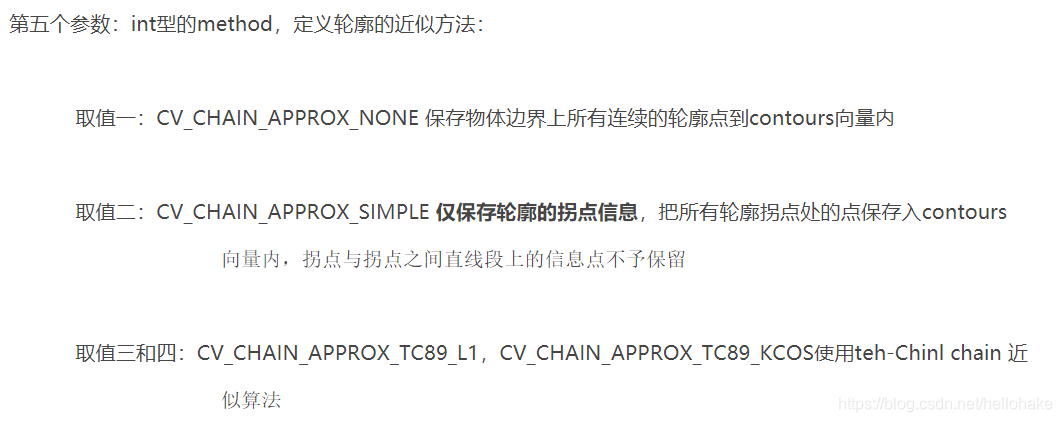
1、发现轮廓API : findContours();
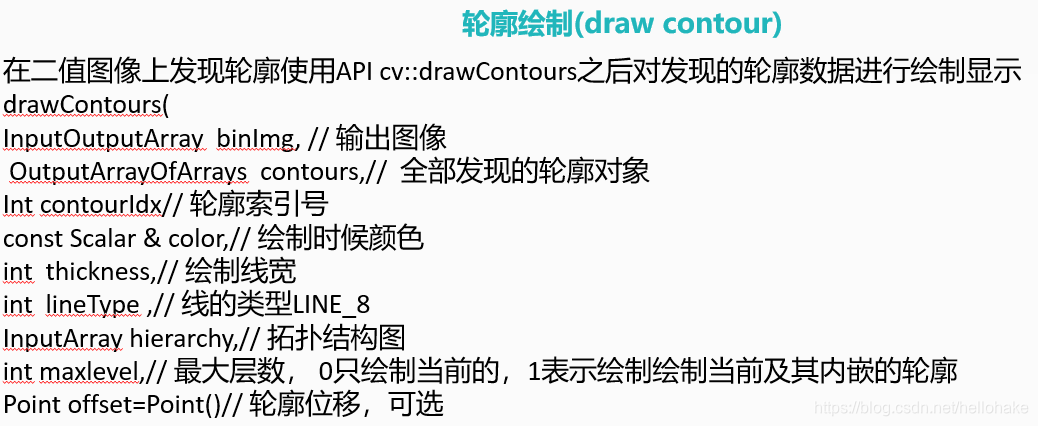
2、绘制轮廓API : drawContours();

在这里插入图片描述
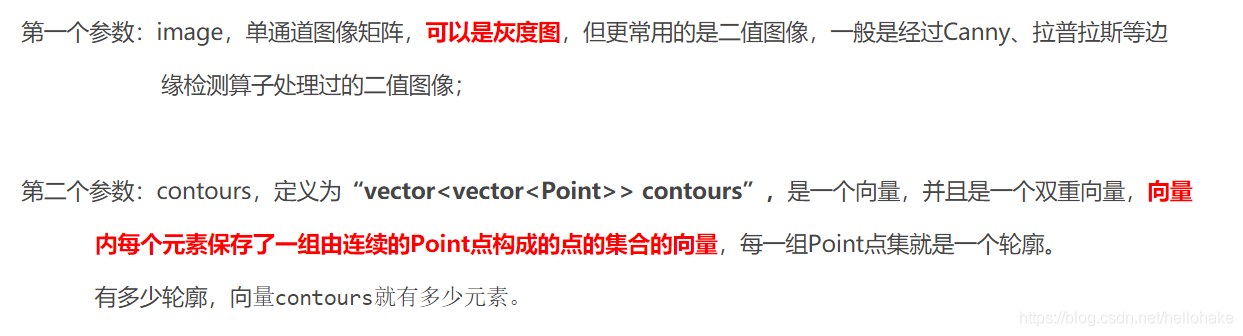
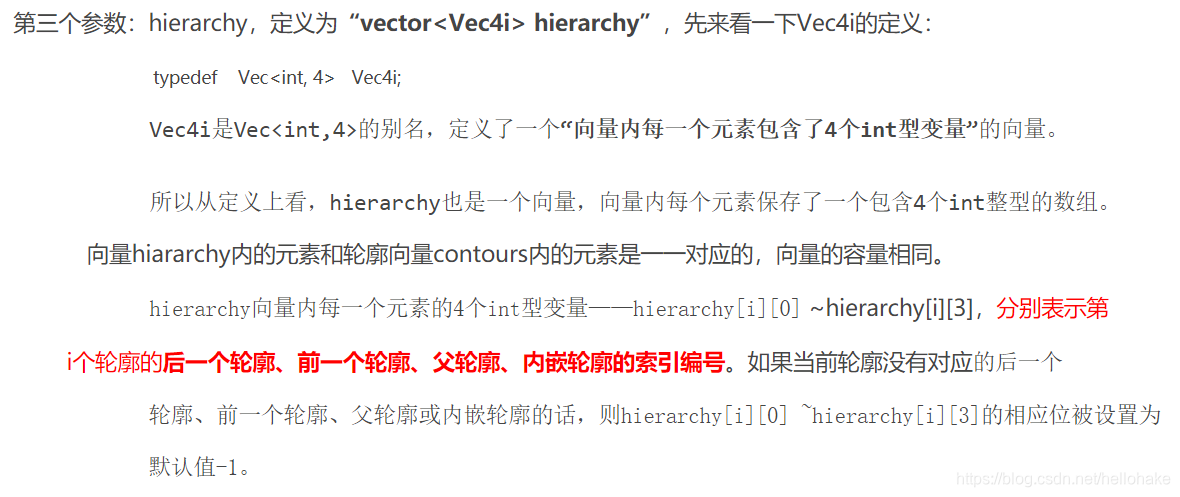
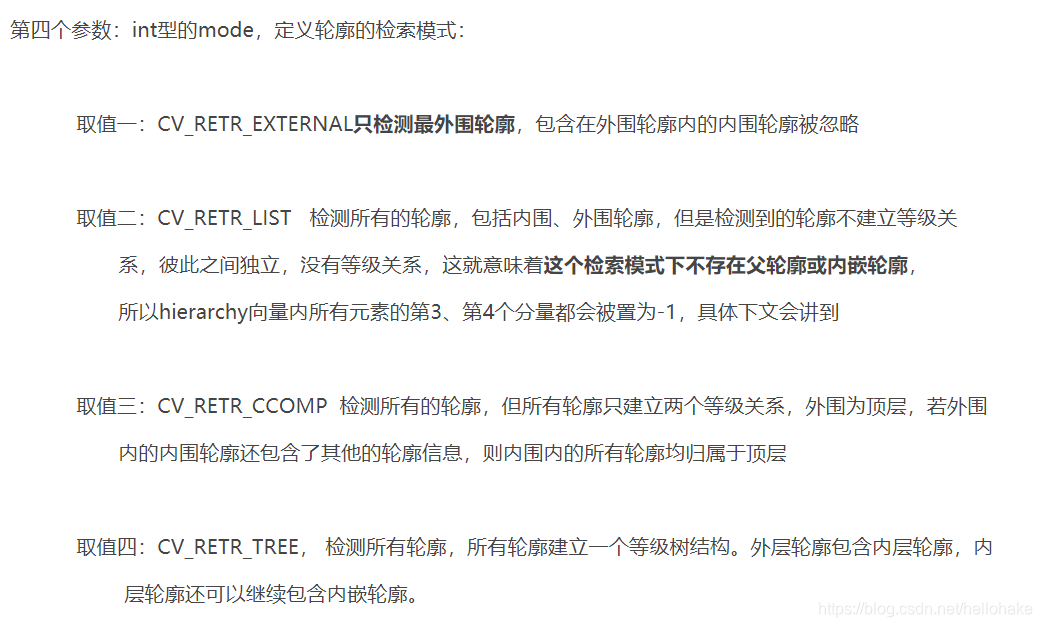
参数说明:

在这里插入图片描述
在这里插入图片描述
在这里插入图片描述
在这里插入图片描述

在这里插入图片描述
注: maxlevel : 0–绘制当前的,1–绘制当前及其内嵌的轮廓

Code

#include <opencv2/opencv.hpp>
#include <iostream>

using namespace std;
using namespace cv;

Mat src, dst;
const char *input_win = "input image";
const char *output_win = "contour image";

int threshold_value = 100;
int threshold_max = 255;


void Contour_Demo(int, void *);

int main(int argc, char** argv)
{
	src = imread("C:\\Users\\hello\\Desktop\\15.jpg");
	if (src.empty())
	{
		cout << "could not load the image..." << endl;
		return -1;
	}
	namedWindow(input_win, WINDOW_AUTOSIZE);
	namedWindow(output_win, WINDOW_AUTOSIZE);
	cvtColor(src, src, CV_BGR2GRAY);
	imshow(input_win, src);

	createTrackbar("Threshold Value:", input_win, &threshold_value, threshold_max, Contour_Demo);
	Contour_Demo(0, 0);

	//阈值通过trackbar找到最合适的值;
	
	waitKey(0);
	return 0;
}
//定义Callback 回调函数
void Contour_Demo(int, void *)
{
	//进行滤波
	Mat gaus,edge_image;
	GaussianBlur(src, gaus, Size(3, 3), 0, 0);
	//Canny边缘检测
	Canny(gaus, edge_image, threshold_value, threshold_value * 2, 3,false);
	//发现轮廓
	vector<vector<Point>> contourpoints;   //vector向量的使用会影响速度
	vector<Vec4i> hierachy;  //存储返回的拓扑结构
	findContours(edge_image, contourpoints, hierachy, RETR_TREE, CHAIN_APPROX_SIMPLE, Point(0, 0));
	
	dst = Mat::zeros(src.size(), CV_8UC3);  //初始化dst对象
	RNG rng(12345);
	for (size_t i = 0; i < contourpoints.size(); i++)   //将contourpoints中的点全部描绘出来
	{
		Scalar color = Scalar(rng.uniform(0, 255), rng.uniform(0, 255), rng.uniform(0, 255));
		drawContours(dst, contourpoints, i, color, 2, LINE_8, hierachy, 0, Point(0, 0));
	}
	//颜色相同的部分是同一轮廓
	imshow(output_win, dst);  //显示结果

}

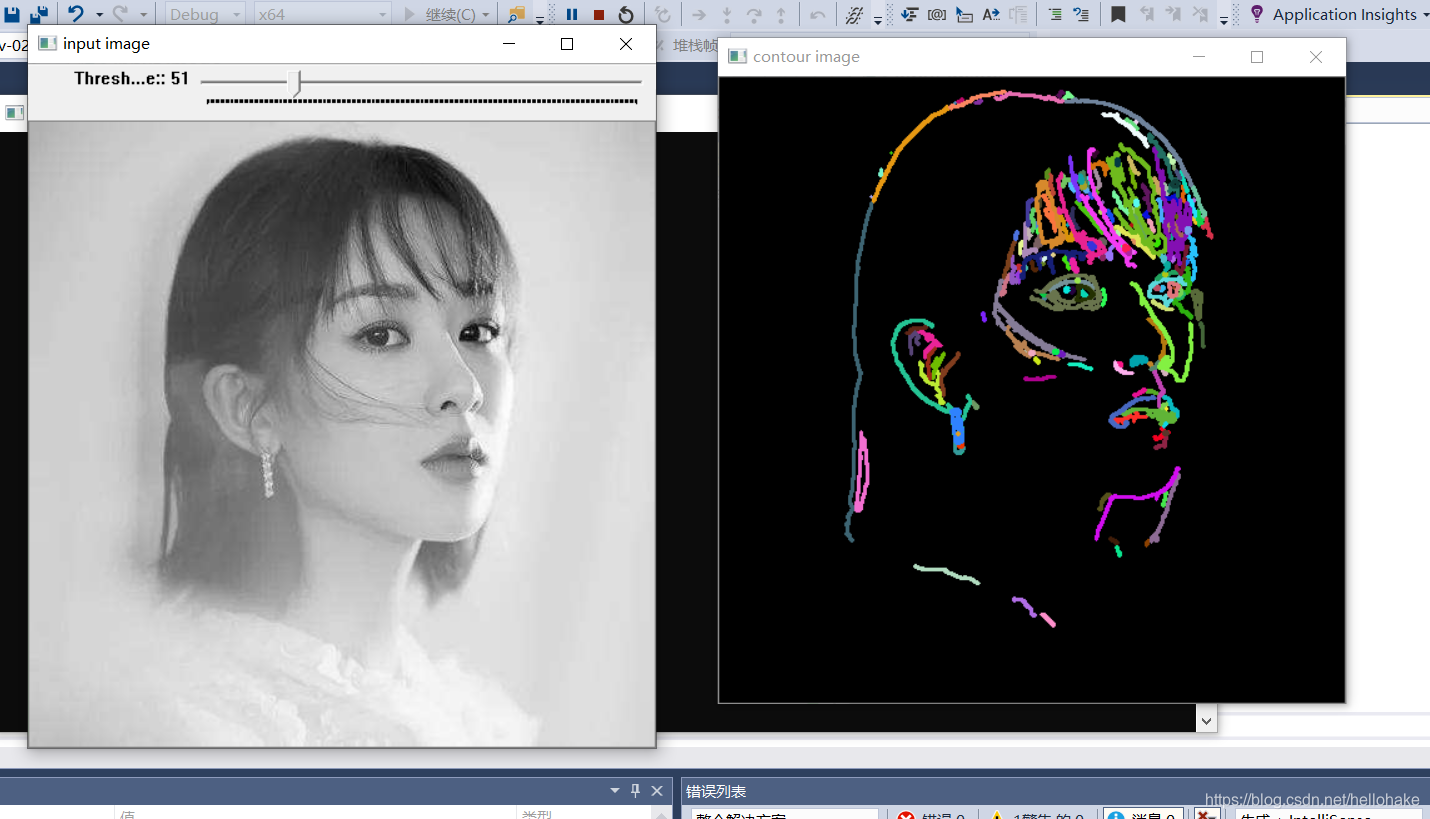
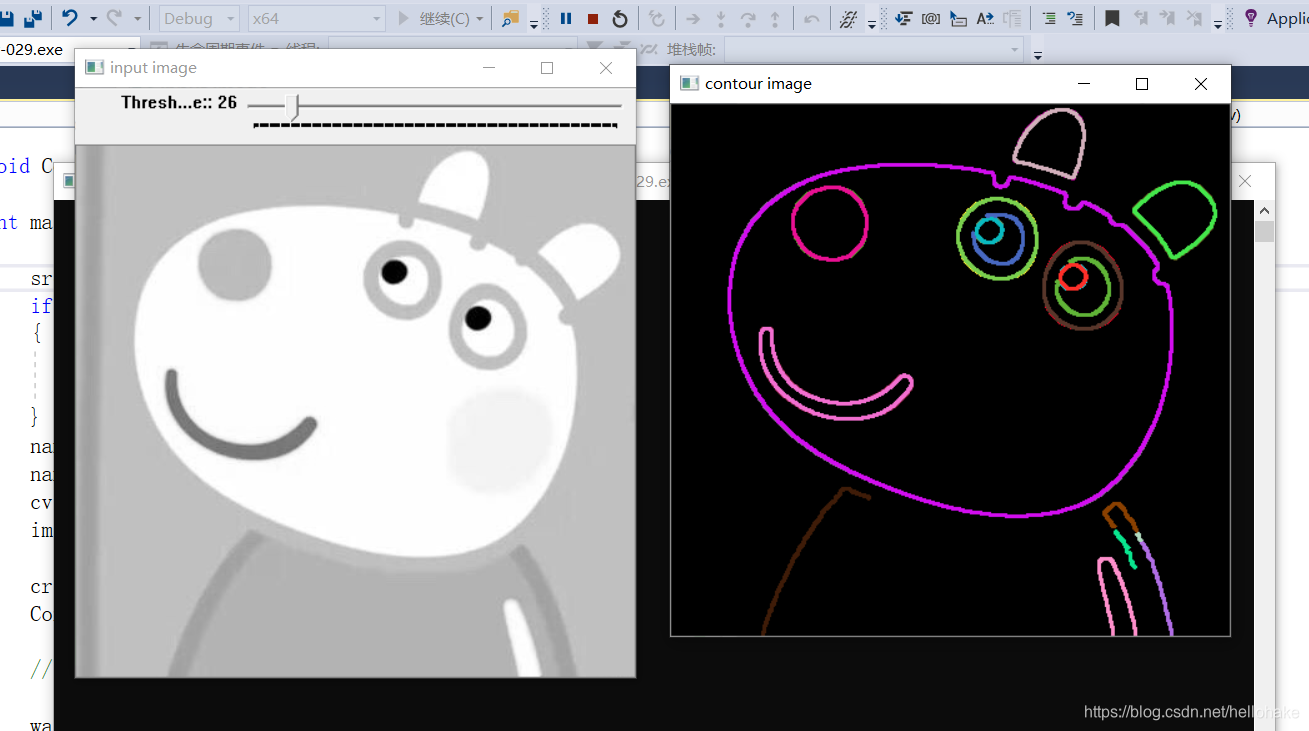
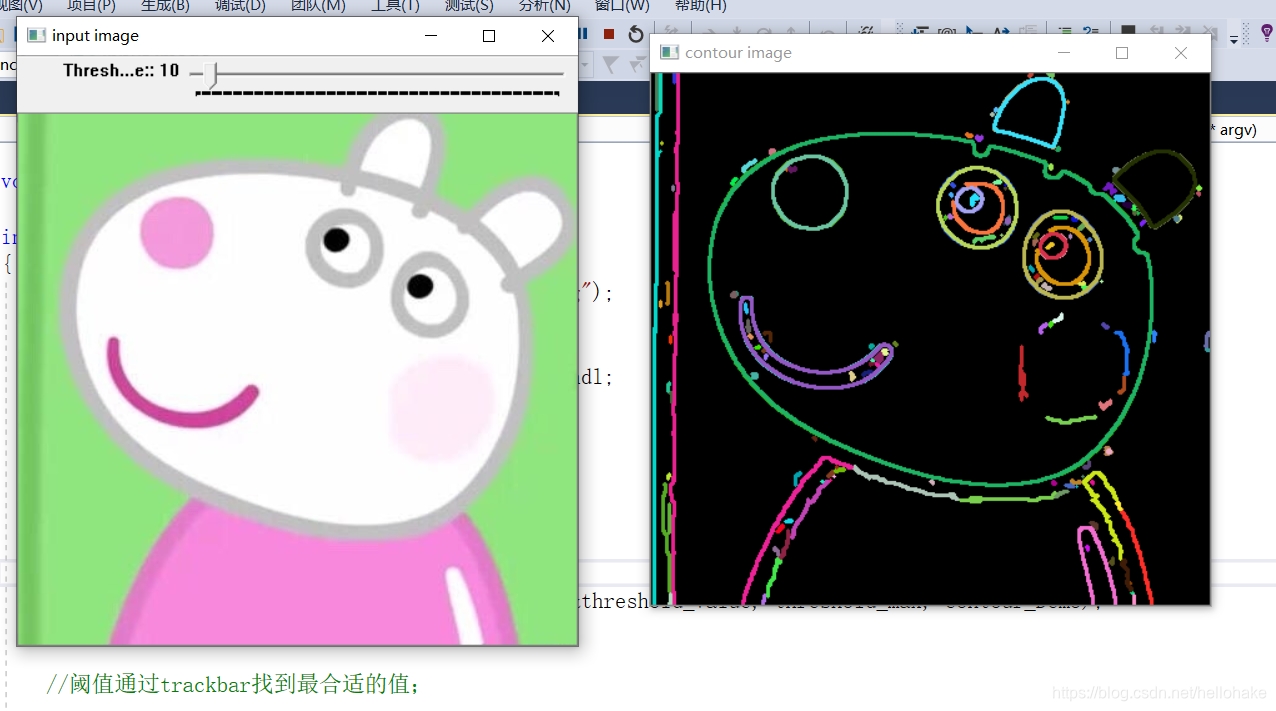
效果

注:轮廓检测的效果受Canny算法中阈值threshold的影响较大,如下图:需要自己去寻找合适的阈值

在这里插入图片描述
在这里插入图片描述

在这里插入图片描述

opencvsharp_基于轮廓的形状匹配中匹配坐标与旋转角度 本篇博客不讲理论! 需要看理论的这里附上三个博客: ①一步一步实现多尺度多角度的形状匹配算法(C++版本) ②图像的矩,以及利用矩求图像的重心,方向 ③OpenCV学习(十九) :图像的矩:moments(),HuMoments() 直接上干货! 以下代码为定位零件的像素位置,旋转角度 emmmmm其他没有…… 我们拿着模板(轮廓)去匹配的时候,找到的目标像素坐标为: 首先用Cv2.MatchShapes去筛选图像中的轮廓,然后筛选好的轮廓如果... 阅读详情

相关推荐

OpenCV-Python实战(11)——OpenCV轮廓检测相关应用

在计算机视觉领域,轮廓通常指图像中对象边界的一系列点。因此,轮廓通常描述了对象边界的关键信息,包含了有关对象形状的主要信息,该信息可用于形状分析与对象检测和识别。在本文中,我们将学习如何利用获取到的轮廓,进行形状分析以及对象检测和识别。

盼小辉丶的博客 1万+

29.轮廓发现

1.轮廓发现(find contour in your image) 轮廓发现(find contour) 代码演示 2.介绍 轮廓发现是基于图像边缘提取的基础寻找对象轮廓的方法,所以边缘提取的阈值选定会影响最终轮廓发现结果 3.API介绍 在二值图像上发现轮廓使用API cv::findContours( InputOutputArray binImg, // 输入图像,非0的像素被...

罗伊的博客 302

OpenCV-Python实战(10)——详解 OpenCV 轮廓检测

在计算机视觉领域,轮廓通常指图像中对象边界的一系列点。因此,轮廓通常描述了对象边界的关键信息,包含了有关对象形状的主要信息,该信息可用于形状分析与对象检测和识别。在本文中,将首次通过简单示例了解轮廓的基本概念,然后通过实际示例来了解如何检测和压缩轮廓,最后利用介绍如何利用图像矩描述检测到的轮廓属性。

盼小辉丶的博客 3万+

opencv_29轮廓发现

概念 基于图像边缘提取的基础寻找对象轮廓的方法。边缘提取的阈值很关键 API 1.findContours 找到二值图像的轮廓 findContours{ input img;//8bit 非0像素值为1,0像素值保持 output contour;//发现的轮廓点数组 vector output hierachy;//图像的拓扑结构,轮廓的发现算法基于图像的拓扑结构实现 int mode;//轮廓返回的模式,轮廓树 int method;//轮廓发现方法 Point(0,0)//轮廓位移 } ..

weixin_41405284的博客 215

ARM架构实战:在鲲鹏920服务器上用Debian12部署PVE虚拟化平台

本文详细介绍了在基于ARM架构的华为鲲鹏920服务器上,以Debian 12为底层系统,部署Proxmox VE(PVE)虚拟化平台的完整实战流程。文章重点解析了ARM64架构下PVE软件源的配置、内核安装的注意事项、部署后网络与存储的调优,并提供了针对ARM虚拟化环境的性能优化建议,为在国产化硬件上构建稳定高效的虚拟化环境提供了宝贵经验。

efc12345678的博客 780

AUTOSAR网络管理配置详解:Vector DaVinci工具全面讲解

手把手带你用Vector DaVinci完成AUTOSAR网络管理模块的配置,涵盖NmChannel、NmPdu、重复帧抑制等关键参数设置,深入解析CAN总线上的NM报文调度与唤醒机制,助你扎实掌握AUTOSAR网络管理核心实践。

weixin_42504649的博客 168

第29课 轮廓发现(find contour)

文章目录1. 轮廓发现(find contour)2. 步骤3.相关API3.1寻找轮廓findCon tours()3.2 绘制轮廓drawContours()4. 例程 1. 轮廓发现(find contour) 轮廓发现是基于图像边缘提取的基础寻找对象轮廓的方法。所以边缘提取的阈值选定会影响最终轮廓发现结果。 2. 步骤 输入图像转为灰度图像cvtColor 使用Canny进行边缘提...

weixin_42877426的博客 1953

UDS诊断入门第一课:手把手教你玩转0x10会话控制服务(附ISO14229实战解析)

刚接触汽车电子诊断的工程师们,往往会被厚厚的ISO 14229标准文档和各种专业术语吓退。但就像学习编程要从"Hello World"开始一样,掌握UDS协议的最佳切入点就是0x10诊断会话控制服务。这个看似简单的服务,实际上是整个诊断系统的"钥匙"——它决定了ECU(电子控制单元)当前处于何种工作模式,直接影响着其他诊断服务的可用性。 在实际车辆诊断中,ECU默认处于DefaultSession模式,这种模式下许多高级诊断功能是被禁用的。想象一下你正在开发一个需要刷写ECU固件的工具,如果连最基本的会

weixin_30402343的博客 392

OpenCv cvFindContours 查询轮廓并返回轮廓数量

Hai cvFindContours(binaryim, contourStorage, &contourSeq, sizeof(CvContour),CV_RETR_CCOMP, CV_CHAIN_APPROX_SIMPLE, cvPoint(0, 0)); &contourSeq是用于储存轮廓的序列 contourSeq->total所表示的是contourSe...

weixin_30443813的博客 2287

linux下docker 部署onlyoffice社区版

Onlyoffice 是一款功能丰富的在线 Office 工具,类似 WPS 和 微软的 Office 套件。OnlyOffice Workspace 是由 OnlyOffice 推出的基于云计算的企业级在线协作办公平台,由文档服务(Document Server)、控制面板(Control Panel)、社区服务(Community Server)和邮件服务(Mail Server)四个组件构成,提供了文档、项目、成员、邮件等功能模块,支持文档多人协作、历史版本控制等功能,旨在帮助用户提高工作效率和工作质

axiaowua的博客 2382

6.6kW的车载充电器(On-Board Charger, OBC)电路分析

图片展示了6.6kW的车载充电器(On-Board Charger, OBC)电路,其中包含双向和单向两种拓扑结构。接下来我们将深入分析每个模块的设计、原理及其优势,以帮助理解不同结构在实际应用中的选型和应用。

weixin_43199439的博客 5646

OpenCV29---轮廓周围绘制矩形框和圆形框

三十、轮廓周围绘制矩形框和圆形框 1、减少多边形轮廓点数APIapproxPolyDP 作用是把一个很多点的多边形变成一个点数适中的多边形,在这个多边形里面找它的最小连接矩形和最小的圆。 approxPolyDP( InputArray curve,//输入一个多边形(点) OutputArray approxCurve, //输出一个处理后的多边形(点) double epsilon,//表示两...

进阶的花生 432

《QT+PCL 第一章》:点云读取显示

点云读取显示一、核心代码二、QT设置三、效果展示 一、核心代码 二、QT设置 三、效果展示

阁楼 1万+

【OpenCV 4开发详解】轮廓外接多边形

本文首发于“小白学视觉”微信公众号,欢迎关注公众号 本文作者为小白,版权归人民邮电出版社发行所有,禁止转载,侵权必究! 经过几个月的努力,小白终于完成了市面上第一本OpenCV 4入门书籍《OpenCV 4开发详解》。为了更让小伙伴更早的了解最新版的OpenCV 4,小白与出版社沟通,提前在公众号上连载部分内容,请持续关注小白。 由于噪声和光照的影响,物体的轮廓会出现不规则的形状,根据不规...

小白学视觉 2946

【STM32项目】基于stm32智能鱼缸控制系统的设计与实现(完整工程资料源码)

随着现代化经济的快速发展,物质条件富足的人开始追求精神富足,越来越多的人通过饲养观赏鱼来充实生活、释放压力,但并非所有饲养者都有时间和经验来管理好鱼缸。一种由单片机控制,可实时检测和调节鱼缸环境,可把鱼缸环境实时反映给用户并能被用户远程操控的系统,可以解决养鱼成活率低、耗费时间和精力、参与感不强等诸多难题。

嵌入式技术开发 7351

15、运行语音识别应用:从Mac到微控制器的部署指南

本文详细介绍了如何在Mac上运行语音识别应用,并将其部署到Arduino Nano 33 BLE Sense和SparkFun Edge等微控制器设备上的完整流程。内容涵盖应用构建、设备特定的音频与输出实现、部署步骤、常见问题解决方案及进一步优化建议。通过本指南,开发者可快速实现基于TensorFlow Lite的嵌入式语音识别系统,并根据需求进行自定义修改与功能扩展。

l3m4n的博客 57

将轮廓检测的各个轮廓提取出来并显示

本文作者:longlongago     博客地址:http://blog.youkuaiyun.com/longlongago2000 今晚想到要将之前轮廓检测所得到的各个轮廓提取出来观察并找到特征点进行特征检测.通过查找相关资料和群友的帮助之下,终于实现了这个功能,下面是主要代码:for(int o=0;contour;contour = contour->h_next)    { cvNam

Jean的专栏 1328

jdk-8u144-linux-x64.tar.gz.

该资源为搭建Linux系统Java环境用,资源的后缀为tar.gz格式的压缩包

15、OpenCV Python 轮廓发现

1 __author__ = "WSX" 2 import cv2 as cv 3 import numpy as np 4 # 基于拓扑结构来发现和绘制(边缘提取) 5 # cv.findContours() 发现轮廓 6 # cv.drawContours() 绘制轮廓 7 # 使用梯度 ,不需要阈值了就 8 9 def edge_demo(image...

weixin_30949361的博客 100

深度学习工具包 DeepLearningToolbox

深度学习工具包Deprecation notice.-----This toolbox is outdated and no longer maintained.There are much better tools available for deep learning than this toolbox, e.g. [Theano](http://deeplearning.net/software/theano/), [torch](http://torch.ch/) or [tensorflow](http://www.tensorflow.org/)I would suggest you use one of the tools mentioned above rather than use this toolbox.Best, Rasmus.DeepLearnToolbox================A Matlab toolbox for Deep Learning.Deep Learning is a new subfield of machine learning that focuses on learning deep hierarchical models of data.It is inspired by the human brain's apparent deep (layered, hierarchical) architecture.A good overview of the theory of Deep Learning theory is[Learning Deep Architectures for AI](http://www.iro.umontreal.ca/~bengioy/papers/ftml_book.pdf)For a more informal introduction, see the following videos by Geoffrey Hinton and Andrew Ng.* [The Next Generation of Neural Networks](http://www.youtube.com/watch?v=AyzOUbkUf3M) (Hinton, 2007)* [Recent Developments in Deep Learning](http://www.youtube.com/watch?v=VdIURAu1-aU) (Hinton, 2010)* [Unsupervised Feature Learning and Deep Learning](http://www.youtube.com/watch?v=ZmNOAtZIgIk) (Ng, 2011)If you use this toolbox in your research please cite [Prediction as a candidate for learning deep hierarchical models of data](http://www2.imm.dtu.dk/pubdb/views/publication_details.php?id=6284)```@MASTERSTHESIS\{IMM2012-06284, author = "R. B. Palm", title = "Prediction as a candidate for learning deep hierarchical models of data", year = "2012",}```Contact: rasmusbergpalm at gmail dot comDirectories included in the toolbox-----------------------------------`NN/` - A library for Feedforward Backpropagation Neural Networks`CNN/` - A library for Convolutional Neural Networks`DBN/` - A library for Deep Belief Networks`SAE/` - A library for Stacked Auto-Encoders`CAE/` - A library for Convolutional Auto-Encoders`util/` - Utility functions used by the libraries`data/` - Data used by the examples`tests/` - unit tests to verify toolbox is workingFor references on each library check REFS.mdSetup-----1. Download.2. addpath(genpath('DeepLearnToolbox'));Example: Deep Belief Network---------------------```matlabfunction test_example_DBNload mnist_uint8;train_x = double(train_x) / 255;test_x = double(test_x) / 255;train_y = double(train_y);test_y = double(test_y);%% ex1 train a 100 hidden unit RBM and visualize its weightsrand('state',0)dbn.sizes = [100];opts.numepochs = 1;opts.batchsize = 100;opts.momentum = 0;opts.alpha = 1;dbn = dbnsetup(dbn, train_x, opts);dbn = dbntrain(dbn, train_x, opts);figure; visualize(dbn.rbm{1}.W'); % Visualize the RBM weights%% ex2 train a 100-100 hidden unit DBN and use its weights to initialize a NNrand('state',0)%train dbndbn.sizes = [100 100];opts.numepochs = 1;opts.batchsize = 100;opts.momentum = 0;opts.alpha = 1;dbn = dbnsetup(dbn, train_x, opts);dbn = dbntrain(dbn, train_x, opts);%unfold dbn to nnnn = dbnunfoldtonn(dbn, 10);nn.activation_function = 'sigm';%train nnopts.numepochs = 1;opts.batchsize = 100;nn = nntrain(nn, train_x, train_y, opts);[er, bad] = nntest(nn, test_x, test_y);assert(er < 0.10, 'Too big error');```Example: Stacked Auto-Encoders---------------------```matlabfunction test_example_SAEload mnist_uint8;train_x = double(train_x)/255;test_x = double(test_x)/255;train_y = double(train_y);test_y = double(test_y);%% ex1 train a 100 hidden unit SDAE and use it to initialize a FFNN% Setup and train a stacked denoising autoencoder (SDAE)rand('state',0)sae = saesetup([784 100]);sae.ae{1}.activation_function = 'sigm';sae.ae{1}.learningRate = 1;sae.ae{1}.inputZeroMaskedFraction = 0.5;opts.numepochs = 1;opts.batchsize = 100;sae = saetrain(sae, train_x, opts);visualize(sae.ae{1}.W{1}(:,2:end)')% Use the SDAE to initialize a FFNNnn = nnsetup([784 100 10]);nn.activation_function = 'sigm';nn.learningRate = 1;nn.W{1} = sae.ae{1}.W{1};% Train the FFNNopts.numepochs = 1;opts.batchsize = 100;nn = nntrain(nn, train_x, train_y, opts);[er, bad] = nntest(nn, test_x, test_y);assert(er < 0.16, 'Too big error');```Example: Convolutional Neural Nets---------------------```matlabfunction test_example_CNNload mnist_uint8;train_x = double(reshape(train_x',28,28,60000))/255;test_x = double(reshape(test_x',28,28,10000))/255;train_y = double(train_y');test_y = double(test_y');%% ex1 Train a 6c-2s-12c-2s Convolutional neural network %will run 1 epoch in about 200 second and get around 11% error. %With 100 epochs you'll get around 1.2% errorrand('state',0)cnn.layers = { struct('type', 'i') %input layer struct('type', 'c', 'outputmaps', 6, 'kernelsize', 5) %convolution layer struct('type', 's', 'scale', 2) %sub sampling layer struct('type', 'c', 'outputmaps', 12, 'kernelsize', 5) %convolution layer struct('type', 's', 'scale', 2) %subsampling layer};cnn = cnnsetup(cnn, train_x, train_y);opts.alpha = 1;opts.batchsize = 50;opts.numepochs = 1;cnn = cnntrain(cnn, train_x, train_y, opts);[er, bad] = cnntest(cnn, test_x, test_y);%plot mean squared errorfigure; plot(cnn.rL);assert(er<0.12, 'Too big error');```Example: Neural Networks---------------------```matlabfunction test_example_NNload mnist_uint8;train_x = double(train_x) / 255;test_x = double(test_x) / 255;train_y = double(train_y);test_y = double(test_y);% normalize[train_x, mu, sigma] = zscore(train_x);test_x = normalize(test_x, mu, sigma);%% ex1 vanilla neural netrand('state',0)nn = nnsetup([784 100 10]);opts.numepochs = 1; % Number of full sweeps through dataopts.batchsize = 100; % Take a mean gradient step over this many samples[nn, L] = nntrain(nn, train_x, train_y, opts);[er, bad] = nntest(nn, test_x, test_y);assert(er < 0.08, 'Too big error');%% ex2 neural net with L2 weight decayrand('state',0)nn = nnsetup([784 100 10]);nn.weightPenaltyL2 = 1e-4; % L2 weight decayopts.numepochs = 1; % Number of full sweeps through dataopts.batchsize = 100; % Take a mean gradient step over this many samplesnn = nntrain(nn, train_x, train_y, opts);[er, bad] = nntest(nn, test_x, test_y);assert(er < 0.1, 'Too big error');%% ex3 neural net with dropoutrand('state',0)nn = nnsetup([784 100 10]);nn.dropoutFraction = 0.5; % Dropout fraction opts.numepochs = 1; % Number of full sweeps through dataopts.batchsize = 100; % Take a mean gradient step over this many samplesnn = nntrain(nn, train_x, train_y, opts);[er, bad] = nntest(nn, test_x, test_y);assert(er < 0.1, 'Too big error');%% ex4 neural net with sigmoid activation functionrand('state',0)nn = nnsetup([784 100 10]);nn.activation_function = 'sigm'; % Sigmoid activation functionnn.learningRate = 1; % Sigm require a lower learning rateopts.numepochs = 1; % Number of full sweeps through dataopts.batchsize = 100; % Take a mean gradient step over this many samplesnn = nntrain(nn, train_x, train_y, opts);[er, bad] = nntest(nn, test_x, test_y);assert(er < 0.1, 'Too big error');%% ex5 plotting functionalityrand('state',0)nn = nnsetup([784 20 10]);opts.numepochs = 5; % Number of full sweeps through datann.output = 'softmax'; % use softmax outputopts.batchsize = 1000; % Take a mean gradient step over this many samplesopts.plot = 1; % enable plottingnn = nntrain(nn, train_x, train_y, opts);[er, bad] = nntest(nn, test_x, test_y);assert(er < 0.1, 'Too big error');%% ex6 neural net with sigmoid activation and plotting of validation and training error% split training data into training and validation datavx = train_x(1:10000,:);tx = train_x(10001:end,:);vy = train_y(1:10000,:);ty = train_y(10001:end,:);rand('state',0)nn = nnsetup([784 20 10]); nn.output = 'softmax'; % use softmax outputopts.numepochs = 5; % Number of full sweeps through dataopts.batchsize = 1000; % Take a mean gradient step over this many samplesopts.plot = 1; % enable plottingnn = nntrain(nn, tx, ty, opts, vx, vy); % nntrain takes validation set as last two arguments (optionally)[er, bad] = nntest(nn, test_x, test_y);assert(er < 0.1, 'Too big error');```[![Bitdeli Badge](https://d2weczhvl823v0.cloudfront.net/rasmusbergpalm/deeplearntoolbox/trend.png)](https://bitdeli.com/free "Bitdeli Badge")

VB摄像头监控

该VB模块可对摄像头捕获的画面进行录像等,可在创建的窗口进行控制

轮廓的特征值---OpenCV-Python开发指南(29)

目录前言宽高比ExtendSolidity等效直径方向掩摸和像素点 前言 轮廓自身的一些属性特征及轮廓所包围对象的特征对于描述图像具有重要意义。本篇博文将介绍几个轮廓自身的属性特征及轮廓包围对象的特征。 宽高比 在轮廓中,我们可以通过宽高比来描述轮廓,例如矩形的轮廓宽高比为: 宽高比=宽度/高度 下面,我们来计算矩形轮廓的宽高比,代码如下: import cv2 img = cv2.imread("26_1.jpg") cv2.imshow("img", img) # 转换为灰度图像 gray = cv

李元静 6397

【OpenCV 4开发详解】轮廓面积与长度

本文首发于“小白学视觉”微信公众号,欢迎关注公众号 本文作者为小白,版权归人民邮电出版社发行所有,禁止转载,侵权必究! 经过几个月的努力,小白终于完成了市面上第一本OpenCV 4入门书籍《OpenCV 4开发详解》。为了更让小伙伴更早的了解最新版的OpenCV 4,小白与出版社沟通,提前在公众号上连载部分内容,请持续关注小白。 轮廓面积 轮廓面积是轮廓重要的统计特性之一,通过轮廓面积的大...

小白学视觉 4631

opencv29-轮廓周围绘制矩形框和圆形框

#include<opencv2\opencv.hpp> #include<iostream> #include<math.h> using namespace cv; using namespace std; Mat src, temp, dst, src_gray; int threshold_v = 170; int threshold_...

weixin_38383877的博客 480

matlab 轮廓系数,kmeans聚类理论篇K的选择(轮廓系数)

实际应用下面通过例子(R实现,完整代码见附件)讲解kmeans使用方法,会将上面提到的内容全部串起来。加载实验数据iris,这个数据在机器学习领域使用比较频繁,主要是通过画的几个部分的大小,对花的品种分类,实验中需要使用fpc库估计轮廓系数,如果没有可以通过install.packages安装。# install.packages("fpc")library(fpc)library(dataset...

Aysen的博客 5960

全球建筑轮廓数据分享

本文主要记录全球各地的有关建筑轮廓,建筑屋顶,建筑高度等数据的下载源

weixin_42311008的博客 5835

【OpenCV-Python】14 轮廓检测

轮廓是一系列相连的点组成的曲线,代表了物体的基本外形; 轮廓是连续的,边缘并不全都连续;

扬帆·启航 532

OpenCV 轮廓方向

//求轮廓的方向 //第二个函数调用第一个 void drawAxis(Mat&, Point, Point, Scalar, const float); double getOrientation(const vector<Point> &, Mat&); 函数方法如下: 1 void drawAxis(Mat& im...

weixin_30467087的博客 1074

opencv学习之路(28)、轮廓查找与绘制(七)——位置关系及轮廓匹配

opencv学习之路(28)、轮廓查找与绘制(七)——位置关系及轮廓匹配 一、点与轮廓的距离及位置关系 1 #include &quot;opencv2/opencv.hpp&quot; 2 #include &amp;lt;iostream&amp;gt; 3 using namespace std; 4 using namespace cv; 5 6 void ma...

人生几何的博客 1067
上一篇: 28-模板匹配
下一篇: 30-凸包(Convex Hull)
hellohake
博客等级 码龄10年 4543粉丝 108原创
评论
成就一亿技术人!
拼手气红包6.0元
还能输入1000个字符
 
 条评论被折叠 查看
添加红包

请填写红包祝福语或标题

个

红包个数最小为10个

元

红包金额最低5元

当前余额3.43元 前往充值 >
需支付:10.00元
成就一亿技术人!
领取后你会自动成为博主和红包主的粉丝 规则
hope_wisdom
发出的红包
实付元
使用余额支付
点击重新获取
扫码支付
钱包余额 0

抵扣说明:

1.余额是钱包充值的虚拟货币,按照1:1的比例进行支付金额的抵扣。
2.余额无法直接购买下载,可以购买VIP、付费专栏及课程。

余额充值