


SpringBoot
1.创建一个SpringBoot应用
1.1 官网
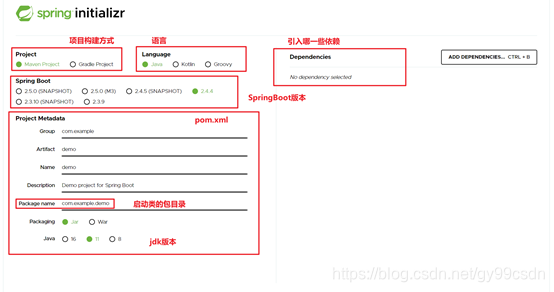
1.1.1 应用快速运行
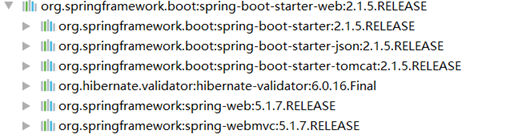
只需引入依赖spring-boot-starter-web
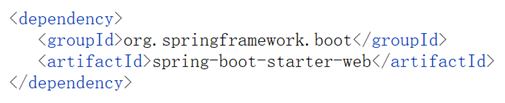
后面使用一些框架的时候 👉 spring-boot-starter-xxx
1.1.2 springboot的pom.xml
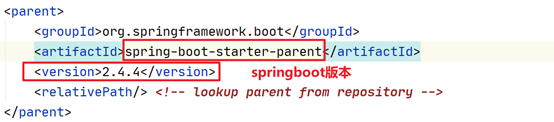
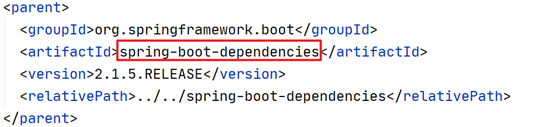
很多依赖并没有写版本号,springboot会自动帮你引入对应的版本
👉 spring-boot-dependencies里涵盖常用的依赖的版本 👉 约定大于配置的体现
也会引入该框架所需要的依赖
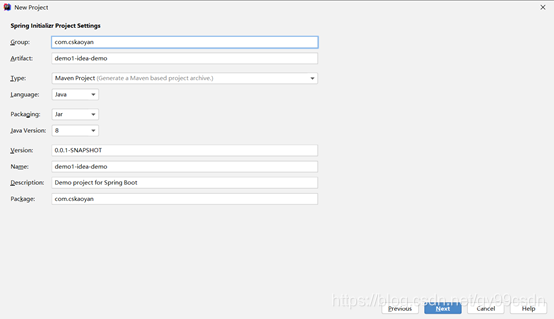
1.2 idea
其实和在官网配置项是一样的 👉 只不过过程转移到idea中了
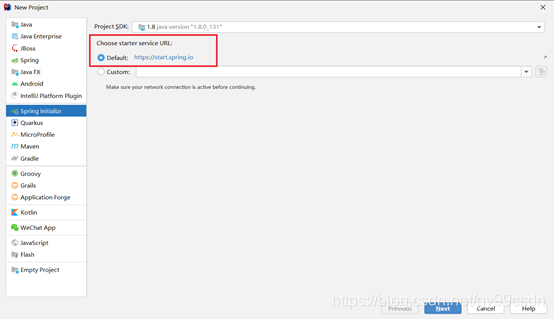
downloading xxx.zip 👉 从start.spring.io上下载zip然后解压
1.3 Springboot的配置文件
1.3.1 名称格式
application(-xxx).properties(yml) 键值对的形式
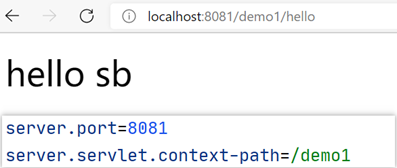
1.3.2 和tomcat(javaEE容器)相关
端口号配置:server.port
context-path: 应用名的配置
1.3.3 controller写在哪里,和扫描包的配置有关
扫描包的配置 👉 默认的扫描包 👉 启动类所在的包目录
启动类 👉 注解
@EnableAutoConfiguration 👉 约定大于配置 自动配置
1.3.4 spring容器中的组件获得springboot配置文件中的值
1.3.4.1 @Value
通过@Value注解获得springboot配置文件中的值
实例1:
pom.xml
<?xml version="1.0" encoding="UTF-8"?>
<project xmlns="http://maven.apache.org/POM/4.0.0" xmlns:xsi="http://www.w3.org/2001/XMLSchema-instance"
         xsi:schemaLocation="http://maven.apache.org/POM/4.0.0 https://maven.apache.org/xsd/maven-4.0.0.xsd">
    <modelVersion>4.0.0</modelVersion>
    <parent>
        <groupId>org.springframework.boot</groupId>
        <artifactId>spring-boot-starter-parent</artifactId>
        <version>2.1.5.RELEASE</version>
        <relativePath/> <!-- lookup parent from repository -->
    </parent>
    <groupId>com.cskaoyan</groupId>
    <artifactId>demo</artifactId>
    <version>0.0.1-SNAPSHOT</version>
    <name>demo1-properties</name>
    <description>Demo project for Spring Boot</description>
    <properties>
        <java.version>1.8</java.version>
    </properties>
    <dependencies>
        <dependency>
            <groupId>org.springframework.boot</groupId>
            <artifactId>spring-boot-starter-web</artifactId>
        </dependency>

        <dependency>
            <groupId>org.projectlombok</groupId>
            <artifactId>lombok</artifactId>
            <optional>true</optional>
        </dependency>
        <dependency>
            <groupId>com.alibaba</groupId>
            <artifactId>druid</artifactId>
            <version>1.2.4</version>
        </dependency>
        <dependency>
            <groupId>mysql</groupId>
            <artifactId>mysql-connector-java</artifactId>
            <version>5.1.47</version>
        </dependency>
        <dependency>
            <groupId>org.springframework.boot</groupId>
            <artifactId>spring-boot-starter-test</artifactId>
            <scope>test</scope>
        </dependency>
    </dependencies>

    <build>
        <plugins>
            <plugin>
                <groupId>org.springframework.boot</groupId>
                <artifactId>spring-boot-maven-plugin</artifactId>
                <configuration>
                    <excludes>
                        <exclude>
                            <groupId>org.projectlombok</groupId>
                            <artifactId>lombok</artifactId>
                        </exclude>
                    </excludes>
                </configuration>
            </plugin>
        </plugins>
    </build>
</project>
CskaoyanDataSourceConfiguration
@Configuration//意味着这是一个配置类
public class CskaoyanDataSourceConfiguration {

    @Value("${cskaoyan.db.driver}")
    String driver;
    @Value("${cskaoyan.db.url}")
    String url;
    @Value("${cskaoyan.db.username}")
    String username;
    @Value("${cskaoyan.db.password}")
    String password;

    @Bean
    public DruidDataSource dataSource(){
        DruidDataSource dataSource = new DruidDataSource();
        dataSource.setDriverClassName(driver);
        dataSource.setUrl(url);
        dataSource.setUsername(username);
        dataSource.setPassword(password);
        return dataSource;
    }
}
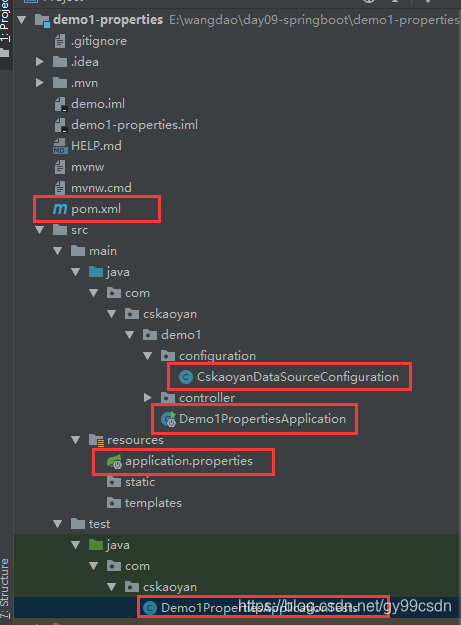
Demo1PropertiesApplication
@SpringBootApplication
public class Demo1PropertiesApplication {

    public static void main(String[] args) {
        SpringApplication.run(Demo1PropertiesApplication.class, args);
    }
}
application.properties
cskaoyan.db.driver=com.mysql.jdbc.Driver
cskaoyan.db.url=jdbc:mysql://localhost:3306/cskaoyan_db
cskaoyan.db.username=root
cskaoyan.db.password=123456
Demo1PropertiesApplicationTests
@SpringBootTest
class Demo1PropertiesApplicationTests {

    @Test
    void contextLoads() {
    }
}
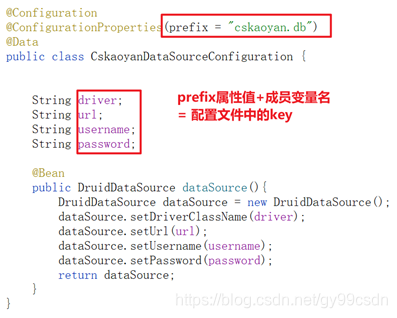
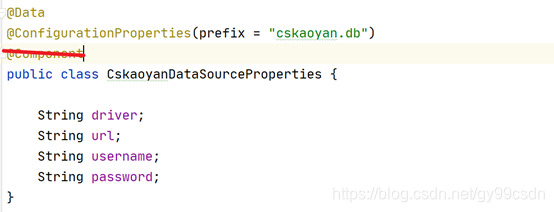
1.3.4.2 @ConfigurationProperties
打通当前类的成员变量和配置文件之间的联系
1、 容器中的组件上增加该注解
2、 通过前缀+成员变量名 = 配置文件的key
3、 成员变量需要提供set方法
pom.xml
<?xml version="1.0" encoding="UTF-8"?>
<project xmlns="http://maven.apache.org/POM/4.0.0"
         xmlns:xsi="http://www.w3.org/2001/XMLSchema-instance"
         xsi:schemaLocation="http://maven.apache.org/POM/4.0.0 http://maven.apache.org/xsd/maven-4.0.0.xsd">
    <modelVersion>4.0.0</modelVersion>
    <parent>
        <artifactId>spring-boot-starter-parent</artifactId>
        <groupId>org.springframework.boot</groupId>
        <version>2.1.5.RELEASE</version>
    </parent>
    <groupId>com.cskaoyan</groupId>
    <artifactId>demo2-configuration-properties</artifactId>
    <version>1.0-SNAPSHOT</version>

    <packaging>jar</packaging>
    <properties>
        <java.version>1.8</java.version>
    </properties>

    <dependencies>
        <dependency>
            <groupId>org.springframework.boot</groupId>
            <artifactId>spring-boot-starter-web</artifactId>
        </dependency>
        <dependency>
            <groupId>org.springframework.boot</groupId>
            <artifactId>spring-boot-starter-test</artifactId>
        </dependency>
        <dependency>
            <groupId>com.alibaba</groupId>
            <artifactId>druid</artifactId>
            <version>1.2.4</version>
        </dependency>
        <dependency>
            <groupId>mysql</groupId>
            <artifactId>mysql-connector-java</artifactId>
            <version>5.1.47</version>
        </dependency>
        <dependency>
            <groupId>org.projectlombok</groupId>
            <artifactId>lombok</artifactId>
        </dependency>
    </dependencies>
    <build>
        <plugins>
            <plugin>
                <groupId>org.springframework.boot</groupId>
                <artifactId>spring-boot-maven-plugin</artifactId>
                <configuration>
                    <excludes>
                        <exclude>
                            <groupId>org.projectlombok</groupId>
                            <artifactId>lombok</artifactId>
                        </exclude>
                    </excludes>
                </configuration>
            </plugin>
        </plugins>
    </build>

</project>
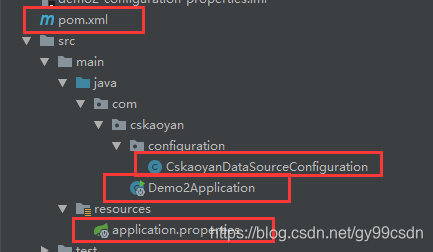
CskaoyanDataSourceConfiguration
@Configuration
@ConfigurationProperties(prefix = "cskaoyan.db")
@Data
public class CskaoyanDataSourceConfiguration {


    String driver;
    String url;
    String username;
    String password;

    @Bean
    public DruidDataSource dataSource(){
        DruidDataSource dataSource = new DruidDataSource();
        dataSource.setDriverClassName(driver);
        dataSource.setUrl(url);
        dataSource.setUsername(username);
        dataSource.setPassword(password);
        return dataSource;
    }
}
application.properties
cskaoyan.db.driver=com.mysql.jdbc.Driver
cskaoyan.db.url=jdbc:mysql://localhost:3306/cskaoyan_db
cskaoyan.db.username=root
cskaoyan.db.password=123456
1.3.4.3 @EnableConfigurationProperties(Class)
@ConfigurationProperties注解所对应的类
1、 使用@EnableConfigurationProperties注解时,@ConfigurationProperties注解对应的类不需要组件注册功能的注解
2、Class
3、提供有参构造方法
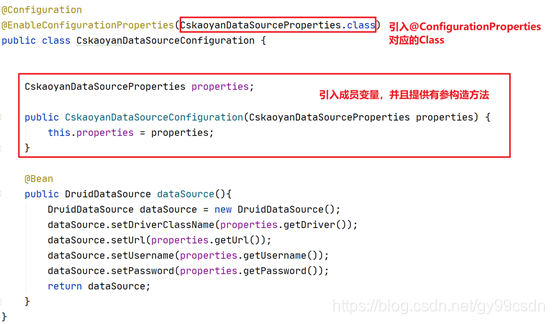
CskaoyanDataSourceConfiguration
@Configuration
@EnableConfigurationProperties(CskaoyanDataSourceProperties.class)
public class CskaoyanDataSourceConfiguration {


    CskaoyanDataSourceProperties properties;

    public CskaoyanDataSourceConfiguration(CskaoyanDataSourceProperties properties) {
        this.properties = properties;
    }

    @Bean
    public DruidDataSource dataSource(){
        DruidDataSource dataSource = new DruidDataSource();
        dataSource.setDriverClassName(properties.getDriver());
        dataSource.setUrl(properties.getUrl());
        dataSource.setUsername(properties.getUsername());
        dataSource.setPassword(properties.getPassword());
        return dataSource;
    }
}
CskaoyanDataSourceProperties
@Data
@ConfigurationProperties(prefix = "cskaoyan.db")
public class CskaoyanDataSourceProperties {

    String driver;
    String url;
    String username;
    String password;
    int maxPool;
}
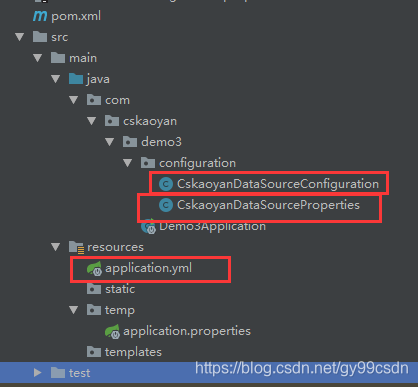
application.yml
# server.port=8081
# server.servlet.context-path=/demo3
# cskaoyan.db.driver=xxx
server:
  port: 8081
  servlet:
    context-path: /demo3
cskaoyan:
  db:
    driver: com.mysql.jdbc.Driver
    url: jdbc:mysql://localhost:3306/cskaoyan_db
    username: root
    password: 123456
    max-pool: 7
application.properties
cskaoyan.db.driver=com.mysql.jdbc.Driver
cskaoyan.db.url=jdbc:mysql://localhost:3306/cskaoyan_db
cskaoyan.db.username=root
cskaoyan.db.password=123456
cskaoyan.db.max-pool=6
1.3.4.4 配置文件中的提示configuration-processor

重启应用,就会提示。
1.3.5 yml格式文件
yml仍然是key=value的形式,只不过语法和properties不一样
由properties转换为yml如何做:
-
点 👉 冒号、换行、使用空格缩进 - 等于 👉 冒号、空格
- 同一级对齐
- 大小写敏感
也是示例3:

1.3.6 配置文件中驼峰的词
转换为-小写
maxPool 👉 max-pool
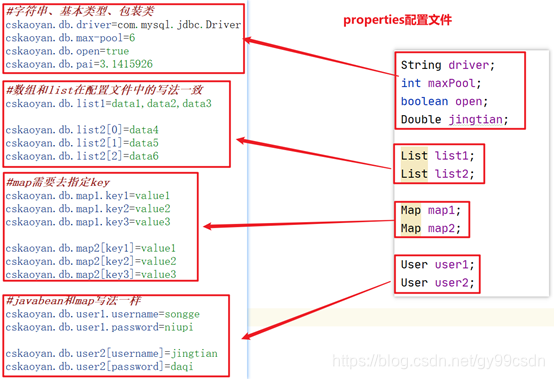
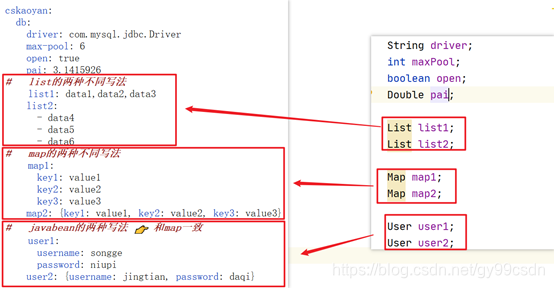
1.3.7 通过配置文件给不同类型的成员变量赋值
字符串
基本类型以及所对应的包装类
List或数组
Map或javabean
示例4

DataSourceConfiguration
@Configuration
@EnableConfigurationProperties(DataSourceProperties.class)
public class DataSourceConfiguration {

    DataSourceProperties properties;

    public DataSourceConfiguration(DataSourceProperties properties) {
        this.properties = properties;
    }

    @Bean
    public DruidDataSource dataSource(){
        return new DruidDataSource();
    }
}
DataSourceProperties
@Data
@ConfigurationProperties(prefix = "cskaoyan.db")
public class DataSourceProperties {

    String driver;
    int maxPool;
    boolean open;
    Double pai;

    List list1;
    List list2;

    Map map1;
    Map map2;

    User user1;
    User user2;
}
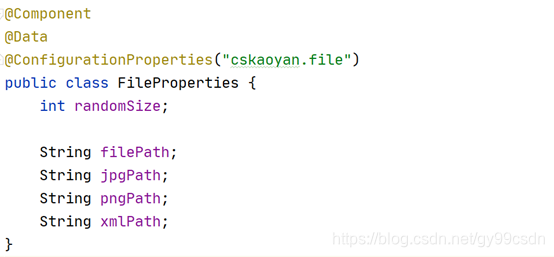
FileProperties
@Component
@Data
@ConfigurationProperties("cskaoyan.file")
public class FileProperties {
    int randomSize;

    String filePath;
    String jpgPath;
    String pngPath;
    String xmlPath;
}
User
@Data
public class User {
    String username;
    String password;
}
application.xml
cskaoyan:
db:
driver: com.mysql.jdbc.Eriver
max-pool: 6
open: true
pai: 3.1415926
# list的两种不同写法
list1: data1,data2,data3
list2:
- data4
- data5
- data6
# map的两种不同写法
map1:
key1: value1
key2: value2
key3: value3
map2: {key1: value1, key2: value2, key3: value3}
# javabean的两种写法 👉 和map一致
user1:
username: songge
password: niupi
user2: {username: jingtian, password: daqi}
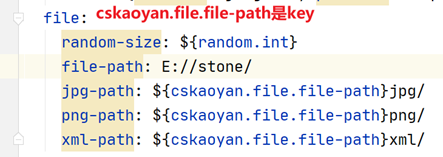
file:
random-size: ${random.int}
file-path: E://stone/
jpg-path: ${cskaoyan.file.file-path}jpg/
png-path: ${cskaoyan.file.file-path}png/
xml-path: ${cskaoyan.file.file-path}xml/
application.properties
#字符串、基本类型、包装类
cskaoyan.db.driver=com.mysql.jdbc.Driver
cskaoyan.db.max-pool=6
cskaoyan.db.open=true
cskaoyan.db.pai=3.1415926

#数组和list在配置文件中的写法一致
cskaoyan.db.list1=data1,data2,data3

cskaoyan.db.list2[0]=data4
cskaoyan.db.list2[1]=data5
cskaoyan.db.list2[2]=data6

#map需要去指定key
cskaoyan.db.map1.key1=value1
cskaoyan.db.map1.key2=value2
cskaoyan.db.map1.key3=value3

cskaoyan.db.map2[key1]=value1
cskaoyan.db.map2[key2]=value2
cskaoyan.db.map2[key3]=value3

#javabean和map写法一样
cskaoyan.db.user1.username=songge
cskaoyan.db.user1.password=niupi

cskaoyan.db.user2[username]=jingtian
cskaoyan.db.user2[password]=daqi
1.3.7.1 properties
1.3.7.2 yml
1.3.8 占位符
1.3.8.1随机数(了解)
1.3.8.2 引用配置文件中已经存在的值
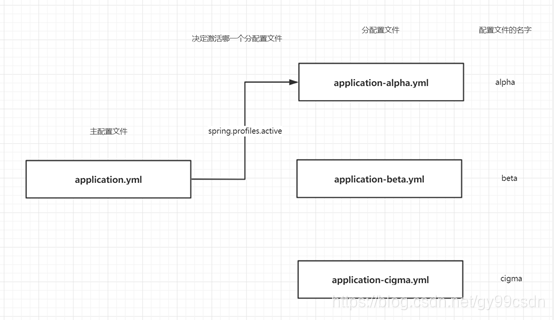
1.3.9 多配置文件
在springboot应用程序中可以写多个配置文件
多个配置文件之间是什么关系
主配置文件和多个分配置文件
示例5:
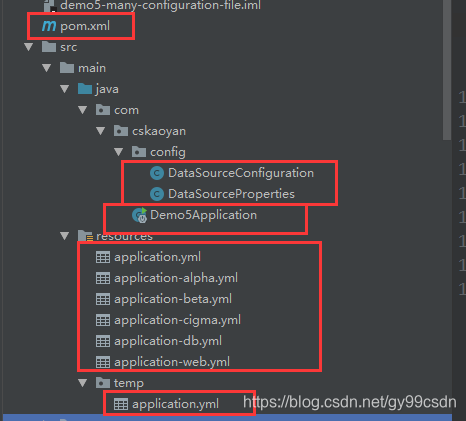
pom.xml(不变)
DataSourceConfiguration
@Configuration
@EnableConfigurationProperties(DataSourceProperties.class)
public class DataSourceConfiguration {

    DataSourceProperties properties;

    public DataSourceConfiguration(DataSourceProperties properties) {
        this.properties = properties;
    }

    @Bean
    public DruidDataSource dataSource(){
        return new DruidDataSource();
    }
}
DataSourceProperties
@Data
@ConfigurationProperties(prefix = "cskaoyan.db")
public class DataSourceProperties {

    String driver;
    String url;
    String username;
    String password;

    String filePath;
}
application.yml(主配置文件)
cskaoyan:
  db:
    driver: com.mysql.jdbc.Driver
    password: 123456
spring:
  profiles:
#    active: beta,db,web
    active:
      - beta
      - db
      - web
application-alpha.yml(分主配置文件)
cskaoyan:
  db:
    url: jdbc:mysql://localhost:3306/db_alpha
    username: alpha
    file-path: d://alpha/
server:
  port: 8081
application-beta.yml(分主配置文件)
cskaoyan:
  db:
    url: jdbc:mysql://localhost:3306/db_beta
    username: beta
    file-path: d://beta/
server:
  port: 8082
application-cigma.yml(分主配置文件)
cskaoyan:
  db:
    url: jdbc:mysql://localhost:3306/db_cigma
    username: cigma
    file-path: d://cigma/
server:
  port: 8083
application-db.yml(分主配置文件)
application-web.yml(分主配置文件)
server:
  servlet:
    context-path: /demo5
application.yml(暂时)
cskaoyan:
  db:
    driver: com.mysql.jdbc.Driver
#    url: jdbc:mysql://localhost:3306/db_alpha
#    url: jdbc:mysql://localhost:3306/db_beta
    url: jdbc:mysql://localhost:3306/db_cigma
#    username: alpha
#    username: beta
    username: cigma
    password: 123456
#    filePath: d://alpha/
#    filePath: d://beta/
    filePath: d://cigma/
1.3.9.1分流
alpha
beta
cigma
1.3.9.2解耦
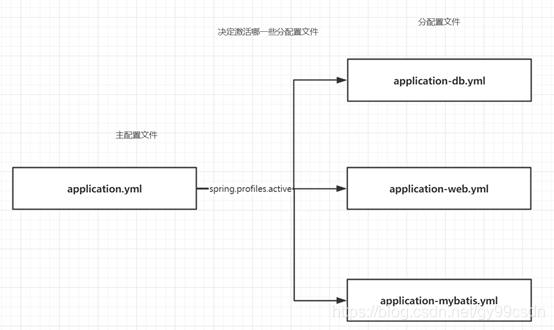
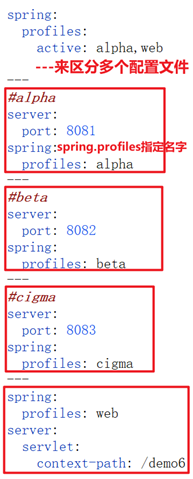
1.3.9.3通过一个yml表达主配置文件和多个分配置文件
实例6:
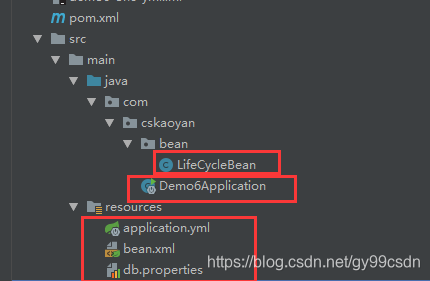 LifeCycleBean
public class LifeCycleBean {
}
Demo6Application
@SpringBootApplication
@ImportResource(locations = "classpath:bean.xml") //spring配置文件
@PropertySource("classpath:db.properties") //springboot配置文件properties
public class Demo6Application {

    public static void main(String[] args) {
        SpringApplication.run(Demo6Application.class, args);
    }
}
application.xml
spring:
  profiles:
    active: alpha,web

---
#alpha
server:
  port: 8081
spring:
  profiles: alpha
---
#beta
server:
  port: 8082
spring:
  profiles: beta
---
#cigma
server:
  port: 8083
spring:
  profiles: cigma
---
spring:
  profiles: web
server:
  servlet:
    context-path: /demo6
bean.xml
<?xml version="1.0" encoding="UTF-8"?>
<beans xmlns="http://www.springframework.org/schema/beans"
       xmlns:xsi="http://www.w3.org/2001/XMLSchema-instance"
       xmlns:context="http://www.springframework.org/schema/context"
       xmlns:aop="http://www.springframework.org/schema/aop"
       xsi:schemaLocation="
        http://www.springframework.org/schema/beans https://www.springframework.org/schema/beans/spring-beans.xsd
        http://www.springframework.org/schema/context https://www.springframework.org/schema/context/spring-context.xsd
        http://www.springframework.org/schema/aop https://www.springframework.org/schema/aop/spring-aop.xsd">

    <!-- bean definitions here -->
    <bean class="com.cskaoyan.bean.LifeCycleBean"/>
</beans>
db.properties(空)
1.3.10 引入外部的配置文件(了解)

1.3.10.1 xml(Spring配置文件)
推荐使用JavaConfig
1.3.10.2 properties(springboot配置文件)
可以使用多配置文件的形式来做


 21万+
21万+

 被折叠的 条评论
为什么被折叠?
被折叠的 条评论
为什么被折叠?
 到【灌水乐园】发言


