


 本文详细介绍了UIKit中的关键组件,包括UILabel、UIScrollView、UITextView等的基本用法及代码实现,重点讲解了UITableView的多种应用场景,如简单实例展示、单元格样式定制、自定义单元格以及分区表的实现方式。
目录
UILabel 简介
UILabel 是一个只读文本视图,可以使用该视图创建若干个静态文本,我们可以为 UILabel 设置一些属性来实现格式化的文本。
UIScrollView 简介
UIScrollView 是一个滚动视图,用来实现的当要显示的内容大于屏幕或者组件尺寸,滚动显示的功能。例如,显示大图片,大文本等内容时。
代码实现
@property (strong, nonatomic) UIImageView *imgView;
@property (strong, nonatomic) UIScrollView *srollView;
- (void)viewDidLoad {
    [super viewDidLoad];
    // Do any additional setup after loading the view, typically from a nib.
    self.imgView = [[UIImageView alloc]initWithImage:[UIImage imageNamed:@"B.jpg"]];
    self.srollView = [[UIScrollView alloc]initWithFrame:self.view.bounds];

    self.srollView.contentSize = self.imgView.bounds.size;

    [self.srollView addSubview:self.imgView];
    self.srollView.delegate = self;
    [self.view addSubview:self.srollView];
}
- (void)scrollViewDidScroll:(UIScrollView *)scrollView{
    NSLog(@"scrollViewDidScroll...");
}                                            // any offset changes
UITextView 简介
UITextView 继承了 UIScrollView 是一个可滚动的多行视图文本区域。和 UILabel 一样可以对要显示的文本进行格式化。并且该文本可以进行编辑。
代码实现
- (void)viewDidLoad {
    [super viewDidLoad];
    // Do any additional setup after loading the view, typically from a nib.
    self.myTextView2 = [[UITextView alloc]initWithFrame:CGRectMake(30, 400, 100, 100)];
    [self.view addSubview:self.myTextView2];
    self.myTextView2.text = @"你好,我是gyd";

    self.myTextView2.delegate = self;
}
//已经开始编辑
- (void)textViewDidBeginEditing:(UITextView *)textView{
    NSLog(@"textViewDidBeginEditing");
}
//已经结束编辑
- (void)textViewDidEndEditing:(UITextView *)textView{
    NSLog(@"textViewDidEndEditing");
}
//将要开始编辑
- (BOOL)textViewShouldBeginEditing:(UITextView *)textView;
//将要结束编辑
- (BOOL)textViewShouldEndEditing:(UITextView *)textView;
UIToolbar 简介
UIToolbar 是一个工具栏视图组件,用来并列显示多个按钮,点击每个按钮可以执行响应的操作。
代码实现
- (void)viewDidLoad {
    [super viewDidLoad];
    // Do any additional setup after loading the view, typically from a nib.
    self.toolbar = [[UIToolbar alloc]initWithFrame:CGRectMake(0, 100, self.view.frame.size.width, 45)];
    [self.view addSubview:self.toolbar];

    self.toolbar.barStyle = UIBarStyleBlack;

    UIBarButtonItem *items1 = [[UIBarButtonItem alloc]initWithTitle:@"Draw" style:UIBarButtonItemStylePlain target:self action:@selector(draw:)];
    UIBarButtonItem *items2 = [[UIBarButtonItem alloc]initWithTitle:@"Erase" style:UIBarButtonItemStylePlain target:self action:@selector(erase:)];
    UIBarButtonItem *fixedSpace = [[UIBarButtonItem alloc]initWithBarButtonSystemItem:UIBarButtonSystemItemFixedSpace target:nil action:nil];

    self.toolbar.items = @[items1, fixedSpace, items2, fixedSpace, items1];
}
-(IBAction)draw:(id)sender{
    NSLog(@"draw");
}
-(IBAction)erase:(id)sender{
    NSLog(@"erase");
}

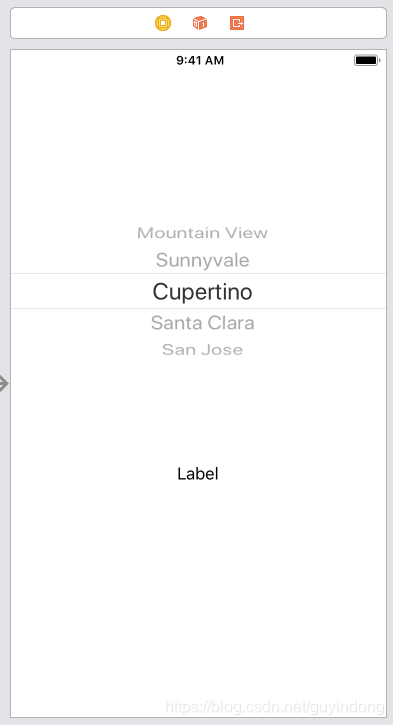
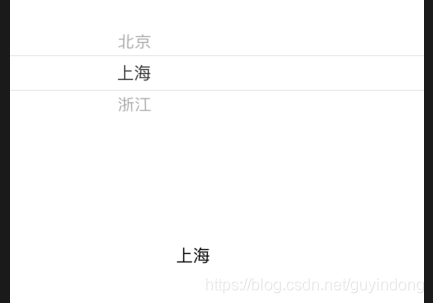
UIPickerView 简介
UIPickerView 和 UIDatePicker 类似也是允许用户从滚轮视图中选择需要的数据,不过 UIPickerView 需要我们自己绑定数据,并实现数据源和代理的相应方法。
IB + 代码实现
#import <UIKit/UIKit.h>

@interface ViewController : UIViewController<UIPickerViewDataSource,UIPickerViewDelegate>

@end
@interface ViewController ()
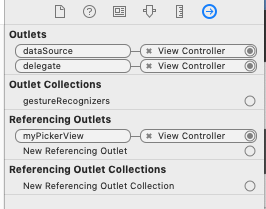
@property (strong, nonatomic) IBOutlet UILabel *show;
@property (strong, nonatomic) IBOutlet UIPickerView *myPickerView;
@property (strong, nonatomic) NSArray *ds;
@end
- (void)viewDidLoad {
  self.myPickerView.dataSource = self;
  self.myPickerView.delegate = self;
  self.ds = @[@"北京",@"上海",@"浙江"];
}
// returns the number of 'columns' to display.
- (NSInteger)numberOfComponentsInPickerView:(UIPickerView *)pickerView{
    return 1;
}

// returns the # of rows in each component..
- (NSInteger)pickerView:(UIPickerView *)pickerView numberOfRowsInComponent:(NSInteger)component{
    return self.ds.count;
}

- (UIView *)pickerView:(UIPickerView *)pickerView viewForRow:(NSInteger)row forComponent:(NSInteger)component reusingView:(nullable UIView *)view{
    UILabel *label;
    if(view == nil){
        label = [[UILabel alloc]initWithFrame:CGRectMake(2, 5, 200, 36)];
    }else{
        label = (UILabel*)view;
    }
    label.text = [self.ds objectAtIndex:row];

    return label;
}

- (void)pickerView:(UIPickerView *)pickerView didSelectRow:(NSInteger)row inComponent:(NSInteger)component{
    NSString *rowContent = [self.ds objectAtIndex:row];
    self.show.text = rowContent;
}
UITableView 简介 ☆
UITableView 是一个表格视图,可以以行列的方式来显示内容,是iOS开发中最常见的组件之一。
第一个简单的实例
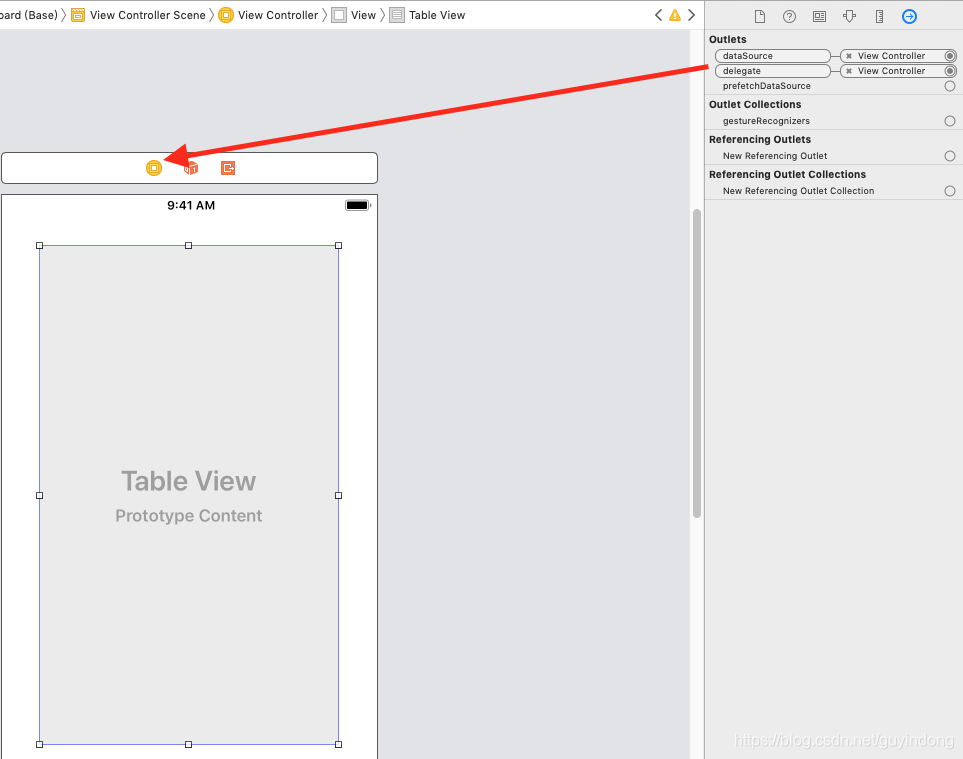
#import <UIKit/UIKit.h>

@interface ViewController : UIViewController<UITableViewDataSource, UITableViewDelegate>

@end
#import "ViewController.h"
@interface ViewController ()
@property (strong, nonatomic) NSArray *dataSource;
@end
@implementation ViewController
- (void)viewDidLoad {
[super viewDidLoad];
// Do any additional setup after loading the view, typically from a nib.
self.dataSource = @[@"北京",@"天津",@"上海",@"浙江",@"重庆",@"天津",@"上海",@"浙江",@"重庆",@"天津",@"上海",@"浙江",@"重庆",@"天津",@"上海",@"浙江",@"重庆",@"天津",@"上海",@"浙江",@"重庆"];
}
// UITableView
- (NSInteger)tableView:(UITableView *)tableView numberOfRowsInSection:(NSInteger)section{
return self.dataSource.count;
}
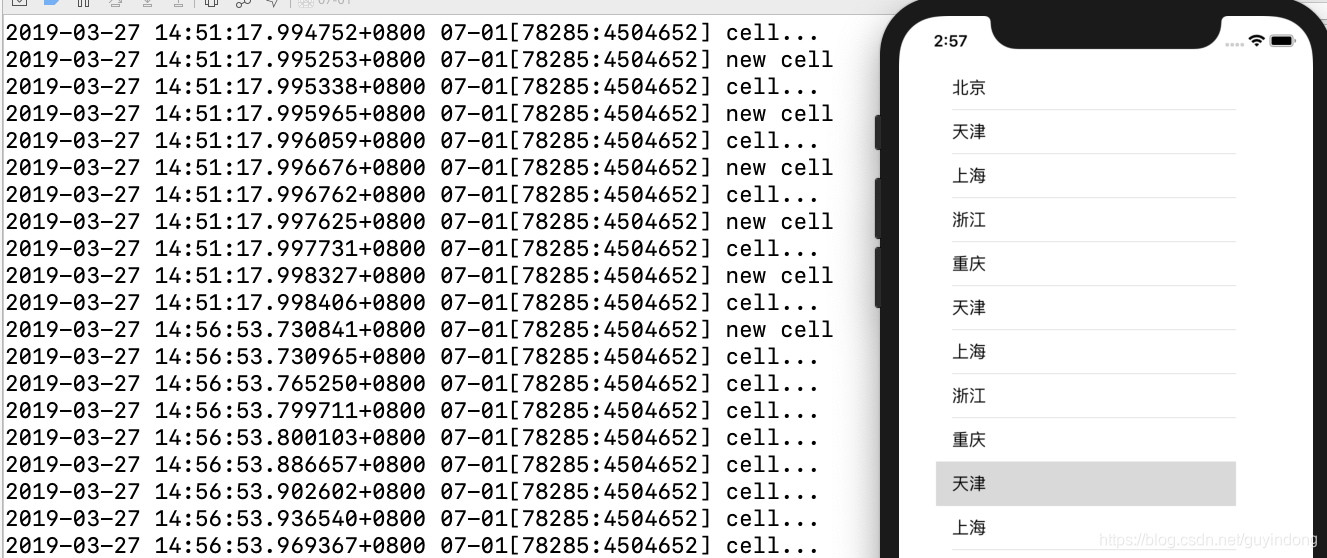
// Row display. Implementers should *always* try to reuse cells by setting each cell's reuseIdentifier and querying for available reusable cells with dequeueReusableCellWithIdentifier:
// Cell gets various attributes set automatically based on table (separators) and data source (accessory views, editing controls)
- (UITableViewCell *)tableView:(UITableView *)tableView cellForRowAtIndexPath:(NSIndexPath *)indexPath{
static NSString *cid = @"cid";
//可以循环使用
UITableViewCell *cell = [tableView dequeueReusableCellWithIdentifier:cid];
if(cell == nil){
cell = [[UITableViewCell alloc]initWithStyle:UITableViewCellStyleDefault reuseIdentifier:cid];
NSLog(@"new cell");
}
NSLog(@"cell...");
cell.textLabel.text = [self.dataSource objectAtIndex:indexPath.row];
return cell;
}
@end
UITableView 单元格样式
UITableViewCellStyleDefault, // Simple cell with text label and optional image view (behavior of UITableViewCell in iPhoneOS 2.x)

UITableViewCellStyleSubtitle // Left aligned label on top and left aligned label on bottom with gray text (Used in iPod).
UITableViewCellStyleValue1, // Left aligned label on left and right aligned label on right with blue text (Used in Settings)
UITableViewCellStyleValue2, // Right aligned label on left with blue text and left aligned label on right (Used in Phone/Contacts)
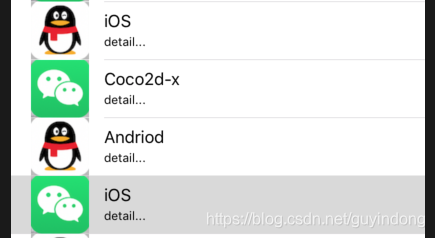
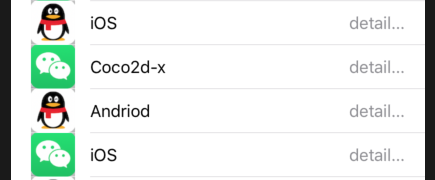
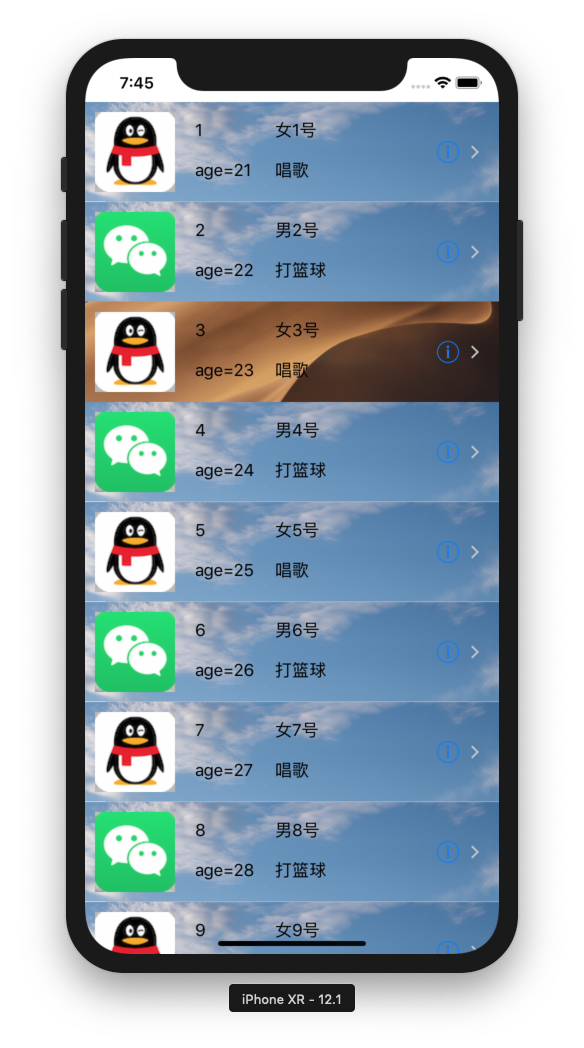
UITableView 自定义
-
创建 person 类(MVC设计模式)
@interface Person : NSObject @property (nonatomic, assign) int pid; @property (nonatomic, copy) NSString *name; @property (nonatomic, copy) NSString *hobby; @property (nonatomic, copy) NSString *imgPath; @property (nonatomic, assign) int age; @end -
创建 model 类管理
@interface Model : NSObject
@property (nonatomic, strong) NSMutableArray *personlist;
@end
#import "Person.h" @implementation Model -(instancetype)init{ self = [super init]; if(self){ self.personlist = [NSMutableArray arrayWithCapacity:5]; for(int i = 1; i <= 30; i++){ Person *person = [[Person alloc]init]; person.pid = i; person.age = 20+i; if(i%2 == 0){ person.name = [NSString stringWithFormat:@"男%d号",i]; person.hobby = @"打篮球"; person.imgPath = @"1.png"; }else{ person.name = [NSString stringWithFormat:@"女%d号",i]; person.hobby = @"唱歌"; person.imgPath = @"2.png"; } [self.personlist addObject:person]; } } return self; } @end -
创建 PersonTableViewCell 继承 ableViewCell ,自定义
-
@interface PersonTableViewCell : UITableViewCell
@property (nonatomic, strong) UILabel *pidLable;
@property (nonatomic, strong) UILabel *nameLable;
@property (nonatomic, strong) UILabel *ageLable;
@property (nonatomic, strong) UILabel *hobbyLable;
@property (nonatomic, strong) UIImageView *headImg;

-(void)prepareLayout;

@end
@implementation PersonTableViewCell - (instancetype)initWithStyle:(UITableViewCellStyle)style reuseIdentifier:(nullable NSString *)reuseIdentifier{ self = [super initWithStyle:style reuseIdentifier:reuseIdentifier]; if(self){ [self prepareLayout]; self.backgroundView = [[UIImageView alloc]initWithImage:[UIImage imageNamed:@"bgi.png"]]; self.selectedBackgroundView = [[UIImageView alloc]initWithImage:[UIImage imageNamed:@"sbgi.png"]]; self.accessoryType = UITableViewCellAccessoryDetailDisclosureButton; // self.accessoryView = [[UIImageView alloc]initWithImage:[UIImage imageNamed:@"acc.png"]]; } NSLog(@"PersonTableViewCell..."); return self; } -(void)prepareLayout{ self.headImg = [[UIImageView alloc]initWithFrame:CGRectMake(10, 10, 80, 80)]; self.pidLable = [[UILabel alloc]initWithFrame:CGRectMake(110, 10, 50, 36)]; self.ageLable = [[UILabel alloc]initWithFrame:CGRectMake(110, 50, 80, 36)]; self.nameLable = [[UILabel alloc]initWithFrame:CGRectMake(190, 10, 60, 36)]; self.hobbyLable = [[UILabel alloc]initWithFrame:CGRectMake(190, 50, 100, 36)]; [self.contentView addSubview:self.pidLable]; [self.contentView addSubview:self.headImg]; [self.contentView addSubview:self.nameLable]; [self.contentView addSubview:self.ageLable]; [self.contentView addSubview:self.hobbyLable]; } @end -
ViewController.h
#import <UIKit/UIKit.h> @interface ViewController : UIViewController<UITabBarDelegate,UITableViewDataSource> @end -
加载,完成
#import "ViewController.h"
#import "Model.h"
#import "Person.h"
#import "PersonTableViewCell.h"

@interface ViewController ()
@property (strong, nonatomic)IBOutlet UITableView *tabelview;
@property (strong, nonatomic) NSMutableArray *dataSource;
@end

@implementation ViewController

- (void)viewDidLoad {
    [super viewDidLoad];
    // Do any additional setup after loading the view, typically from a nib.
    self.tabelview = [[UITableView alloc]initWithFrame:self.view.frame];
    [self.view addSubview:self.tabelview];
    self.tabelview.dataSource = self;
    self.tabelview.delegate = self;
    self.dataSource = [[Model alloc]init].personlist;
}

- (NSInteger)tableView:(UITableView *)tableView numberOfRowsInSection:(NSInteger)section{
    return self.dataSource.count;
}

// Row display. Implementers should *always* try to reuse cells by setting each cell's reuseIdentifier and querying for available reusable cells with dequeueReusableCellWithIdentifier:
// Cell gets various attributes set automatically based on table (separators) and data source (accessory views, editing controls)

- (UITableViewCell *)tableView:(UITableView *)tableView cellForRowAtIndexPath:(NSIndexPath *)indexPath{
    static NSString *cid = @"cid";
    PersonTableViewCell *cell;
    cell = [tableView dequeueReusableCellWithIdentifier:cid];
    if(cell == nil){
        cell = [[PersonTableViewCell alloc]initWithStyle:UITableViewCellStyleDefault reuseIdentifier:cid];
    }
    Person *person = [self.dataSource objectAtIndex:indexPath.row];
//    cell.textLabel.text = person.name;
    cell.pidLable.text = [NSString stringWithFormat:@"%d", person.pid];
    cell.headImg.image = [UIImage imageNamed:person.imgPath];
    cell.nameLable.text = person.name;
    cell.ageLable.text = [NSString stringWithFormat:@"age=%d", person.age];
    cell.hobbyLable.text = person.hobby;
    return cell;
}

- (CGFloat)tableView:(UITableView *)tableView heightForRowAtIndexPath:(NSIndexPath *)indexPath{
    return 100;
}

@end
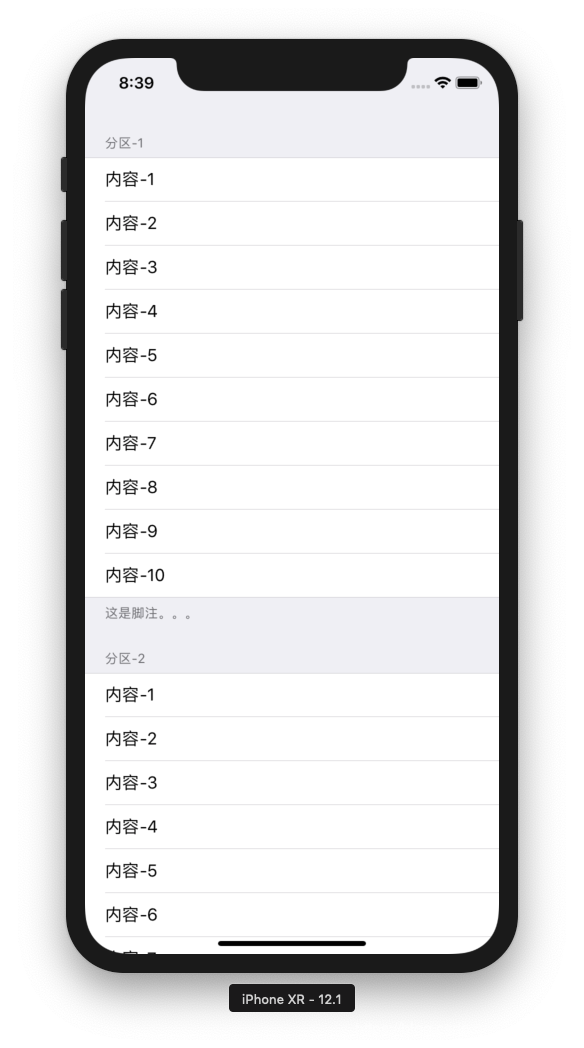
UITableView 分区表
-
建立一个数据模型
@interface Model : NSObject
@property (strong, nonatomic) NSMutableDictionary *list;
@end
@implementation Model -(instancetype)init{ self = [super init]; self.list = [NSMutableDictionary dictionaryWithCapacity:5]; if(self){ for (int i = 1; i <= 5; i++) { NSString *key = [NSString stringWithFormat:@"分区-%d",i]; NSMutableArray *value = [NSMutableArray arrayWithCapacity:10]; for (int j = 1; j <= 10; j++) { [value addObject:[NSString stringWithFormat:@"内容-%d",j]]; } [self.list setObject:value forKey:key]; } } return self; } @end -
VierController.h
@interface ViewController : UIViewController<UITableViewDelegate, UITableViewDataSource> @end -
VierController.m
#import "ViewController.h"
#import "Model.h"

@interface ViewController ()
@property (strong, nonatomic) UITableView *tv;
@property (strong, nonatomic) NSMutableDictionary *dataSource;
@end

@implementation ViewController

- (void)viewDidLoad {
    [super viewDidLoad];
    // Do any additional setup after loading the view, typically from a nib.
    self.tv = [[UITableView alloc]initWithFrame:self.view.frame style:UITableViewStyleGrouped];
    self.dataSource = [[Model alloc]init].list;
    self.tv.dataSource = self;
    self.tv.delegate = self;
    [self.view addSubview:self.tv];
}
- (nullable NSString *)tableView:(UITableView *)tableView titleForHeaderInSection:(NSInteger)section{
    NSArray *keys = self.dataSource.allKeys;
    keys = [keys sortedArrayUsingComparator:^NSComparisonResult(id  _Nonnull obj1, id  _Nonnull obj2) {
        return [obj1 compare:obj2];
    }];
    return [keys objectAtIndex:section];
}

- (NSInteger)numberOfSectionsInTableView:(UITableView *)tableView{
    return self.dataSource.count;
}

- (NSInteger)tableView:(UITableView *)tableView numberOfRowsInSection:(NSInteger)section{
    NSArray *keys = self.dataSource.allKeys;
    NSArray *values = [self.dataSource objectForKey:[keys objectAtIndex:section]];
    return values.count;
}

- (UITableViewCell *)tableView:(UITableView *)tableView cellForRowAtIndexPath:(NSIndexPath *)indexPath{
    static NSString *cid = @"cid";
    UITableViewCell *cell = [tableView dequeueReusableCellWithIdentifier:cid];
    if(cell == nil){
        cell = [[UITableViewCell alloc]initWithStyle:UITableViewCellStyleDefault reuseIdentifier:cid];
    }

    NSArray *keys = self.dataSource.allKeys;
    NSArray *values = [self.dataSource objectForKey:[keys objectAtIndex:indexPath.section]];
    cell.textLabel.text = [values objectAtIndex:indexPath.row];
    return  cell;
}
@end
UITableView 编辑
- (UITableViewCellEditingStyle)tableView:(UITableView *)tableView editingStyleForRowAtIndexPath:(NSIndexPath *)indexPath{
    return UITableViewCellEditingStyleDelete;
}
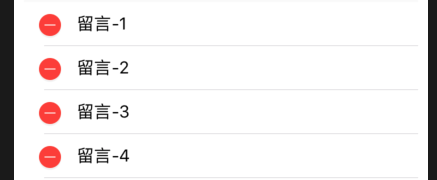
UITableViewCellEditingStyleInsert


 被折叠的 条评论
为什么被折叠?
被折叠的 条评论
为什么被折叠?
 到【灌水乐园】发言


