


 本文档详细介绍了OpenStack的简化安装步骤,包括环境准备、基础设置、时间同步、系统优化、安装OpenStack组件、配置负载均衡、数据库安装、控制器与计算节点配置以及KVM嵌套虚拟化的启用。通过此教程,读者可以快速搭建起OpenStack环境。
OpenStack的q版安装操作手册
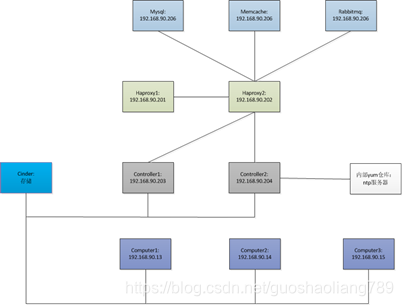
1、 架构图:
2、基础环境准备:
systemctl disable firewalld
systemctl disable NetworkManager
vim /etc/selinux/config
SELINUX=disabled
2.2 安装常用命令
yum install -y vim wget tree lrzsz gcc gcc-c++ automake pcre pcre-devel zlib zlib-devel openssl openssl-devel iproute net-tools iotop lsof ntpdate telnet bridge-utils
2.3 时间同步
cp /usr/share/zoneinfo/Asia/Shanghai /etc/localtime
ntpdate time3.aliyun.com && hwclock -w
2.4 更改文字描述符
vim /etc/security/limits.conf
-
soft core unlimited -
hard core unlimited -
soft nproc 1000000 -
hard nproc 1000000 -
soft nofile 1000000 -
hard nofile 1000000 -
soft memlock 32000 -
hard memlock 32000 -
soft msgqueue 8192000 -
hard msgqueue 8192000
2.5 优化内核参数
vim /etc/sysctl.conf
net.ipv4.conf.default.rp_filter = 1
net.ipv4.ip_nonlocal_bind = 1
net.ipv4.ip_forward = 1
# Do not accept source routing
net.ipv4.conf.default.accept_source_route = 0
# Controls the System Request debugging functionality of the kernel
kernel.sysrq = 0
# Controls whether core dumps will append the PID to the core filename.
# Useful for debugging multi-threaded applications.
kernel.core_uses_pid = 1
# Controls the use of TCP syncookies
net.ipv4.tcp_syncookies = 1
# Disable netfilter on bridges.
net.bridge.bridge-nf-call-ip6tables = 1
net.bridge.bridge-nf-call-iptables = 1
net.bridge.bridge-nf-call-arptables = 0
# Controls the default maxmimum size of a mesage queue
kernel.msgmnb = 65536
# # Controls the maximum size of a message, in bytes
kernel.msgmax = 65536
# Controls the maximum shared segment size, in bytes
kernel.shmmax = 68719476736
# # Controls the maximum number of shared memory segments, in pages
kernel.shmall = 4294967296
# TCP kernel paramater
net.ipv4.tcp_mem = 786432 1048576 1572864
net.ipv4.tcp_rmem = 4096 87380 4194304
net.ipv4.tcp_wmem = 4096 16384 4194304
net.ipv4.tcp_window_scaling = 1
net.ipv4.tcp_sack = 1
# socket buffer
net.core.wmem_default = 8388608
net.core.rmem_default = 8388608
net.core.rmem_max = 16777216
net.core.wmem_max = 16777216
net.core.netdev_max_backlog = 262144
net.core.somaxconn = 20480
2.6 更改主机名
2.7 所有的服务器做域名和vip绑定
Vim /etc/hosts
192.168.90.248 openstack-vip.preview.local
2.8安装openstack的q版
首先对系统进行初始化:
yum list centos-release-openstack* #查询版本
yum install centos-release-openstack-queens.noarch -y
yum install https://rdoproject.org/repos/rdo-release.rpm
yum install python-openstackclient openstack-selinux -y
3、安装keepalived和haproxy(192.168.90.201和192.168.90.202)
3.1 安装keepalived
yum install keepalived -y
[root@haproxy1 conf]# vim /etc/keepalived/keepalived.conf
vrrp_instance VI_1 {
state MASTER
interface eth0
virtual_router_id 80
priority 100
advert_int 1
unicast_src_ip 192.168.90.201
unicast_peer {
192.168.90.202
}
authentication {
    auth_type PASS
    auth_pass 123456
}
virtual_ipaddress {
    192.168.90.248 dev eth0 label eth0:0
}
}
[root@linux-host5 ~]# systemctl start keepalived
[root@linux-host5 ~]# systemctl enable keepalived
2.5.3:验证:
注意:192.168.90.203(controller)ping 192.168.90.248是否能ping通,如果ping通ok
如果不通,执行以下操作,然后重启keepalived服务。
3.2安装haproxy
一、 部署haproxy,实现访问6379端口时,轮询访问六个节点
1)下载版本1.8.14版本的harpoxy软件并安装
tar xf haproxy-1.8.14.tar.gz
cd haproxy-1.8.14
make ARCH=x86_64 TARGET=linux2628 USE_PCRE=1 USE_OPENSSL=1 USE_ZLIB=1 USE_SYSTEMD=1 USE_CPU_AFFINITY=1 PREFIX=/usr/local/haproxy
make install PREFIX=/usr/local/haproxy
cp haproxy /usr/sbin/
2)配置haproxy相关的参数
[root@master1 init.d]# vim /usr/lib/systemd/system/haproxy.service
[Unit]
Description=HAProxy Load Balancer
After=syslog.target network.target
[Service]
ExecStartPre=/usr/sbin/haproxy -f /etc/haproxy/haproxy.cfg -f /etc/haproxy/conf -c -q
ExecStart=/usr/sbin/haproxy -Ws -f /etc/haproxy/haproxy.cfg -f /etc/haproxy/conf -p /run/haproxy.pid
ExecReload=/bin/kill -USR2 $MAINPID
[Install]
WantedBy=multi-user.target
[root@master1 init.d]# vim /etc/haproxy/conf/ops.cfg
listen web_port
bind 192.168.90.248:80 #对client提供的VIP
mode tcp
server 192.168.90.203 192.168.90.203:80 check inter 3000 fall 3 rise 5
#server 192.168.90.204 192.168.90.204:80 check inter 3000 fall 3 rise 5
listen openstack-mysql-3306
bind 192.168.90.248:3306
mode tcp
server 192.168.90.206 192.168.90.206:3306 check inter 3000 fall 3 rise 5
#server 192.168.90.204 192.168.90.204:3306 check inter 3000 fall 3 rise 5 backup
listen openstack-keystone-35357
bind 192.168.90.248:35357
mode tcp
server 192.168.90.203 192.168.90.203:35357 check inter 3000 fall 3 rise 5
# server 192.168.90.204 192.168.90.204:35357 check inter 3000 fall 3 rise 5 backup
listen openstack-keystone-5000
bind 192.168.90.248:5000
mode tcp
server 192.168.90.203 192.168.90.203:5000 check inter 3000 fall 3 rise 5
# server 192.168.90.204 192.168.90.204:5000 check inter 3000 fall 3 rise 5 backup
listen openstack-memcache-11211
bind 192.168.90.248:11211
mode tcp
server 192.168.90.206 192.168.90.206:11211 check inter 3000 fall 3 rise 5
# server 192.168.90.207 192.168.90.207:11211 check inter 3000 fall 3 rise 5
listen openstack-glance-9292
bind 192.168.90.248:9292
mode tcp
server 192.168.90.203 192.168.90.203:9292 check inter 3000 fall 3 rise 5
# server 192.168.90.204 192.168.90.204:9292 check inter 3000 fall 3 rise 5
listen openstack-glance-9291
bind 192.168.90.248:9291
mode tcp
server 192.168.90.203 192.168.90.203:9291 check inter 3000 fall 3 rise 5
# server 192.168.90.204 192.168.90.204:9291 check inter 3000 fall 3 rise 5
listen openstack-rabbit-5672
bind 192.168.90.248:5672
mode tcp
server 192.168.90.206 192.168.90.206:5672 check inter 3000 fall 3 rise 5
# server 192.168.90.207 192.168.90.207:5672 check inter 3000 fall 3 rise 5
listen openstack-nove-8774
bind 192.168.90.248:8774
mode tcp
server 192.168.90.203 192.168.90.203:8774 check inter 3000 fall 3 rise 5
mode tcp
server 192.168.90.203 192.168.90.203:8774 check inter 3000 fall 3 rise 5
# server 192.168.90.204 192.168.90.204:8774 check inter 3000 fall 3 rise 5
listen openstack-nove-6080
bind 192.168.90.248:6080
mode tcp
server 192.168.90.203 192.168.90
 最低0.47元/天 解锁文章


 1803
1803

 被折叠的 条评论
为什么被折叠?
被折叠的 条评论
为什么被折叠?
 到【灌水乐园】发言


