springboot jpa设置多数据源

【Spring Boot 3】【数据源】自定义JPA数据源 【Spring Boot 3】【数据源】自定义JDBC数据源》说明了开发Spring Boot JDBC应用时如何自定义数据源,但在实际开发工作中,很少再使用JDBC直接进行数据库操作,取而代之的是各种ORM框架。本文介绍使用Spring Data JPA时如何自定义数据源。回顾一下自定义JDBC数据源的步骤:1> 自定义对象实例,通过加载配置文件中的数据源配置信息;2> 通过自定义的对象实例构建DataSource对象实例;3> 通过DataSource对象实例构建对象实例;4> 通过。 阅读详情

项目使用springboot jpa作为数据持久层,这里记录多数据源配置的信息。

1.数据库配置文件

这里注意spring.datasource.user和spring.datasource.system在后面多数据源配置时需要使用。如果是单一数据源配置,就不需要user和system这一层。

spring:
  datasource:
    user:
      jdbc-url: jdbc:mysql://192.168.1.23:3306/ruizhi_dev?useUnicode=true&characterEncoding=utf-8&useSSL=false&serverTimezone=CTT
      username: root
      password: Ruizhi@321
      driverClassName: com.mysql.cj.jdbc.Driver
      type: com.zaxxer.hikari.HikariDataSource
      hikari:
        minimum-idle: 5
        maximum-pool-size: 15
        auto-commit: true
        idle-timeout: 30000
        pool-name: DatebookHikariC
        max-lifetime: 120000
        connection-timeout: 30000co
        nnection-test-query: SELECT 1
    system:
      jdbc-url: jdbc:mysql://192.168.1.23:3306/ruizhi_apple?useUnicode=true&characterEncoding=utf-8&useSSL=false&serverTimezone=CTT
      username: root
      password: Ruizhi@321
      driverClassName: com.mysql.cj.jdbc.Driver
      type: com.zaxxer.hikari.HikariDataSource
      hikari:
        minimum-idle: 5
        maximum-pool-size: 15
        auto-commit: true
        idle-timeout: 30000
        pool-name: DatebookHikariCP
        max-lifetime: 120000
        connection-timeout: 30000
        connection-test-query: SELECT 1
  jpa:
    show-sql: true
    open-in-view: true
    hibernate:
      ddl-auto: update
      use-new-id-generator-mappings: true
      naming:
        implicit-strategy: org.hibernate.boot.model.naming.ImplicitNamingStrategyLegacyJpaImpl
        physical-strategy: org.hibernate.boot.model.naming.PhysicalNamingStrategyStandardImpl

2.需要引入的pom依赖

我这里使用的springboot是2.1.13,这个mysql-connector-java默认是8.0.11

 <dependency>
    <groupId>mysql</groupId>
    <artifactId>mysql-connector-java</artifactId>
</dependency>

<dependency>
    <groupId>org.springframework.boot</groupId>
    <artifactId>spring-boot-starter-data-jpa</artifactId>
</dependency>

<dependency>
    <groupId>org.springframework.boot</groupId>
    <artifactId>spring-boot-starter-jdbc</artifactId>
</dependency>

3.DataSourceConfig

import org.springframework.beans.factory.annotation.Qualifier;
import org.springframework.boot.context.properties.ConfigurationProperties;
import org.springframework.boot.jdbc.DataSourceBuilder;
import org.springframework.context.annotation.Bean;
import org.springframework.context.annotation.Configuration;
import org.springframework.context.annotation.Primary;
import javax.sql.DataSource;

/**
 * @description: 多数据源数据库配置
 * @Date: 2020/11/11 14:25
 */
@Configuration
public class DataSourceConfig {

    /**
     * 体系模块的数据源(主数据源)
     * 使用@Primary标记主数据源;主数据源只能有一个
     * @return
     */
    @Primary
    @Bean(name = "systemDataSource")
    @Qualifier("systemDataSource")
    @ConfigurationProperties(prefix = "spring.datasource.system")
    public DataSource userDataSource() {
        return DataSourceBuilder.create().build();
    }

    /**
     * 用户模块数据源
     * @return
     */
    @Bean(name = "userDataSource")
    @Qualifier("userDataSource")
    @ConfigurationProperties(prefix = "spring.datasource.user")
    public DataSource systemDataSource() {
        return DataSourceBuilder.create().build();
    }

}

这里注意ConfigurationProperties中的prefix是配置文件中配置的参数,要保持一致。@Bean中的name在下面各自数据源的设置中需要使用。使用@Primary标记主数据源,主数据源只能有一个。

4.SystemRepositoryConfig(主数据有配置)

import com.ruizhi.detection.repository.BaseRepositoryImpl;
import org.springframework.beans.factory.annotation.Autowired;
import org.springframework.beans.factory.annotation.Qualifier;
import org.springframework.boot.autoconfigure.orm.jpa.HibernateProperties;
import org.springframework.boot.autoconfigure.orm.jpa.HibernateSettings;
import org.springframework.boot.autoconfigure.orm.jpa.JpaProperties;
import org.springframework.boot.orm.jpa.EntityManagerFactoryBuilder;
import org.springframework.context.annotation.Bean;
import org.springframework.context.annotation.Configuration;
import org.springframework.context.annotation.Primary;
import org.springframework.data.jpa.repository.config.EnableJpaRepositories;
import org.springframework.orm.jpa.JpaTransactionManager;
import org.springframework.orm.jpa.LocalContainerEntityManagerFactoryBean;
import org.springframework.transaction.PlatformTransactionManager;
import org.springframework.transaction.annotation.EnableTransactionManagement;
import javax.sql.DataSource;
import java.util.Map;

/**
 * @description: 体系管理的repository配置
 * @Date: 2020/11/11 14:25
 */
@Configuration
@EnableTransactionManagement
@EnableJpaRepositories(
        entityManagerFactoryRef="entityManagerFactorySystem",
        transactionManagerRef="transactionManagerSystem",
        //设置Repository所在位置
        basePackages= {"com.ruizhi.detection.repository.systemfile"}, repositoryBaseClass = BaseRepositoryImpl.class)
public class SystemRepositoryConfig {

    @Autowired
    @Qualifier("systemDataSource")
    private DataSource systemDataSource;

    @Autowired
    private JpaProperties jpaProperties;

    @Autowired
    private HibernateProperties hibernateProperties;

    /**
     * 使用@Primary标记主数据源
     * @bean中name与顶部配置需要一致
     * @param builder
     * @return
     */
    @Primary
    @Bean(name = "entityManagerFactorySystem")
    public LocalContainerEntityManagerFactoryBean entityManagerFactorySystem(
            EntityManagerFactoryBuilder builder) {
        //网上文章大多数都是jpaProperties.getHibernateProperties(dataSource);就直接得到了hibernate的配置map,
        //但这个方法在springboot2.0+好像就舍弃了,所以这里改成这样。
        Map<String, Object> properties = hibernateProperties.determineHibernateProperties(
                jpaProperties.getProperties(), new HibernateSettings());
        return builder.dataSource(systemDataSource).properties(properties)
                //实体包路径
                .packages("com.ruizhi.detection.model.systemfile").build();
    }

    @Primary
    @Bean(name = "transactionManagerSystem")
    public PlatformTransactionManager transactionManagerSystem(EntityManagerFactoryBuilder builder) {
        return new JpaTransactionManager(entityManagerFactorySystem(builder).getObject());
    }
}

这里的EnableJpaRepositories中的repositoryBaseClass可以配置也可以不用配置,我这里是有一给封装的,所以进行了配置。

5.UserRepositoryConfig

import com.ruizhi.detection.repository.BaseRepositoryImpl;
import org.springframework.beans.factory.annotation.Autowired;
import org.springframework.beans.factory.annotation.Qualifier;
import org.springframework.boot.autoconfigure.orm.jpa.HibernateProperties;
import org.springframework.boot.autoconfigure.orm.jpa.HibernateSettings;
import org.springframework.boot.autoconfigure.orm.jpa.JpaProperties;
import org.springframework.boot.orm.jpa.EntityManagerFactoryBuilder;
import org.springframework.context.annotation.Bean;
import org.springframework.context.annotation.Configuration;
import org.springframework.data.jpa.repository.config.EnableJpaRepositories;
import org.springframework.orm.jpa.JpaTransactionManager;
import org.springframework.orm.jpa.LocalContainerEntityManagerFactoryBean;
import org.springframework.transaction.PlatformTransactionManager;
import org.springframework.transaction.annotation.EnableTransactionManagement;
import javax.sql.DataSource;
import java.util.Map;

/**
 * @description: 用户的repository配置
 * @Author: yang.fu.ren
 * @Date: 2020/11/11 14:26
 */
@Configuration
@EnableTransactionManagement
@EnableJpaRepositories(
        entityManagerFactoryRef="entityManagerFactoryUser",
        transactionManagerRef="transactionManagerUser",
        //设置Repository所在位置
        basePackages= {"com.ruizhi.detection.repository.user"}, repositoryBaseClass = BaseRepositoryImpl.class)
public class UserRepositoryConfig {

    /**
     * 这里名字与DataSourceConfig中定义的一致
     */
    @Autowired
    @Qualifier("userDataSource")
    private DataSource userDataSource;

    @Autowired
    private JpaProperties jpaProperties;

    @Autowired
    private HibernateProperties hibernateProperties;

    @Bean(name = "entityManagerFactoryUser")
    public LocalContainerEntityManagerFactoryBean entityManagerFactoryUser(
            EntityManagerFactoryBuilder builder) {
        //网上文章大多数都是jpaProperties.getHibernateProperties(dataSource);就直接得到了hibernate的配置map,
        //但这个方法在springboot2.0+好像就舍弃了,所以这里改成这样。
        Map<String, Object> properties = hibernateProperties.determineHibernateProperties(
                jpaProperties.getProperties(), new HibernateSettings());
        return builder.dataSource(userDataSource).properties(properties)
                //实体的包路径
                .packages("com.ruizhi.detection.model.user").build();
    }

    @Bean(name = "transactionManagerUser")
    public PlatformTransactionManager transactionManagerUser(EntityManagerFactoryBuilder builder) {
        return new JpaTransactionManager(entityManagerFactoryUser(builder).getObject());
    }
}

6.启动类的配置

启动类中就不需要之前单一数据源设置的那些参数,全部去掉。
之前单一数据源时启动类的配置:
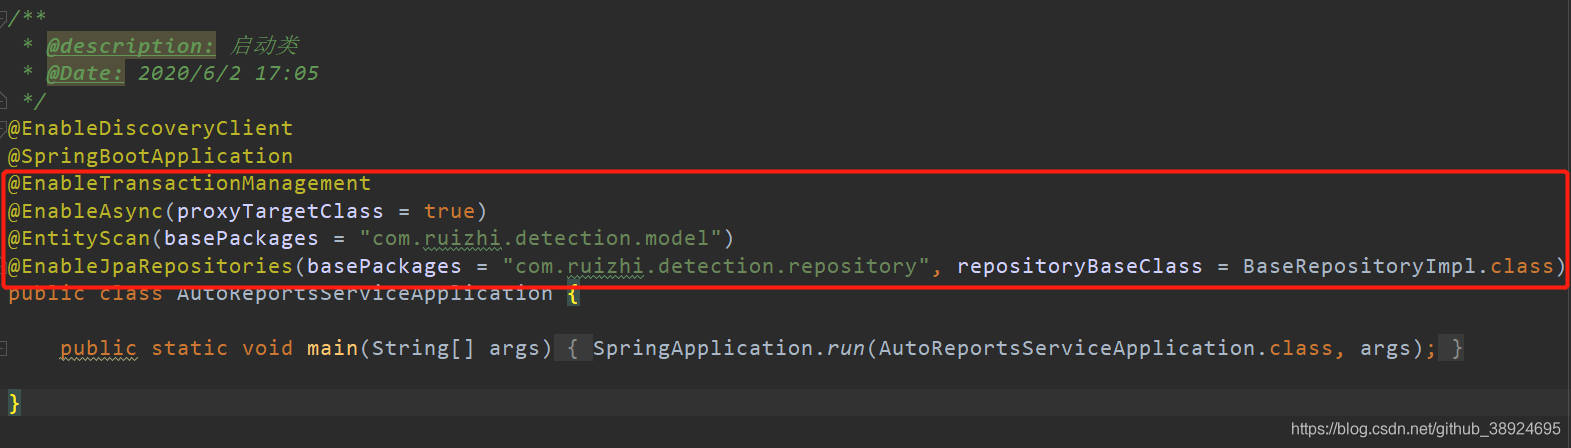
在这里插入图片描述

多数据源的配置:
在这里插入图片描述

SpringBoot整合Jpa实现多数据源 SpringBoot整合Jpa实现多数据源 前言: 最近工作中需要用到两个数据源,刚好是SpringBoot项目整合的JPA,之前有写过SpringBoo Mybatis Druid配置多数据源 的文章,不过这次是 SpringBoot JPA Hikari 配置多数据源。好了,废话不多说,直接进入正题。 首先,我这里的SpringBoot版本是<version>2.3.1.RELEASE</version>,这个很重要,如果你的版本是低于2.1.x的,可能会有些依赖不一样,导致程序 阅读详情

相关推荐

springBoot+Hibernate(Jpa)多数据源配置

application.xml数据库连接信息配置 spring: datasource: primary: type: com.zaxxer.hikari.HikariDataSource driverClassName: com.mysql.jdbc.Driver jdbc-url: jdbc:mysql://localhost...

weixin_43714266的博客 1616

springboot+jpa+aop自定义注解多数据源配置

springboot+jpa+aop自定义注解多数据源配置

焚琴煮鹤呀的博客 2707

最详细的SpringBoot配置多数据源讲解

关于springboot配置多数据源整理了笔记,分享给有需要的小伙伴,视频是看的动力节点王鹤老师讲的springboot, 动力节点王鹤老师讲解的springboot教程,由浅入深,带你体验Spring Boot的极速开发过程,内容丰富,涵盖了SpringBoot开发的方方面面,并且同步更新到Spring Boot 2.x系列的最新版本。 视频链接:动力节点springboot视频教程-初学springboot必备教程-springboot最新完整版_哔哩哔哩_bilibili你的三连就是录制视频的动力

DDDYSz的博客 1580

Spring Boot 实践折腾记(19):自定义配置JPA使用多数据源

圣爱克苏佩里在《小王子》里写道:用心去看才看得清楚,本质的东西用肉眼是看不见的。 今天的内容有点多,希望你能耐心看完,因为会复习 Spring Boot 和 Sping 的相关内容。 Java持久性API(JPA)是一个对象关系映射(ORM)框架,它是Java EE平台的一部分。 JPA通过让开发人员使用面向对象的API,而不是手动编写SQL查询来简化数据访问层的实现。目前,流行的...

mickjoust的技术小屋 1万+

【Spring Boot 3】【数据源】自定义JPA多数据源

【Spring Boot 3】【数据源】自定义JDBC多数据源说明了开发Spring Boot JDBC应用时如何自定义多数据源,但在实际开发工作中,很少再使用JDBC直接进行数据库操作,取而代之的是各种ORM框架。本文介绍使用Spring Data JPA时如何自定义多数据源。本文也基于【Spring Boot 3】【数据源】自定义JPA数据源。,请先用MySQL管理工具(本文使用MySQL官方提供的MySQL Workbench)连接一下新创建的数据库,注意使用新创建的数据库用户(本文SQL中的。

又言又语 1534

关于Springboot配置多数据源,这篇笔记太详细了

关于springboot配置多数据源,整理了这篇笔记,分享给有需要的小伙伴们,视频看的动力节点王鹤老师讲的springboot 视频资源:动力节点springboot视频教程-初学springboot必备教程-springboot最新完整版_哔哩哔哩_bilibili你的三连就是录制视频的动力!一定不要忘记收藏、点赞、投币哦~本套视频基于SpringBoot2.4版本讲解。教程从细节入手,每个事例先讲解pom.xml中的重要依赖,其次application配置文件,最后是代码实现。让你知其所以,逐步让掌握

f5465245的博客 1581

SpringBoot 1.5 JPA MongoDB 设置多数据源

SpringBoot 1.5 JPA MongoDB 设置多数据源

LitongZero的博客 1097

Spring Boot的多数据源配置——JPA

    之前的项目一直在用Mybatis,不过因为sql都比较复杂,所Mybatis实现起来很方便。但一些简单的增删改查却也要写sql就比较麻烦了,毕竟代码的话能少写一点是一点。于是开始打算用JPA来做一些简单的小服务。一. yml文件配置    项目就直接用STS建了,导包也直接在建项目时勾选就行。    如果只是单独的数据源的话直接配置yml使用Spring Boot的datasource配置...

JuFF_白羽的博客 1596

springboot之jpa多数据源

  1、随着业务复杂程度的增加,我们在单一数据源上面的使用越来越不满足具体的业务逻辑以及实现了。   2、那么多数据源,比如多库多数据库等,我们在使用一个工程的时候多数据源的连接还是很有必要的,这里做一下记录   3、实例配置   1)目录结构      2)依赖包(pom.xml)    <parent> <groupId>org.spr...

weixin_33856370的博客 197

SAR ADC设计——SAR Logic原理

SAR ADC设计——SAR Logic原理 参考:集成电路设计实践 SAR ADC 清华大学 李福乐 文章目录SAR ADC设计——SAR Logic原理一. Overview二. TSPC(True Single Phase Clock)三. SC_Gen(Sequential Control Generator)四. LATCH_Dynamic五. 时序控制逻辑总结六. SW产生七. DO产生八. GT产生九. SAR Logic模块总结 一. Overview 输入:CKC,CompB,SAMPL

夏风喃喃的博客 1万+

华为铁三角(AR、SR、FR)的考核指标设计

以和为核心,通过和实现协同。考核维度分为和,并随市场阶段动态调整权重。

从技术实践立足,从项目管理方法论延伸思考 2768

Spring Boot整合Jpa多数据源

Spring Boot整合Jpa多数据源 本文是Spring Boot整合数据持久化方案的最后一篇,主要和大伙来聊聊Spring Boot整合Jpa多数据源问题。在Spring Boot整合JbdcTemplate多数据源、Spring Boot整合MyBatis多数据源以及Spring Boot整合Jpa多数据源这三个知识点中,整合Jpa多数据源算是最复杂的一种,也是很多人在配置时最容易出错的一...

liuzuoping的博客 2400

定制PYNQ的overlay

一、用HLS生成一个定制IP(加速器)(1)首先打开vivado hls,本人的版本是2017.2,点击创建一个新工程。(2)设置工程名和路径,顶层函数设置为add,创建一个新的C++程序,名字叫做adder.cpp,不用在testbench中添加文件。选择板子的时候搜索xc7z020clg400-1,这是PYNQ的板子号,选择完成。             (3)在左侧的菜单栏里选择Sourc...

bramblewalls的博客 1万+

Spring Boot 多数据源配置(JPA)

一般一个系统至少有一个数据源,用来持久化业务数据以及查询。单个数据源的系统很常见,在 Spring Boot 框架下配置也很简单。在约定大于配置这个思想下,只需要在配置文件中简单配置下数据库连接信息就行了。除了单数据源系统,在实际工作中,还会遇到多数据源系统。有可能是因为业务需要,以实际中做过的资产清查相关的项目为例,数据的存储分成了两个库,一个当前库和归档库,系统就需要配置两个数据源来满足业务需求。也有可能是技术架构。

m0_74823021的博客 1804

u-boot-2014.10移植第22天----添加nand flash命令支持(四)

解决问题:nand0: MTD Erase failure: -5 drivers/mtd/nand/nand_bbt.c文件中初始化bbt/* * Allocate memory (2bit per block) and clear the memory bad block * table. */ this->bbt = kzalloc(len, GFP_

fulinux的博客 3631

第229篇 轨迹时间参数化——TOPP-RA和速度约束处理

本文介绍了时间最优路径参数化(TOPP)问题及其解法。TOPP研究如何在给定空间路径上分配时间,使机器人运动时间最短且不超速,需满足速度、加速度和力矩约束。经典解法采用相平面法,通过前向和后向扫描确定最优速度曲线。TOPP-RA改进了数值稳定性,支持多约束处理。文章对比了TOPP与轨迹优化的区别,列举了开源工具,并解答了面试常见问题,指出TOPP广泛应用于机械臂、AGV等领域。TOPP不改变路径形状,仅优化速度分配,其最优解具有bang-bang特性。

郑伟强dev的专栏 318

Spring Boot2 系列教程(二十五)Spring Boot 整合 Jpa 多数据源

本文是 Spring Boot 整合数据持久化方案的最后一篇,主要和大伙来聊聊 Spring Boot 整合 Jpa 多数据源问题。在 Spring Boot 整合JbdcTemplate 多数据源、Spring Boot 整合 MyBatis 多数据源以及 Spring Boot 整合 Jpa 多数据源这三个知识点中,整合 Jpa 多数据源算是最复杂的一种,也是很多人在配置时最容易出错的一种。本...

江南一点雨的专栏 4352

lammps案例:扭转

扭转有两种方式,一是固定一端旋转另外一端,二是两端沿相反的方向旋转。案例为两侧旋转方式,扭转后的效果如图所示。

lammps_jiayou的博客 1199

SpringBoot——JPA访问MySql+多数据源配置(简单的单表增删改查使用)

JPA:使用JPA的好处在于,对于简单的单表增删改查,无需再数据库创建表,只需在工程的bean创建字段的实体类,就会自动创建表;同样,在对于繁琐的表结构查询时,使用JPA会繁琐很多,此时推荐大家使用mybatis表查询 一、单个配置 1、创建started project工程 此时pom.xml相关的依赖包已自动配置完成,如创建工程未勾选jpa组件,则需手动在pom.xml文件添加依赖jpa包 <dependency> <groupId>org.springframewor

ZHANGDANDAN04的博客 788

AES加密算法及AES-CMAC原理白话版系统解析

对AES不同加密算法,加密模式,加密原理,填充算法及AES-CMAC算法的详细系统介绍,帮助大家对AES进行系统掌握。

initiallizer的博客 4066

AutoSAR_BSW高阶 7. Signal Group 信号组

Autosar BSW的高级配置是实现复杂汽车电子系统的关键步骤之一。通过合理配置信号组和使用适当的参数,您可以提高系统性能,确保数据的可靠传输。在本博客中,我们深入探讨了信号组的概念和高级配置参数,并提供了示例代码,希望这些信息能够帮助您更好地理解和应用Autosar BSW的高级配置。如果您在配置过程中遇到任何问题,不妨寻求专业支持,以确保您的汽车电子系统能够顺利运行。Autosar COM 模块是一个广泛应用于汽车行业的关键技术,它使不同的电子控制单元能够有效地通信和协作。

一直在水些技术小文 662

springboot jpa 多条件查询_SpringBoot和JPA多数据源整合

​ 项目中经常会遇到使用多个数据源的情况。这里是基于 JPA 来配置多个数据源。此配置是给予java1.8,闲话少说,一起来看看文章内容吧。1.引入maven依赖<2.配置数据库和jpa一些简易配置spring: 3.多数据源配置DataSourceConfig@Configuration PrimaryConfig@Configuration SecondConfig@Config...

weixin_39743414的博客 118

WINCC7.3破解文件

WINCC7.3硬件够破解文件,有需要的下载!WINCC7.3硬件够破解文件,有需要的下载!

[springboot] spring-data-jpa多数据源配置与使用

 项目依赖 &lt;parent&gt; &lt;groupId&gt;org.springframework.boot&lt;/groupId&gt; &lt;artifactId&gt;spring-boot-starter-parent&lt;/artifactId&gt; &lt;version&gt;2.1.2.RELEASE&...

Boone的博客 1889

jre9下载 jdk9

(Java SE Runtime Environment 9.0) 9.0u175 官方最新版 【x86|x64】

深度学习工具包 DeepLearningToolbox

深度学习工具包Deprecation notice.-----This toolbox is outdated and no longer maintained.There are much better tools available for deep learning than this toolbox, e.g. [Theano](http://deeplearning.net/software/theano/), [torch](http://torch.ch/) or [tensorflow](http://www.tensorflow.org/)I would suggest you use one of the tools mentioned above rather than use this toolbox.Best, Rasmus.DeepLearnToolbox================A Matlab toolbox for Deep Learning.Deep Learning is a new subfield of machine learning that focuses on learning deep hierarchical models of data.It is inspired by the human brain's apparent deep (layered, hierarchical) architecture.A good overview of the theory of Deep Learning theory is[Learning Deep Architectures for AI](http://www.iro.umontreal.ca/~bengioy/papers/ftml_book.pdf)For a more informal introduction, see the following videos by Geoffrey Hinton and Andrew Ng.* [The Next Generation of Neural Networks](http://www.youtube.com/watch?v=AyzOUbkUf3M) (Hinton, 2007)* [Recent Developments in Deep Learning](http://www.youtube.com/watch?v=VdIURAu1-aU) (Hinton, 2010)* [Unsupervised Feature Learning and Deep Learning](http://www.youtube.com/watch?v=ZmNOAtZIgIk) (Ng, 2011)If you use this toolbox in your research please cite [Prediction as a candidate for learning deep hierarchical models of data](http://www2.imm.dtu.dk/pubdb/views/publication_details.php?id=6284)```@MASTERSTHESIS\{IMM2012-06284, author = "R. B. Palm", title = "Prediction as a candidate for learning deep hierarchical models of data", year = "2012",}```Contact: rasmusbergpalm at gmail dot comDirectories included in the toolbox-----------------------------------`NN/` - A library for Feedforward Backpropagation Neural Networks`CNN/` - A library for Convolutional Neural Networks`DBN/` - A library for Deep Belief Networks`SAE/` - A library for Stacked Auto-Encoders`CAE/` - A library for Convolutional Auto-Encoders`util/` - Utility functions used by the libraries`data/` - Data used by the examples`tests/` - unit tests to verify toolbox is workingFor references on each library check REFS.mdSetup-----1. Download.2. addpath(genpath('DeepLearnToolbox'));Example: Deep Belief Network---------------------```matlabfunction test_example_DBNload mnist_uint8;train_x = double(train_x) / 255;test_x = double(test_x) / 255;train_y = double(train_y);test_y = double(test_y);%% ex1 train a 100 hidden unit RBM and visualize its weightsrand('state',0)dbn.sizes = [100];opts.numepochs = 1;opts.batchsize = 100;opts.momentum = 0;opts.alpha = 1;dbn = dbnsetup(dbn, train_x, opts);dbn = dbntrain(dbn, train_x, opts);figure; visualize(dbn.rbm{1}.W'); % Visualize the RBM weights%% ex2 train a 100-100 hidden unit DBN and use its weights to initialize a NNrand('state',0)%train dbndbn.sizes = [100 100];opts.numepochs = 1;opts.batchsize = 100;opts.momentum = 0;opts.alpha = 1;dbn = dbnsetup(dbn, train_x, opts);dbn = dbntrain(dbn, train_x, opts);%unfold dbn to nnnn = dbnunfoldtonn(dbn, 10);nn.activation_function = 'sigm';%train nnopts.numepochs = 1;opts.batchsize = 100;nn = nntrain(nn, train_x, train_y, opts);[er, bad] = nntest(nn, test_x, test_y);assert(er < 0.10, 'Too big error');```Example: Stacked Auto-Encoders---------------------```matlabfunction test_example_SAEload mnist_uint8;train_x = double(train_x)/255;test_x = double(test_x)/255;train_y = double(train_y);test_y = double(test_y);%% ex1 train a 100 hidden unit SDAE and use it to initialize a FFNN% Setup and train a stacked denoising autoencoder (SDAE)rand('state',0)sae = saesetup([784 100]);sae.ae{1}.activation_function = 'sigm';sae.ae{1}.learningRate = 1;sae.ae{1}.inputZeroMaskedFraction = 0.5;opts.numepochs = 1;opts.batchsize = 100;sae = saetrain(sae, train_x, opts);visualize(sae.ae{1}.W{1}(:,2:end)')% Use the SDAE to initialize a FFNNnn = nnsetup([784 100 10]);nn.activation_function = 'sigm';nn.learningRate = 1;nn.W{1} = sae.ae{1}.W{1};% Train the FFNNopts.numepochs = 1;opts.batchsize = 100;nn = nntrain(nn, train_x, train_y, opts);[er, bad] = nntest(nn, test_x, test_y);assert(er < 0.16, 'Too big error');```Example: Convolutional Neural Nets---------------------```matlabfunction test_example_CNNload mnist_uint8;train_x = double(reshape(train_x',28,28,60000))/255;test_x = double(reshape(test_x',28,28,10000))/255;train_y = double(train_y');test_y = double(test_y');%% ex1 Train a 6c-2s-12c-2s Convolutional neural network %will run 1 epoch in about 200 second and get around 11% error. %With 100 epochs you'll get around 1.2% errorrand('state',0)cnn.layers = { struct('type', 'i') %input layer struct('type', 'c', 'outputmaps', 6, 'kernelsize', 5) %convolution layer struct('type', 's', 'scale', 2) %sub sampling layer struct('type', 'c', 'outputmaps', 12, 'kernelsize', 5) %convolution layer struct('type', 's', 'scale', 2) %subsampling layer};cnn = cnnsetup(cnn, train_x, train_y);opts.alpha = 1;opts.batchsize = 50;opts.numepochs = 1;cnn = cnntrain(cnn, train_x, train_y, opts);[er, bad] = cnntest(cnn, test_x, test_y);%plot mean squared errorfigure; plot(cnn.rL);assert(er<0.12, 'Too big error');```Example: Neural Networks---------------------```matlabfunction test_example_NNload mnist_uint8;train_x = double(train_x) / 255;test_x = double(test_x) / 255;train_y = double(train_y);test_y = double(test_y);% normalize[train_x, mu, sigma] = zscore(train_x);test_x = normalize(test_x, mu, sigma);%% ex1 vanilla neural netrand('state',0)nn = nnsetup([784 100 10]);opts.numepochs = 1; % Number of full sweeps through dataopts.batchsize = 100; % Take a mean gradient step over this many samples[nn, L] = nntrain(nn, train_x, train_y, opts);[er, bad] = nntest(nn, test_x, test_y);assert(er < 0.08, 'Too big error');%% ex2 neural net with L2 weight decayrand('state',0)nn = nnsetup([784 100 10]);nn.weightPenaltyL2 = 1e-4; % L2 weight decayopts.numepochs = 1; % Number of full sweeps through dataopts.batchsize = 100; % Take a mean gradient step over this many samplesnn = nntrain(nn, train_x, train_y, opts);[er, bad] = nntest(nn, test_x, test_y);assert(er < 0.1, 'Too big error');%% ex3 neural net with dropoutrand('state',0)nn = nnsetup([784 100 10]);nn.dropoutFraction = 0.5; % Dropout fraction opts.numepochs = 1; % Number of full sweeps through dataopts.batchsize = 100; % Take a mean gradient step over this many samplesnn = nntrain(nn, train_x, train_y, opts);[er, bad] = nntest(nn, test_x, test_y);assert(er < 0.1, 'Too big error');%% ex4 neural net with sigmoid activation functionrand('state',0)nn = nnsetup([784 100 10]);nn.activation_function = 'sigm'; % Sigmoid activation functionnn.learningRate = 1; % Sigm require a lower learning rateopts.numepochs = 1; % Number of full sweeps through dataopts.batchsize = 100; % Take a mean gradient step over this many samplesnn = nntrain(nn, train_x, train_y, opts);[er, bad] = nntest(nn, test_x, test_y);assert(er < 0.1, 'Too big error');%% ex5 plotting functionalityrand('state',0)nn = nnsetup([784 20 10]);opts.numepochs = 5; % Number of full sweeps through datann.output = 'softmax'; % use softmax outputopts.batchsize = 1000; % Take a mean gradient step over this many samplesopts.plot = 1; % enable plottingnn = nntrain(nn, train_x, train_y, opts);[er, bad] = nntest(nn, test_x, test_y);assert(er < 0.1, 'Too big error');%% ex6 neural net with sigmoid activation and plotting of validation and training error% split training data into training and validation datavx = train_x(1:10000,:);tx = train_x(10001:end,:);vy = train_y(1:10000,:);ty = train_y(10001:end,:);rand('state',0)nn = nnsetup([784 20 10]); nn.output = 'softmax'; % use softmax outputopts.numepochs = 5; % Number of full sweeps through dataopts.batchsize = 1000; % Take a mean gradient step over this many samplesopts.plot = 1; % enable plottingnn = nntrain(nn, tx, ty, opts, vx, vy); % nntrain takes validation set as last two arguments (optionally)[er, bad] = nntest(nn, test_x, test_y);assert(er < 0.1, 'Too big error');```[![Bitdeli Badge](https://d2weczhvl823v0.cloudfront.net/rasmusbergpalm/deeplearntoolbox/trend.png)](https://bitdeli.com/free "Bitdeli Badge")

微人事第五天:spring Boot 整合 Jpa 多数据源

本文是 Spring Boot 整合数据持久化方案的最后一篇,主要和大伙来聊聊 Spring Boot 整合 Jpa 多数据源问题。在 Spring Boot 整合JbdcTemplate 多数据源、Spring Boot 整合 MyBatis 多数据源以及 Spring Boot 整合 Jpa 多数据源这三个知识点中,整合 Jpa 多数据源算是最复杂的一种,也是很多人在配置时最容易出错的一种。本...

qq_41998938的博客 307

复分析 阿尔福斯(Ahlfors) 第三版答案 英文

答案分为十章,有部分习题没有答案,全英文复分析阿尔福斯(Ahlfors) 第三版答案

SpringBoot__整合多数据源JPA

我们来看看SpringBoot如何整合多数据源的JPA。 话不多说,直接放代码。 项目结构 依赖 这值得一提的是这里使用数据库连接池,使用的是Druid,这里是Druid是使用的是com.alibaba.druid-spring-boot-starter,该starter是由第三方提供的,MyBatis和Druid依赖的命名和其他库的命名不太一样,但是它所支持的mysql是mysql8,这由于...

qq_37432174的博客 352
上一篇: docker磁盘清理
下一篇: docker将容器打包成镜像并在另一个服务器中运行
蓝色格子
博客等级 码龄9年 129粉丝 174原创
评论 6
成就一亿技术人!
拼手气红包6.0元
还能输入1000个字符
 
 条评论被折叠 查看
添加红包

请填写红包祝福语或标题

个

红包个数最小为10个

元

红包金额最低5元

当前余额3.43元 前往充值 >
需支付:10.00元
成就一亿技术人!
领取后你会自动成为博主和红包主的粉丝 规则
hope_wisdom
发出的红包
实付元
使用余额支付
点击重新获取
扫码支付
钱包余额 0

抵扣说明:

1.余额是钱包充值的虚拟货币,按照1:1的比例进行支付金额的抵扣。
2.余额无法直接购买下载,可以购买VIP、付费专栏及课程。

余额充值