


1.样式如下,简单易用,如果需要其他样式,直接更改样式就行。
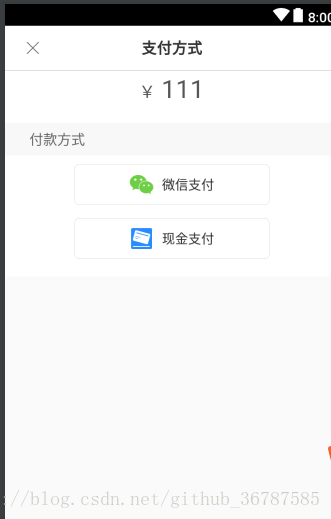
2.自定义代码实现方式:
/**

* 支付方式单选对话框

* Created by J.query on 16/4/9.

*/


public class PaySelectDialog extends android.app.Dialog {
  private Context mContext;

    private TextView mTitleTv;

    private TextView mRightTv;

    private TextView mLeftTv;

    private ImageView mCloseIv;

    private LinearLayout mLlRightTv;

    private LinearLayout mLlLeftTv;


    public PaySelectDialog(Context context) {

        this(context, false);

    }


    /**

     * @param context

     * @param b       是否隐藏right btn

     */

    public PaySelectDialog(Context context, boolean b) {

        this(context, R.style.SelectDialog);

        this.mContext = context;

        initViews(b);

    }


    public PaySelectDialog(Context context, int themeResId) {

        super(context, themeResId);

    }


    private void initViews(boolean b) {

        LayoutInflater layoutInflater = LayoutInflater.from(mContext);

        View view = layoutInflater.inflate(R.layout.layout_dialog_pay_select, null);

        mTitleTv = (TextView) view.findViewById(R.id.tv_title);

        View mLine = view.findViewById(R.id.line);

        mRightTv = (TextView) view.findViewById(R.id.tv_right);

        mLeftTv = (TextView) view.findViewById(R.id.tv_left);

        mCloseIv = (ImageView) view.findViewById(R.id.iv_close);

        mLlRightTv = (LinearLayout) view.findViewById(R.id.ll_tv_right);

        mLlLeftTv = (LinearLayout) view.findViewById(R.id.ll_tv_left);

        if (b) {

            mLine.setVisibility(View.GONE);

            mRightTv.setVisibility(View.GONE);

            //leftTv.setBackgroundResource(R.drawable.actionsheet_bottom_selector);

        }


        mLlLeftTv.setOnClickListener(new View.OnClickListener() {

            @Override

            public void onClick(View v) {

                dismiss();

                if (listener != null)

                    listener.wxClick();

            }

        });

        mLlRightTv.setOnClickListener(new View.OnClickListener() {

            @Override

            public void onClick(View v) {

                dismiss();

                if (listener != null)

                    listener.otherClick();

            }

        });

        mCloseIv.setOnClickListener(new View.OnClickListener() {

            @Override

            public void onClick(View v) {

                dismiss();

                if (listener != null)

                    listener.closeClick();

            }

        });

        setContentView(view);


        /**

         * 设置宽度全屏,要设置在show的后面

         */

        WindowManager.LayoutParams layoutParams = getWindow().getAttributes();

        layoutParams.gravity = Gravity.BOTTOM;

        layoutParams.width = WindowManager.LayoutParams.MATCH_PARENT;

        layoutParams.height = WindowManager.LayoutParams.WRAP_CONTENT;

        getWindow().getDecorView().setPadding(0, 0, 0, 0);

        getWindow().setAttributes(layoutParams);

        getWindow().setGravity(Gravity.BOTTOM);

    }


    /**

     * Title 设置

     * @param s

     * @return

     */

    public PaySelectDialog setTitle(String s) {

        if (mTitleTv != null)

            mTitleTv.setText(s);

        return this;

    }


    public void setLeftAndRightButtonText(String left, String right) {

        if (mLeftTv != null) {

            mLeftTv.setText(left);

        }

        if (mRightTv != null) {

            mRightTv.setText(right);

        }

    }


    /**

     * 设置button 选项值

     * @param left

     * @param right

     */

    public void setLeftAndRightText(String left, String right) {

        if (mLeftTv != null) {

            mLeftTv.setVisibility(View.VISIBLE);

            mLeftTv.setText(left);

        }

        if (mRightTv != null) {

            mRightTv.setVisibility(View.VISIBLE);

            mRightTv.setText(right);

        }

    }


    public void showDialog() {

        if (!isShowing()) {

            show();

        }

    }


    public PaySelectDialogListener listener;


    public PaySelectDialog setListener(PaySelectDialogListener listener) {

        this.listener = listener;

        return this;

    }

}
3.布局文件:
<?xml version="1.0" encoding="utf-8"?>

<LinearLayout xmlns:android="http://schemas.android.com/apk/res/android"

    android:layout_width="match_parent"

    android:layout_height="wrap_content"

    android:background="@drawable/bg_white_2_bg"

    android:orientation="vertical">


    <RelativeLayout

        android:layout_width="match_parent"

        android:layout_height="wrap_content"

        android:layout_gravity="center">


        <ImageView

            android:id="@+id/iv_close"

            android:layout_width="wrap_content"

            android:layout_height="wrap_content"

            android:layout_centerVertical="true"

            android:layout_marginLeft="@dimen/dp_15"

            android:padding="@dimen/dp_10"

            android:src="@drawable/close" />


        <TextView

            android:layout_width="match_parent"

            android:layout_height="wrap_content"


            android:gravity="center"

            android:padding="@dimen/dp_14"

            android:text="@string/payment"

            android:textColor="@color/c_33"

            android:textSize="@dimen/dp_17"

            android:textStyle="bold" />


    </RelativeLayout>


    <View

        android:layout_width="match_parent"

        android:layout_height="@dimen/dp_1"

        android:background="@color/c_da" />


    <RelativeLayout

        android:layout_width="match_parent"

        android:layout_height="wrap_content"

        android:gravity="center">


        <TextView

            android:id="@+id/tv_pay_dollar_symbol"

            android:layout_width="wrap_content"

            android:layout_height="wrap_content"

            android:layout_marginBottom="@dimen/dp_10"

            android:layout_marginTop="@dimen/dp_10"

            android:gravity="center_horizontal"

            android:text="@string/pay_dollar_symbol"

            android:textColor="@color/c_55"

            android:textSize="@dimen/dp_19" />


        <TextView

            android:id="@+id/tv_title"

            android:layout_width="wrap_content"

            android:layout_height="wrap_content"

            android:layout_marginBottom="@dimen/dp_10"

            android:layout_marginLeft="@dimen/dp_7"

            android:layout_toRightOf="@id/tv_pay_dollar_symbol"

            android:text="111"

            android:textColor="@color/c_55"

            android:textSize="@dimen/dp_29" />

    </RelativeLayout>


    <RelativeLayout

        android:layout_width="match_parent"

        android:layout_height="wrap_content"

        android:layout_marginBottom="@dimen/dp_10"

        android:layout_marginTop="@dimen/dp_10"

        android:background="@color/c_f8">


        <TextView

            android:layout_width="match_parent"

            android:layout_height="wrap_content"

            android:layout_marginLeft="@dimen/dp_20"

            android:padding="@dimen/dp_8"

            android:text="@string/payment_method"

            android:textColor="@color/c_66"

            android:textSize="16dp" />

    </RelativeLayout>


    <LinearLayout

        android:layout_width="match_parent"

        android:layout_height="wrap_content"

        android:layout_marginBottom="@dimen/dp_20"

        android:orientation="vertical">


        <LinearLayout

            android:id="@+id/ll_tv_left"

            style="@style/button_white_frame"

            android:layout_width="match_parent"

            android:layout_height="wrap_content"

            android:layout_marginLeft="@dimen/dp_80"

            android:layout_marginRight="@dimen/dp_80"

            android:gravity="center"

            android:orientation="horizontal"

            android:padding="@dimen/dp_10">


            <TextView

                android:id="@+id/tv_left"

                android:layout_width="wrap_content"

                android:layout_height="wrap_content"

                android:layout_gravity="center"

                android:drawableLeft="@drawable/wx_logo"

                android:drawablePadding="@dimen/dp_10"

                android:gravity="center"

                android:text="@string/wx_pay"

                android:textColor="@color/c_33"

                android:textSize="@dimen/dp_15" />

        </LinearLayout>


        <View

            android:id="@+id/line"

            style="@style/vertical_line"

            android:visibility="gone" />


        <LinearLayout

            android:id="@+id/ll_tv_right"

            style="@style/button_white_frame"

            android:layout_width="match_parent"

            android:layout_height="wrap_content"

            android:layout_marginLeft="@dimen/dp_80"

            android:layout_marginRight="@dimen/dp_80"

            android:layout_marginTop="@dimen/dp_15"

            android:gravity="center"

            android:orientation="vertical"

            android:padding="@dimen/dp_10">


            <TextView

                android:id="@+id/tv_right"

                android:layout_width="wrap_content"

                android:layout_height="wrap_content"

                android:layout_gravity="center"

                android:drawableLeft="@drawable/cash_payment"

                android:drawablePadding="@dimen/dp_10"

                android:gravity="center"

                android:text="@string/cash_pay"

                android:textColor="@color/c_33"

                android:textSize="@dimen/dp_15" />

        </LinearLayout>

    </LinearLayout>


</LinearLayout>
styles 文件
<style name="button_white_frame">
    <item name="android:gravity">center</item>
    <item name="android:background">@drawable/button_rounded_white_frame</item>
    <item name="android:textColor">@drawable/button_white_text</item>
    <item name="android:layout_height">wrap_content</item>
    <item name="android:textSize">16sp</item>
</style>
button_rounded_white_frame.xml 文件
<?xml version="1.0" encoding="utf-8"?>
<selector xmlns:android="http://schemas.android.com/apk/res/android">

    <item android:state_focused="false" android:state_pressed="false" android:state_enabled="true" android:drawable="@drawable/frame_rounded_white" />
    <item android:state_enabled="false" android:drawable="@drawable/frame_rounded_white" />
    <item android:state_pressed="true" android:drawable="@drawable/frame_rounded_white_pressed" />
    <item android:state_focused="true" android:drawable="@drawable/frame_rounded_white_pressed" />
</selector>
button_white_text.xml 文件

<?xml version="1.0" encoding="utf-8"?>
<selector xmlns:android="http://schemas.android.com/apk/res/android">

    <item android:color="@color/c_ff" android:state_enabled="true" android:state_focused="false" android:state_pressed="false" />
    <item android:color="@color/c_ff" android:state_enabled="false" />
    <item android:color="@color/c_ff" android:state_pressed="true" />
    <item android:color="@color/c_ff" android:state_focused="true" />

</selector>
4.示例代码:
/**

* 选择支付选项值

*

* @param pay

* @param amount

* @param pay

*/

public void showSelectDialog(final String pay, final String amount) {

    if (mPaySelectDialog == null) {

        mPaySelectDialog = new PaySelectDialog(this, true);

        mPaySelectDialog.setListener(new PaySelectDialogListener() {

            @Override

            public void wxClick() {

                initWeChatPayQrData(pay, amount);

            }


            @Override

            public void otherClick() {

                initCashPaymentData(pay, amount, mReWriteFlag);

            }


            @Override

            public void closeClick() {

                //dialog.dismiss();

            }

        });

        mPaySelectDialog.setTitle(pay);

        mPaySelectDialog.setCanceledOnTouchOutside(false);

        mPaySelectDialog.setCancelable(false);

        mPaySelectDialog.setLeftAndRightText(getString(R.string.wx_pay), getString(R.string.cash_pay));

    } else {

        mPaySelectDialog.setListener(new PaySelectDialogListener() {

            @Override

            public void wxClick() {

                initWeChatPayQrData(pay, amount);

            }


            @Override

            public void otherClick() {

                initCashPaymentData(pay, amount, mReWriteFlag);

            }


            @Override

            public void closeClick() {

                //dialog.dismiss();

            }

        });

        mPaySelectDialog.setTitle(pay);

        mPaySelectDialog.setCanceledOnTouchOutside(false);

        mPaySelectDialog.setCancelable(false);

        mPaySelectDialog.setLeftAndRightText(getString(R.string.wx_pay), getString(R.string.cash_pay));

    }

    mPaySelectDialog.showDialog();

}


 2372


 扫一扫


 被折叠的 条评论
为什么被折叠?
 到【灌水乐园】发言


