1.定义接口地址
/**
 * Created by PrinceOfAndroid on 2018/4/9 0009.
 * 接口地址存放类
 */

public class ApiUrl {

    //基本地址(要以“/”结尾)
    public static final String BASE_URL = "";

    //请求地址
    public static final String ARTICLE_LIST = "";
}
2.定义接口返回的数据类型
这里根据自己接口返回情况定制(返回数据类型一定要规范)
/**
 * <pre>
 *     author   : PrinceOfAndroid
 *     created  : 2017/7/5 0005 11:50
 *     desc     : 基本的接口数据返回类型
 * </pre>
 */
public class HttpResponse<T> {
    private int code;  //状态码,由后台去定义(如code=200为成功)
    private String message;
    private T object;  //泛型 最终使用的数据

    public int getCode() {
        return code;
    }

    public void setCode(int code) {
        this.code = code;
    }

    public String getMessage() {
        return message;
    }

    public void setMessage(String message) {
        this.message = message;
    }

    public T getObject() {
        return object;
    }

    public void setObject(T object) {
        this.object = object;
    }

}
3.请求接口定义
/**
 * Created by PrinceOfAndroid on 2018/4/9 0009.
 */

public interface BaseHttpService {
   /**
     * get 请求,参数以map的形式传入
     *
     * @param map
     * @return
     */
    @GET(ApiUrl.ARTICLE_LIST)
    Flowable<HttpResponse<String>> getList(@QueryMap Map<String, String> map);
}
如果不会的话,可看看retrofit2教程
这里申明返回一个Flowable,至于为啥是Flowable,去看看Rxjava2就知道Flowable有多强大。
4.构建retrofit
/**
 * Created by PrinceOfAndroid on 2018/4/9 0009.
 */

public class RetrofitFactory {
    private static BaseHttpService httpService = null;

    public static BaseHttpService getInstance() {
        if (httpService == null) {
            synchronized (RetrofitFactory.class) {
                if (httpService == null) {
                    return createHttpService();
                }
            }
        }
        return httpService;
    }

    private static BaseHttpService createHttpService() {
        OkHttpClient client = new OkHttpClient.Builder()
                .addInterceptor(new LogInterceptor())  //全局拦截器(这个就自己找个喜欢的拦截器)
                .connectTimeout(8L, TimeUnit.SECONDS)  //连接超时
                .readTimeout(8L, TimeUnit.SECONDS)     //读取超时
                .build();

        Retrofit retrofit = new Retrofit.Builder()
                .client(client)                                             //设置okHttp
                .baseUrl(ApiUrl.BASE_URL)                                   //基础地址
                .addCallAdapterFactory(RxJava2CallAdapterFactory.create())  //引入rxJava2
                .addConverterFactory(GsonConverterFactory.create())         //json 转换
                .build();

        httpService = retrofit.create(BaseHttpService.class);
        return httpService;
    }
}
5.Subscriber的封装
/**
 * <pre>
 *     author: PrinceOfAndroid
 *     date  : 2017/7/5 0005 11:30
 *     desc  : 网络请求结果封装(可处理Toast或dialog,但注意内存泄露问题)
 * </pre>
 */
//这个只是基本功能,还可以通过构造方法传入一些值来做很多事情如:弹窗
public abstract class CommonSubscriber<T> extends ResourceSubscriber<T> {

    @Override
    public void onNext(T t) {
        onSuccess(t);
    }

    /**
     * 通过Throwable处理对应异常
     * @param e
     */
    @Override
    public void onError(Throwable e) {
        e.printStackTrace();
    }

    /**
     * 完成
     */
    @Override
    public void onComplete() {

    }

    /**
     * 根据具体的Api 业务逻辑去重写 onSuccess 方法!Error 是选择重写,but 必须Super !
     *
     * @param t
     */
    public abstract void onSuccess(T t);


}
这里我的CommonSubscriber是继承自ResourceSubscriber,至于为什么,后面会写到。
来个线程切换工具
/**
 * Created by Administrator on 2018/3/20 0020.
 * 线程调度
 */

public class RxUtils {

    public static <T> FlowableTransformer<T, T> applyFSchedulers() {
        return new FlowableTransformer<T, T>() {
            @Override
            public Publisher<T> apply(Flowable<T> upstream) {
                return upstream.subscribeOn(Schedulers.io())
                        .observeOn(AndroidSchedulers.mainThread());
            }
        };
    }

    /**
     * 预处理  code处理
     *
     * @param <T>
     * @return
     */
    public static <T> FlowableTransformer<HttpResponse<T>, T> handleResult() {
        return new FlowableTransformer<HttpResponse<T>, T>() {
            @Override
            public Publisher<T> apply(Flowable<HttpResponse<T>> upstream) {
                return upstream.flatMap(new Function<HttpResponse<T>, Flowable<T>>() {
                    @Override
                    public Flowable<T> apply(@NonNull HttpResponse<T> tHttpResponse) throws Exception {
                        if (tHttpResponse.getCode() == 200) {
                            return createData(tHttpResponse.getObject());
                        } else {
                            return Flowable.error(new ApiException("服务器返回error"));
                        }
                    }
                });
            }
        };
    }


    /**
     * 生成Flowable
     *
     * @param <T>
     * @return
     */
    public static <T> Flowable<T> createData(final T t) {
        return Flowable.create(new FlowableOnSubscribe<T>() {
            @Override
            public void subscribe(FlowableEmitter<T> emitter) throws Exception {
                try {
                    emitter.onNext(t);
                    emitter.onComplete();
                } catch (Exception e) {
                    emitter.onError(e);
                }
            }
        }, BackpressureStrategy.BUFFER);
    }
}
标题中说到的错误码集中处理就在handleResult()这个方法里了
还有 createData(final T t)中使用了BackpressureStrategy.BUFFER,就是标题中的背压
怎么使用呢?
很简单,几句代码就ok了
    Map<String, String> map = new HashMap<>();
        map.put("is_index", "true");
        map.put("rows", String.valueOf("3"));
        addSubscribe(iModel.getList(map)
                .compose(RxUtils.<HttpResponse<String>>applyFSchedulers())
                .compose(RxUtils.<String>handleResult())
                .subscribeWith(new CommonSubscriber<String>() {
                    @Override
                    public void onSuccess(String s) {
                        Log.e("result", s);
                    }
                }));
里面有个iModel,里面代码如下
/**
 * Created by PrinceOfAndroid on 2018/4/9 0009.
 * 模型层,负责数据的处理
 */

public class LoginModel implements LoginContract.IModel {
    /**
     * @param map
     */
    @Override
    public Flowable<HttpResponse<String>> getList(Map<String,String> map) {
        return RetrofitFactory.getInstance()
                .getList(map);
    }
}
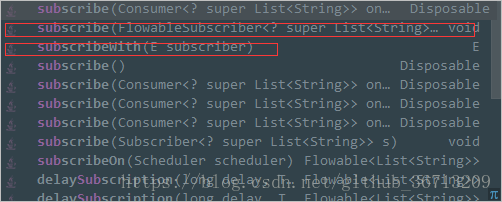
看到这里,有人会好奇,为什么是subscribeWith(),而不是subscribe()方法呢

看上图就知道,subscribe()是没有返回值的,而subscribeWith()返回了我们传进去的CommonSubscriber。
为什么要这个CommonSubscriber呢?这就要说刚刚写到的ResourceSubscriber了。

这里就知道ResourceSubscriber其实是实现Disposable实现方法如下
/**
     * Cancels the subscription (if any) and disposes the resources associated with
     * this AsyncObserver (if any).
     *
     * <p>This method can be called before the upstream calls onSubscribe at which
     * case the Subscription will be immediately cancelled.
     */
    @Override
    public final void dispose() {
        if (SubscriptionHelper.cancel(s)) {
            resources.dispose();
        }
    }
其实这个就是取消订阅,这个就是我标题写到的生命周期管理了。
有了这些就知道怎么去管理网络请求了,看上面的使用方法中会发现有一个addSubscribe()方法,里面传的就是我们的CommonSubscriber,里面就是对网络请求进行管理的,代码很简单。
 protected void addSubscribe(Disposable subscription) {
        if (mCompositeDisposable == null) {
            mCompositeDisposable = new CompositeDisposable();
        }
        mCompositeDisposable.add(subscription);

    }

    protected void unSubscribe() {
        if (mCompositeDisposable != null) {
            mCompositeDisposable.clear();
        }
    }
就是把Disposable 添加到CompositeDisposable中,需要取消订阅的时候如:activity或fragment已经关闭,直接调用
unSubscribe()方法,防止空指针。
这样一来基于retrofit2、rxjava2、OkHttp的网络请求封装就完成了。
如果对于retrofit2 rxjava2不熟悉可以阅读
https://juejin.im/post/5848d96761ff4b0058c9d3dc
https://blog.youkuaiyun.com/lmj623565791/article/details/51304204
如果想看源码的话,这里是地址:
https://github.com/PrinceOfAndroid/BaseProject


 本文介绍了一种基于Retrofit2、RxJava2及OkHttp的网络请求封装方案,包括定义接口地址、返回数据类型、请求接口、构建Retrofit实例以及管理网络请求生命周期的方法。


 被折叠的 条评论
为什么被折叠?


