Tauri 开源笔记(2) - 配合 Next.js + shadcn/ui 搭建项目

大家好,我是 codexu。从今天开始,我在撰写一个关于 Tauri 跨端开发的系列文章,分享我在开发笔记 APP 过程中所采用技术和遇到的问题。

往期内容

如果你对本系列有兴趣,可以关注一下往期的内容。我将带你一步一步地从零开始开发一款跨端 APP,帮助你掌握相关知识和技能。

从零开始

看过上一期的同学应该已经了解了我们要开发一款什么样的 APP。

从本期开始,我们将真正进入开发阶段的第一步:搭建项目。

开发环境

macOS

如果你打算开发 iOS,你需要安装 Xcode

如果只针对桌面端开发,可以安装 Xcode 命令行工具即可:

xcode-select \--install
windows

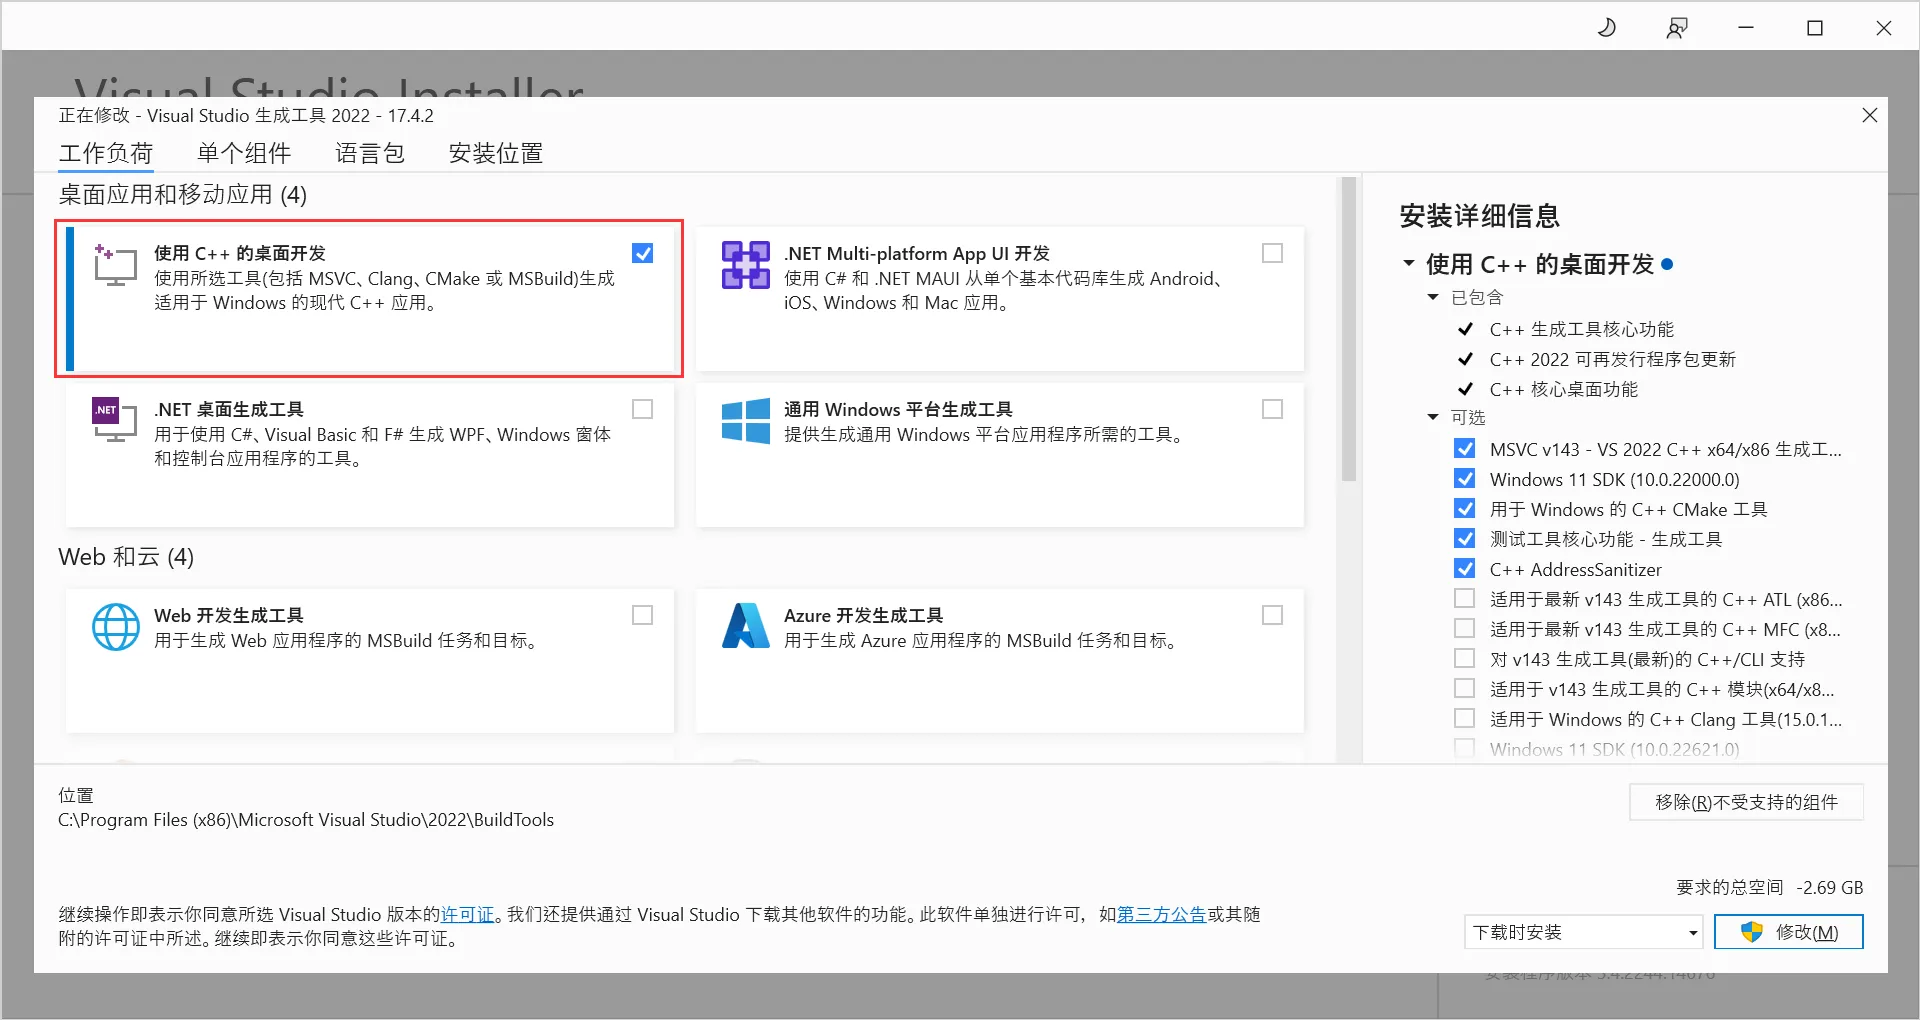
下载 Microsoft C++ 构建工具 安装程序并打开它以开始安装。在安装过程中,选中“使用 C++ 进行桌面开发”选项:

Windows 10(从版本 1803 开始)和更高版本的 Windows 上已经安装了 webview2,如果你的版本更低,需要手动安装:

WebView2 Runtime 下载区

安装 rustup

macOS 或 linux 执行一下命令,随后重新启动终端:

curl \--proto '\=https' \--tlsv1.2 https://sh.rustup.rs \-sSf | sh

windows 前往 https://www.rust-lang.org/tools/install 下载并安装。

移动端开发

如果要做移动端开发,还需要做一些配置,有兴趣可以先了解一下:

本文跳过这块,后续做移动端开发时再进行讲解。

创建一个 Tauri2 项目

对 Tauri2 不太了解也没有关系,有时间可以先浏览一遍官方文档,官网目前还有大量内容未汉化,如果你不擅长阅读文档,跟着我一步一步的搭建也是不错的选择,我会更侧重于前端方式来实现,尽量让大家避免使用 rust 实现功能,尽量使用前端的工具链。

Tauri 提供了很多种创建项目的方式,我们选择前端目前最流行的方式 pnpm:

pnpm create tauri-app

随后需要填写几个问题:

✔ Project name · note-gen
✔ Identifier · com.codexu.NoteGen
✔ Choose which language to use for your frontend · TypeScript
✔ Choose your package manager · pnpm
✔ Choose your UI template › 这里先选 react

创建后进入目录:

cd note-gen
pnpm install
pnpm tauri dev

注意这里是 tauri dev,如果是 pnpm run dev 只是跑前端 web 服务。

创建 next.js,合并项目

由于我们目标是使用 next.js 开发,所以要删除 vite 和 react。

可以先删除 src 和 vite.config.ts,如果你不想使用 next.js,直接用你喜欢的框架也是没问题的,核心的思路是没什么区别的。

使用 npx create-next-app@latest 创建一个新项目,随后把里面的文件复制到 tauri 项目中,注意 package.json 的内容合并。

# 其他随意
Would you like to use Tailwind CSS? - yes

更新 Tauri 配置:

{
  "build": {
      "beforeDevCommand": "pnpm dev",
      "beforeBuildCommand": "pnpm build",
      "devUrl": "http://localhost:3456",
      "frontendDist": "../dist"
  }
}

更新 next.config.ts 配置:

import type { NextConfig } from "next";

const isProd = process.env.NODE_ENV === 'production';

const internalHost = process.env.TAURI_DEV_HOST || 'localhost';

const nextConfig: NextConfig = {
  /* config options here */
  output: "export",
  images: {
    unoptimized: true,
  },
  assetPrefix: isProd ? undefined : `http://${internalHost}:3456`,
  devIndicators: {
    appIsrStatus: false,
  },
  sassOptions: {
    silenceDeprecations: ['legacy-js-api'],
  },
};

export default nextConfig;

更新 package.json

"scripts": {
  "dev": "next dev -p 3456",
  "build": "next build",
  "start": "next start -p 3456",
  "lint": "next lint",
  "tauri": "tauri"
},

现在运行 pnpm tauri dev,既可以启动一个桌面端程序,内容是 next.js 初始页面。

shadcn/ui

shadcn/ui 在开发中体验真的是无比舒服,这个只有在体验之后才可以感受到。

运行初始化命令以

pnpm dlx shadcn@latest init

问题是一些风格的选择,这里直接默认即可。

shadcn/ui 与其他常规的组件库安装组件的方式不同,每个组件都是独立安装的,所以就可以独立的去维护。

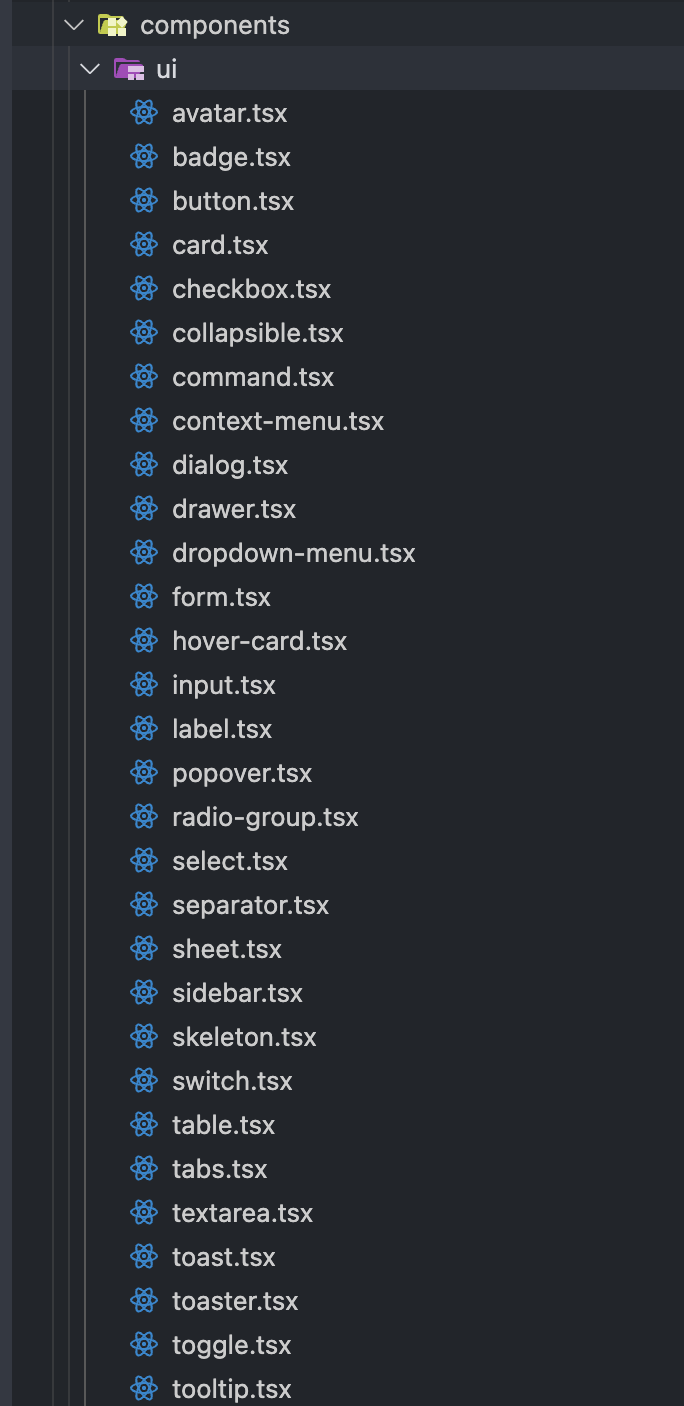
pnpm dlx shadcn@latest add button

这样就可以安装你的第一个按钮组件了,未来使用的组件多了之后,你的 src/components/ui 目录将会是这样:

他的好处显而易见,你可以在项目里直接修改这些组件。

当你查看 shadcn/ui 文档时,可能会疑问,为什么连 API 接口都不写呢?这是因为它实际上是使用 tailwind 对 radix-ui 做了外观的美化,大部分的组件,你可以查看 radix-ui 文档即可。

结语

本文至此结束,今天带大家创建了一个基础的 tauri + next.js 的项目,目前它还是空空如也,没关系,我将在未来的文章中,带大家一步一步的完成这个笔记应用,如果你已经迫不接待的进行下一步,可以查看我的note-gen仓库,参考其中的源码,同时祝你在其他同学中的学习进度遥遥领先。

记得关注点赞Star一波三连,爱你的xu。

./ollama serve 2025/07/29 23:00:09 routes.go:1186: INFO server config env="map[CUDA_VISIBLE_DEVICES: GPU_DEVICE_ORDINAL: HIP_VISIBLE_DEVICES: HSA_OVERRIDE_GFX_VERSION: HTTPS_PROXY: HTTP_PROXY: NO_PROXY: OLLAMA_DEBUG:false OLLAMA_FLASH_ATTENTION:false OLLAMA_GPU_OVERHEAD:0 OLLAMA_HOST:http://127.0.0.1:11434 OLLAMA_INTEL_GPU:false OLLAMA_KEEP_ALIVE:5m0s OLLAMA_KV_CACHE_TYPE: OLLAMA_LLM_LIBRARY: OLLAMA_LOAD_TIMEOUT:5m0s OLLAMA_MAX_LOADED_MODELS:0 OLLAMA_MAX_QUEUE:512 OLLAMA_MODELS:/home/3C600/.ollama/models OLLAMA_MULTIUSER_CACHE:false OLLAMA_NOHISTORY:false OLLAMA_NOPRUNE:false OLLAMA_NUM_PARALLEL:0 OLLAMA_ORIGINS:[http://localhost https://localhost http://localhost:* https://localhost:* http://127.0.0.1 https://127.0.0.1 http://127.0.0.1:* https://127.0.0.1:* http://0.0.0.0 https://0.0.0.0 http://0.0.0.0:* https://0.0.0.0:* app://* file://* tauri://* vscode-webview://*] OLLAMA_SCHED_SPREAD:false ROCR_VISIBLE_DEVICES: http_proxy: https_proxy: no_proxy:]" time=2025-07-29T23:00:09.615+08:00 level=INFO source=images.go:432 msg="total blobs: 0" time=2025-07-29T23:00:09.615+08:00 level=INFO source=images.go:439 msg="total unused blobs removed: 0" [GIN-debug] [WARNING] Creating an Engine instance with the Logger and Recovery middleware already attached. [GIN-debug] [WARNING] Running in "debug" mode. Switch to "release" mode in production. - using env: export GIN_MODE=release - using code: gin.SetMode(gin.ReleaseMode) [GIN-debug] POST /api/pull --> github.com/ollama/ollama/server.(*Server).PullHandler-fm (5 handlers) [GIN-debug] POST /api/generate --> github.com/ollama/ollama/server.(*Server).GenerateHandler-fm (5 handlers) [GIN-debug] POST /api/chat --> github.com/ollama/ollama/server.(*Server).ChatHandler-fm (5 handlers) [GIN-debug] POST /api/embed --> github.com/ollama/ollama/server.(*Server).EmbedHandler-fm (5 handlers) [GIN-debug] POST /api/embeddings --> github.com/ollama/ollama/server.(*Server).EmbeddingsHandler-fm (5 handlers) [GIN-debug] POST /api/create --> github.com/ollama/ollama/server.(*Server).CreateHandler-fm (5 handlers) [GIN-debug] POST /api/push --> github.com/ollama/ollama/server.(*Server).PushHandler-fm (5 handlers) [GIN-debug] POST /api/copy --> github.com/ollama/ollama/server.(*Server).CopyHandler-fm (5 handlers) [GIN-debug] DELETE /api/delete --> github.com/ollama/ollama/server.(*Server).DeleteHandler-fm (5 handlers) [GIN-debug] POST /api/show --> github.com/ollama/ollama/server.(*Server).ShowHandler-fm (5 handlers) [GIN-debug] POST /api/blobs/:digest --> github.com/ollama/ollama/server.(*Server).CreateBlobHandler-fm (5 handlers) [GIN-debug] HEAD /api/blobs/:digest --> github.com/ollama/ollama/server.(*Server).HeadBlobHandler-fm (5 handlers) [GIN-debug] GET /api/ps --> github.com/ollama/ollama/server.(*Server).PsHandler-fm (5 handlers) [GIN-debug] POST /v1/chat/completions --> github.com/ollama/ollama/server.(*Server).ChatHandler-fm (6 handlers) [GIN-debug] POST /v1/completions --> github.com/ollama/ollama/server.(*Server).GenerateHandler-fm (6 handlers) [GIN-debug] POST /v1/embeddings --> github.com/ollama/ollama/server.(*Server).EmbedHandler-fm (6 handlers) [GIN-debug] GET /v1/models --> github.com/ollama/ollama/server.(*Server).ListHandler-fm (6 handlers) [GIN-debug] GET /v1/models/:model --> github.com/ollama/ollama/server.(*Server).ShowHandler-fm (6 handlers) [GIN-debug] GET / --> github.com/ollama/ollama/server.(*Server).GenerateRoutes.func1 (5 handlers) [GIN-debug] GET /api/tags --> github.com/ollama/ollama/server.(*Server).ListHandler-fm (5 handlers) [GIN-debug] GET /api/version --> github.com/ollama/ollama/server.(*Server).GenerateRoutes.func2 (5 handlers) [GIN-debug] HEAD / --> github.com/ollama/ollama/server.(*Server).GenerateRoutes.func1 (5 handlers) [GIN-debug] HEAD /api/tags --> github.com/ollama/ollama/server.(*Server).ListHandler-fm (5 handlers) [GIN-debug] HEAD /api/version --> github.com/ollama/ollama/server.(*Server).GenerateRoutes.func2 (5 handlers) time=2025-07-29T23:00:09.615+08:00 level=INFO source=routes.go:1237 msg="Listening on 127.0.0.1:11434 (version 0.0.0)" time=2025-07-29T23:00:09.616+08:00 level=INFO source=gpu.go:217 msg="looking for compatible GPUs" time=2025-07-29T23:00:09.626+08:00 level=WARN source=amd_linux.go:61 msg="ollama recommends running the https://www.amd.com/en/support/linux-drivers" error="amdgpu version file missing: /sys/module/amdgpu/version stat /sys/module/amdgpu/version: no such file or directory" time=2025-07-29T23:00:09.626+08:00 level=INFO source=amd_linux.go:402 msg="no compatible amdgpu devices detected" time=2025-07-29T23:00:09.626+08:00 level=INFO source=gpu.go:377 msg="no compatible GPUs were discovered" time=2025-07-29T23:00:09.626+08:00 level=INFO source=types.go:130 msg="inference compute" id=0 library=cpu variant="" compute="" driver=0.0 name="" total="31.6 GiB" available="17.2 GiB" [GIN] 2025/07/29 - 23:00:15 | 200 | 276.91µs | 127.0.0.1 | HEAD "/" [GIN] 2025/07/29 - 23:00:15 | 404 | 252.226µs | 127.0.0.1 | POST "/api/show"
07-30
# ===== 第一阶段:前端构建(使用 LTS Node)===== FROM node:25-alpine AS frontend-builder WORKDIR /app COPY package*.json ./ RUN npm ci COPY . . RUN npm run build # ===== 第二阶段:Tauri 构建(使用 Debian 基础镜像)===== FROM rust:1.91 AS tauri-builder # 设置非交互模式 ENV DEBIAN_FRONTEND=noninteractive # 更换为清华镜像源,并更新 RUN sed -i 's|http://deb.debian.org|https://mirrors.tuna.tsinghua.edu.cn|g' /etc/apt/sources.list && \ sed -i 's|http://security.debian.org|https://mirrors.tuna.tsinghua.edu.cn/debian-security|g' /etc/apt/sources.list && \ echo 'Acquire::ForceIPv4 "true";' > /etc/apt/apt.conf.d/99force-ipv4 && \ apt-get update && \ apt-get install -y \ curl \ wget \ libwebkit2gtk-4.1-dev \ libappindicator3-dev \ librsvg2-dev \ patchelf \ libssl-dev \ pkg-config \ build-essential \ && rm -rf /var/lib/apt/lists/* # 安装 tauri-cli RUN cargo install tauri-cli WORKDIR /app # 复制前端资源和 Tauri 代码 COPY --from=frontend-builder /app/dist ./dist COPY package.json . COPY src-tauri ./src-tauri # 构建并打包 RUN cd src-tauri && cargo build --release RUN cd src-tauri && cargo tauri bundle --release --format appimage # ===== 第三阶段:运行时镜像(使用稳定 Ubuntu)===== FROM ubuntu:25.04 AS runtime ENV DEBIAN_FRONTEND=noninteractive # 更换为清华镜像源 RUN sed -i 's|http://archive.ubuntu.com/ubuntu|https://mirrors.tuna.tsinghua.edu.cn/ubuntu|g' /etc/apt/sources.list && \ sed -i 's|http://security.ubuntu.com/ubuntu|https://mirrors.tuna.tsinghua.edu.cn/ubuntu|g' /etc/apt/sources.list && \ echo 'Acquire::ForceIPv4 "true";' > /etc/apt/apt.conf.d/99force-ipv4 && \ apt-get update && \ apt-get install -y \ libwebkit2gtk-4.1-0 \ libgstreamer-plugins-base1.0-0 \ libgstreamer1.0-0 \ libappindicator3-1 \ librsvg2-2 \ && rm -rf /var/lib/apt/lists/* WORKDIR /app # 复制 AppImage 并赋予可执行权限 COPY --from=tauri-builder /app/src-tauri/target/release/bundle/appimage/*.AppImage ./app.AppImage RUN chmod +x ./app.AppImage CMD ["./app.AppImage"]
最新发布
11-02
评论
成就一亿技术人!
拼手气红包6.0元
还能输入1000个字符
 
红包 添加红包
表情包 插入表情
 条评论被折叠 查看
添加红包

请填写红包祝福语或标题

红包个数最小为10个

红包金额最低5元

当前余额3.43前往充值 >
需支付:10.00
成就一亿技术人!
领取后你会自动成为博主和红包主的粉丝 规则
hope_wisdom
发出的红包
实付
使用余额支付
点击重新获取
扫码支付
钱包余额 0

抵扣说明:

1.余额是钱包充值的虚拟货币,按照1:1的比例进行支付金额的抵扣。
2.余额无法直接购买下载,可以购买VIP、付费专栏及课程。

余额充值