


往期内容:
在cesium里面有一个抽象类
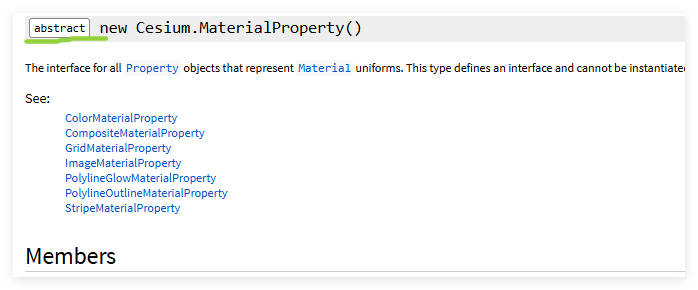
要想实现封装自定义的materialProperty我们就需要实现这个抽象类
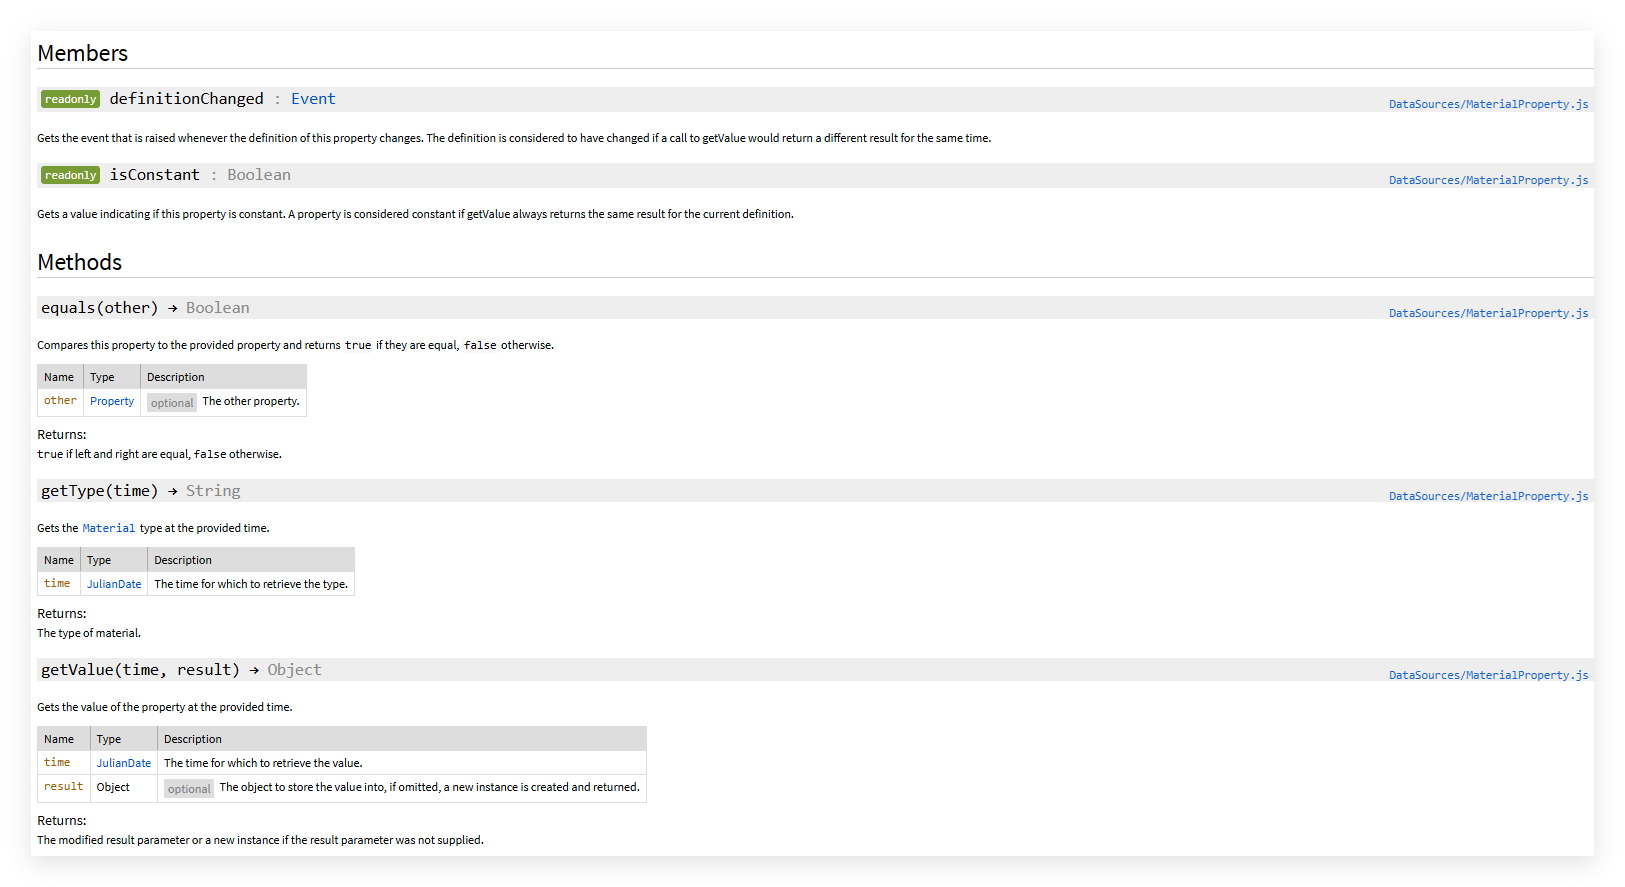
可以看到他有两个只读的属性和 三个方法。
我们可以参考cesium源码中的colorMaterialProperty
分析这段代码并结合相关文档以及cesium运行机制我们发现定义一个实体材质需要注意以下方面
- 在构造函数中,我们发现有带_的变量,这种变量属于材质属性中的私有变量,外部不要去直接访问与修改,而是通过不带下划线的变量,比如color,再去修改属性
- Object.defineProperties(ColorMaterialProperty.prototype,...}中的内容,就是使用createPropertyDescriptor去对_变量做更新,更新之后的事件触发等。
- 定义isConstant属性:这个属性用来控制这个材质属性是否随clock的变化而变化
- 定义definitionChanged属性,这个属性是一个event,用来监听变化
- 原型上需要有getType,getValue,equals这三个函数,用来获取材质类型,材质属性,材质是否能相等
- 最后需要将材质推送到cesium的材质缓存中,在这个阶段,可以自定义着色器
所以第一步就是把大概的架子搭好
class PolylineFlowMaterialProperty {
	static materialType = "PolylineFlow";
  constructor(options) {}
  get isConstant() {}
  get definitionChanged() {}
  getType(time) {}
  getValue(time, result) {}
  equals(other) {}
}
同时掏出我们准备好的shader用来构建material
czm_material czm_getMaterial(czm_materialInput materialInput)
{
    vec2 st = materialInput.st;
    czm_material material = czm_getDefaultMaterial(materialInput);

    // 动态时间参数,用于流动效果
    float iTime = fract(czm_frameNumber / 60.0);
    iTime = clamp(iTime, 0.0, 1.0);

    // 颜色基础设置(需要外部传入 color)
    vec3 baseColor = color.rgb;


    // 拖尾参数设置(st.s方向)可以通过外界传入
    float headLength = 0.05;
    float tailLength = 0.1;
    // 横向宽度控制(st.t方向),中心在0.5处
    float verticalWidth = 0.5;
    float glowFalloff = 1.0 - smoothstep(0.0, verticalWidth, abs(st.t - 0.5));


    // 拖尾遮罩计算(平滑拖尾)
    float headMask = smoothstep(iTime, iTime + headLength, st.s);
    float tailMask = 1.0 - smoothstep(0.0, tailLength, iTime - st.s);
    float flowMask = clamp(tailMask * (1.0 - headMask), 0.0, 1.0);

    // 应用遮罩增强发光
    vec3 diffuseColor = baseColor;
    vec3 emissionColor = baseColor * (glowFalloff * flowMask * 6.0);
    float alpha = glowFalloff * flowMask * color.a * 0.6;

    // 最终输出
    material.diffuse = diffuseColor;
    material.emission = emissionColor * 0.4;
    material.alpha = alpha;

    return material;
}
czm_material czm_getMaterial(czm_materialInput materialInput)
{
vec2 st = materialInput.st;
czm_material material = czm_getDefaultMaterial(materialInput);
// 动态时间参数,用于流动效果
float iTime = fract(czm_frameNumber / 60.0);
iTime = clamp(iTime, 0.0, 1.0);
// 颜色基础设置(需要外部传入 color)
vec3 baseColor = color.rgb;
// 拖尾参数设置(st.s方向)可以通过外界传入
float headLength = 0.05;
float tailLength = 0.1;
// 横向宽度控制(st.t方向),中心在0.5处
float verticalWidth = 0.5;
float glowFalloff = 1.0 - smoothstep(0.0, verticalWidth, abs(st.t - 0.5));
// 拖尾遮罩计算(平滑拖尾)
float headMask = smoothstep(iTime, iTime + headLength, st.s);
float tailMask = 1.0 - smoothstep(0.0, tailLength, iTime - st.s);
float flowMask = clamp(tailMask * (1.0 - headMask), 0.0, 1.0);
// 应用遮罩增强发光
vec3 diffuseColor = baseColor;
vec3 emissionColor = baseColor * (glowFalloff * flowMask * 6.0);
float alpha = glowFalloff * flowMask * color.a * 0.6;
// 最终输出
material.diffuse = diffuseColor;
material.emission = emissionColor * 0.4;
material.alpha = alpha;
return material;
}这个发光流动线的材质需要传递颜色color、递减强度taperPower、发光强度glowPower,所以还需要去定义一下
Object.defineProperties(PolylineFlowMaterialProperty.prototype, {
  color: Cesium.createPropertyDescriptor("color"),
  glowPower: Cesium.createPropertyDescriptor("glowPower"),
  taperPower: Cesium.createPropertyDescriptor("taperPower"),
});注意这里只能使用Object.defineProperties ,Cesium.createPropertyDescriptor 返回的不是值,而是一个属性描述器对象(包含 get、set 方法)。因为我们需要修改这些属性的对象属性描述符,所以这一步很重要,是实现响应性机制的重要步骤
而 ES6 类字段只能定义“实例字段”,不能定义“属性描述器”,所以只能用Object.defineProperties
然后就是实现构造函数的初始化
  constructor(options = {}) {
    this._definitionChanged = new Cesium.Event();
    this._color = undefined;
    this._glowPower = undefined;
    this._taperPower = undefined;
    this.color = options.color ?? Cesium.Color.ORANGERED;
    this.glowPower = options.glowPower ?? 0.25;
    this.taperPower = options.taperPower ?? 1.0;
  }
isConstant判断是否为常量
// ✅ 是否常量
  get isConstant() {
    return (
      Cesium.Property.isConstant(this._color) &&
      Cesium.Property.isConstant(this._glowPower) &&
      Cesium.Property.isConstant(this._taperPower)
    );
  }
接下来是属性变化的事件
 // ✅ 属性变化事件
  get definitionChanged() {
    return this._definitionChanged;
  }
获取材质类型名
  // ✅ 材质类型名
  getType() {
    return PolylineFlowMaterialProperty.materialType;
  }
获取当前事件的uniform值
  // ✅ 获取当前时间对应的uniform值
  getValue(time, result) {
    if (!Cesium.defined(result)) {
      result = {};
    }

    result.color = Cesium.Property.getValueOrClonedDefault(
      this._color,
      time,
      Cesium.Color.ORANGERED,
      result.color
    );
    result.glowPower = Cesium.Property.getValueOrDefault(
      this._glowPower,
      time,
      0.25
    );
    result.taperPower = Cesium.Property.getValueOrDefault(
      this._taperPower,
      time,
      1.0
    );
    return result;
}判断是否相等,作用:判断两个 Property 是否等价 就是用来完成这个“是否变化”的判断。
 // ✅ 判断是否相等
  equals(other) {
    return (
      this === other ||
      (other instanceof PolylineFlowMaterialProperty &&
        Cesium.Property.equals(this._color, other._color) &&
        Cesium.Property.equals(this._glowPower, other._glowPower) &&
        Cesium.Property.equals(this._taperPower, other._taperPower))
    );
  }
这个方法的意思是:
- 如果是同一个对象(
this === other),当然相等; - 否则,如果两个都是
PolylineFlowMaterialProperty; - 且它们内部的属性(
color,glowPower,taperPower)也都相等; - 那 Cesium 就认为“这个材质属性没变”。
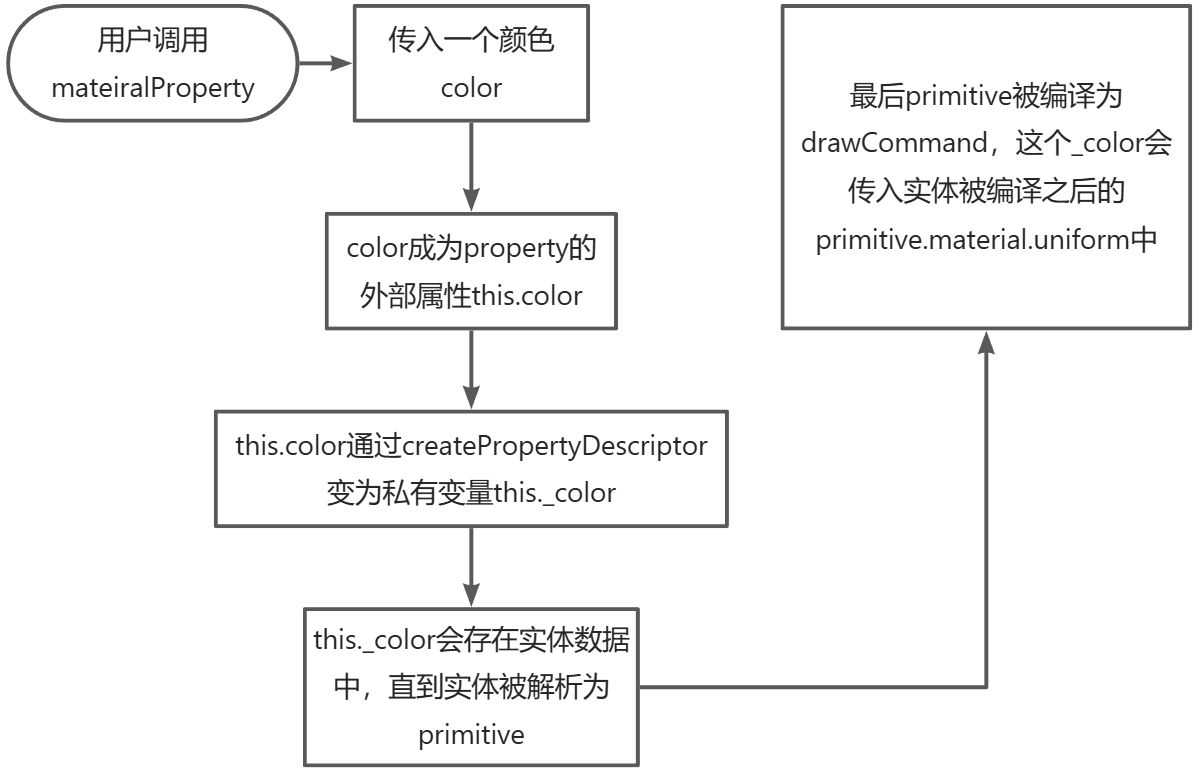
大致流程为

最后我们写完这个类之后要注册这个材质,所以我们加一个静态方法用来注册材质
static register() {
    if (
      Cesium.Material._materialCache.getMaterial(
        PolylineFlowMaterialProperty.materialType
      )
    ) {
      return; // 已注册则跳过
    }

    Cesium.Material._materialCache.addMaterial(
      PolylineFlowMaterialProperty.materialType,
      {
        fabric: {
          type: PolylineFlowMaterialProperty.materialType,
          uniforms: {
            color: Cesium.Color.ORANGERED,
            glowPower: 0.25,
            taperPower: 1.0,
          },
          source: polylineFlowShader,
        },
        translucent: () => true,
      }
    );
  }

看不明白没关系,需要上述视频教程+源码
+下方↓↓小助手【cesium进阶】无偿获取


 2440
2440

 被折叠的 条评论
为什么被折叠?
被折叠的 条评论
为什么被折叠?
 到【灌水乐园】发言


